这个代码计算的是 π × x 3 + 0.4 × x + 1 \pi \times x^3+0.4 \times x +1 π×x3+0.4×x+1。
代码解析
方案选择
首先照例是方案选择
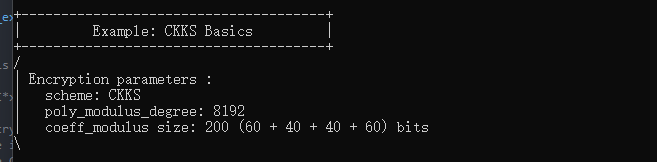
EncryptionParameters parms(scheme_type::ckks);
参数设置
CKKS方案中使用rescale方法来控制膨胀的密文规模和噪声,这个和modulus switching有点类似,如果想要获取良好的规模控制,那么对于系数模的选取就很重要。
和论文CKKS方案里的一样,将模数链上的模数 P i P_i Pi设定为和缩放因子接近的大小,如此就可以将规模维持在接近原来的样子,这样一来,能计算的乘法深度就和模数链的长度有关,做一次乘法预算就会消耗一个模数,除此之外,需要将模数链上的第一个模数设定要更大一些来保障明文小数点之前值的精确度,也就是说最后一次rescale时,将用这个模数来保证精确度。因此,官方给出的选取策略是(首尾选最大,中间选一样)
- 选取60-bit的素数作为模数链的第一个模数,这能在解密的时候保证最大的精确度
- 选择另外一个60-bit的素数作为模数链的最后一个模数,它将作为special prime,前面说过它必须和模数链里最大的一样大。
- 其他模数选择基本上接近的
接下来参数设置,根据阶数得出模数最大为218,这里选取的200。
size_t poly_modulus_degree = 8192;
parms.set_poly_modulus_degree(poly_modulus_degree);
parms.set_coeff_modulus(CoeffModulus::Create(poly_modulus_degree, {

     60, 40, 40, 60 }));
缩放因子设置
选择初始的缩放因子scale,这里选择的是 2 40 2^{40} 240,和上面的模数接近,最后一次rescale时会获得大致小数点前60-40=20bit的精确度
double scale = pow(2.0, 40);

SEALContext context(parms);
print_parameters(context);
cout << endl;
密钥生成与加解密器实例化
然后是常规的密钥生成、加密器解密器实例化
KeyGenerator keygen(context);
auto secret_key = keygen.secret_key();
PublicKey public_key;
keygen.create_public_key(public_key);
RelinKeys relin_keys;
keygen.create_relin_keys(relin_keys);
GaloisKeys gal_keys;
keygen.create_galois_keys(gal_keys);
Encryptor encryptor(context, public_key);
Evaluator evaluator(context);
Decryptor decryptor(context, secret_key);
插槽设置
CKKSEncoder encoder(context);
size_t slot_count = encoder.slot_count();
cout << "Number of slots: " << slot_count << endl;
明文输入
明文输入
vector<double> input;
input.reserve(slot_count);
double curr_point = 0;
double step_size = 1.0 / (static_cast<double>(slot_count) - 1);
for (size_t i = 0; i < slot_count; i++)
{


    input.push_back(curr_point);
    curr_point += step_size;
}
cout << "Input vector: " << endl;
print_vector(input, 3, 7);

cout << "Evaluating polynomial PI*x^3 + 0.4x + 1 ..." << endl;
编码和加密
编码并加密,编码将把浮点值编码到向量的每个插槽
Plaintext plain_coeff3, plain_coeff1, plain_coeff0;
encoder.encode(3.14159265, scale, plain_coeff3);
encoder.encode(0.4, scale, plain_coeff1);
encoder.encode(1.0, scale, plain_coeff0);

Plaintext x_plain;
print_line(__LINE__);
cout << "Encode input vectors." << endl;
encoder.encode(input, scale, x_plain);
Ciphertext x1_encrypted;
encryptor.encrypt(x_plain, x1_encrypted);

同态计算
这里计算的顺序很重要,乘法越多产生的噪声越多。
先计算 x 2 x^2 x2,并看看rescale前后的scale的变化
Ciphertext x3_encrypted;
print_line(__LINE__);
cout << "Compute x^2 and relinearize:" << endl;
evaluator.square(x1_encrypted, x3_encrypted);
evaluator.relinearize_inplace(x3_encrypted, relin_keys);
cout << "    + Scale of x^2 before rescale: " << log2(x3_encrypted.scale()) << " bits" << endl;
print_line(__LINE__);
cout << "Rescale x^2." << endl;
evaluator.rescale_to_next_inplace(x3_encrypted);
cout << "    + Scale of x^2 after rescale: " << log2(x3_encrypted.scale()) << " bits" << endl;
可以看到是还原到了以前的规模

注意,现在 x 2 x^2 x2的密文和x的密文不是一个level的了(因为rescale了一下,它到了下一个level),同一个level应当具有相同的加密参数(每一层所使用的参数都是不一样的)和相同的scale,否则不能进行加法或乘法运算。当然可以选择用modulus switching将其切换为下一个level,但是考虑到要计算的是三次幂,所以选择计算 π × x \pi \times x π×x
接下来计算 π × x \pi \times x π×x并rescale一下。
print_line(__LINE__);
cout << "Compute and rescale PI*x." << endl;
Ciphertext x1_encrypted_coeff3;
evaluator.multiply_plain(x1_encrypted, plain_coeff3, x1_encrypted_coeff3);
cout << "    + Scale of PI*x before rescale: " << log2(x1_encrypted_coeff3.scale()) << " bits" << endl;
evaluator.rescale_to_next_inplace(x1_encrypted_coeff3);
cout << "    + Scale of PI*x after rescale: " << log2(x1_encrypted_coeff3.scale()) << " bits" << endl;

这样一操作,现在它们都在同一个level上了(具有相同scale,相同加密参数),就能进行合并乘法了。
计算 ( π × x ) × x 2 (\pi \times x)\times x^2 (π×x)×x2
print_line(__LINE__);
cout << "Compute, relinearize, and rescale (PI*x)*x^2." << endl;
evaluator.multiply_inplace(x3_encrypted, x1_encrypted_coeff3);
evaluator.relinearize_inplace(x3_encrypted, relin_keys);
cout << "    + Scale of PI*x^3 before rescale: " << log2(x3_encrypted.scale()) << " bits" << endl;
evaluator.rescale_to_next_inplace(x3_encrypted);
cout << "    + Scale of PI*x^3 after rescale: " << log2(x3_encrypted.scale()) << " bits" << endl;

再经历又一次的计算和rescale后,密文到了最后一个level。(一共4个模数,即4个level,密钥生成在第一个,密文诞生第二个,平方第三个,三次幂第四个,下面有表格说明)。
然后计算 0.4 × x 0.4 \times x 0.4×x
print_line(__LINE__);
cout << "Compute and rescale 0.4*x." << endl;
evaluator.multiply_plain_inplace(x1_encrypted, plain_coeff1);
cout << "    + Scale of 0.4*x before rescale: " << log2(x1_encrypted.scale()) << " bits" << endl;
evaluator.rescale_to_next_inplace(x1_encrypted);
cout << "    + Scale of 0.4*x after rescale: " << log2(x1_encrypted.scale()) << " bits" << endl;

现在想把三个项合起来,但是三个项的所用的加密参数、scale是不同的,也就是level不一样,那么接下来要做的就是切换到同一个level上
获取密文项的level。
cout << endl;
print_line(__LINE__);
cout << "Parameters used by all three terms are different." << endl;
cout << "    + Modulus chain index for x3_encrypted: "
     << context.get_context_data(x3_encrypted.parms_id())->chain_index() << endl;
cout << "    + Modulus chain index for x1_encrypted: "
     << context.get_context_data(x1_encrypted.parms_id())->chain_index() << endl;
cout << "    + Modulus chain index for plain_coeff0: "
     << context.get_context_data(plain_coeff0.parms_id())->chain_index() << endl;
cout << endl;
可以看到level是不一样的

获取密文项的scale
print_line(__LINE__);
cout << "The exact scales of all three terms are different:" << endl;
ios old_fmt(nullptr);
old_fmt.copyfmt(cout);
cout << fixed << setprecision(10);
cout << "    + Exact scale in PI*x^3: " << x3_encrypted.scale() << endl;
cout << "    + Exact scale in  0.4*x: " << x1_encrypted.scale() << endl;
cout << "    + Exact scale in      1: " << plain_coeff0.scale() << endl;
cout << endl;
cout.copyfmt(old_fmt);
可以看到,尽管此时三项的scale都是接近40,但是它的确切值是不同,而且加密参数不同,所以是不能相加的。

现在来集中回顾一下密文计算中项的level变化,假定模数链上的模数为 P 0 , P 1 , P 2 , P 3 P_0,P_1,P_2,P_3 P0,P1,P2,P3
| 项 | scale, level | after rescale, level |
|---|---|---|
| x 2 x^2 x2 | 80 , 2 80,2 80,2 | 80 / P 2 , 1 80/P_2,1 80/P2,1 |
| π × x \pi \times x π×x | 80 , 2 80,2 80,2 | 80 / P 2 , 1 80/P_2,1 80/P2,1 |
| π × x 3 \pi \times x^3 π×x3 | ( 80 / P 2 ) 2 (80/P_2)^2 (80/P2)2,1 | ( 80 / P 2 ) 2 / P 1 (80/P_2)^2/P_1 (80/P2)2/P1,0 |
| 0.4 × x 0.4 \times x 0.4×x | 80 , 2 80,2 80,2 | 80 / P 2 , 1 80/P_2,1 80/P2,1 |
| 1 1 1 | 40 , 2 40,2 40,2 |
接下来要做的是,将scale和加密参数都变为一致。
改变scale,有两种方式,
- 一种是直接强行将三项的scale设置为一样的(最简单的)
- 另一种是将明文1编码到和 0.4 × x 0.4 \times x 0.4×x一样的level,然后相乘,然后rescale
本例用的是第一种方法
设置scale
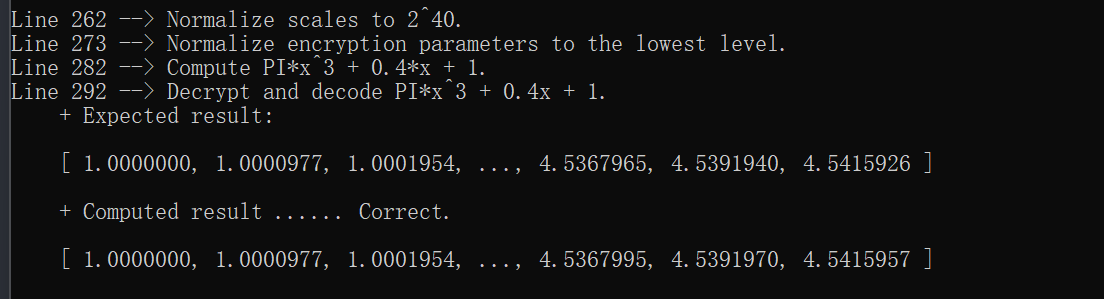
print_line(__LINE__);
cout << "Normalize scales to 2^40." << endl;
x3_encrypted.scale() = pow(2.0, 40);
x1_encrypted.scale() = pow(2.0, 40);
有关加密参数的切换,直接使用modulus switching,不用rescale即可
print_line(__LINE__);
cout << "Normalize encryption parameters to the lowest level." << endl;
parms_id_type last_parms_id = x3_encrypted.parms_id();
evaluator.mod_switch_to_inplace(x1_encrypted, last_parms_id);
evaluator.mod_switch_to_inplace(plain_coeff0, last_parms_id);
现在把三个项相加即可
print_line(__LINE__);
cout << "Compute PI*x^3 + 0.4*x + 1." << endl;
Ciphertext encrypted_result;
evaluator.add(x3_encrypted, x1_encrypted, encrypted_result);
evaluator.add_plain_inplace(encrypted_result, plain_coeff0);
解码解密并输出结果
这里先是直接手动计算了一下值,然后再将密文解密,解码
Plaintext plain_result;
print_line(__LINE__);
cout << "Decrypt and decode PI*x^3 + 0.4x + 1." << endl;
cout << "    + Expected result:" << endl;
vector<double> true_result;
for (size_t i = 0; i < input.size(); i++)
{


    double x = input[i];
        true_result.push_back((3.14159265 * x * x + 0.4) * x + 1);
}
print_vector(true_result, 3, 7);

decryptor.decrypt(encrypted_result, plain_result);
vector<double> result;
encoder.decode(plain_result, result);
cout << "    + Computed result ...... Correct." << endl;
print_vector(result, 3, 7);
可以看到是有一定的误差的,CKKS是近似计算。