CSDN同学总结,转发分享——
简介
由于其他项目中断了几天更新,继续~~
这一篇主要是讲光照的(包含漫反射和高光以及多光源的处理)
还是先来看看具体效果(多光源后面单独展示)

有了基本的光照处理之后越来越有立体感了有不有 ╮(╯▽╰)╭
最基本的漫反射
原理
这次我们先来解释下原理比较好
比较复杂的原理大家就自行百度吧,我这里来简单的解释一下
光照在物体上面,然后将物体表面的颜色一起反射到摄像机中
也就是光–>物体(颜色)–>摄像机
反射出来的亮度则是由物体表面和光线的夹角确定的(其实是物体表面的法线和光线的夹角)
好了基本概念就降到这里,所以我们需要:
光(方向和强度),物体的颜色,物体表面的法向量
下面开始看代码
Shader "LT/Lesson4_Lighting"
{
    Properties
    {
         _Color ("Diffuse Color", Color) = (1, 1, 1, 1)
    }
    SubShader
    {
        Pass {
            Tags { "LightMode" = "ForwardBase" }
            CGPROGRAM
            #pragma vertex vert
            #pragma fragment frag
            #include "UnityCG.cginc"

            uniform float4 _LightColor0;
            uniform float4 _Color;

            appdata_base vert ( appdata_base input)
            {
                float3 normalDirection = normalize( mul(float4(input.normal, 0.0), _World2Object).xyz );
                float3 lightDirection;
                float attenuation;

                if (0.0 == _WorldSpaceLightPos0.w) {
                    attenuation = 1.0;
                    lightDirection = normalize(_WorldSpaceLightPos0.xyz);
                } else {
                    float3 vertexToLightSource = (_WorldSpaceLightPos0 - mul( _Object2World , input.vertex)).xyz;
                    float distance = length(vertexToLightSource);
                    attenuation = 1.0 / distance;
                    lightDirection = normalize(vertexToLightSource);
                }

                float3 diffuseReflection = float3(_LightColor0.xyz ) * _Color.xyz * max(0.0, dot(normalDirection, lightDirection));

                input.texcoord = float4(diffuseReflection, 1.0);
                input.vertex  = mul(UNITY_MATRIX_MVP, input.vertex );
                return input;
            }

            fixed4 frag (appdata_base input) : COLOR
            {
                return input.texcoord;
            }
            ENDCG
        }
    }
}
代码一共就50行,而且很多都是熟悉的,比如用appdata_base 中的不用字段来储存颜色呀,外接漫反射要用的颜色属性啥的就不多做赘述了
然后这个光照颜色其实是在lighting.cginc中 ,但是我们要是用的话,还是要再次声明一下,其实是unity内置的一个外接参数(想想也知道辣,光照的属性肯定是从unity传进来的,shader自己肯定不知道灯光的信息啊)
uniform float4 _LightColor0; 直击核心代码
                float3 normalDirection = normalize( mul(float4(input.normal, 0.0), _World2Object).xyz );
                // 单位化(有些地方也翻译成归一化)物体的法向量

                float3 lightDirection;
                // 光照方向
                float attenuation;
                // 光线衰减量

                if (0.0 == _WorldSpaceLightPos0.w) {
                    // _WorldSpaceLightPos0.w = 0 表示这个光是平行光,
                    // 不是平行光的话这个值为1,(比如点光源啥的)
                    attenuation = 1;
                    // 设置衰减为1(类似于给个默认值)
                    lightDirection = normalize(_WorldSpaceLightPos0.xyz);
                    // 设置光照方向
                } else {
                    float3 vertexToLightSource = (_WorldSpaceLightPos0 - mul( _Object2World , input.vertex)).xyz;
                    float distance = length(vertexToLightSource);
                    // 计算光源和顶点之间的距离

                    attenuation = 1.0 / distance;
                    // 通过距离计算衰减(距离越大,衰减越大)
                    lightDirection = normalize(vertexToLightSource);
                    // 设置光照方向
                }

                float3 diffuseReflection = float3(_LightColor0.xyz ) * _Color.xyz * max(0.0, dot(normalDirection, lightDirection));
                // 计算漫反射颜色和亮度(就是前面说的,
                // 用物体的颜色和光的颜色混合作为漫反射的颜色,
                // 然后法向量和光照的夹角算出光的强度)
恩,然后Pass后面还跟了个Tags { “LightMode” = “ForwardBase” },放到后面一起解释
下面来讲高光
来一点点高光
原理
还是先来原理,跟前面一样,漫反射是360无死角的反射,其实不管摄像机在哪(因为漫反射是360度的嘛,不管摄像机在哪都能反射进去),高光呢就可以理解成针对摄像机的位置,再反射一次光线(加强一次颜色,可以自己设定,一般来说是白色,RBG各种颜色混在一起就是白色了撒,当然也可以使用灯光颜色让他自己去混合)。
以上是为了图方便乱吹的啊,具体复杂的原理还是自行百度去吧。
下面开始看代码
Shader "LT/Lesson4_Lighting"
{
    Properties
    {
         _Color ("Diffuse Color", Color) = (1, 1, 1, 1)
         _SpecColor ("Specular Color", Color) = (1, 1, 1, 1)
         _Shininess ("Shininess", Float) = 10
    }
    SubShader
    {
        Pass {
            Tags { "LightMode" = "ForwardBase" }
            CGPROGRAM
            #pragma vertex vert
            #pragma fragment frag
            #include "UnityCG.cginc"

            uniform float4 _LightColor0;
            uniform float4 _Color;
            uniform float4 _SpecColor;
            uniform float _Shininess;

            appdata_base vert ( appdata_base input)
            {
                float3 normalDirection = normalize( mul(float4(input.normal, 0.0), _World2Object).xyz );
                float3 viewDirection = normalize( (float4(_WorldSpaceCameraPos, 1.0) - mul( _Object2World, input.vertex)).xyz );
                float3 lightDirection = normalize( _WorldSpaceLightPos0.xyz );
                float attenuation;

                if (0.0 == _WorldSpaceLightPos0.w) {
                    attenuation = 1.0;
                    lightDirection = normalize(_WorldSpaceLightPos0.xyz);
                } else {
                    float3 vertexToLightSource = (_WorldSpaceLightPos0 - mul( _Object2World , input.vertex)).xyz;
                    float distance = length(vertexToLightSource);
                    attenuation = 1.0 / distance;
                    lightDirection = normalize(vertexToLightSource);
                }
                float3 ambientLighting = UNITY_LIGHTMODEL_AMBIENT.xyz * _Color.xyz;

                float3 diffuseReflection = float3(_LightColor0.xyz ) * _Color.xyz * max(0.0, dot(normalDirection, lightDirection));

                float3 specularReflection;
                if (dot(normalDirection, lightDirection) < 0.0) {
                    specularReflection = float3(0.0, 0.0, 0.0);
                } else {
                    specularReflection = attenuation * _LightColor0.xyz * _SpecColor.xyz *
                    pow(max(0.0, dot(reflect(-lightDirection, normalDirection),viewDirection)),
                     _Shininess);
                }

                input.texcoord = float4(ambientLighting  + diffuseReflection + specularReflection, _Color.w);
                input.vertex  = mul(UNITY_MATRIX_MVP, input.vertex );
                return input;
            }

            fixed4 frag (appdata_base input) : COLOR
            {
                return input.texcoord;
            }
            ENDCG
        }
    }
}
这次代码多了10行左右,大部分代码前面都讲了,我们来直击没讲过的核心代码吧~~
                float3 normalDirection = normalize( mul(float4(input.normal, 0.0), _World2Object).xyz );
                float3 viewDirection = normalize( (float4(_WorldSpaceCameraPos, 1.0) - mul( _Object2World, input.vertex)).xyz );
                // 单位化摄像机的方向
                float3 lightDirection = normalize( _WorldSpaceLightPos0.xyz );
                float attenuation;

                if (0.0 == _WorldSpaceLightPos0.w) {
                    attenuation = 1.0;
                    lightDirection = normalize(_WorldSpaceLightPos0.xyz);
                } else {
                    float3 vertexToLightSource = (_WorldSpaceLightPos0 - mul( _Object2World , input.vertex)).xyz;
                    float distance = length(vertexToLightSource);
                    attenuation = 1.0 / distance;
                    lightDirection = normalize(vertexToLightSource);
                }
                float3 ambientLighting = UNITY_LIGHTMODEL_AMBIENT.xyz * _Color.xyz;
                // 计算环境光(其实可以不要,但是高光都有了,没环境光太寒蝉了,可以自行去掉..)

                float3 diffuseReflection = float3(_LightColor0.xyz ) * _Color.xyz * max(0.0, dot(normalDirection, lightDirection));

                float3 specularReflection;
                // 定义高光!
                if (dot(normalDirection, lightDirection) < 0.0) {
                    specularReflection = float3(0.0, 0.0, 0.0);
                    // 如果光源夹角<0了,说明看不高光了,全0
                } else {
                    specularReflection = attenuation * _LightColor0.xyz * _SpecColor.xyz *
                    pow(max(0.0, dot(reflect(-lightDirection, normalDirection),viewDirection)),
                     _Shininess);
                    // 根据光线颜色,高光颜色,距离衰减,光照角度,法线方向等信息计算高光区域,
                    // 这些其实都是公式,需要去看看资料吧
                }

                input.texcoord = float4(ambientLighting  + diffuseReflection + specularReflection, _Color.w);
                // 将各种颜色加起来赋值给颜色
恩,没什么需要过多解释的了吧,代码里面都注释了
然后下面进入多光源
多光源的简单处理
试过上面的代码的童鞋可以尝试下,再在场景中增加一个灯光(如果加的是点光源,注意点光源的参数范围是否可以照到物体),然后会发现后面增加的光源没有任何效果,这是为神马捏
这里就要引入我们前面跳过的一个概念了
Tags { "LightMode" = "ForwardBase" } 这里的LightMode是与渲染路径配合使用的
我们先来科普下unity支持的各种渲染路径:
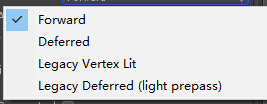
看着有四种,其实就三个(好吧,其实是我只在官方文档里面看到三个)
Deferred(延迟渲染,最好的效果),Forward(正向渲染),Vertex(顶点光照,效果最差,默认只有一个光照),还有就是,shader没有写专门支持Deferred的就会自动寻找Forward,没有Forward就寻找Vertex(Vertex是最基本的,如果还没有,就不显示了,一般是不会发生的,因为你不声明LightMode模式默认都是支持Vertex的)
所以对应下来有:
Always: Always rendered; no lighting is applied.
ForwardBase: Used in Forward rendering, ambient, main directional light, vertex/SH lights and lightmaps are applied.
ForwardAdd: Used in Forward rendering; additive per-pixel lights are applied, one pass per light.
Deferred: Used in Deferred Shading; renders g-buffer.
ShadowCaster: Renders object depth into the shadowmap or a depth texture.
PrepassBase: Used in legacy Deferred Lighting, renders normals and specular exponent.
PrepassFinal: Used in legacy Deferred Lighting, renders final color by combining textures, lighting and emission.
Vertex: Used in legacy Vertex Lit rendering when object is not lightmapped; all vertex lights are applied.
VertexLMRGBM: Used in legacy Vertex Lit rendering when object is lightmapped; on platforms where lightmap is RGBM encoded (PC & console).
VertexLM: Used in legacy Vertex Lit rendering when object is lightmapped; on platforms where lightmap is double-LDR encoded (mobile platforms).
英文就不翻译了,还有10分钟要去吃饭了~~看名字大概就看的出来了
这里Always(一直渲染),ShadowCaster(产生阴影),ShadowCollector(接受阴影)是独立于渲染路径存在的(Unity里面设置的)
讲的有点拼远了,这里我们的ForwardBase只会包含一个光源信息(最重要的的光源),然后在ForwardAdd中再将其他光源(不那么重要的光源)渲染出来
所以我们这里需要添加一个Pass,像这样(看后面,多了一个Pass)
Shader "LT/Lesson4_Lighting"
{
    Properties
    {
         _Color ("Diffuse Color", Color) = (1, 1, 1, 1)
         _SpecColor ("Specular Color", Color) = (1, 1, 1, 1)
         _Shininess ("Shininess", Float) = 10
    }
    SubShader
    {
        Pass {
            Tags { "LightMode" = "ForwardBase" }
            CGPROGRAM
            #pragma vertex vert
            #pragma fragment frag
            #include "UnityCG.cginc"

            uniform float4 _LightColor0;
            uniform float4 _Color;
            uniform float4 _SpecColor;
            uniform float _Shininess;

            appdata_base vert ( appdata_base input)
            {
                float3 normalDirection = normalize( mul(float4(input.normal, 0.0), _World2Object).xyz );
                float3 viewDirection = normalize( (float4(_WorldSpaceCameraPos, 1.0) - mul( _Object2World, input.vertex)).xyz );
                // 单位化摄像机的方向
                float3 lightDirection = normalize( _WorldSpaceLightPos0.xyz );
                float attenuation;

                if (0.0 == _WorldSpaceLightPos0.w) {
                    attenuation = 1.0;
                    lightDirection = normalize(_WorldSpaceLightPos0.xyz);
                } else {
                    float3 vertexToLightSource = (_WorldSpaceLightPos0 - mul( _Object2World , input.vertex)).xyz;
                    float distance = length(vertexToLightSource);
                    attenuation = 1.0 / distance;
                    lightDirection = normalize(vertexToLightSource);
                }
                float3 ambientLighting = UNITY_LIGHTMODEL_AMBIENT.xyz * _Color.xyz;
                // 计算环境光(其实可以不要,但是高光都有了,没环境光太寒蝉了,可以自行去掉..)

                float3 diffuseReflection = float3(_LightColor0.xyz ) * _Color.xyz * max(0.0, dot(normalDirection, lightDirection));

                float3 specularReflection;
                // 定义高光!
                if (dot(normalDirection, lightDirection) < 0.0) {
                    specularReflection = float3(0.0, 0.0, 0.0);
                    // 如果光源夹角<0了,说明看不高光了,全0
                } else {
                    specularReflection = attenuation * _LightColor0.xyz * _SpecColor.xyz *
                    pow(max(0.0, dot(reflect(-lightDirection, normalDirection),viewDirection)),
                     _Shininess);
                    // 根据光线颜色,高光颜色,距离衰减,光照角度,法线方向等信息计算高光区域,
                    // 这些其实都是公式,需要去看看资料吧
                }

                input.texcoord = float4(ambientLighting  + diffuseReflection + specularReflection, _Color.w);
                // 将各种颜色加起来赋值给颜色
                input.vertex  = mul(UNITY_MATRIX_MVP, input.vertex );
                return input;
            }

            fixed4 frag (appdata_base input) : COLOR
            {
                return input.texcoord;
            }
            ENDCG
        }

        Pass {
            Tags { "LightMode" = "ForwardAdd" }
            Blend One One

            CGPROGRAM
            #pragma vertex vert
            #pragma fragment frag
            #include "UnityCG.cginc"

            uniform float4 _LightColor0;
            uniform float4 _Color;
            uniform float4 _SpecColor;
            uniform float _Shininess;

            appdata_base vert ( appdata_base input)
            {
                float3 normalDirection = normalize( mul(float4(input.normal, 0.0), _World2Object).xyz );
                float3 viewDirection = normalize( (float4(_WorldSpaceCameraPos, 1.0) - mul( _Object2World, input.vertex)).xyz );
                float3 lightDirection = normalize( _WorldSpaceLightPos0.xyz );
                float attenuation;

                if (0.0 == _WorldSpaceLightPos0.w) {
                    attenuation = 1.0;
                    lightDirection = normalize(_WorldSpaceLightPos0.xyz);
                } else {
                    float3 vertexToLightSource = (_WorldSpaceLightPos0 - mul( _Object2World , input.vertex)).xyz;
                    float distance = length(vertexToLightSource);
                    attenuation = 1.0 / distance;
                    lightDirection = normalize(vertexToLightSource);
                }
                float3 ambientLighting = UNITY_LIGHTMODEL_AMBIENT.xyz * _Color.xyz;

                float3 diffuseReflection = float3(_LightColor0.xyz ) * _Color.xyz * max(0.0, dot(normalDirection, lightDirection));

                float3 specularReflection;
                if (dot(normalDirection, lightDirection) < 0.0) {
                    specularReflection = float3(0.0, 0.0, 0.0);
                } else {
                    specularReflection = attenuation * _LightColor0.xyz * _SpecColor.xyz *
                    pow(max(0.0, dot(reflect(-lightDirection, normalDirection),viewDirection)),
                     _Shininess);
                }

                input.texcoord = float4(ambientLighting  + diffuseReflection + specularReflection, _Color.w);
                input.vertex  = mul(UNITY_MATRIX_MVP, input.vertex );
                return input;
            }

            fixed4 frag (appdata_base input) : COLOR
            {
                return input.texcoord;
            }
            ENDCG
        }
    }
}
这里我们还启用了Blend One One。因为其他光源反射的颜色需要完全与原来的光照信息混合,所以用1:1混合。
来看看效果:
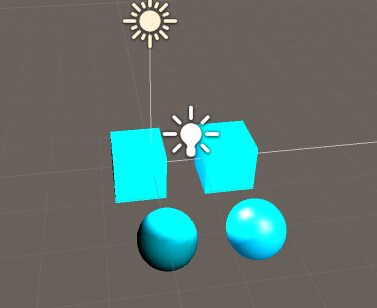
这里高光的效果很明显,可以看到两个高光点( 视图中也可以看到有两个光源)
然后使用Tags { “LightMode” = “ForwardAdd” }的好处还可以适应质量调节(比如Android打包的时候选成Vertex,高于Vertex的Pass就不会执行啥的)。
总结
光照啥的代码其实很简单,最主要是理清楚顺序,比如先渲染啥后渲染啥,也就是Pass的顺序,不光是光照,后续很多效果都需要多个Pass进行叠加啥的
————————————————
原文链接:https://blog.csdn.net/ghostwolfliu/article/details/51596911