Tinkter学习笔记
1_GUI编程和tinkter介绍
GUI(Graphics User Interface)图形用户接口
常用的GUI库:
- Tkinter(TK interface)小型GUI程序编写
- wxPython(适合大型应用程序开发)
- Pyqt(适合大型GUI程序开发)
GUI编程的核心步骤和第一个GUI程序
基于tkinter模块创建GUI程序包含以下4个核心步骤:
-
创建应用程序主窗口对象(也称:根窗口)
(1)通过类Tk的无参构造函数
from tkinter import * root=Tk() root.mainloop() #调用组件的mainloop()方法,进入事件循环 -
在主窗口中,添加各种可视化组件。比如:按钮(Button)、文本框(Label)等
btn01=Button(root) btn01['text']="WBQ" -
通过几何布局管理器,管理组件的大小和位置
bnt01.pack() -
事件处理
(1)通过绑定事件处理程序,相应用户操作所触发的事件(比如:单机、双击等)
def songhua(e):
	messagebox.showinfo("Message","送你玫瑰")
	print("送出玫瑰")
btn01.bind("<Button-1>",songhua)
2_PEP8编码规范 _窗口大小和位置
通过geometry(‘wxh±x±y’),+x表示距离屏幕左边的距离,-x表示距离屏幕右边的距离,+y表示距离屏幕上边的距离,-y表示距离屏幕下边的距离。
3_GUI编程整体描述_常用组件汇总
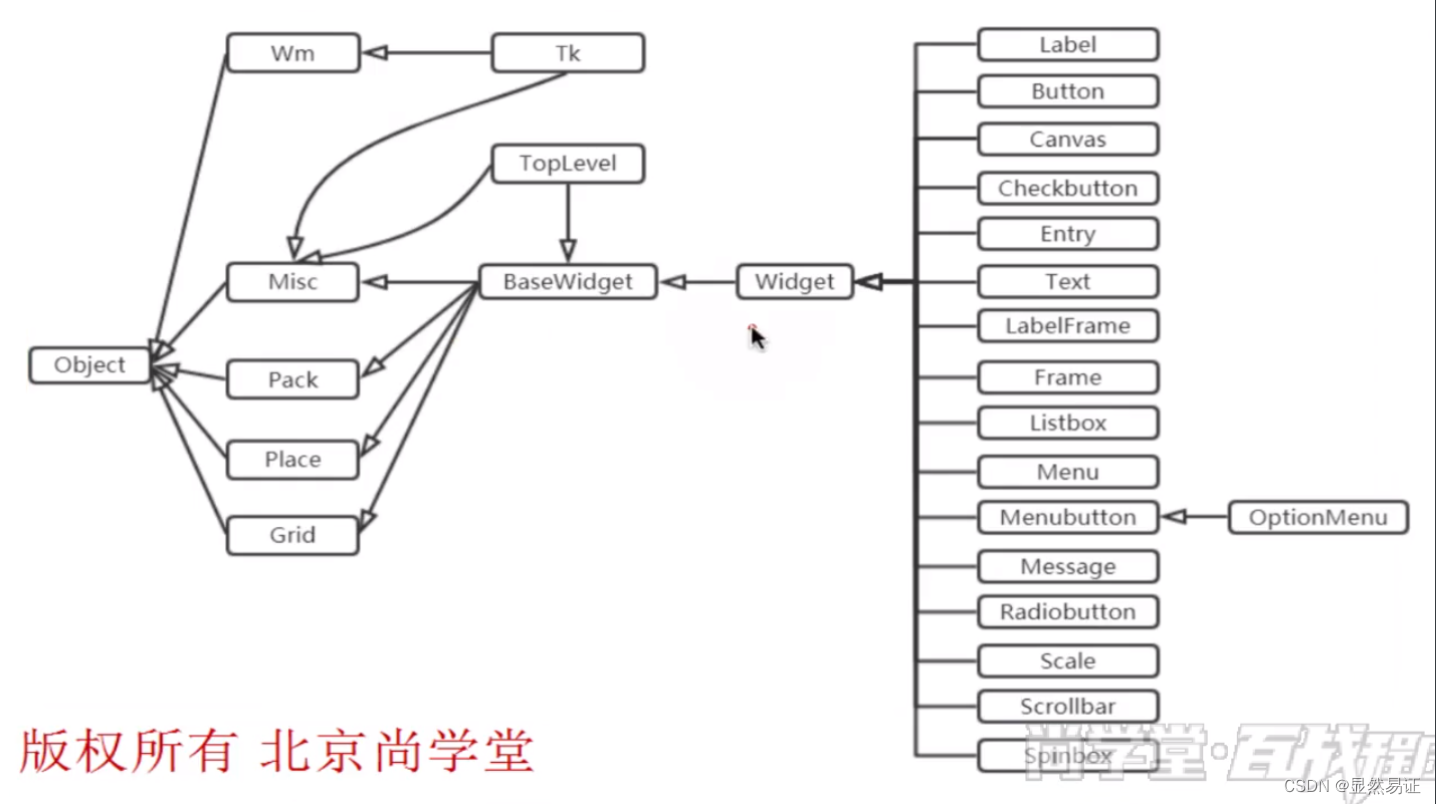
Wm:窗口间的通信
TopLevel:顶级窗口
Pack、Place、Grid:通讯管理器
from tkinter import *
from tkinter import messagebox

root = Tk()
root.title("我的第一个GUI程序")
root.geometry("500*300+100+200")

btn01 = Button(root)
# 可以按住ctrl键打开Button类 Button继承了Widget,Widget继承了BaseWidget,Pack,Place,Grid,Widget又继承了Misc

btn01["text"] = "送花"

btn01.pack()


def songhua(e):
    messagebox.showinfo("Message", "送你玫瑰")
    print("送出玫瑰")


btn01.bind("<Button-1>", songhua)
root.mainloop()
![[外链图片转存失败,源站可能有防盗链机制,建议将图片保存下来直接上传(img-Vb6bGf9x-1662193943163)(C:\Users\Vermouth\AppData\Roaming\Typora\typora-user-images\image-20220816150541730.png)]](https://img-blog.csdnimg.cn/22fd9eb408c34f0aa70e785dc0dcd96e.png)
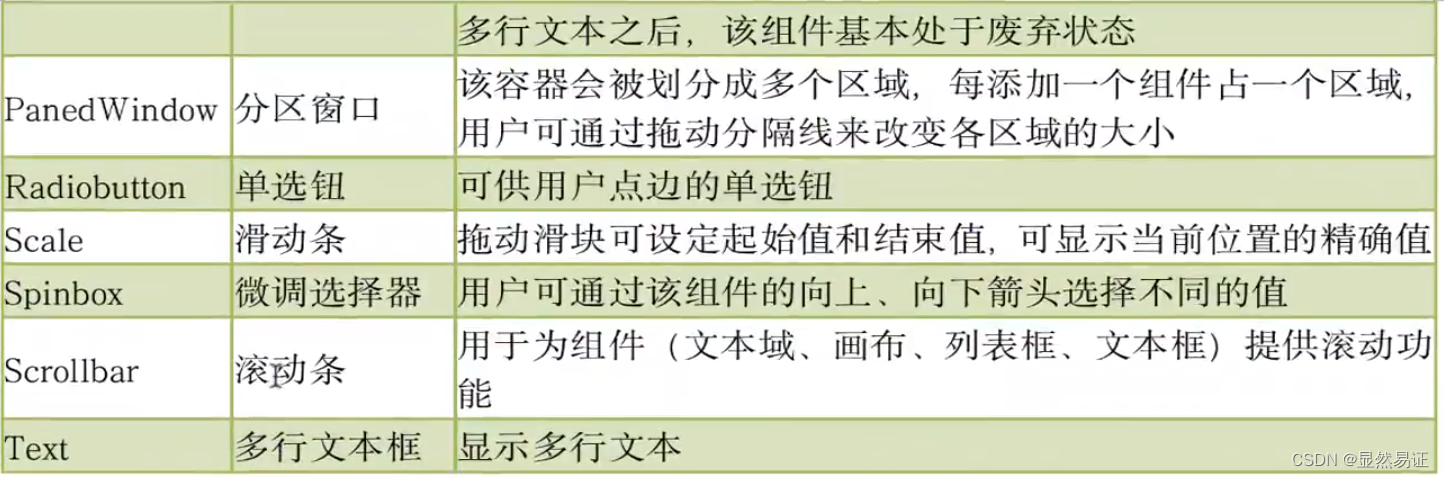
常用组件汇总列表:

4_GUI程序的经典面向对象写法
通过类Application组织整个GUI程序,类Application继承了Frame及通过继承拥有了父类的特性。通过构造__init__()初始化窗口的对象。
Frame框架是一个tkinter组件,表示一个矩形的区域。Frame】一般作为容器使用,而已放置其他组件,从而实现复杂的布局。
"""测试一个经典的GUI程序的写法,使用面向对象的方式"""
from tkinter import *
from tkinter import messagebox
import tkinter as TK

class Application(Frame):
    """一个经典的GUI程序的类的写法"""

    def __init__(self, master=None):
        super().__init(master)  # super()代表的是弗雷的定义,而不是父类对象
        self.master = master
        self.pack()

        self.createWidget()

        # 创建一个退出按钮
        self.btnQuit = Button(self,text="退出",command=root.distroy)


    def createWidget(self):
        """创建组件"""
        self.btn01 = Button(self)
        self.btn01["text"]="点击送花"
        self.btn01.pack()
        self.btn01["command"]=self.songhua

    def songhua(self):
        messagebox.showinfo("送花","送你99朵玫瑰")

if __name__ == '__main__':
    root = Tk()
    root.geometry("400*100+200+300")
    root.title("一个经典的GUI程序类的测试")
    app = Application(master=root)
	root.mainloop()
5_Label组件 _Tkinter中图像正确显示全局变量的写法
Label组件
Label(标签)主要用于显示文本信息,也可以显示图像
Label(标签)有这样一些常见属性:
-
width,height
用于指定区域大小,如果显示是文本,则以单个英文字符大小为单位(一个汉字宽度占2个字符位置,高度和英文字符一样);如果显示是图像,则以次昂宿为单位,默认值是根据具体显示的内容动态调整。
-
font
指定字体和字体大小,如:font=(font_name,size)
-
image
显示再Label上的图像,目前tkinter只支持gif格式
-
fg和bg
fg(foreground):前景色 bg(background):背景色
-
justify
针对多行文字的对齐,可设置justify属性,可选值“left”,“center”or“right”
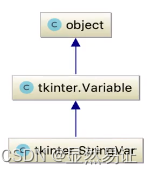
全局变量(图片全局变量的写法)
"""测试Label组件的基本用法,使用面向对象的方式"""
from tkinter import *
from tkinter import messagebox


class Application(Frame):

    def __init__(self, master=None):
        super().__init__(master)  # super()代表的是弗雷的定义,而不是父类对象
        self.master = master
        self.pack()

        self.createWidget()

    def createWidget(self):
        """创建组件"""
        self.label01 = Label(self, text="百战程序员", width=10, height=2, bg="black", fg="white")
        self.label01.pack()
        self.label02 = Label(self, text="小汪", width=10, height=2, bg="blue", fg="white", font=("黑体", 30))
        self.label02.pack()

        # 显示图像
        global photo  # 把photo声明成全局变量。如果局部变量,本方法执行完毕后,图像对象销毁,窗口显示不出图像。
        photo = PhotoImage(file="C:/Users/Vermouth/Desktop/CV/img/taichi.gif")
        self.label03 = Label(self, image=photo)
        self.label03.pack()

        self.label04 = Label(self, text="lalala\nbalabala\nhahaha", borderwidth=5, relief="solid", justify="right")
        self.label04.pack()


if __name__ == '__main__':
    root = Tk()
    root.geometry("400x100+200+300")
    root.title("测试Label组件的基本用法")
    app = Application(master=root)
    root.mainloop()
6_options选项详解 _底层源码分析和阅读 _可变参数和重载运算符复习
Option选项的详解
通过学习Label组件,我们发现可以通过Options设置的属性,从而控制组件的各种状态,比如:宽度、高度、颜色、位置等等。
我们可以通过三种方式设置Options选项,这在各种GUI组件中用法都一致。
-
创建对象时,使用命名参数(也叫做关键字参数)
fred = Button(self, fg="red", bg="blue") -
创建对象后,使用字典索引方式
fred["fg"] = "red" fred["bg"] = "blue" -
创建对象后,使用config()方法
fred.config(fg="red", bg="blue")
7_Button_anchor位置控制
Button(按钮)用来执行用户的单击操作,Button可以包含文本,也可以包含图像,按钮被单机后会自动调用对应事件的绑定的方法。
"""测试Label组件的基本用法,使用面向对象的方式"""
from tkinter import *
from tkinter import messagebox


class Application(Frame):

    def __init__(self, master=None):
        super().__init__(master)  # super()代表的是弗雷的定义,而不是父类对象
        self.master = master
        self.pack()
        self.createWidget()

    def createWidget(self):
        """创建组件"""
        self.btn01 = Button(root, text="Login", width=6, height=3, anchor=E, command=self.login)
        self.btn01.pack()

        # 显示图像
        global photo  # 把photo声明成全局变量。如果局部变量,本方法执行完毕后,图像对象销毁,窗口显示不出图像。
        photo = PhotoImage(file="C:/Users/Vermouth/Desktop/CV/img/taichi.gif")
        self.btn02 = Button(root, image=photo, command=self.login)
        self.btn02.pack()
        self.btn02.config(state="disabled")  # 设置按钮为禁用

    def login(self):
        messagebox.INFO("Login")


if __name__ == '__main__':
    root = Tk()
    root.geometry("400x100+200+300")
    root.title("测试Label组件的基本用法")
    app = Application(master=root)
    root.mainloop()
8_Entry_StringVar _登录界面设计和功能实现
Entry单行文本框
Entry用来接收一行字符串的空间,如果用户输入的文字长度长于Entry控件的宽度时,文字会自动向后滚动,如果想输入多行文本,需要使用Text控件。

"""测试Label组件的基本用法,使用面向对象的方式"""
from tkinter import *
from tkinter import messagebox


class Application(Frame):

    def __init__(self, master=None):
        super().__init__(master)  # super()代表的是弗雷的定义,而不是父类对象
        self.master = master
        self.pack()
        self.createWidget()

    def createWidget(self):
        """创建登录界面的条件"""
        self.label01 = Label(self, text="用户名")
        self.label01.pack()

        # StringVar变量绑定到指定的组件。
        # StringVar变量的值发生变化,组件内容也变化。
        # 组件内容发生变化,StringVar变量的值也发生变化。
        v1 = StringVar()
        self.entry01 = Entry(self, textvariable=v1)
        self.entry01.pack()
        v1.set("admin")
        print(v1.get());
        print(self.entry01.get())

        # 创建密码框
        v2 = StringVar()
        self.entry02 = Entry(self, textvariable=v2, show="*")
        self.entry02.pack()

        # 登录按钮
        self.btn01 = Button(self, text="登录", command=self.login).pack()

    def login(self):
        username = self.entry01.get()
        pwd = self.entry02.get()
        print("去数据库比对用户名和密码")
        print("用户名:", username)
        print("密码:", pwd)

        if username=="wbq" and pwd=="123456":
            messagebox.showinfo("学习系统", "欢迎开始学习!")
        else:
            messagebox.showinfo("学习系统", "登录失败!用户名或密码错误!")

if __name__ == '__main__':
    root = Tk()
    root.geometry("400x100+200+300")
    root.title("测试Label组件的基本用法")
    app = Application(master=root)
    root.mainloop()
9_Text多行文本框详解 _复杂tag标记
Text(多行文本框)的主要用于显示多行文本,还可以显示网页链接、图片、HTML页面、甚至CSS央视表,添加组件等。因此,也常被当作简单的文本处理器、文本编辑器或者网页浏览器来使用。比如IDLE就是Text组件构成的。
"""_Text多行文本框详解 _复杂tag标记"""
from tkinter import *
from tkinter import messagebox
import webbrowser

class Application(Frame):

    def __init__(self, master=None):
        super().__init__(master)  # super()代表的是弗雷的定义,而不是父类对象
        self.master = master
        self.pack()
        self.createWidget()

    def createWidget(self):
        self.w1 = Text(root, width=40, height=12, bg="gray")
        # 宽度20个字母(10个汉字),高度一个行高
        self.w1.pack()

        self.w1.insert(1.0, "0123456789\nabcdefg")
        self.w1.insert(2.3, "lalalalala,hahahahaha,balabalaba\n")

        Button(self, text="重复插入文本", command=self.insertText).pack(side="left")
        Button(self, text="返回文本", command=self.returnText).pack(side="left")
        Button(self, text="添加图片", command=self.addImage).pack(side="left")
        Button(self, text="添加组件", command=self.addWidget).pack(side="left")
        Button(self, text="通过tag精确控制文本", command=self.testTag).pack(side="left")

    def insertText(self):
        # INSERT索引表示在光标处插入
        self.w1.insert(INSERT, 'wbq')
        # END索引号表示在最后插入
        self.w1.insert(END, '[sxt]')

    def returnText(self):
        # INdexes(索引)是用来指向Text组件中文本的位置,Text的组件索引也是对应实际字符之间的位置
        # 核心:行号以1开始,列号以0开始
        print(self.w1.get(1.2, 1.6))
        self.w1.insert(1.8, "wbq")
        print("所有文本内容 \n" + self.w1.get((1.0, END)))

    def addImage(self):
        # global photo
        self.photo = PhotoImage(file="C:/Users/Vermouth/Desktop/CV/img/taichi.gif")
        self.w1.image_create(END, image=self.photo)

    def addWidget(self):
        b1 = Button(self.w1, text='小汪学堂')
        # 在text创建组件的命令
        self.w1.window_create(INSERT, window=b1)

    def testTag(self):
        self.w1.delete(1.0, END)
        self.w1.insert(INSERT, "good\ngood\nstudy\nday day up!\n")
        self.w1.tag_add("good", 1.0, 1.9)
        self.w1.tag_config("good", background="yellow", foreground="red")

        self.w1.tag_add("baidu", 4.0, 4.2)
        self.w1.tag_config("baidu", underline=True)
        self.w1.tag_bind("baidu", "<Button-1>", self.webshow)

    def webshow(self, event):
        webbrowser.open("http://www.baidu.com")


if __name__ == '__main__':
    root = Tk()
    root.geometry("400x100+200+300")
    root.title("测试Label组件的基本用法")
    app = Application(master=root)
    root.mainloop()
10_Radiobutton_Checkbutton详解
Radiobutton 单选按钮
Radiobutton控件用于选择同一组单选按钮中的一个,Radiobutton可以显示文本,也可以显示图像。
"""_Radiobutton_Checkbutton详解"""
from tkinter import *
from tkinter import messagebox
import webbrowser


class Application(Frame):

    def __init__(self, master=None):
        super().__init__(master)  # super()代表的是父类的定义,而不是父类对象
        self.master = master
        self.pack()
        self.createWidget()

    def createWidget(self):
        self.v = StringVar()
        self.v.set("F")

        self.r1 = Radiobutton(self, text="男性", value="M", variable=self.v)
        self.r2 = Radiobutton(self, text="女性", value="F", variable=self.v)

        self.r1.pack(side="left")
        self.r2.pack(side="left")

        Button(self, text="确定", command=self.confirm).pack(side="left")

    def confirm(self):
        messagebox.showinfo("测试", "选择的性别:" + self.v.get())


if __name__ == '__main__':
    root = Tk()
    root.geometry("400x100+200+300")
    root.title("测试Label组件的基本用法")
    app = Application(master=root)
    root.mainloop()
Checkbutton 单选按钮
Checkbutton控件用于选择多个按钮的情况,Checkbutton可以显示文本,也可以显示图像。
"""_Radiobutton_Checkbutton详解"""
from tkinter import *
from tkinter import messagebox
import webbrowser


class Application(Frame):

    def __init__(self, master=None):
        super().__init__(master)  # super()代表的是父类的定义,而不是父类对象
        self.master = master
        self.pack()
        self.createWidget()

    def createWidget(self):
        self.codeHobby = IntVar()
        self.videoHobby = IntVar()

        print(self.codeHobby.get())
        self.c1 = Checkbutton(self, text="敲代码", variable=self.codeHobby, onvalue=1, offvalue=0)
        self.c2 = Checkbutton(self, text="看视频", variable=self.videoHobby, onvalue=1, offvalue=0)

        self.c1.pack(side="left")
        self.c2.pack(side="left")

        Button(self, text="确定", command=self.confirm).pack(side="left")

    def confirm(self):
        if self.videoHobby.get() == 1:
            messagebox.showinfo("测试", "看视频是正常的")
        if self.codeHobby.get() == 1:
            messagebox.showinfo("测试", "抓到野生程序猿一只")


if __name__ == '__main__':
    root = Tk()
    root.geometry("400x100+200+300")
    root.title("测试Label组件的基本用法")
    app = Application(master=root)
    root.mainloop()