关于Netty,推荐大家一个介绍的视频,是Netty项目的Leader的演讲:https://www.youtube.com/watch?v=I8yy2Cy7dDI
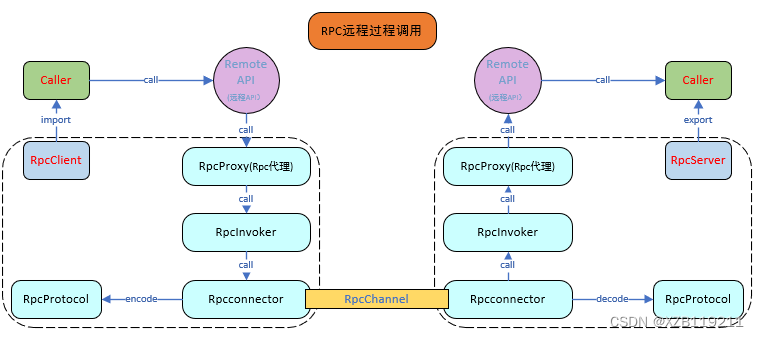
RPC:(Remote Procedure Call)-- 远程过程调用
(1)一个计算机通信协议。该协议允许运行与A计算机的程序调用运行于另一台计算机的子程序,而程序员无需额外滴为这个交互作用编程。
(2)两个或多个应用程序都分布在不同的服务器上,他们之间的调用都像是本地方法调用一样。
(3)常见的RPC框架有:比较知名的如阿里的Dubbo,google的gRPC,Go语言的rpcx,Apache的thrift,Spring的Spring Cloud。
实现Dubbo RPC(基于Netty)
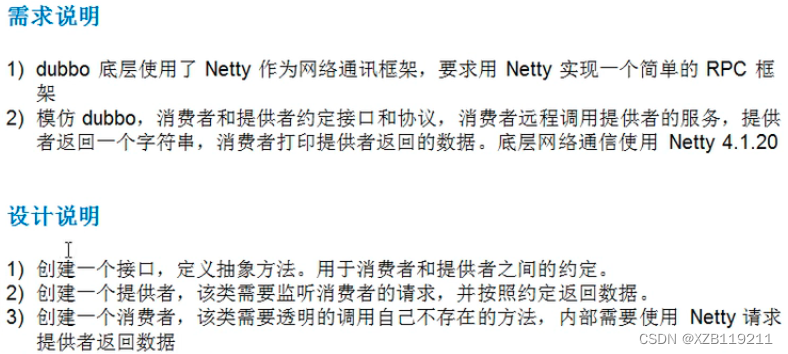
基本实现逻辑:
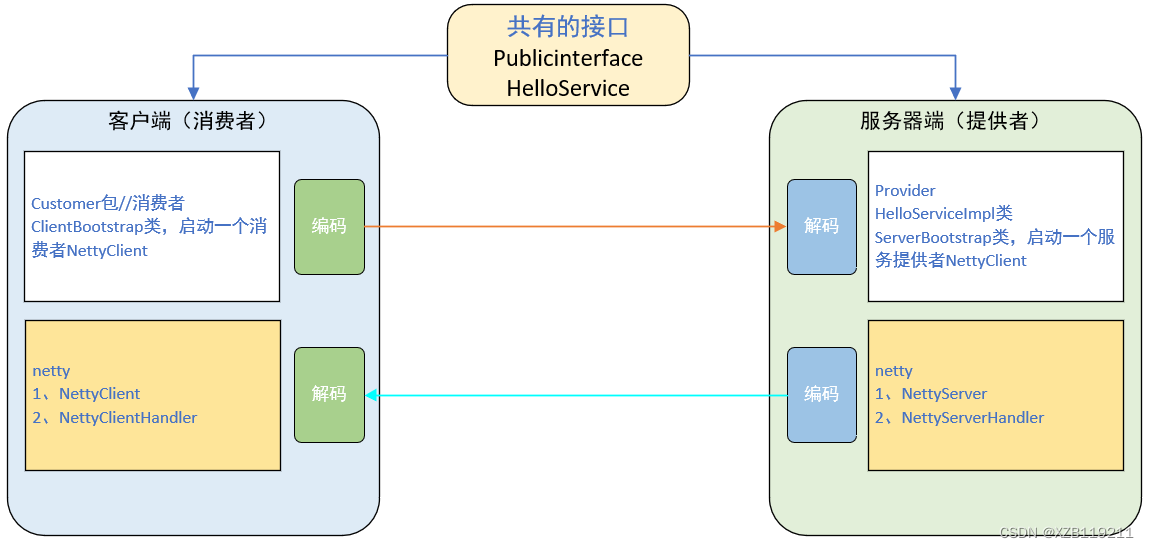
我们首先来实现HelloService,这是一个共有的接口
package com.sgg.Netty.DubboRpc.publicinterface;

//这个是接口,是服务提供方和服务消费方都需要的
public interface HelloService {


    String hello(String mes);
}
然后我们先来实现服务端的部分,分成两个部分:netty部分和provider部分
服务端(服务提供者)
provider部分:
HelloServiceImpl :
package com.sgg.Netty.DubboRpc.provider;

import com.sgg.Netty.DubboRpc.publicinterface.HelloService;

public class HelloServiceImpl implements HelloService {


    //当有消费方调用该方法时,就返回一个结果
    @Override
    public String hello(String mes) {


        System.out.println("收到客户端消息="+mes);
        if(mes!=null){


            return "你好客户端,我已经收到你的消息【"+mes+"】";
        }else {


            return "你好客户端,我已经收到你的消息";
        }
    }
}
启动类:ServerBootstrap
package com.sgg.Netty.DubboRpc.provider;

import com.sgg.Netty.DubboRpc.Netty.NettyServer;

public class ServerBootstrap {


    public static void main(String[] args) {


        //代码代填
        NettyServer.startServer("127.0.0.1",8849);
    }
}
netty部分
NettyServer
package com.sgg.Netty.DubboRpc.Netty;


import io.netty.bootstrap.ServerBootstrap;
import io.netty.channel.*;
import io.netty.channel.nio.NioEventLoopGroup;
import io.netty.channel.socket.SocketChannel;
import io.netty.channel.socket.nio.NioServerSocketChannel;
import io.netty.handler.codec.string.StringDecoder;
import io.netty.handler.codec.string.StringEncoder;

public class NettyServer {


    //对外只暴露这一个方法,在这个方法内部可以选择不同的启动方法
    public static void startServer(String hostname,int port){


        startServer0(hostname,port);
    }

    //编写一个方法,完成对NettyServer的初始化和启动
    private static void startServer0(String hostname,int port){


        EventLoopGroup bossGroup = new NioEventLoopGroup(1);
        EventLoopGroup workerGroup = new NioEventLoopGroup();

        ServerBootstrap b = new ServerBootstrap();
        try{


            b.group(bossGroup,workerGroup)
                    .channel(NioServerSocketChannel.class)
                    .option(ChannelOption.SO_BACKLOG,128)       //设置线程队列的连接个数
                    .childOption(ChannelOption.SO_KEEPALIVE,true)    //设置保持活动连接状态
                    .childHandler(new ChannelInitializer<SocketChannel>() {


                        @Override
                        protected void initChannel(SocketChannel socketChannel) throws Exception {


                            ChannelPipeline pipeline = socketChannel.pipeline();
                            pipeline.addLast("decoder",new StringDecoder());
                            pipeline.addLast("encoder", new StringEncoder());
                            pipeline.addLast(new NettyServerhandler());   //自定义的handler
                        }
                    });

            System.out.println("服务器提供者启动成功...");
            ChannelFuture cf = b.bind(port).sync();

            cf.addListener(new ChannelFutureListener() {


                @Override
                public void operationComplete(ChannelFuture channelFuture) throws Exception {


                    if(cf.isSuccess()){


                        System.out.println("监听端口成功");
                    }else{


                        System.out.println("监听端口失败");
                    }
                }
            });

            cf.channel().closeFuture().sync();

        } catch (InterruptedException e) {


            e.printStackTrace();
        } finally {


            bossGroup.shutdownGracefully();
            workerGroup.shutdownGracefully();
        }
    }
}
NettyServerhandler
package com.sgg.Netty.DubboRpc.Netty;

import com.sgg.Netty.DubboRpc.provider.HelloServiceImpl;
import io.netty.channel.ChannelHandlerContext;
import io.netty.channel.ChannelInboundHandlerAdapter;

public class NettyServerhandler extends ChannelInboundHandlerAdapter {


    @Override
    public void channelRead(ChannelHandlerContext ctx, Object msg) throws Exception {


        //获取客户端发送的消息,并调用服务
        System.out.println("msg="+msg);
        //客户端在调用服务提供者的API时,我们需要定义一个协议
        if(msg.toString().startsWith("HelloService#hello#")){


            String result = new HelloServiceImpl().hello(msg.toString().substring(msg.toString().lastIndexOf("#")+1));
            ctx.writeAndFlush(result);
        }

    }

    @Override
    public void exceptionCaught(ChannelHandlerContext ctx, Throwable cause) throws Exception {


        ctx.close();
    }
}
客户端部分(服务消费者)
customer部分
ClientBootstrap
package com.sgg.Netty.DubboRpc.customer;

import com.sgg.Netty.DubboRpc.Netty.NettyClient;
import com.sgg.Netty.DubboRpc.publicinterface.HelloService;

public class ClientBootstrap {


    //这里定义协议头
    public static final String providerName = "HelloService#hello#";

    public static void main(String[] args) {


        NettyClient nettyClient = new NettyClient();

        //创建代理对象
        HelloService helloService = (HelloService) nettyClient.getBean(HelloService.class,providerName);

        //通过代理对象调用服务提供者提供的方法
        String res = helloService.hello("你好!Dubbo");
        System.out.println("调用的结果res="+res);
    }
}
netty部分
NettyClient
package com.sgg.Netty.DubboRpc.Netty;

import io.netty.bootstrap.Bootstrap;
import io.netty.channel.*;
import io.netty.channel.nio.NioEventLoopGroup;
import io.netty.channel.socket.SocketChannel;
import io.netty.channel.socket.nio.NioSocketChannel;
import io.netty.handler.codec.string.StringDecoder;
import io.netty.handler.codec.string.StringEncoder;

import java.lang.reflect.Proxy;
import java.util.concurrent.ExecutorService;
import java.util.concurrent.Executors;

public class NettyClient {


    //创建线程池
    private static ExecutorService executorService = Executors.newFixedThreadPool(Runtime.getRuntime().availableProcessors());
    private static NettyClienthandler client;


    //编写方法使用代理模式,获取一个代理对象
    public Object getBean(final Class<?> serviceclass,final String providerName){


        return Proxy.newProxyInstance(Thread.currentThread().getContextClassLoader(),new Class<?>[]{

    serviceclass},(proxy,method,args)->{


            if(client==null){


                initClient();
            }
            //设置要发给服务端的信息
            //providerName协议头,args[0]就是客户端调用api
            client.setpara(providerName+args[0]);
            return executorService.submit(client).get();
        });
    }


    //初始化客户端
    private static void initClient(){


//        System.out.println("进入initClient");
        client = new NettyClienthandler();
        //创建EventLoopGroup
        NioEventLoopGroup group = new NioEventLoopGroup();
        Bootstrap bootstrap = new Bootstrap();
        bootstrap.group(group)
                .channel(NioSocketChannel.class)
                .option(ChannelOption.TCP_NODELAY,true)
                .handler(new ChannelInitializer<SocketChannel>() {


                    @Override
                    protected void initChannel(SocketChannel socketChannel) throws Exception {


                        ChannelPipeline pipeline = socketChannel.pipeline();
                        pipeline.addLast(new StringDecoder());
                        pipeline.addLast(new StringEncoder());
                        pipeline.addLast(client);
                    }
                });

        try {


//            System.out.println("连接8849");
            ChannelFuture channelFuture = bootstrap.connect("127.0.0.1",8849).sync();
            channelFuture.addListener(new ChannelFutureListener() {


                @Override
                public void operationComplete(ChannelFuture channelFuture) throws Exception {


                    if(channelFuture.isSuccess()){


                        System.out.println("连接端口成功");

                    }else{


                        System.out.println("连接端口失败");
                    }
                }
            });
        }catch (Exception e){


            System.out.println("连接发生错误");
            e.printStackTrace();
        }
    }

}
NettyClienthandler
package com.sgg.Netty.DubboRpc.Netty;

import io.netty.channel.ChannelHandlerContext;
import io.netty.channel.ChannelInboundHandlerAdapter;
import io.netty.channel.SimpleChannelInboundHandler;

import java.util.concurrent.Callable;

public class NettyClienthandler extends ChannelInboundHandlerAdapter implements Callable {


    private ChannelHandlerContext context;//上下文
    private String result;//返回的结果
    private String para; //客户调用方法时传入的参数


    //改程序首先被调用,与服务器的连接创建后,就会被调用
    @Override
    public void channelActive(ChannelHandlerContext ctx) throws Exception {


//        System.out.println("连接服务器");
        context = ctx;    //因为我们在其他方法中会用到ctx,所以我们将其拿出
    }

    /**
     * call()和 channelRead()两个方法通过配合,完成远程方法的调用
     * 1、首先channelActive()方法执行,获取到context
     * 2、执行call()方法,将参数通过buffer进行传递
     * 3、然后该线程进入wait(),
     * 4、等待远程过程调用返回结果
     * 5、返回结果,channelRead()被执行,返回结果取出,然后唤醒call线程
     * 6、call()线程唤醒,返回结果给代理对象
     */
    //被代理对象调用,发送数据给服务提供者-->  wait()  -->  等待被唤醒(channelRead)-->  返回结果
    @Override
    public synchronized Object call() throws Exception {


//        System.out.println("进入call");
        context.writeAndFlush(para);
        wait();         //等待channeRead的唤醒
//        System.out.println("返回call");
        return result;  //服务提供者返回的结果
    }


    //收到服务提供者传回的数据后,调用方法
    @Override
    public synchronized void channelRead(ChannelHandlerContext channelHandlerContext, Object o) throws Exception {


        System.out.println("返回参数"+o.toString());
        result = o.toString();
        notify(); //唤醒call,执行后续步骤
    }


    @Override
    public void exceptionCaught(ChannelHandlerContext ctx, Throwable cause) throws Exception {


        ctx.close();
    }

    void setpara(String param){


        System.out.println("参数:"+param);
        this.para = param;
    }
}
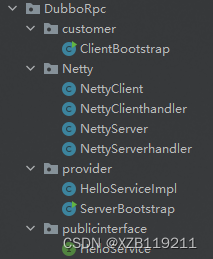
文件结构如下:
代码说明:
1、公共接口HelloService接口只是定义了一些需要实现的方法,具体的实现是在HelloServiceImpl中。这些方法就是服务端提供的方法,供客户端远程调用的。
2、客户端想要调用服务端提供的方法,需要定义一个特殊的协议,也就是服务端和客户端之间自定义的特有通信协议,例如,客户端传来的消息必须要以“HelloService#hello#”为头才会接收,并调用方法。
- 服务端的这部分功能由下面的方法实现,触发时间点就是当接收到消息时,所以写在自定义handler中的channelRead方法中。
- 客户端的这部分功能通过定义一个协议头加到发送的消息前:
@Override
    public void channelRead(ChannelHandlerContext ctx, Object msg) throws Exception {


        //获取客户端发送的消息,并调用服务
        System.out.println("msg="+msg);
        //客户端在调用服务提供者的API时,我们需要定义一个协议
        if(msg.toString().startsWith("HelloService#hello#")){


            String result = new HelloServiceImpl().hello(msg.toString().substring(msg.toString().lastIndexOf("#")+1));
            ctx.writeAndFlush(result);
        }
    }
3、服务端的其他代码实现比较简单,和正常的服务端没有区别
4、客户端在启动类中需要定义代理对象(也就是公共接口HelloService),然后远程调用其hello方法,得到返回值。实际的具体操作都在创建代理对象类的方法中实现。如下所示:
public static void main(String[] args) {


        NettyClient nettyClient = new NettyClient();

        //创建代理对象
        HelloService helloService = (HelloService) nettyClient.getBean(HelloService.class,providerName);

        //通过代理对象调用服务提供者提供的方法
        String res = helloService.hello("你好!Dubbo");
        System.out.println("调用的结果res="+res);
    }
5、在nettyClient.getBean中,我们返回了一个代理对象,在创建这个代理对象的过程中,初始化netty中客户端对象,设置传递参数
//编写方法使用代理模式,获取一个代理对象
    public Object getBean(final Class<?> serviceclass,final String providerName){


        return Proxy.newProxyInstance(Thread.currentThread().getContextClassLoader(),new Class<?>[]{

    serviceclass},(proxy,method,args)->{


            if(client==null){


                initClient();
            }
            //设置要发给服务端的信息
            //providerName协议头,args[0]就是客户端调用api
            client.setpara(providerName+args[0]);
            return executorService.submit(client).get();
        });
    }
6、在initClient()中,我们构建EventLoopGroup,并添加handler,连接服务端等。
private static void initClient(){


//        System.out.println("进入initClient");
        client = new NettyClienthandler();
        //创建EventLoopGroup
        NioEventLoopGroup group = new NioEventLoopGroup();
        Bootstrap bootstrap = new Bootstrap();
        bootstrap.group(group)
                .channel(NioSocketChannel.class)
                .option(ChannelOption.TCP_NODELAY,true)
                .handler(new ChannelInitializer<SocketChannel>() {


                    @Override
                    protected void initChannel(SocketChannel socketChannel) throws Exception {


                        ChannelPipeline pipeline = socketChannel.pipeline();
                        pipeline.addLast(new StringDecoder());
                        pipeline.addLast(new StringEncoder());
                        pipeline.addLast(client);
                    }
                });

        try {


//            System.out.println("连接8849");
            ChannelFuture channelFuture = bootstrap.connect("127.0.0.1",8849).sync();
            channelFuture.addListener(new ChannelFutureListener() {


                @Override
                public void operationComplete(ChannelFuture channelFuture) throws Exception {


                    if(channelFuture.isSuccess()){


                        System.out.println("连接端口成功");

                    }else{


                        System.out.println("连接端口失败");
                    }
                }
            });
        }catch (Exception e){


            System.out.println("连接发生错误");
            e.printStackTrace();
        }
    }
7、具体和服务端交互获取消息的步骤在自定义handler中实现,主要难点在于理解其执行过程,在哪一部分与服务端进行了远程交互。具体如下:
(1)、首先在handler中有三个参数值,分别是:context;//上下文、result;//返回的结果、para; //客户调用方法时传入的参数,因为在整个handler中不同函数间需要用到这三个值,所以我们需要在得到这三个值时,将其赋值到该类的参数,实现类内的共享。
(2)、该类有5个函数,分别是:channelActive()、call() 、channelRead()、exceptionCaught()、setpara()
- channelActive():在与服务端建立连接时触发
- channelRead():在服务端有消息返回时触发
- call():在构建代理对象的最后一步调用,return executorService.submit(client).get();
- exceptionCaught():捕捉异常
- setpara():设置具体发送消息的参数
(3)、这5个函数执行顺序时怎样的,如何配合完成远程方法调用?
执行逻辑:获取上下文 —> 设置参数 —> 执行远程调用(发送消息给服务端)—> 接收返回消息 —> 消息返回代理对象
获取上下文: channelActive()
设置参数:setpara()
执行远程调用(发送消息给服务端):call()
接收返回消息:channelRead()
消息返回代理对象:call()
可以看出:执行远程调用以及接收消息并发回代理对象这个过程是需要同步执行,所以在call()和channelRead()前面加了synchronized 关键字,并且,在call()中将消息发送至服务端后,需要等待其返回(通过wait()使线程休眠),而在消息返回时触发的是channelRead()函数,所以需要唤醒call然后继续将消息返回代理对象。
public class NettyClienthandler extends ChannelInboundHandlerAdapter implements Callable {


    private ChannelHandlerContext context;//上下文
    private String result;//返回的结果
    private String para; //客户调用方法时传入的参数


    //改程序首先被调用,与服务器的连接创建后,就会被调用
    @Override
    public void channelActive(ChannelHandlerContext ctx) throws Exception {


//        System.out.println("连接服务器");
        context = ctx;    //因为我们在其他方法中会用到ctx,所以我们将其拿出
    }

    /**
     * call()和 channelRead()两个方法通过配合,完成远程方法的调用
     * 1、首先channelActive()方法执行,获取到context
     * 2、执行call()方法,将参数通过buffer进行传递
     * 3、然后该线程进入wait(),
     * 4、等待远程过程调用返回结果
     * 5、返回结果,channelRead()被执行,返回结果取出,然后唤醒call线程
     * 6、call()线程唤醒,返回结果给代理对象
     */
    //被代理对象调用,发送数据给服务提供者-->  wait()  -->  等待被唤醒(channelRead)-->  返回结果
    @Override
    public synchronized Object call() throws Exception {


//        System.out.println("进入call");
        context.writeAndFlush(para);
        wait();         //等待channeRead的唤醒
//        System.out.println("返回call");
        return result;  //服务提供者返回的结果
    }


    //收到服务提供者传回的数据后,调用方法
    @Override
    public synchronized void channelRead(ChannelHandlerContext channelHandlerContext, Object o) throws Exception {


        System.out.println("返回参数"+o.toString());
        result = o.toString();
        notify(); //唤醒call,执行后续步骤
    }


    @Override
    public void exceptionCaught(ChannelHandlerContext ctx, Throwable cause) throws Exception {


        ctx.close();
    }

    void setpara(String param){


        System.out.println("参数:"+param);
        this.para = param;
    }
}
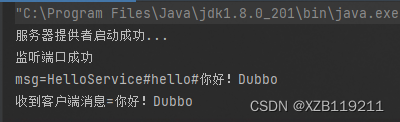
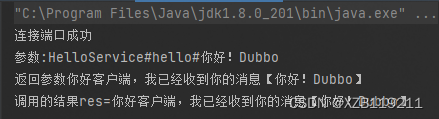
如此我们就实现了远程方法的调用,实验结果如下: