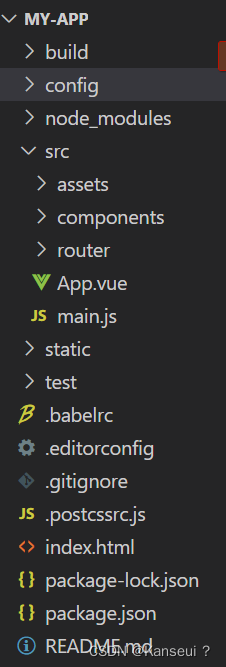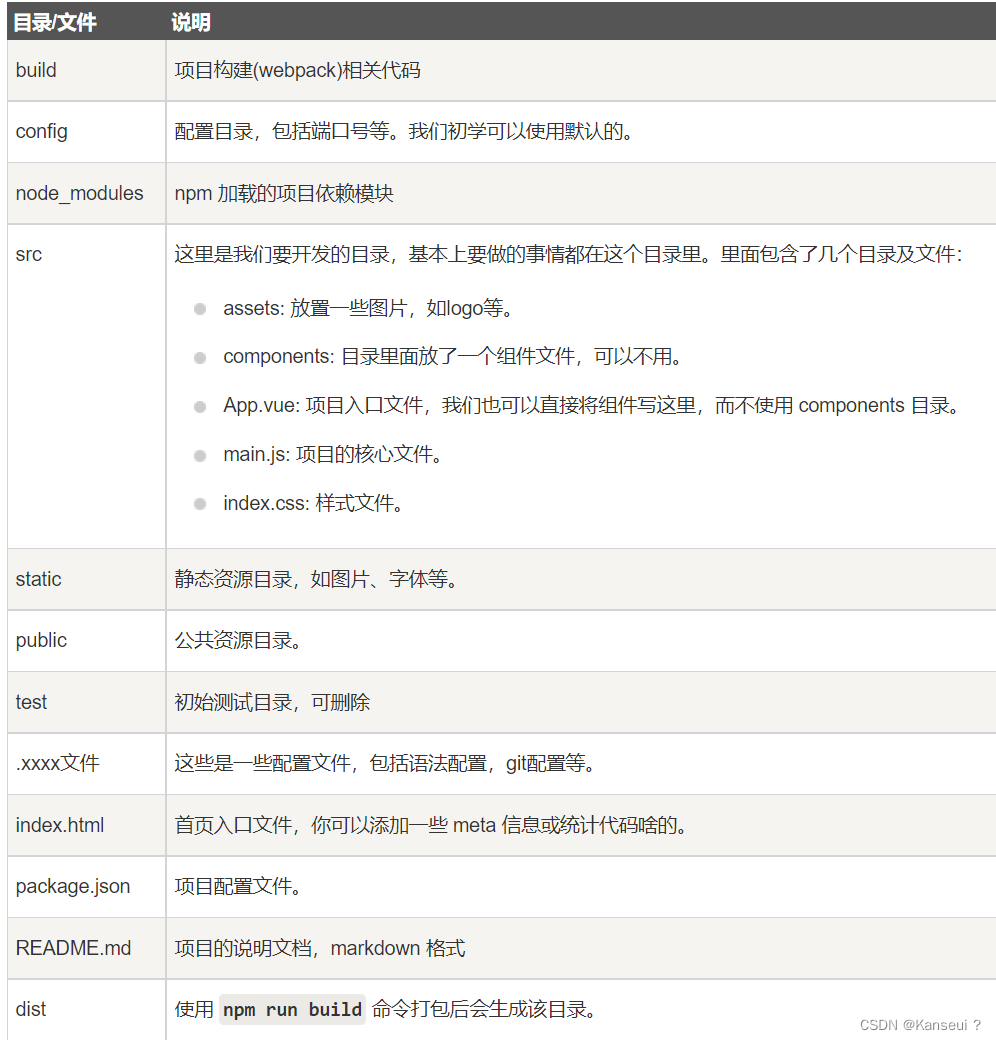

小知识:
class=abc js中的表示(’abc‘)
id=abc js中的表示('#abc')
name=abc js中的表示('.abc')
几个重要的函数:
data(){return{}}
methods:{}
模板语法:
- 数据绑定{ {...}}
- html属性中的值用v-bind命令,也可以直接用:代替v-bind
<a v-bind:href="url"> 告知 v-bind 指令将该元素的 href 属性与表达式 url 的值绑定。data() { return { url: 'https://www.runoob.com' } }
- v-if 指令将根据表达式 seen 的值( true 或 false )来决定是否插入 p 元素。
- v-for 指令可以绑定数组的数据来渲染一个项目列表
轮播图
注意v-for时,需要表明:key时什么
<template>
<div>
<div class="showImg" >
    <!-- 轮播图片 -->
    <img  @mouseover="changeInterval(true)"
         @mouseleave="changeInterval(false)"
         v-for="(item) in imgArr"
         :key="item.id"
         :src="item.url"
         alt="暂无图片"
         v-show="item.id===currentIndex"
         >
    <!-- 左侧按钮 -->
    <div  @click="clickIcon('up')"   class="iconDiv icon-left">
        <i class="el-icon-caret-left"></i>
    </div>
    <!-- 右侧按钮 -->
    <div  @click="clickIcon('down')"  class="iconDiv icon-right">
        <i class="el-icon-caret-right"></i>
    </div>
    <!-- 控制圆点 -->
    <div class="banner-circle">
        <ul>
            <li @click="changeImg(item.id)"
                v-for="(item) in imgArr"
                :key="item.id"
                :class="item.id===currentIndex? 'active': '' "
             ></li>
        </ul>
    </div>
</div>
</div>
</template>

<script>
export default {

 		data(){
			return {
				currentIndex :0,//当前所在图片下标
				timer:null,//定时轮询
				imgArr:[
					{	id:0,
						url:require("@/assets/banner/p1.jpeg"),
					},{
						id:1,
						url:require("@/assets/banner/p2.jpeg"),
					},{
						id:2,
						url:require("@/assets/banner/p3.jpeg"),
					},{
						id:3,
						url:require("@/assets/banner/p4.jpeg"),
					},
				]
			}
		},
		methods:{
			//开启定时器
			startInterval(){
				// 事件里定时器应该先清除在设置,防止多次点击直接生成多个定时器
				clearInterval(this.timer);
				this.timer = setInterval(()=>{
					this.currentIndex++;
					if(this.currentIndex > this.imgArr.length-1){
						this.currentIndex = 0
					}
				},3000)
			},
			// 点击左右箭头
			clickIcon(val){
				if(val==='down'){
					this.currentIndex++;
					if(this.currentIndex===this.imgArr.length){
						this.currentIndex = 0;
					}
				}else{
					/* 第一种写法
					this.currentIndex--;
					if(this.currentIndex < 0){
						this.currentIndex = this.imgArr.length-1;
					} */
					// 第二种写法
					if(this.currentIndex === 0){
						this.currentIndex = this.imgArr.length;
					}
					this.currentIndex--;
				}
			},
			// 点击控制圆点
			changeImg(index){
				this.currentIndex = index
			},
			//鼠标移入移出控制
			changeInterval(val){
				if(val){
					clearInterval(this.timer)
				}else{
					this.startInterval()
				}
			}
		},
		//进入页面后启动定时轮询
		mounted(){
			this.startInterval()
		}
}
</script>
<style scoped>
* {
	padding: 0;
	margin: 0;
}
/* 清除li前面的圆点 */
li {
	list-style-type: none;
}
.showImg{
	position: relative;
	width: 50%;
	height: 250px;
	margin: 50px auto;
	overflow: hidden;
}
/* 轮播图片 */
.showImg img{
	width: 100%;
	height: 100%;
}

/* 箭头图标 */
.iconDiv{
	position: absolute;
	top: 50%;
	transform: translateY(-50%);
	width: 30px;
	height: 30px;
	border: 1px solid #666;
	border-radius: 15px;
	background-color: rgba(125,125,125,.2);
	line-height: 30px;
	text-align: center;
	font-size: 25px;
	cursor: pointer;
}
.iconDiv:hover{
	background-color: white;
}
.icon-left{
	left: 10px;
}
.icon-right{
	right: 10px;
}

/* 控制圆点 */
.banner-circle{
	position: absolute;
	bottom: 0;
	width: 100%;
	height: 20px;
}
.banner-circle ul{
	margin: 0 50px;
	height: 100%;
	text-align: right;
}
.banner-circle ul li{
	display: inline-block;
	width: 14px;
	height: 14px;
	margin: 0 5px;
	border-radius: 7px;
	background-color: rgba(125,125,125,.8);
	cursor: pointer;
}
.active{
	background-color: black !important;
}

</style>
.和..和@代表什么
1、/根目录
2、./是当前目录
3、../是父级目录
4、@是src目录
如何引用组件
以固定的下导航栏为例,现在components文件夹创建navbottom.vue文件
然后在需要的vue文件中import该组件
<template>
  <div id="app">
    <router-view/>
    <NavBottom/>
  </div>
</template>

<script>
import NavBottom from './components/NavBottom'; //引入组件
export default {
  name: 'App',
  components:{
    NavBottom
  }
}
</script>
导航栏跳转到其他页面

其他页面也可以在组件文件夹中创建新的vue。主要用到router-link标签进行跳转
<template>
  <div>
    <div id="tab-bar">
      <div class="tab-bar-item">
        <router-link to="/home">
          <i class="iconfont icon-shouye1"></i>
          <label>首页</label>
        </router-link>
      </div>
      <div class="tab-bar-item">
        <router-link to="/find">
        <i class="iconfont icon-faxian"></i>
          <label>发现</label>
        </router-link>
      </div>
      <div class="tab-bar-item">
        <router-link to="/order">
        <i class="iconfont icon-dingdan"></i>
          <label>订单</label>
        </router-link>
      </div>
      <div class="tab-bar-item">
        <router-link to="/my">
        <i class="iconfont icon-shouye"></i>
          <label>我的</label>
        </router-link>
      </div>
    </div>
  </div>
</template>

<script>
export default {};
</script>

<style>
#tab-bar {
  display: flex;
  background-color: #f6f6f6;
  position: fixed;
  left: 0;
  right: 0;
  bottom: 0;
  box-shadow: 0 -1px 1px rgba(100, 100, 100, 0.08);
}
.tab-bar-item {
  flex: 1;
  text-align: center;
  height: 49px;
  line-height: 49px;
}
.active{
  color: red;
}
</style>
在router目录下的Index.js,把首页、发现、订单、我的这些页面的路径标明
注意:要把组件import
import Vue from 'vue'
import Router from 'vue-router'
import HelloWorld from '@/components/HelloWorld'
import Home from '@/components/module/Home'
import Find from '@/components/module/Find'
import Order from '@/components/module/Order'
import My from '@/components/module/My'

Vue.use(Router)

export default new Router({
  linkActiveClass:'active',
  routes: [
    {
      path: '/',
      name: 'HelloWorld',
      component: HelloWorld
    },
    {
      path: '/home',
      name: 'home',
      component: Home
    },
    {
      path: '/find',
      name: 'find',
      component: Find
    },
    {
      path: '/order',
      name: 'order',
      component: Order
    },
    {
      path: '/my',
      name: 'my',
      component: My
    }
  ]
})
如何返回上一页?
以详情页想回到首页为例。主要用到this.$router.push()
<template>
  <div>
      <a @click="goBack()">返回</a>
  </div>
</template>

<script>
export default {
    data(){
        return{
            name:'详情'
        }
    },
    methods:{
        goBack:function(){
            this.$router.push('/home');
        }
    }
}
</script>

<style>

</style>
如何引用阿里的矢量库
主要用到<i>标签,class=“iconfont 矢量的名称”,
要在main.js(全局)中import "./assets/font/iconfont.css"