一、TensorFlow Lite
TensorFlow Lite 是一组工具,可帮助开发人员在移动、嵌入式和边缘设备上运行模型,从而实现设备上机器学习。TensorFlow Lite(简称 TF Lite)是一个开源的跨平台框架,它通过使模型能够在移动、嵌入式和物联网设备上运行来提供设备端机器学习。
有两种方法可以生成 TensorFlow Lite 模型:
1、将 TensorFlow 模型转换为 TensorFlow Lite 模型。
2、从头开始创建 TensorFlow Lite 模型。
TF Lite Converter 将 TensorFlow 模型转换为 TF Lite 模型。TF Lite 模型以一种特殊的高效可移植格式表示,称为 FlatBuffers,具有 .tflite 文件扩展名。与 TensorFlow 的协议缓冲区模型格式相比,这提供了几个优点,例如减小了大小和加快了推理速度。它使 TF Lite 能够在计算和内存资源有限的设备上高效执行。
TF Lite 目前仅支持 Quantization 技术,不需要任何外部库/依赖项。
| 技术 | 好处 | 硬件 |
|---|---|---|
| 动态范围量化 | 4倍小,2倍-3倍 加速 | 中央处理器 |
| 全整数量化 | 4 倍小,3倍以上加速 | CPU、Edge TPU、微控制器 |
| Float16 量化 | 2 倍小,GPU 加速 | 中央处理器、图形处理器 |
二、测试案例
(1)进行基础训练
1、处理数据集
还是基于猫狗大战数据集进行训练。
import os
import numpy as np
import tensorflow as tf
from tensorflow import keras
import tensorflow_datasets as tfds
from tensorflow.keras.models import Model
import tensorflow_model_optimization as tfmot
from tensorflow.keras.layers import Dropout, Dense, BatchNormalization

# 获取数据集
(train_ds, val_ds, test_ds), info = tfds.load('cats_vs_dogs', split=['train[:70%]', 'train[70%:90%]', 'train[90%:]'], shuffle_files=True, as_supervised=True, with_info=True)
查看数据集信息
# Obtaining dataset information.
print("Number of  Classes: " + str(info.features['label'].num_classes))
print("Classes : " + str(info.features['label'].names))
NUM_TRAIN_IMAGES = tf.data.experimental.cardinality(train_ds).numpy()
print("Training Images: " + str(NUM_TRAIN_IMAGES))
NUM_VAL_IMAGES = tf.data.experimental.cardinality(val_ds).numpy()
print("Validation Images: " + str(NUM_VAL_IMAGES))
NUM_TEST_IMAGES = tf.data.experimental.cardinality(test_ds).numpy()
print("Testing Images: " + str(NUM_TEST_IMAGES))
输出数据集信息如下
Number of  Classes: 2
Classes : ['cat', 'dog']
Training Images: 16283
Validation Images: 4653
Testing Images: 2326
可视化一些数据
vis = tfds.visualization.show_examples(train_ds, info)
处理数据集,调整图像大小
# Defining batch-size and input image size.
batch_size = 16
img_size = [224, 224]# Resizing images in the dataset.
train_ds = train_ds.map(lambda x, y: (tf.image.resize(x, img_size), y))
val_ds = val_ds.map(lambda x, y: (tf.image.resize(x, img_size), y))

# 从缓冲读取,只适合小数据集
train_ds = train_ds.cache().batch(batch_size).prefetch(buffer_size=10)
val_ds = val_ds.cache().batch(batch_size).prefetch(buffer_size=10)
test_ds = test_ds.cache().batch(batch_size).prefetch(buffer_size=10)
提取图像和标签
# Extracting and saving test images and labels from the test dataset.
test_images = []
test_labels = []
for image, label in test_ds.take(len(test_ds)).unbatch():
  test_images.append(image)
  test_labels.append(label)
2、使用预先训练的模型
选择在 imagenet 数据集上预训练的 EfiicientNet B0 模型用于图像分类。EfficientNets 是较先进的图像分类模型。
让我们导入模型表单tf.keras.applications()。 最后一层已通过设置删除include_top = False。我们将输入图像大小设置为 224×224 像素,并将池化层保持为GlobalMaxPooling2D。让我们加载模型并解冻所有层以使它们可训练。
# Defining the model architecture.
efnet = tf.keras.applications.EfficientNetB0(include_top = False, weights ='imagenet', input_shape = (224, 224, 3), pooling = 'max')# Unfreezing all the layers of the model.
for layer in efnet.layers:
  set_trainable = True
在预训练模型中添加一个 Dense 层并对其进行训练。该层将成为最后一层或推理层。我们还将添加 Dropout 和 BatchNormalization 以减少过度拟合。
# Adding Dense, BatchNormalization and Dropout layers to the base model.
x = Dense(512, activation='relu')(efnet.output)
x = BatchNormalization()(x)
x = Dense(64, activation='relu')(x)
x = Dropout(0.2)(x)
predictions = Dense(2, activation='softmax')(x)
编译模型
# Defining the input and output layers of the model.
model = Model(inputs=efnet.input, outputs=predictions)

# Compiling the model.
model.compile(optimizer=tf.keras.optimizers.Adam(0.0001), loss =tf.keras.losses.SparseCategoricalCrossentropy(from_logits=False), metrics = ["accuracy"])

# Obtaining the model summary.
model.summary()
定义回调
# Defining file path of the saved model.
filepath = '/content/model.h5'

# Defining Model Save Callback and Reduce Learning Rate Callback.
model_save = tf.keras.callbacks.ModelCheckpoint(
    filepath,
    monitor="val_accuracy",
    verbose=0,
    save_best_only=True,
    save_weights_only=False,
    mode="max",
    save_freq="epoch")

reduce_lr = tf.keras.callbacks.ReduceLROnPlateau(monitor='loss', factor=0.1, patience=3, verbose=1, min_delta=5*1e-3,min_lr =5*1e-9,)

callback = [model_save, reduce_lr]
2、训练和评估
# Training the model for 15 epochs.
model.fit(train_ds, epochs=15, steps_per_epoch=(len(train_ds)//batch_size), validation_data=val_ds, validation_steps=(len(val_ds)//batch_size), shuffle=False, callbacks=callback)

# Evaluating the model on the test dataset.
_, baseline_model_accuracy = model.evaluate(test_ds, verbose=0)
print('Baseline test accuracy:', baseline_model_accuracy*100)(2)使用 TF Lite 进行训练后量化
量化通过降低用于表示模型参数的数字的精度来工作,默认情况下,这些数字是 32 位浮点数。这导致更小的模型尺寸和更快的计算。
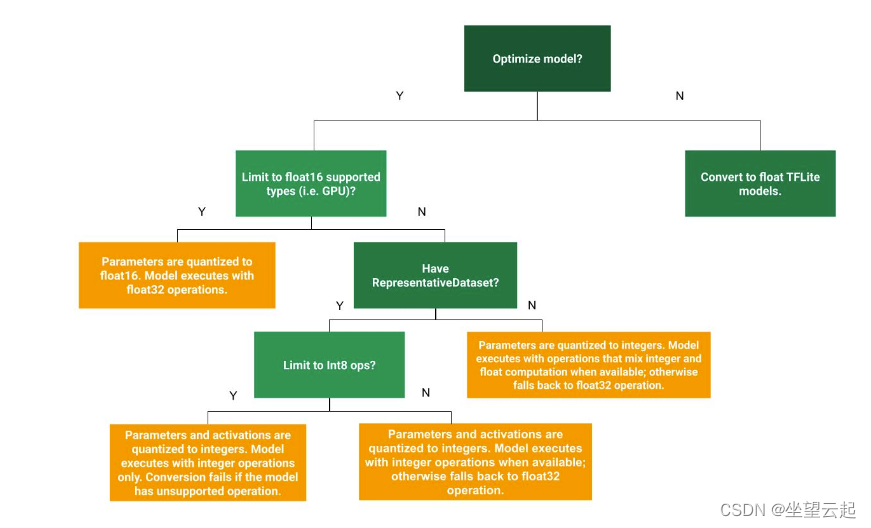
可以根据下图的决策树(图片来自官网),来选择量化方式。
1、Float-16 量化
在 Float-16 量化中,权重被转换为 16 位浮点值。这导致模型尺寸减少了 2 倍。模型大小显着减小,以换取对延迟和准确性的最小影响。
# Passing the Keras model to the TF Lite Converter.
converter = tf.lite.TFLiteConverter.from_keras_model(model)

# Using float-16 quantization.
converter.optimizations = [tf.lite.Optimize.DEFAULT]
converter.target_spec.supported_types = [tf.float16]

# Converting the model.
tflite_fp16_model = converter.convert()

# Saving the model.
with open('/content/fp_16_model.tflite', 'wb') as f:
  f.write(tflite_fp16_model)
将 Float 16 量化传递给converter.target_spec.supported_type以指定量化类型。对于 TF Lite 模型的一般转换方式,其余代码保持不变。为了获得模型精度,让我们首先定义evaluate() 接受 tflite 模型并返回模型精度的函数。
#Function for evaluating TF Lite Model over Test Images
def evaluate(interpreter):
  prediction= []
  input_index = interpreter.get_input_details()[0]["index"]
  output_index = interpreter.get_output_details()[0]["index"]
  input_format = interpreter.get_output_details()[0]['dtype']

  for i, test_image in enumerate(test_images):
    if i % 100 == 0:
      print('Evaluated on {n} results so far.'.format(n=i))
    test_image = np.expand_dims(test_image, axis=0).astype(input_format)
    interpreter.set_tensor(input_index, test_image)

    # Run inference.
    interpreter.invoke()
    output = interpreter.tensor(output_index)
    predicted_label = np.argmax(output()[0])
    prediction.append(predicted_label)

  print('\n')
  # Comparing prediction results with ground truth labels to calculate accuracy.
  prediction = np.array(prediction)
  accuracy = (prediction == test_labels).mean()
  return accuracy
进行评估
# Passing the FP-16 TF Lite model to the interpreter.
interpreter = tf.lite.Interpreter('/content/fp_16_model.tflite')
# Allocating tensors.
interpreter.allocate_tensors()
# Evaluating the model on the test dataset.
test_accuracy = evaluate(interpreter)
print('Float 16 Quantized TFLite Model Test Accuracy:', test_accuracy*100)
print('Baseline Keras Model Test Accuracy:', baseline_model_accuracy*100)
2、动态范围量化
在动态范围量化中,权重被转换为 8 位精度值。动态范围量化可将模型尺寸缩小 4 倍。模型大小显着减小,以换取对延迟和准确性的最小影响。
# Passing the baseline Keras model to the TF Lite Converter.
converter = tf.lite.TFLiteConverter.from_keras_model(model)
# Using  the Dynamic Range Quantization.
converter.optimizations = [tf.lite.Optimize.DEFAULT]
# Converting the model
tflite_quant_model = converter.convert()
# Saving the model.
with open('/content/dynamic_quant_model.tflite', 'wb') as f:
  f.write(tflite_quant_model)
进行评估
# Passing the Dynamic Range Quantized TF Lite model to the Interpreter.
interpreter = tf.lite.Interpreter('/content/dynamic_quant_model.tflite')
# Allocating tensors.
interpreter.allocate_tensors()
# Evaluating the model on the test images.
test_accuracy = evaluate(interpreter)
print('Dynamically Quantized TFLite Model Test Accuracy:', test_accuracy*100)print('Baseline Keras Model Test Accuracy:', baseline_model_accuracy*100)3、整数量化
整数量化是一种优化策略,将 32 位浮点数(例如权重和激活输出)转换为最接近的 8 位定点数。这导致模型更小并提高了推理速度,这对于微控制器等低功耗设备很有价值。
整数量化需要一个有代表性的数据集,即来自训练数据集的一些图像,才能进行转换。
# Passing the baseline Keras model to the TF Lite Converter.
converter = tf.lite.TFLiteConverter.from_keras_model(model)
# Defining the representative dataset from training images.
def representative_data_gen():
  for input_value in tf.data.Dataset.from_tensor_slices(test_images).take(100):
    yield [input_value]

converter.optimizations = [tf.lite.Optimize.DEFAULT]
converter.representative_dataset = representative_data_gen

# Using Integer Quantization.
converter.target_spec.supported_ops = [tf.lite.OpsSet.TFLITE_BUILTINS_INT8]

# Setting the input and output tensors to uint8.
converter.inference_input_type = tf.uint8
converter.inference_output_type = tf.uint8
# Converting the model.
int_quant_model = converter.convert()

# Saving the Integer Quantized TF Lite model.
with open('/content/int_quant_model.tflite', 'wb') as f:
  f.write(int_quant_model)
进行评估
# Passing the Integer Quantized TF Lite model to the Interpreter.
interpreter = tf.lite.Interpreter('/content/int_quant_model.tflite')
# Allocating tensors.
interpreter.allocate_tensors()
# Evaluating the model on the test images.
test_accuracy = evaluate(interpreter)
print('Integer Quantized TFLite Model Test Accuracy:', test_accuracy*100)
print('Baseline Keras Model Test Accuracy:', baseline_model_accuracy*100)
(3)量化后的评估
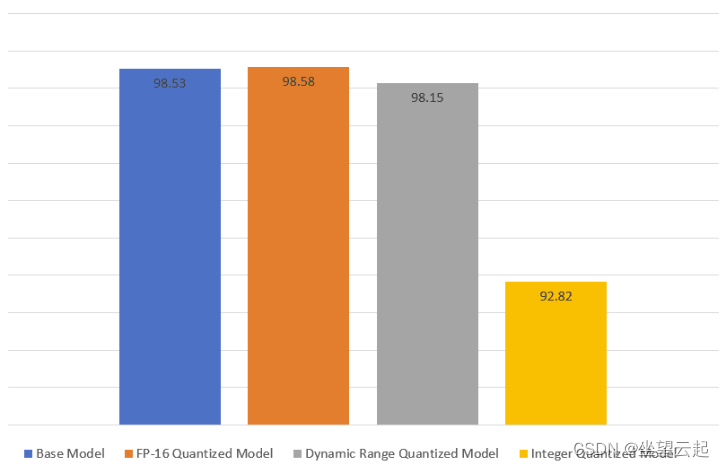
FP-16 量化模型的准确度略有提高,而动态范围量化模型的准确度略有下降。在整数量化模型的情况下,损失了最大的精度。
可以看到模型尺寸在动态范围和整数量化模型中观察到模型尺寸惊人地减少了 10 倍。在 FP-16 量化模型的情况下,模型大小减少了 6 倍。

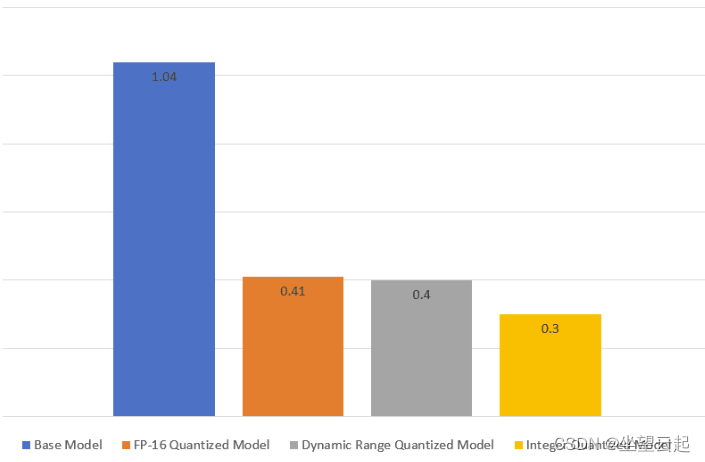
从测试数据集中随机选择一组 100 张图像来检查 TF Lite 模型的推理时间。提到的推理时间是模型推理超过 100 张图像所用时间的平均值。
FP-16 量化模型和动态范围量化模型的推理速度比基本模型快约 2.5 倍。而整数量化模型的推理速度提高了 3.5 倍。