
istio灰度发布
接着上一章部署bookinfo
1.进入 istio 安装目录。

2.istio 默认自动注入 sidecar,需要为 default 命名空间打上标签 istio-injection=enabled,然后 default 也会自动注入了
[root@k8smaster istio-1.10.1]# kubectl label namespace default istio-injection=enabled
namespace/default labeled

3.使用 kubectl 部署应用
[root@k8smaster istio-1.10.1]# kubectl apply -f samples/bookinfo/platform/kube/bookinfo.yaml
上面的命令会启动全部的四个服务,其中也包括了 reviews 服务的三个版本(v1、v2 以及 v3)可以去自己查看一下这个yaml写的啥。

4.确认所有的服务和 Pod 都已经正确的定义和启动:
[root@k8smaster istio-1.10.1]# kubectl get services
NAME          TYPE        CLUSTER-IP      EXTERNAL-IP   PORT(S)    AGE
details       ClusterIP   10.97.7.165     <none>        9080/TCP   2m22s
productpage   ClusterIP   10.105.145.13   <none>        9080/TCP   2m22s
ratings       ClusterIP   10.105.6.245    <none>        9080/TCP   2m22s
reviews       ClusterIP   10.106.50.234   <none>        9080/TCP   2m22s

[root@k8smaster istio-1.10.1]# kubectl get pods
NAME                              READY   STATUS    RESTARTS   AGE
details-v1-65bbfd4f58-7w985       2/2     Running   0          2m45s
productpage-v1-6b746f74dc-hxn89   2/2     Running   0          2m44s
ratings-v1-b45758b-kz668          2/2     Running   0          2m45s
reviews-v1-74894b48c8-g8nv8       2/2     Running   0          2m44s
reviews-v2-f649764d-2lc54         2/2     Running   0          2m45s
reviews-v3-6c675c6774-smbvr       2/2     Running   0          2m45s

5.确认 Bookinfo 应用是否正在运行,在某个 Pod 中用 curl 命令对应用发送请求,例如 ratings:
[root@k8smaster istio-1.10.1]# kubectl exec -it $(kubectl get pod -l app=ratings -o jsonpath='{.items[0].metadata.name}') -c ratings -- curl productpage:9080/productpage | grep -o "<title>.*</title>"
#显示下面这个就是没问题
<title>Simple Bookstore App</title>

6.确定 Ingress 的 IP 和端口
现在 Bookinfo 服务已经启动并运行,你需要使应用程序可以从 Kubernetes 集群外部访问,例如从浏览器访问,那可以用 Istio Gateway 来实现这个目标。
1)为应用程序定义 gateway 网关:
[root@k8smaster istio-1.10.1]# kubectl apply -f samples/bookinfo/networking/bookinfo-gateway.yaml
#这个yaml里的控制器是ingressgateway,对应了istio-system下的ingresspod,hosts:*是所有主机,下一个定义的是虚拟服务。
[root@k8smaster istio-1.10.1]# kubectl describe pods istio-ingressgateway-569f64cdf8-kc8cj -n istio-system
#也可以查看它的详细信息,里面有个标签istio=ingressgateway,网管会找到这个pod去进行操作。
[root@k8smaster istio-1.10.1]# kubectl api-versions | grep istio
install.istio.io/v1alpha1
networking.istio.io/v1alpha3
networking.istio.io/v1beta1
security.istio.io/v1beta1
telemetry.istio.io/v1alpha1
#查看istio的apiversion

2)确认网关创建完成:
[root@k8smaster istio-1.10.1]# kubectl get gateway
NAME               AGE
bookinfo-gateway   19s
[root@k8smaster istio-1.10.1]# kubectl get virtualservice
NAME       GATEWAYS               HOSTS   AGE
bookinfo   ["bookinfo-gateway"]   ["*"]   19m

3)确定 ingress ip 和端口
执行如下指令,明确自身 Kubernetes 集群环境支持外部负载均衡:
[root@k8smaster istio-1.10.1]# kubectl get svc istio-ingressgateway -n istio-system
如果 EXTERNAL-IP 值已设置,说明环境正在使用外部负载均衡,可以用其为 ingress gateway 提供服务。如果 EXTERNAL-IP 值为<none>(或持续显示<pending>),说明环境没有提供外部负载均衡,无法使用 ingress gateway。无法使用域名访问,但是可以用ip和端口,在这种情况下,使用服务的 NodePort 访问网关。

若自身环境未使用外部负载均衡器,需要通过 node port 访问。可以通过以下命令获取 Istio Gateway 的地址:

[root@k8smaster istio-1.10.1]# export INGRESS_PORT=$(kubectl -n istio-system get service istio-ingressgateway -o jsonpath='{.spec.ports[?(@.name=="http2")].nodePort}')
#定义一个变量 指定名称空间,获取到ingress映射到物理机的端口,端口协议是httpd2,赋值给这个变量。
[root@k8smaster istio-1.10.1]# echo $INGRESS_PORT
31411

[root@k8smaster istio-1.10.1]# export SECURE_INGRESS_PORT=$(kubectl -n istio-system get service istio-ingressgateway -o jsonpath='{.spec.ports[?(@.name=="https")].nodePort}')
[root@k8smaster istio-1.10.1]# echo $SECURE_INGRESS_PORT
31608

4)设置 GATEWAY_URL
[root@k8smaster istio-1.10.1]# INGRESS_HOST=192.168.11.129
[root@k8smaster istio-1.10.1]# export GATEWAY_URL=$INGRESS_HOST:$INGRESS_PORT
#把host和port的值赋给网关url
[root@k8smaster istio-1.10.1]# echo $GATEWAY_URL
192.168.11.129:31411

确认可以从集群外部访问应用,可以用 curl 命令来确认是否能够从集群外部访问 Bookinfo 应用程序:
[root@k8smaster istio-1.10.1]# curl -s http://${GATEWAY_URL}/productpage | grep -o "<title>.*</title>"
<title>Simple Bookstore App</title>

还可以用浏览器打开网址 192.168.11.129:31411/productpage 来浏览应用的 Web 页面。如果刷新几次应用的页面,就会看到 productpage 页面中会随机展示 reviews 服务的不同版本的效果(红色、黑色的星形或者没有显示)。

通过 istio 的 ingressgateway 访问可以在官网学习:
https://istio.io/docs/examples/bookinfo/#determine-the-ingress-ip-and-port

扩展:添加外部 IP-extertal-IP
[root@xianchaomaster1 ~]# kubectl edit svc istio-ingressgateway -n istio-system
在clusterIPs:下添加
externalIPs:
  - 192.168.11.129
在 windows 机器上的 C:\Windows\System32\drivers\etc\hosts 里面最后一行加上如下域名解析:
192.168.11.129 productpage.xianchao.cn
在浏览器访问 http://productpage.paopao.cn/productpage 就可以看到网站了!在自己电脑做了ip和域名,访问域名(默认的80,因为没制定)然后会访问到根据网关设置的80映射的端口31411,这个更符合七层代理。

卸载 bookinfo 服务
可以使用下面的命令来完成应用的删除和清理了:
1.删除路由规则,并销毁应用的 Pod
sh samples/bookinfo/platform/kube/cleanup.sh
2.确认应用已经关停
kubectl get virtualservices #-- there should be no virtual services
kubectl get destinationrules #-- there should be no destination rules
kubectl get gateway #-- there should be no gateway
kubectl get pods #-- the Bookinfo pods should be deleted

VirtualService中文名称虚拟服务,是istio中一个重要的资源,它定义了一系列针对指定服务的流量路由规则。每个路由规则都针对特定协议的匹配规则。如果流量符合这些特征,就会根据规则发送到服务注册表中的目标服务(或者目标服务的子集或版本)。
通过 Istio 实现灰度发布
什么是灰度发布?
灰度发布也叫金丝雀发布 ,是指通过控制流量的比例,实现新老版本的逐步更替。
比如对于服务 A 有 version1、 version2 两个版本 , 当前两个版本同时部署,但是 version1 比例 90% ,version2 比例 10% ,看运行效果,如果效果好逐步调整流量占比 80~20 ,70~30 ·····10~90 ,0,100 ,最终 version1 版本下线。
灰度发布的特点:
1)新老板共存
2)可以实时根据反馈动态调整占比
3)理论上不存在服务完全宕机的情况。
4)适合于服务的平滑升级与动态更新。
使用 istio 进行灰度发布
[root@k8snode1 ~]# docker load -i canary-v2.tar.gz
[root@k8snode1 ~]# docker load -i canary-v1.tar.gz
[root@k8smaster ~]# mkdir istio-canary
[root@k8smaster ~]# cd istio-canary/
[root@k8smaster istio-canary]# vim deployment.yaml
apiVersion: apps/v1
kind: Deployment
metadata:
  name: appv1
  labels:
    app: v1
spec:
  replicas: 1
  selector:
    matchLabels:
      app: v1
      apply: canary
  template:
    metadata:
      labels:
        app: v1
        apply: canary
    spec:
      containers:
      - name: nginx
        image: xianchao/canary:v1
        imagePullPolicy: IfNotPresent
        ports:
        - containerPort: 80
---
apiVersion: apps/v1
kind: Deployment
metadata:
  name: appv2
  labels:
    app: v2
spec:
  replicas: 1
  selector:
    matchLabels:
      app: v2
      apply: canary
  template:
    metadata:
      labels:
        app: v2
        apply: canary
    spec:
      containers:
      - name: nginx
        image: xianchao/canary:v2
        imagePullPolicy: IfNotPresent
        ports:
        - containerPort: 80
[root@k8smaster istio-canary]# kubectl apply -f deployment.yaml
[root@k8smaster istio-canary]# kubectl get deployment
NAME             READY   UP-TO-DATE   AVAILABLE   AGE
appv1            1/1     1            1           2m4s
appv2            1/1     1            1           2m4s

创建 service
[root@k8smaster istio-canary]# vim service.yaml
apiVersion: v1
kind: Service
metadata:
  name: canary
  labels:
    apply: canary
spec:
  selector:
    apply: canary
  ports:
    - protocol: TCP
      port: 80
      targetPort: 80
[root@k8smaster istio-canary]# kubectl apply -f service.yaml
[root@k8smaster istio-canary]# kubectl get svc
NAME          TYPE        CLUSTER-IP       EXTERNAL-IP   PORT(S)    AGE
canary        ClusterIP   10.104.100.198   <none>        80/TCP     16s

创建 gateway
[root@k8smaster istio-canary]# vim gateway.yaml
apiVersion: networking.istio.io/v1beta1
kind: Gateway
metadata:
  name: canary-gateway
spec:
  selector:
    istio: ingressgateway
  servers:
  - port:
      number: 80
      name: http
      protocol: HTTP
    hosts:
    - "*"
[root@k8smaster istio-canary]# kubectl apply -f gateway.yaml
[root@k8smaster istio-canary]# kubectl get gateway
NAME               AGE
canary-gateway     15s

创建 virtualservice(虚拟服务)
[root@k8smaster istio-canary]# vim virtual.yaml
apiVersion: networking.istio.io/v1beta1
kind: VirtualService
metadata:
  name: canary
spec:
  hosts:
  - "*"
  gateways:
  - canary-gateway
  http:
  - route:
    - destination:
        host: canary.default.svc.cluster.local
        subset: v1		#v1的全局量域名权重90
      weight: 90
    - destination:
        host: canary.default.svc.cluster.local
        subset: v2		#v2的全局量域名权重10
      weight: 10
---
apiVersion: networking.istio.io/v1beta1
kind: DestinationRule						#目标规则
metadata:
  name: canary
spec:
  host: canary.default.svc.cluster.local	#全局量域名
  subsets:
  - name: v1
    labels:
      app: v1
  - name: v2
    labels:
      app: v2
[root@k8smaster istio-canary]# kubectl apply -f virtual.yaml
[root@k8smaster istio-canary]# kubectl get virtualservice
NAME       GATEWAYS               HOSTS   AGE
canary     ["canary-gateway"]     ["*"]   2m22s
[root@k8smaster istio-canary]# kubectl get DestinationRule
NAME     HOST                               AGE
canary   canary.default.svc.cluster.local   2m54s
[root@k8smaster istio-canary]# vim /etc/hosts
192.168.11.129 productpage.paopao.cn
#添加一个域名解析,下面验证的时候域名也可以

验证金丝雀发布效果:
[root@k8smaster istio-canary]# for i in `seq 1 100`; do curl productpage.paopao.cn;done > 1.txt
或者
[root@k8smaster istio-canary]# for i in `seq 1 100`; do curl 192.168.40.180:30871;done > 1.txt #请求100次
打开 1.txt 可以看到结果有 90 次出现 v1,10 次出现 canary-v2,符合我们预先设计的流量走向。
istio 核心资源解读
Gateway
在 Kubernetes 环境中,Ingress controller(七层代理) 用于管理进入集群的流量。在 Istio 服务网格中 Istio Ingress Gateway 承担相应的角色,它使用新的配置模型(Gateway 和 VirtualServices)完成流量管理的功能。通过下图做一个总的描述。
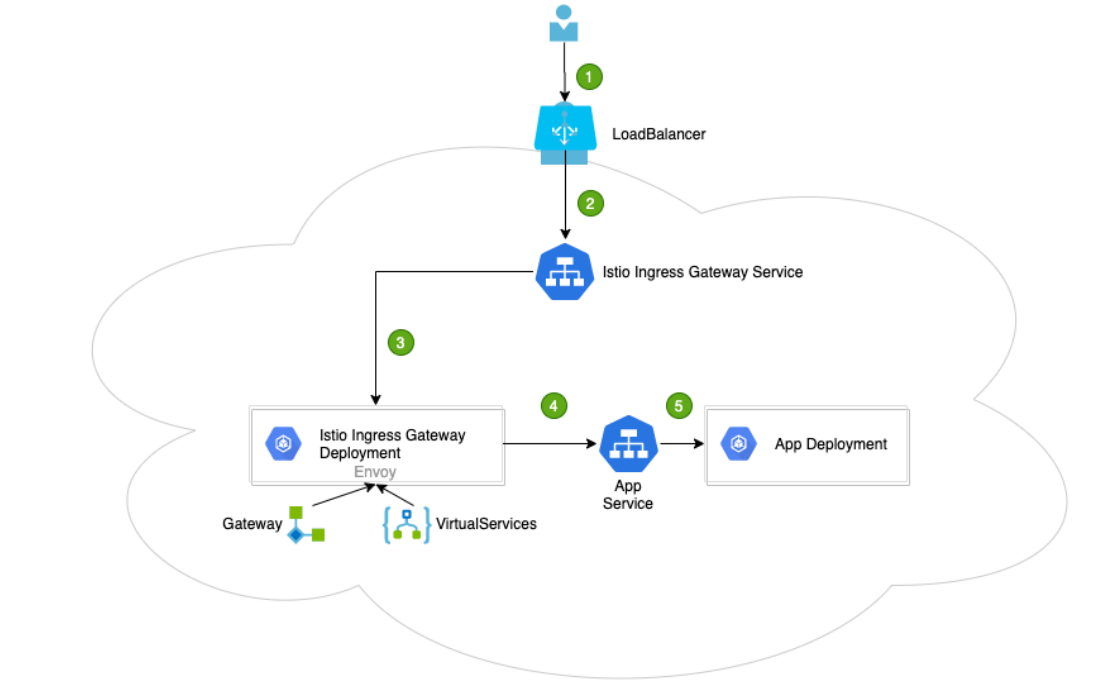
1、用户向某端口发出请求
2、负载均衡器监听端口,并将请求转发到集群中的某个节点上。Istio Ingress Gateway Service 会监听集群节点端口的请求
3、Istio Ingress Gateway Service 将请求交给 Istio Ingress Gateway Pod 处理。IngressGateway Pod 通过 Gateway 和 VirtualService 配置规则处理请求。其中,Gateway 用来配置端口、协议和证书;VirtualService 用来配置一些路由信息(找到请求对应处理的服务 App Service)
4、Istio Ingress Gateway Pod 将请求转给 App Service
5、最终的请求会交给 App Service 关联的 App Deployment 处理
[root@k8smaster istio-canary]# cat gateway.yaml
apiVersion: networking.istio.io/v1beta1
kind: Gateway
metadata:
  name: canary-gateway
spec:
  selector:
    istio: ingressgateway
  servers:
  - port:
      number: 80
      name: http
      protocol: HTTP
    hosts:
    - "*"
网关是一个运行在网格边缘的负载均衡器,用于接收传入或传出的 HTTP/TCP 连接。主要工作是接受外部请求,把请求转发到内部服务。网格边缘的 Ingress 流量,会通过对应的 Istio IngressGateway Controller 进入到集群内部。
在上面这个 yaml 里我们配置了一个监听 80 端口的入口网关,它会将 80 端口的 http 流量导入到集群内对应的 Virtual Service上。
注意:hosts:
- “*”
*表示通配符,通过任何域名都可以访问
VirtualService
VirtualService 是 Istio 流量治理的一个核心配置,可以说是 Istio 流量治理中最重要、最复杂的。VirtualService 在形式上表示一个虚拟服务,将满足条件的流量都转发到对应的服务后端,这个服务后端可以是一个服务,也可以是在 DestinationRule 中定义的服务的子集。
[root@k8smaster istio-canary]# cat virtual.yaml
apiVersion: networking.istio.io/v1beta1
kind: VirtualService
metadata:
  name: canary
spec:
  hosts:
  - "*"
  gateways:
  - canary-gateway
  http:
  - route:
    - destination:
        host: canary.default.svc.cluster.local
        subset: v1
      weight: 90
    - destination:
        host: canary.default.svc.cluster.local
        subset: v2
      weight: 10
---
apiVersion: networking.istio.io/v1beta1
kind: DestinationRule
metadata:
  name: canary
spec:
  host: canary.default.svc.cluster.local
  subsets:
  - name: v1
    labels:
      app: v1
  - name: v2
    labels:
      app: v2
这个虚拟服务会收到上一个 gateway 中所有 80 端口来的 http 流量。
VirtualService 主要由以下部分组成
1、hosts:虚拟主机名称,如果在 Kubernetes 集群中,则这个主机名可以是 service 服务名。
hosts 字段列出了 virtual service 的虚拟主机。它是客户端向服务发送请求时使用的一个或多个地址,通过该字段提供的地址访问 virtual service,进而访问后端服务。在集群内部(网格内)使用时通常与 kubernetes 的 Service 同名;当需要在集群外部(网格外)访问时,该字段为 gateway 请求的地址,即与 gateway 的 hosts 字段相同。
hosts:
- reviews
virtual service 的主机名可以是 IP 地址、DNS 名称,也可以是短名称(例如 Kubernetes 服务短名称),该名称会被隐式或显式解析为全限定域名(FQDN),具体取决于 istio 依赖的平台。可以使用前缀通配符(“*”)为所有匹配的服务创建一组路由规则。virtual service 的 hosts 不一定是 Istio 服务注册表的一部分,它们只是虚拟目的地,允许用户为网格无法路由到的虚拟主机建立流量模型。
virtual service 的 hosts 短域名在解析为完整的域名时,补齐的 namespace 是 VirtualService 所在的命名空间,而非 Service 所在的命名空间。如上例的 hosts 会被解析为:reviews.default.svc.cluster.local。写的时候最好是全局量域名
hosts:
- “*”
*表示通配符,任何域名都可以,如在虚拟机配置 hosts 文件
192.168.11.129 k8smaster hello.com.cn
这样就可以在虚拟机通过域名 hello.com.cn 访问 istio 内部的服务了
扩展:virtualservice 配置路由规则
路由规则的功能是:满足 http.match 条件的流量都被路由到 http.route.destination,执行重定向(HTTPRedirect)、重写(HTTPRewrite)、重试(HTTPRetry)、故障注入(HTTPFaultInjection)、跨站(CorsPolicy)策略等。HTTPRoute 不仅可以做路由匹配,还可以做一些写操作来修改请求本身。
如下:
apiVersion: networking.istio.io/v1alpha3
kind: VirtualService
metadata:
 name: reviews
spec:
 hosts:
 - reviews
 http:
 - match:
 - headers:
 end-user:
 exact: jason
 route:
 - destination:
 host: reviews
 subset: v2
 - route:
 - destination:
 host: reviews
 subset: v3
在 http 字段包含了虚拟服务的路由规则,用来描述匹配条件和路由行为,它们把 HTTP/1.1、HTTP2 和 gRPC 等流量发送到 hosts 字段指定的目标。示例中的第一个路由规则有一个条件,以 match 字段开始。此路由接收来自 ”jason“ 用户的所有请求,把请求发送到 destination 指定的 v2 子集。

路由规则优先级
在上面例子中,不满足第一个路由规则的流量均流向一个默认的目标,该目标在第二条规则中指定。因此,第二条规则没有 match 条件,直接将流量导向 v3 子集。多路由规则详细配置可参考: https://istio.io/latest/zh/docs/reference/config/networking/virtualservice/#HTTPMatchRequest

apiVersion: networking.istio.io/v1alpha3
kind: VirtualService
metadata:
 name: bookinfo
spec:
 hosts:
 - bookinfo.com
 http:
 - match:
 - uri:
 	prefix: /reviews
 route:
 - destination:
 	host: reviews
 - match:
 - uri:
	 prefix: /ratings
 route:
 - destination:
	 host: ratings

路由规则是将特定流量子集路由到指定目标地址的工具。可以在流量端口,header字段,URI等内容上设置匹配条件。例如上面这个虚拟服务让用户发送请求到两个独立的服务ratings和reviews,相当于访问http://bookinfo.com/ratings和http://bookinfo.com/reviews,虚拟服务规则根据请求的 URI 把请求路由到特定的目标地址。

2、Gateway:流量来源网关。

3、路由
路由的 destination 字段指定了匹配条件的流量的实际地址。与 virtual service 的主机不同,该 host 必须是存在于 istio 的服务注册表(如 kubernetes services,consul services 等)中的真实目的地或由 ServiceEntries 声明的 hosts,否则 Envoy 不知道应该将流量发送到哪里。它可以是一个带代理的网格服务或使用 service entry 添加的非网格服务。在 kubernetes 作为平台的情况下,host 表示名为 kubernetes 的 service 名称:
- destination:
host: canary.default.svc.cluster.local
subset: v1
weight: 90	#权重,多少流量到这
DestinationRule
destination rule 是 istio 流量路由功能的重要组成部分。一个 virtual service 可以看作是如何将流量分发给特定的目的地,然后调用 destination rule 来配置分发到该目的地的流量。destination rule 在 virtual service 的路由规则之后起作用(即在 virtual service 的 math->route-destination 之后起作用,如果没匹配上rule才起作用,此时流量已经分发到真实的 service 上)应用于真实的目的地。可以使用 destination rule 来指定命名的服务子集,例如根据版本对服务的实例进行分组,然后通过 virtual service 的路由规则中的服务子集将控制流量分发到不同服务的实例中。
apiVersion: networking.istio.io/v1beta1
kind: DestinationRule
metadata:
 name: canary
spec:
 host: canary.default.svc.cluster.local
 subsets:
 - name: v1
 labels:
 app: v1
 - name: v2
 labels:
 app: v2
在虚拟服务中使用 Hosts 配置默认绑定的路由地址,用 http.route 字段,设置 http 进入的路由地址,可以看到,上面导入到了目标规则为 v1 和 v2 的子集。

v1 子集对应的是具有如下标签的 pod:
selector:
matchLabels:
app: v1

流量控制流程:
Gateway->VirtaulService->TCP/HTTP Router->DestinationWeight->Subset:Port
写在最后
创作不易,如果觉得内容对你有帮助,麻烦给个三连关注支持一下我!如果有错误,请在评论区指出,我会及时更改!
目前正在更新的系列:从零开始学istio
感谢各位的观看,文章掺杂个人理解,如有错误请联系我指出~