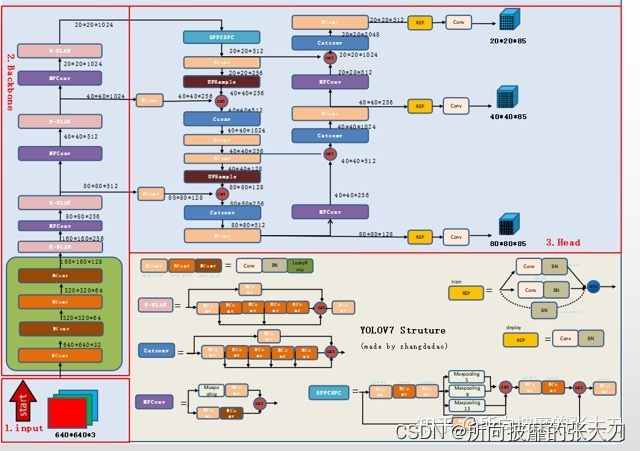
大家好,我是张大刀。
上文中提到了yolov7的正负样本匹配策略,这里主要从0开始训练自己的数据集。
如果大家需文中ppt使用,请关注公众号后台添加微信,领取,备注“ppt”。
首先大刀是在windows电脑端完成数据集的标注,linux ubuntu系统中完成模型的训练。对windows系统电脑无要求,训练的电脑最好有gpu(没有gpu在cpu下也能训练,就是速度感人)
默认大家已经有conda的环境,如果没有的话,请参考
(windows 下:
https://blog.csdn.net/fan18317517352/article/details/123035625
linux下:
https://blog.csdn.net/u011262253/article/details/88828229)
1.数据标注
在window环境下,进入cmd, 安装labelimg(labelme也可以,但是labelme的标注文件为json格式,后面数据预处理方式不同)
pip install labelimg
在安装好labelimg后,cmd中输入labelimg
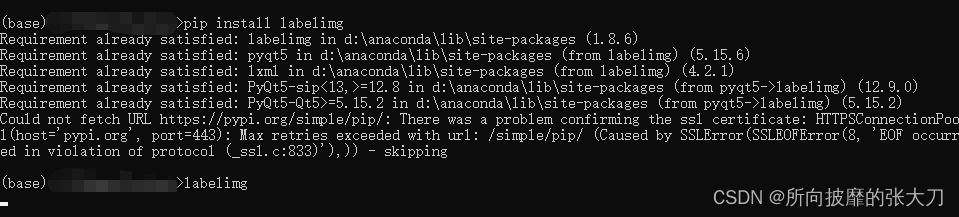
即可进入labelimg界面:

具体labelimg的使用,可以参见这篇文章:

标注完的数据文件夹类似于这种:
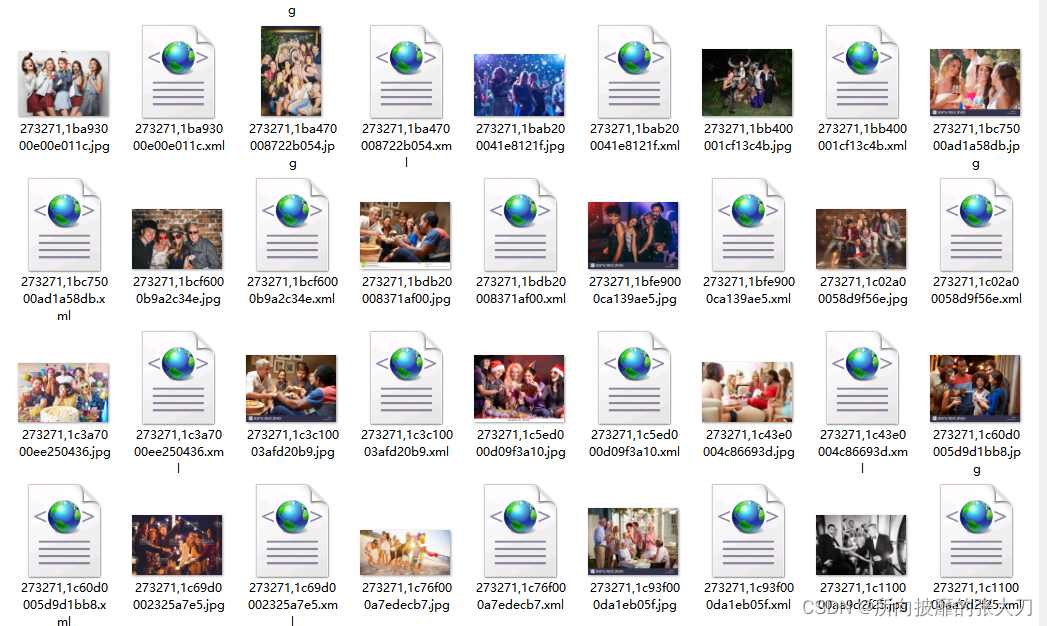
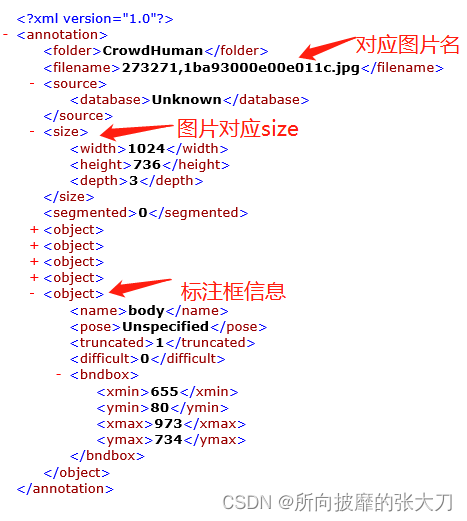
其中xml为标注文件,内容格式如下:
2. 环境安装
在yolov7github官网上下载源码,建议下载官方已经打好tag的代码,最新的代码可能一直在更新中。下载源码的方式有两种,一是:按照图中的方式点击下载;

二是:通过git clone。(git需要安装,其中git的安装在windows和linux上不同,建议度娘搜索安装)

第一种方式推荐小白使用。毕竟我们的目标是把算法训练起来,其中流程越简单越好,对于后面要致力于更专业的开发人员,推荐第二种方式。
在下载完yolov7后,因为是准备在linux服务器上训练,所以,需要将代码和数据均拷贝到linux服务器上,拷贝方式有两种(一是xftp,二是通过scp命令的方式,不会的可以自行百度)。
假设大家已经将代码和数据放到linux上,同时linux上已经安装有anconda环境。

首先通过conda 创建虚拟环境:
conda create -n yolov7 python=3.7
创建好在基于python3.7的环境后,进入该虚拟环境:
conda activate yolov7
在tag0.1中,yolov7还没有上传requirement.txt,因为yolov7基于yolov5的代码库写的(代码风格一脉相承),可以在yolov5中下载requirement.txt ,放到yolov7下面,并安装环境:
pip install -r requirement.txt
至此,yolov7的环境安装成功,使用
pip list
查看环境的安装情况:

3. 数据预处理
首先将数据分成两个文件夹Annotations 和JPEGImages:

其中Annotations里放xml文件,JPEGImages里放对应的Image。需要将xml文件中的VOC格式的标注数据改成yolo格式的数据,并将数据放在labels文件夹下,转换格式的代码如下:
# -*- coding: utf-8 -*-
import xml.etree.ElementTree as ET
import pickle
import os
from os import listdir, getcwd
from os.path import join
import random

classes =  ['person']


def clear_hidden_files(path):
    dir_list = os.listdir(path)
    for i in dir_list:
        abspath = os.path.join(os.path.abspath(path), i)
        if os.path.isfile(abspath):
            if i.startswith("._"):
                os.remove(abspath)
        else:
            clear_hidden_files(abspath)

def convert(size, box):
    dw = 1./size[0]
    dh = 1./size[1]
    x = (box[0] + box[1])/2.0
    y = (box[2] + box[3])/2.0
    w = box[1] - box[0]
    h = box[3] - box[2]
    x = x*dw
    w = w*dw
    y = y*dh
    h = h*dh
    return (x,y,w,h)

def convert_annotation(image_id):
    out_file = open('labels/%s.txt' % image_id, 'w')
    in_file = open('Annotations/%s.xml' %image_id)
    tree = ET.parse(in_file)
    root = tree.getroot()
    size = root.find('size')
    w = int(size.find('width').text)
    h = int(size.find('height').text)
    print(w, h)

    for obj in root.iter('object'):
        difficult = obj.find('difficult').text
        cls = obj.find('name').text
        if cls not in classes or int(difficult) == 1:
            continue

        cls_id = classes.index(cls)
        xmlbox = obj.find('bndbox')
        b = (float(xmlbox.find('xmin').text), float(xmlbox.find('xmax').text), float(xmlbox.find('ymin').text), float(xmlbox.find('ymax').text))
        bb = convert((w,h), b)
        out_file.write(str(cls_id) + " " + " ".join([str(a) for a in bb]) + '\n')
    in_file.close()
    out_file.close()

wd = os.getcwd()

annotation_dir = os.path.join(wd, "Annotations/")
if not os.path.isdir(annotation_dir):
        os.mkdir(annotation_dir)
clear_hidden_files(annotation_dir)
image_dir = os.path.join(wd, "images/")
if not os.path.isdir(image_dir):
        os.mkdir(image_dir)
clear_hidden_files(image_dir)

train_file = open(os.path.join(wd, "2007_train.txt"), 'w')
val_file = open(os.path.join(wd, "2007_val.txt"), 'w')
train_file.close()
val_file.close()

if not os.path.exists('labels'):
    os.makedirs('labels')
train_file = open(os.path.join(wd, "2007_train.txt"), 'a')
val_file = open(os.path.join(wd, "2007_val.txt"), 'a')

list = os.listdir(image_dir) # list image files
probo = random.randint(1, 100)
print (len(list))
for i in range(0, len(list)):
    path = os.path.join(image_dir,list[i])
    if os.path.isfile(path):
        image_path = image_dir + list[i]
        voc_path = list[i]
        (nameWithoutExtention, extention) = os.path.splitext(os.path.basename(image_path))
        (voc_nameWithoutExtention, voc_extention) = os.path.splitext(os.path.basename(voc_path))
        annotation_name = nameWithoutExtention + '.xml'
        annotation_path = os.path.join(annotation_dir, annotation_name)
   #  print (annotation_path)
    probo = random.randint(1, 100)
    print("Probobility: %d" % probo)
    if(probo <=90): # random choice train or test
        if os.path.exists(annotation_path):
            train_file.write(image_path + '\n')
            convert_annotation(nameWithoutExtention)

    else:
        if os.path.exists(annotation_path):
            val_file.write(image_path + '\n')
train_file.close()
val_file.close()
以上代码,将voc格式的xml转换成yolo格式:
 其中第一个值为标注框的标签,后面四位(x,y,w,h)为标注框的位置,均为相对整张图片的位置,这样处理的原因是yolo系列输入到网络的是固定大小的图片,这样的相对位置方便图片标签的预处理。
同时上述代码还将整个数据集以9:1比例随机分成训练集和验证集,分别保存在2007_train.txt和2007_val.txt文件中:

而后整个数据集层级如下:

最后用于yolov7训练的是红框标注的文件和文件夹,至此数据部分处理完毕。
4. 训练配置
在下载好yolov7后,也要另外下载好要训练模型对应的预训练模型。如我要训练yolov7的模型,则下载yolov7.pt(没有预训练模型也是可以训练的,但是收敛速度和精度上可能会打折扣。)

添加数据集配置文件,如我的任务是行人检测,配置文件为data/person.yaml:
# COCO 2017 dataset http://cocodataset.org

# download command/URL (optional)
# download: bash ./scripts/get_coco.sh

# train and val data as 1) directory: path/images/, 2) file: path/images.txt, or 3) list: [path1/images/, path2/images/]
train: /data2/all/2007_train.txt  # 118287 images
val: /data2/all/2007_val.txt  # 5000 images
# https://competitions.codalab.org/competitions/20794

# number of classes
nc: 1

# class names
names: [ 'person' ]
修改网络的配置文件cfg/deploy/yolov7.yaml,主要是修改前面几行的parameters,nc改成自己需要训练的类别数 ,其他的均不需要变化,anchor的设置同yolov5,这里的anchor均为coco数据集的anchor聚类值,如果与训练数据差别过大,anchor会重新聚类计算。
# parameters
nc: 1  # number of classes
depth_multiple: 1.0  # model depth multiple
width_multiple: 1.0  # layer channel multiple

# anchors
anchors:
  - [12,16, 19,36, 40,28]  # P3/8
  - [36,75, 76,55, 72,146]  # P4/16
  - [142,110, 192,243, 459,401]  # P5/32
还有data/hyp.scratch.yaml,训练模型的超参部分,第一次训练的时候建议不用改变,等后续优化的时候再去更新迭代。
最后再去配置train.py中的参数:

其中主要修改的部分为weight(预训练模型路径)、cfg(网络配置路径)、data(数据集配置路径)、hyp(超参配置路径)、epochs(训练轮数)、batch_size(几张图片一起训练,这个与gpu性能和个数有关),img_size(输入网络的图片大小,需要是32的倍数),device(训练时指定的gpu或者cpu)其他的一些参数在调参时会使用到,基本参数意义和yolov5相同。
5.训练及测试
在配置完训练参数后,就可以开始训练了:
python train.py
一般情况下,这样就可以直接训练了,有时候在多卡或者torch版本不高的时候,会出现只能吊用一张卡的情况,为了以防万一,建议使用以下命令启动训练:
python -m torch.distributed.launch --nproc_per_node 4 train.py
其中4表示我使用了4张卡来做训练。

训练完成后,在runs/train下面有对应的训练日志和结果:

其中weight里面放有last.pt和best.pt,train_batch,jpg中放有前处理后放入网络的图片:

test_batch.jpg中放对2007_val.txt预测的图片结果:

以及模型评测的一些指标:PR曲线(用于计算map),PR曲线的recall没有到1的原因是置信度的阈值没有取全阈值,即没有从0.01或者0.001开始,而是从0.3开始的:

F1_score曲线(用于找到模型的最佳score阈值),本文中最佳score阈值为0.341:

混淆矩阵:

模型预测则对detect.py配置:

其中主要修改的部分为:
weight(训练模型路径)
source(测试图片文件夹路径)
conf_thres(置信度阈值)
iou_thres(IOU阈值)
device(预测时指定的gpu或者cpu)
view-img(是否在预测时将预测结果实时显示,不建议)
save-txt(将预测结果保存成txt)
save-conf(保存成txt时,是否保存置信度)
nosave(是否将预测结果保存成图片)
classes(只测试某个类别)
其他的一些参数在调参时会使用到,基本参数意义和yolov5相同。
以上为yolov7的从数据集构建到训练测试整个过程,实际在做项目时,则是一遍遍的构建训练测试集,训练测试,分析错误集,再训练测试,更新迭代。