TensorFlow Lite 是一个跨平台机器学习库,针对在边缘设备(包括 Android 和 iOS 移动设备)上运行机器学习模型进行了优化。其包含如下2个组件:
- Model Maker 是一个 Python 库,只需几行代码即可让您轻松地使用自己的数据训练 TensorFlow Lite 模型,而无需具备机器学习专业知识。
- Task 库是一个跨平台库,通过在您的移动应用中只需几行代码即可轻松部署 TensorFlow Lite 模型。
一、添加 TFLite 库
创建 TFLiteDetectionTest 项目,项目github地址详见,
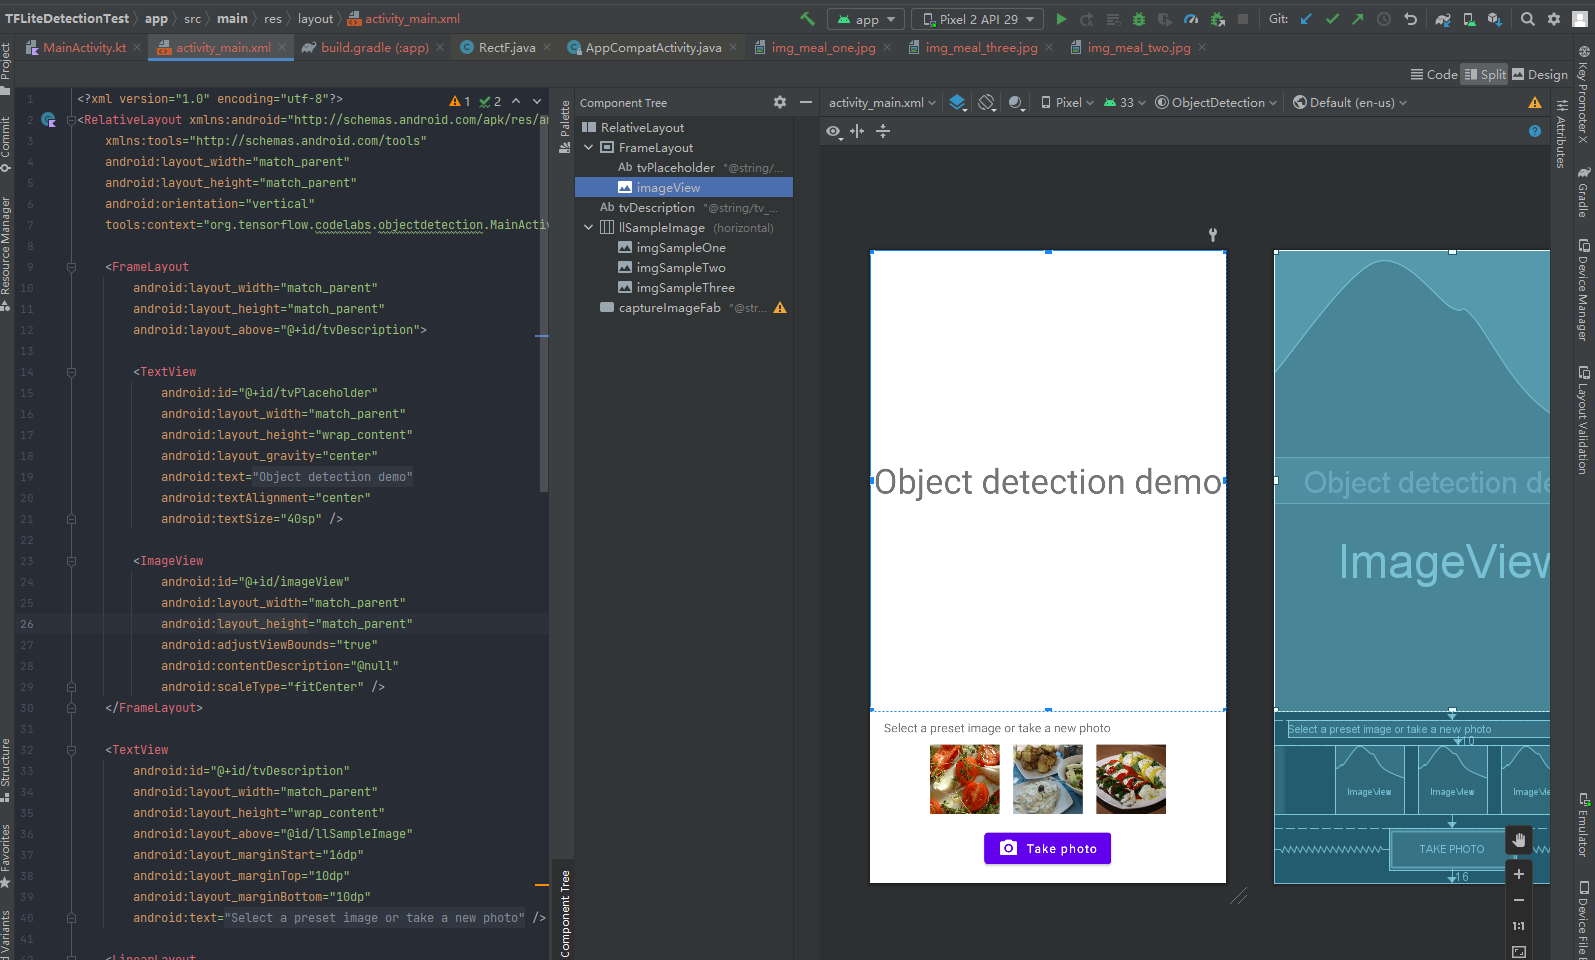
在 activity_main.xml 中添加如下布局:
<?xml version="1.0" encoding="utf-8"?>
<RelativeLayout xmlns:android="http://schemas.android.com/apk/res/android"
    xmlns:tools="http://schemas.android.com/tools"
    android:layout_width="match_parent"
    android:layout_height="match_parent"
    android:orientation="vertical"
    tools:context="org.tensorflow.codelabs.objectdetection.MainActivity">

    <FrameLayout
        android:layout_width="match_parent"
        android:layout_height="match_parent"
        android:layout_above="@+id/tvDescription">

        <TextView
            android:id="@+id/tvPlaceholder"
            android:layout_width="match_parent"
            android:layout_height="wrap_content"
            android:layout_gravity="center"
            android:text="@string/tv_placeholder"
            android:textAlignment="center"
            android:textSize="40sp" />

        <ImageView
            android:id="@+id/imageView"
            android:layout_width="match_parent"
            android:layout_height="match_parent"
            android:adjustViewBounds="true"
            android:contentDescription="@null"
            android:scaleType="fitCenter" />
    </FrameLayout>

    <TextView
        android:id="@+id/tvDescription"
        android:layout_width="match_parent"
        android:layout_height="wrap_content"
        android:layout_above="@id/llSampleImage"
        android:layout_marginStart="16dp"
        android:layout_marginTop="10dp"
        android:layout_marginBottom="10dp"
        android:text="@string/tv_description" />

    <LinearLayout
        android:id="@+id/llSampleImage"
        android:layout_width="match_parent"
        android:layout_height="wrap_content"
        android:layout_above="@+id/captureImageFab"
        android:gravity="center_horizontal"
        android:orientation="horizontal">

        <ImageView
            android:id="@+id/imgSampleOne"
            android:layout_width="80dp"
            android:layout_height="80dp"
            android:adjustViewBounds="true"
            android:contentDescription="@null"
            android:scaleType="centerCrop"
            android:src="@drawable/img_meal_one" />

        <ImageView
            android:id="@+id/imgSampleTwo"
            android:layout_width="80dp"
            android:layout_height="80dp"
            android:layout_marginStart="16dp"
            android:layout_marginEnd="16dp"
            android:adjustViewBounds="true"
            android:contentDescription="@null"
            android:scaleType="centerCrop"
            android:src="@drawable/img_meal_two" />

        <ImageView
            android:id="@+id/imgSampleThree"
            android:layout_width="80dp"
            android:layout_height="80dp"
            android:adjustViewBounds="true"
            android:contentDescription="@null"
            android:scaleType="centerCrop"
            android:src="@drawable/img_meal_three" />
    </LinearLayout>

    <Button
        android:id="@+id/captureImageFab"
        android:layout_width="wrap_content"
        android:layout_height="wrap_content"
        android:layout_alignParentBottom="true"
        android:layout_centerHorizontal="true"
        android:layout_gravity="center|bottom"
        android:layout_margin="16dp"
        android:drawableLeft="@drawable/ic_camera"
        android:text="@string/tv_take_photo"
        android:textAllCaps="false" />

</RelativeLayout>
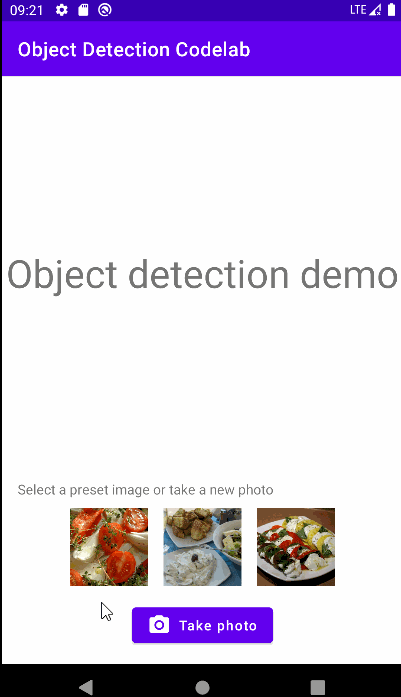
activity_main.xml 的布局有上部1个图片展示控件、下部3个图片预览控件,底部1个拍照按钮,布局效果如下:
在 build.gradle(app) 中添加 tensorflow 的依赖,依赖如下:
implementation 'org.tensorflow:tensorflow-lite-task-vision:0.3.1'
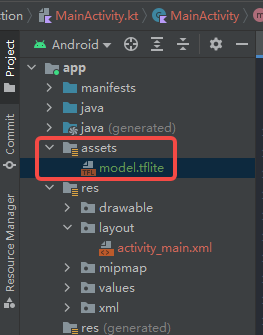
目标检测的模型文件可在此处下载,该模型是用 COCO2017数据集训练的,我们将模型文件命名为 model.tflite 并放在 assets 目录中,效果如下:
接下来,在 MainActivity 中实现基本的图片布局和按钮点击时间,代码如下:
/**
 * Copyright 2021 Google LLC
 *
 * Licensed under the Apache License, Version 2.0 (the "License");
 * you may not use this file except in compliance with the License.
 * You may obtain a copy of the License at
 *
 * https://www.apache.org/licenses/LICENSE-2.0
 *
 * Unless required by applicable law or agreed to in writing, software v
 * distributed under the License is distributed on an "AS IS" BASIS,
 * WITHOUT WARRANTIES OR CONDITIONS OF ANY KIND, either express or implied.
 * See the License for the specific language governing permissions and
 * limitations under the License.
 */

package org.tensorflow.codelabs.objectdetection

import android.app.Activity
import android.content.ActivityNotFoundException
import android.content.Intent
import android.graphics.*
import android.net.Uri
import android.os.Bundle
import android.os.Environment
import android.provider.MediaStore
import android.util.Log
import android.view.View
import android.widget.Button
import android.widget.ImageView
import android.widget.TextView
import androidx.appcompat.app.AppCompatActivity
import androidx.core.content.FileProvider
import androidx.exifinterface.media.ExifInterface
import androidx.lifecycle.lifecycleScope
import kotlinx.coroutines.Dispatchers
import kotlinx.coroutines.launch
import java.io.File
import java.io.IOException
import java.text.SimpleDateFormat
import java.util.*
import kotlin.math.max
import kotlin.math.min

class MainActivity : AppCompatActivity(), View.OnClickListener {


    companion object {


        const val TAG = "TFLite - ODT"
        const val REQUEST_IMAGE_CAPTURE: Int = 1
        private const val MAX_FONT_SIZE = 96F
    }

    private lateinit var captureImageFab: Button
    private lateinit var inputImageView: ImageView
    private lateinit var imgSampleOne: ImageView
    private lateinit var imgSampleTwo: ImageView
    private lateinit var imgSampleThree: ImageView
    private lateinit var tvPlaceholder: TextView
    private lateinit var currentPhotoPath: String

    override fun onCreate(savedInstanceState: Bundle?) {


        super.onCreate(savedInstanceState)
        setContentView(R.layout.activity_main)

        captureImageFab = findViewById(R.id.captureImageFab)
        inputImageView = findViewById(R.id.imageView)
        imgSampleOne = findViewById(R.id.imgSampleOne)
        imgSampleTwo = findViewById(R.id.imgSampleTwo)
        imgSampleThree = findViewById(R.id.imgSampleThree)
        tvPlaceholder = findViewById(R.id.tvPlaceholder)

        captureImageFab.setOnClickListener(this)
        imgSampleOne.setOnClickListener(this)
        imgSampleTwo.setOnClickListener(this)
        imgSampleThree.setOnClickListener(this)
    }

    override fun onActivityResult(requestCode: Int, resultCode: Int, data: Intent?) {


        super.onActivityResult(requestCode, resultCode, data)
        if (requestCode == REQUEST_IMAGE_CAPTURE &&
            resultCode == Activity.RESULT_OK
        ) {


            setViewAndDetect(getCapturedImage())
        }
    }

    /**
     * onClick(v: View?)
     *      Detect touches on the UI components
     */
    override fun onClick(v: View?) {


        when (v?.id) {


            R.id.captureImageFab -> {


                try {


                    dispatchTakePictureIntent()
                } catch (e: ActivityNotFoundException) {


                    Log.e(TAG, e.message.toString())
                }
            }
            R.id.imgSampleOne -> {


                setViewAndDetect(getSampleImage(R.drawable.img_meal_one))
            }
            R.id.imgSampleTwo -> {


                setViewAndDetect(getSampleImage(R.drawable.img_meal_two))
            }
            R.id.imgSampleThree -> {


                setViewAndDetect(getSampleImage(R.drawable.img_meal_three))
            }
        }
    }

    /**
     * runObjectDetection(bitmap: Bitmap)
     *      TFLite Object Detection function
     */
    private fun runObjectDetection(bitmap: Bitmap) {


        //TODO: Add object detection code here
    }

    /**
     * setViewAndDetect(bitmap: Bitmap)
     *      Set image to view and call object detection
     */
    private fun setViewAndDetect(bitmap: Bitmap) {


        // Display capture image
        inputImageView.setImageBitmap(bitmap)
        tvPlaceholder.visibility = View.INVISIBLE

        // Run ODT and display result
        // Note that we run this in the background thread to avoid blocking the app UI because
        // TFLite object detection is a synchronised process.
        lifecycleScope.launch(Dispatchers.Default) {

     runObjectDetection(bitmap) }
    }

    /**
     * getCapturedImage():
     *      Decodes and crops the captured image from camera.
     */
    private fun getCapturedImage(): Bitmap {


        // Get the dimensions of the View
        val targetW: Int = inputImageView.width
        val targetH: Int = inputImageView.height

        val bmOptions = BitmapFactory.Options().apply {


            // Get the dimensions of the bitmap
            inJustDecodeBounds = true

            BitmapFactory.decodeFile(currentPhotoPath, this)

            val photoW: Int = outWidth
            val photoH: Int = outHeight

            // Determine how much to scale down the image
            val scaleFactor: Int = max(1, min(photoW / targetW, photoH / targetH))

            // Decode the image file into a Bitmap sized to fill the View
            inJustDecodeBounds = false
            inSampleSize = scaleFactor
            inMutable = true
        }
        val exifInterface = ExifInterface(currentPhotoPath)
        val orientation = exifInterface.getAttributeInt(
            ExifInterface.TAG_ORIENTATION,
            ExifInterface.ORIENTATION_UNDEFINED
        )

        val bitmap = BitmapFactory.decodeFile(currentPhotoPath, bmOptions)
        return when (orientation) {


            ExifInterface.ORIENTATION_ROTATE_90 -> {


                rotateImage(bitmap, 90f)
            }
            ExifInterface.ORIENTATION_ROTATE_180 -> {


                rotateImage(bitmap, 180f)
            }
            ExifInterface.ORIENTATION_ROTATE_270 -> {


                rotateImage(bitmap, 270f)
            }
            else -> {


                bitmap
            }
        }
    }

    /**
     * getSampleImage():
     *      Get image form drawable and convert to bitmap.
     */
    private fun getSampleImage(drawable: Int): Bitmap {


        return BitmapFactory.decodeResource(resources, drawable, BitmapFactory.Options().apply {


            inMutable = true
        })
    }

    /**
     * rotateImage():
     *     Decodes and crops the captured image from camera.
     */
    private fun rotateImage(source: Bitmap, angle: Float): Bitmap {


        val matrix = Matrix()
        matrix.postRotate(angle)
        return Bitmap.createBitmap(
            source, 0, 0, source.width, source.height,
            matrix, true
        )
    }

    /**
     * createImageFile():
     *     Generates a temporary image file for the Camera app to write to.
     */
    @Throws(IOException::class)
    private fun createImageFile(): File {


        // Create an image file name
        val timeStamp: String = SimpleDateFormat("yyyyMMdd_HHmmss").format(Date())
        val storageDir: File? = getExternalFilesDir(Environment.DIRECTORY_PICTURES)
        return File.createTempFile(
            "JPEG_${

      timeStamp}_", /* prefix */
            ".jpg", /* suffix */
            storageDir /* directory */
        ).apply {


            // Save a file: path for use with ACTION_VIEW intents
            currentPhotoPath = absolutePath
        }
    }

    /**
     * dispatchTakePictureIntent():
     *     Start the Camera app to take a photo.
     */
    private fun dispatchTakePictureIntent() {


        Intent(MediaStore.ACTION_IMAGE_CAPTURE).also {

     takePictureIntent ->
            // Ensure that there's a camera activity to handle the intent
            takePictureIntent.resolveActivity(packageManager)?.also {


                // Create the File where the photo should go
                val photoFile: File? = try {


                    createImageFile()
                } catch (e: IOException) {


                    Log.e(TAG, e.message.toString())
                    null
                }
                // Continue only if the File was successfully created
                photoFile?.also {


                    val photoURI: Uri = FileProvider.getUriForFile(
                        this,
                        "org.tensorflow.codelabs.objectdetection.fileprovider",
                        it
                    )
                    takePictureIntent.putExtra(MediaStore.EXTRA_OUTPUT, photoURI)
                    startActivityForResult(takePictureIntent, REQUEST_IMAGE_CAPTURE)
                }
            }
        }
    }

    /**
     * drawDetectionResult(bitmap: Bitmap, detectionResults: List<DetectionResult>
     *      Draw a box around each objects and show the object's name.
     */
    private fun drawDetectionResult(bitmap: Bitmap, detectionResults: List<DetectionResult>): Bitmap {


        val outputBitmap = bitmap.copy(Bitmap.Config.ARGB_8888, true)
        val canvas = Canvas(outputBitmap)
        val pen = Paint()
        pen.textAlign = Paint.Align.LEFT

        detectionResults.forEach {


            // draw bounding box
            pen.color = Color.RED
            pen.strokeWidth = 8F
            pen.style = Paint.Style.STROKE
            val box = it.boundingBox
            canvas.drawRect(box, pen)


            val tagSize = Rect(0, 0, 0, 0)

            // calculate the right font size
            pen.style = Paint.Style.FILL_AND_STROKE
            pen.color = Color.YELLOW
            pen.strokeWidth = 2F

            pen.textSize = MAX_FONT_SIZE
            pen.getTextBounds(it.text, 0, it.text.length, tagSize)
            val fontSize: Float = pen.textSize * box.width() / tagSize.width()

            // adjust the font size so texts are inside the bounding box
            if (fontSize < pen.textSize) pen.textSize = fontSize

            var margin = (box.width() - tagSize.width()) / 2.0F
            if (margin < 0F) margin = 0F
            canvas.drawText(
                it.text, box.left + margin,
                box.top + tagSize.height().times(1F), pen
            )
        }
        return outputBitmap
    }
}

/**
 * DetectionResult
 *      A class to store the visualization info of a detected object.
 */
data class DetectionResult(val boundingBox: RectF, val text: String)
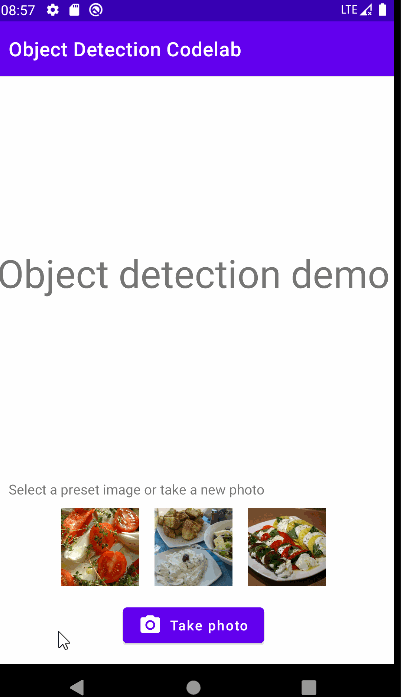
运行后,可以展示、切换图片,并拍照更换图片,效果如下:
二、用 TFLite 对图片做目标检测
在 MainActivity 中初始化 TFLite 的 detector,并向其输入 image,得到输出的 List 结果,代码如下:
    /**
     * runObjectDetection(bitmap: Bitmap)
     *      TFLite Object Detection function
     */
    private fun runObjectDetection(bitmap: Bitmap) {


        val image = TensorImage.fromBitmap(bitmap)
        // Initialize the detector object
        val options = ObjectDetector.ObjectDetectorOptions.builder()
            .setMaxResults(5)
            .setScoreThreshold(0.5f)
            .build()
        val detector = ObjectDetector.createFromFileAndOptions(
            this, // the application context
            "model.tflite", // must be same as the filename in assets folder
            options
        )
        val results = detector.detect(image)
        debugPrint(results)
    }

    private fun debugPrint(results : List<Detection>) {


        for ((i, obj) in results.withIndex()) {


            val box = obj.boundingBox

            Log.d(TAG, "Detected object: $i ")
            Log.d(TAG, "  boundingBox: (${

      box.left}, ${

      box.top}) - (${

      box.right},${

      box.bottom})")

            for ((j, category) in obj.categories.withIndex()) {


                Log.d(TAG, "    Label $j: ${

      category.label}")
                val confidence: Int = category.score.times(100).toInt()
                Log.d(TAG, "    Confidence: ${

      confidence}%")
            }
        }
    }
运行后,可在Logcat 看到打印的日志如下:
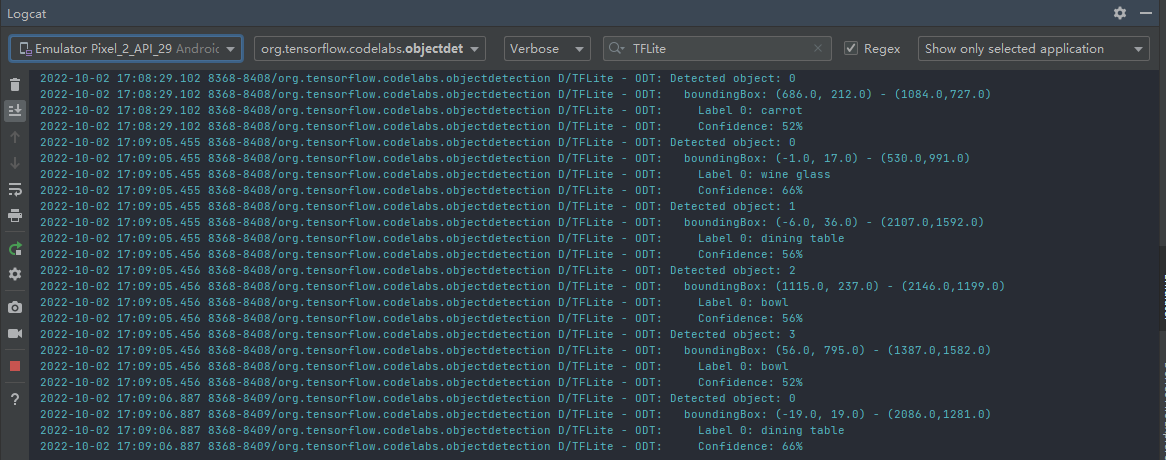
其输出结果中:BoundingBox 是检测框的左上角和右下角,Label 是检测的类别,Confidence 是置信度,例如下例意为对象位于 (0, 15) – (2223, 1645) 的矩形内,标签为餐桌, 此模型确信第 1 个是餐桌 (77%):
D/TFLite-ODT: Detected object: 0
D/TFLite-ODT:   boundingBox: (0.0, 15.0) - (2223.0,1645.0)
D/TFLite-ODT:     Label 0: dining table
D/TFLite-ODT:     Confidence: 77%
接下来,在 MainActivity 中将识别结果的检测框和类别,渲染在界面上即可,效果如下:
     /**
     * runObjectDetection(bitmap: Bitmap)
     *      TFLite Object Detection function
     */
    private fun runObjectDetection(bitmap: Bitmap) {


        val image = TensorImage.fromBitmap(bitmap)
        // Initialize the detector object
        val options = ObjectDetector.ObjectDetectorOptions.builder()
            .setMaxResults(5)
            .setScoreThreshold(0.5f)
            .build()
        val detector = ObjectDetector.createFromFileAndOptions(
            this, // the application context
            "model.tflite", // must be same as the filename in assets folder
            options
        )
        val results = detector.detect(image)
        debugPrint(results)
        val resultToDisplay = results.map {


            // Get the top-1 category and craft the display text
            val category = it.categories.first()
            val text = "${

      category.label}, ${

      category.score.times(100).toInt()}%"

            // Create a data object to display the detection result
            DetectionResult(it.boundingBox, text)
        }
        // Draw the detection result on the bitmap and show it.
        val imgWithResult = drawDetectionResult(bitmap, resultToDisplay)
        runOnUiThread {

     inputImageView.setImageBitmap(imgWithResult) }
    }
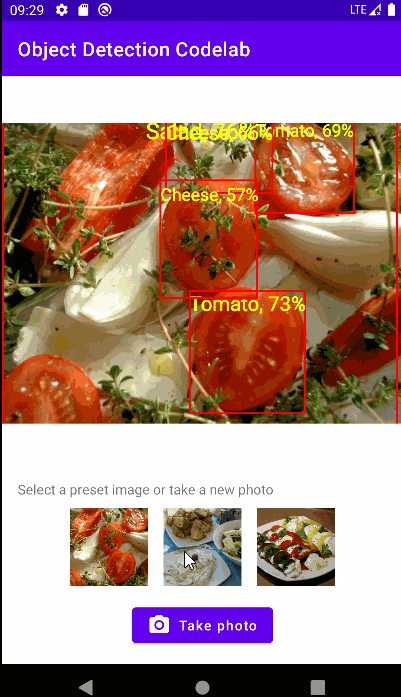
运行后,每张图片均可检测出检测框和类别,效果如下:
为了优化效果,可在 模型链接地址 下载新模型,放置在 assets 目录中,优化算法效果,用新模型运行后,可更详细地推断图片中食材的类别,效果如下: