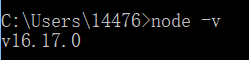
一、先安装node.js
如若安装时出现磁盘无效的报错信息,以下解决方法
1、win+r 输入subst Y: %TEMP%
2、再次win+r 输入subst Y:/Y
Y代表报错时出现的盘符
以下方法检查是否安装完成:
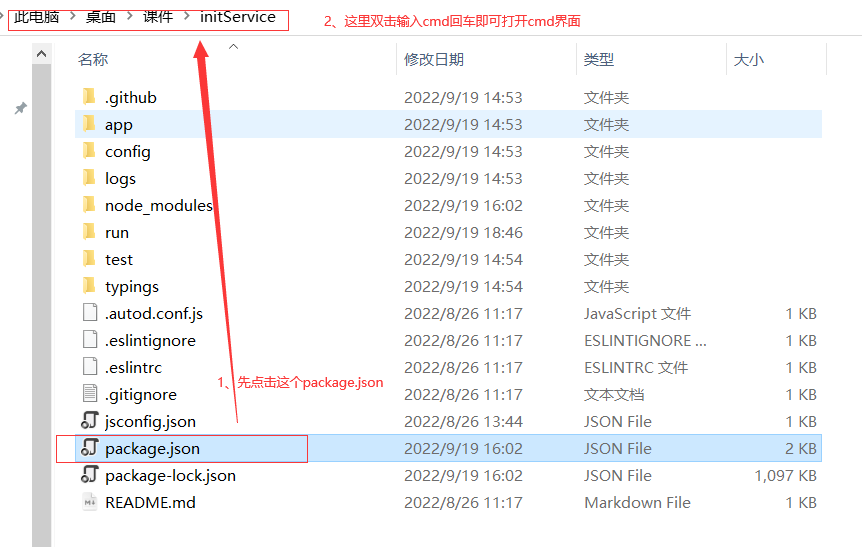
二、安装一个egg服务器
egg 是阿里出品的一款 node.js 后端 web 框架,egg 的定位是企业级 web 基础框架
学习egg.js,看这一篇就够了! - 掘金 (juejin.cn)
这里使用一现成的服务器,网盘地址下载:
链接:https://pan.baidu.com/s/1jKNHhIgEXu1tBb6j4bWt3w?pwd=6666
提取码:6666
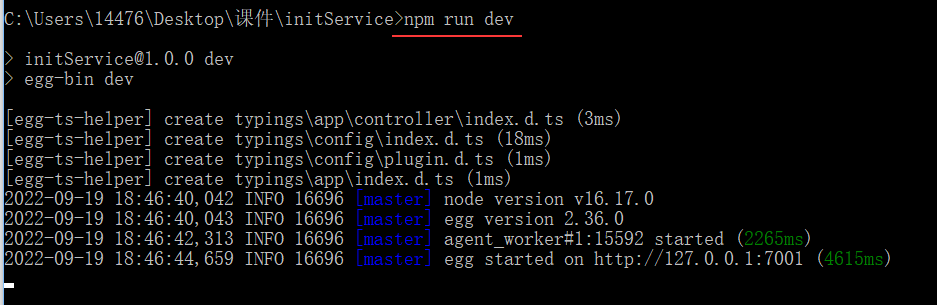
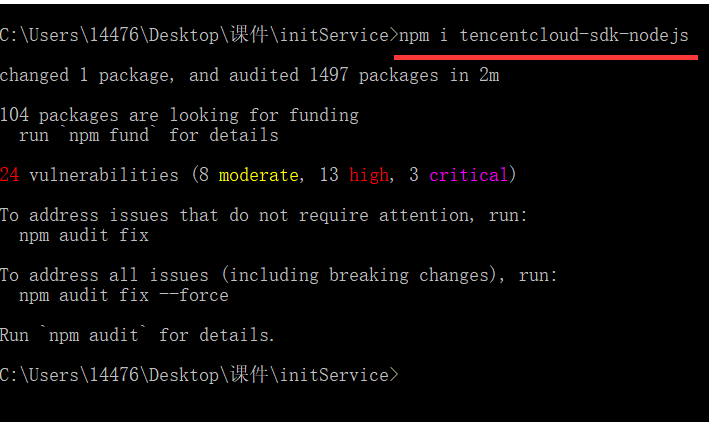
在cmd中输入命令,运行启动服务器
npm:相当于有一个仓库
最后一行是服务器地址: http://127.0.0.1:7001
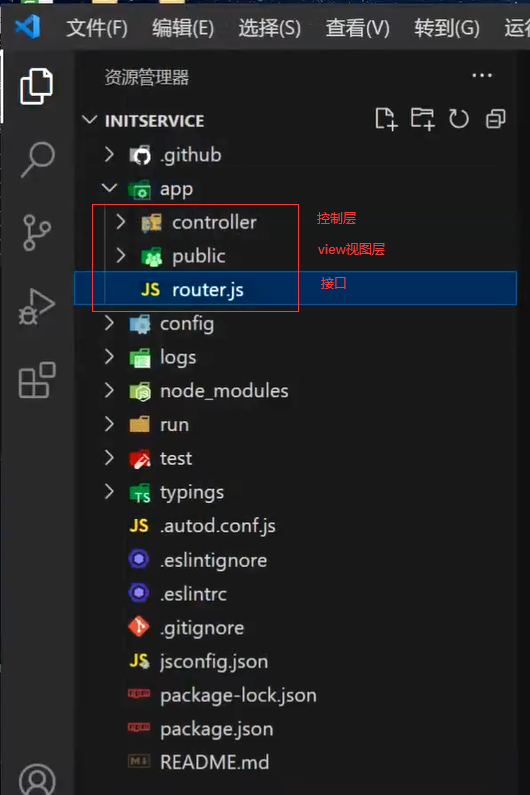
三、使用vscode打开这个服务器文件
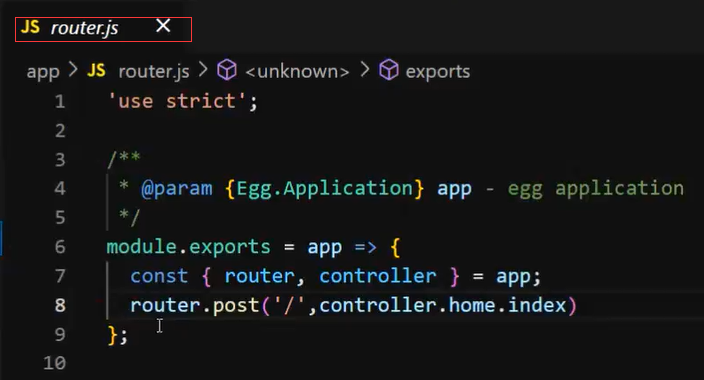
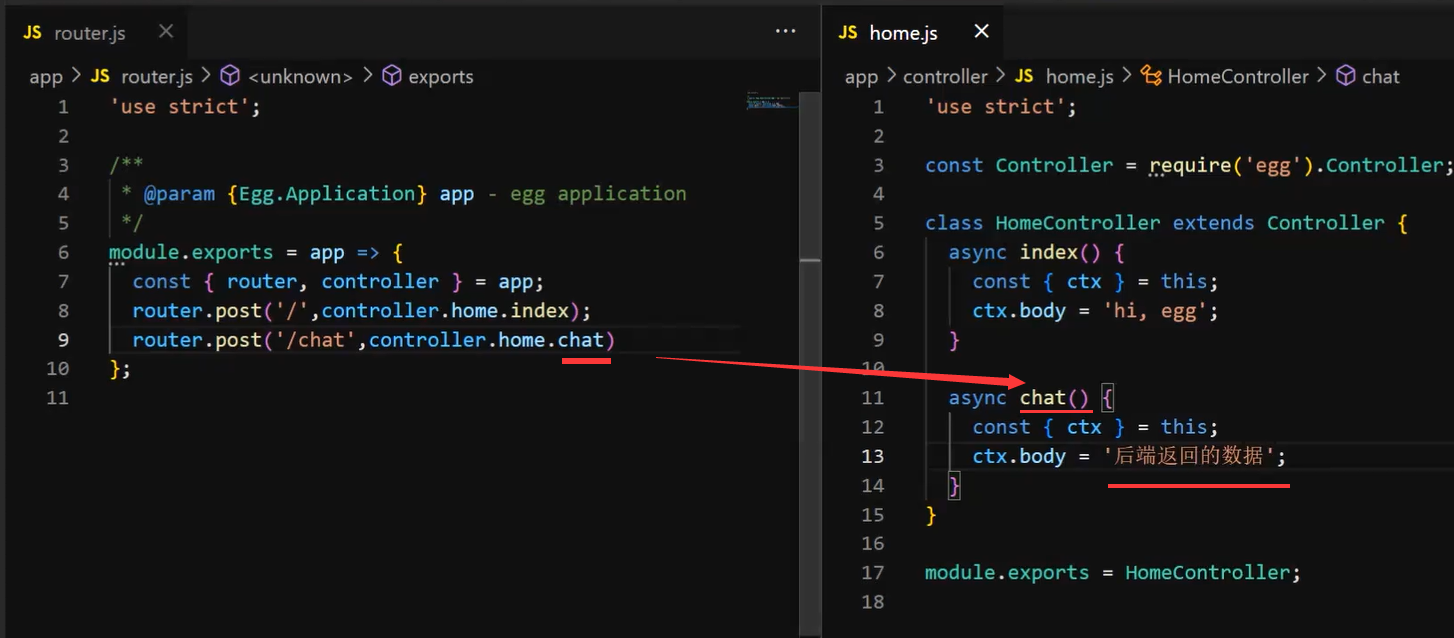
router.js
router.js是写接口的,上图的斜杠/就是接口,这里我们添加一个接口chat,controller.home.index表示这个接口对应在home.js文件里面的index()方法。
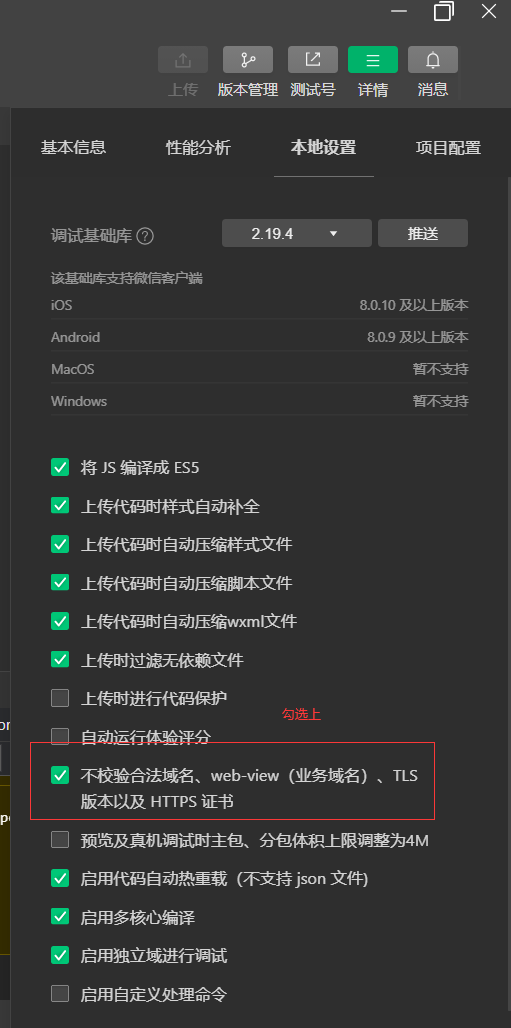
async是处理js异步操作的处理函数
如若不勾选则会报以下错误


四、微信小程序发送网络请求
 wx.request({
        url: 'http://127.0.0.1:7001/chat',
        method:"POST",
        // data表示给后端传的数据
        data:{
          myMsg:myMsg
        },
        // success表示从后端获取的数据
        success(res){
           console.log(res.data.ResponseText);
        }
      })
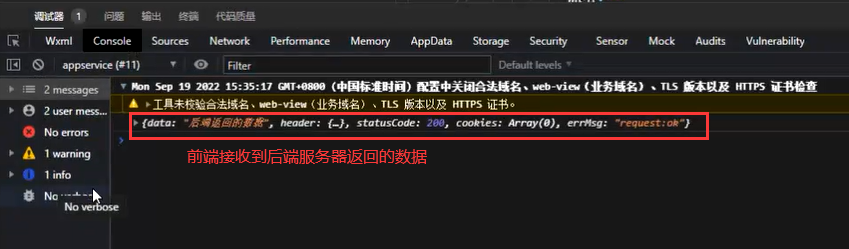
五、后端服务器接收请求并返回数据
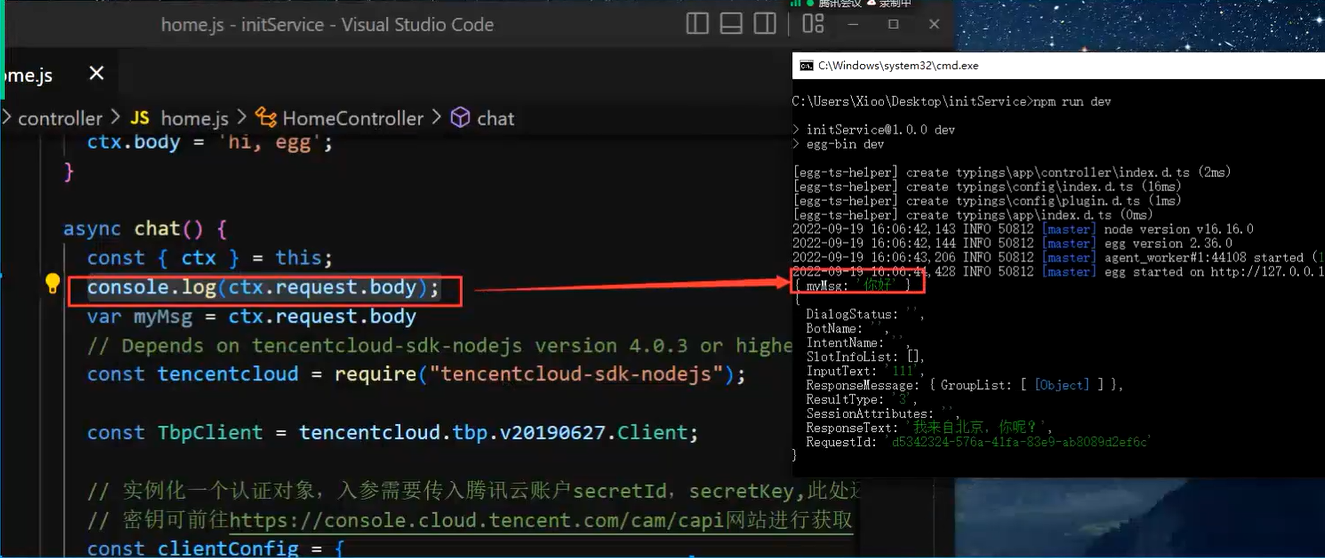
后端服务器接收前端传来的数据
var myMsg = ctx.request.body.myMsg
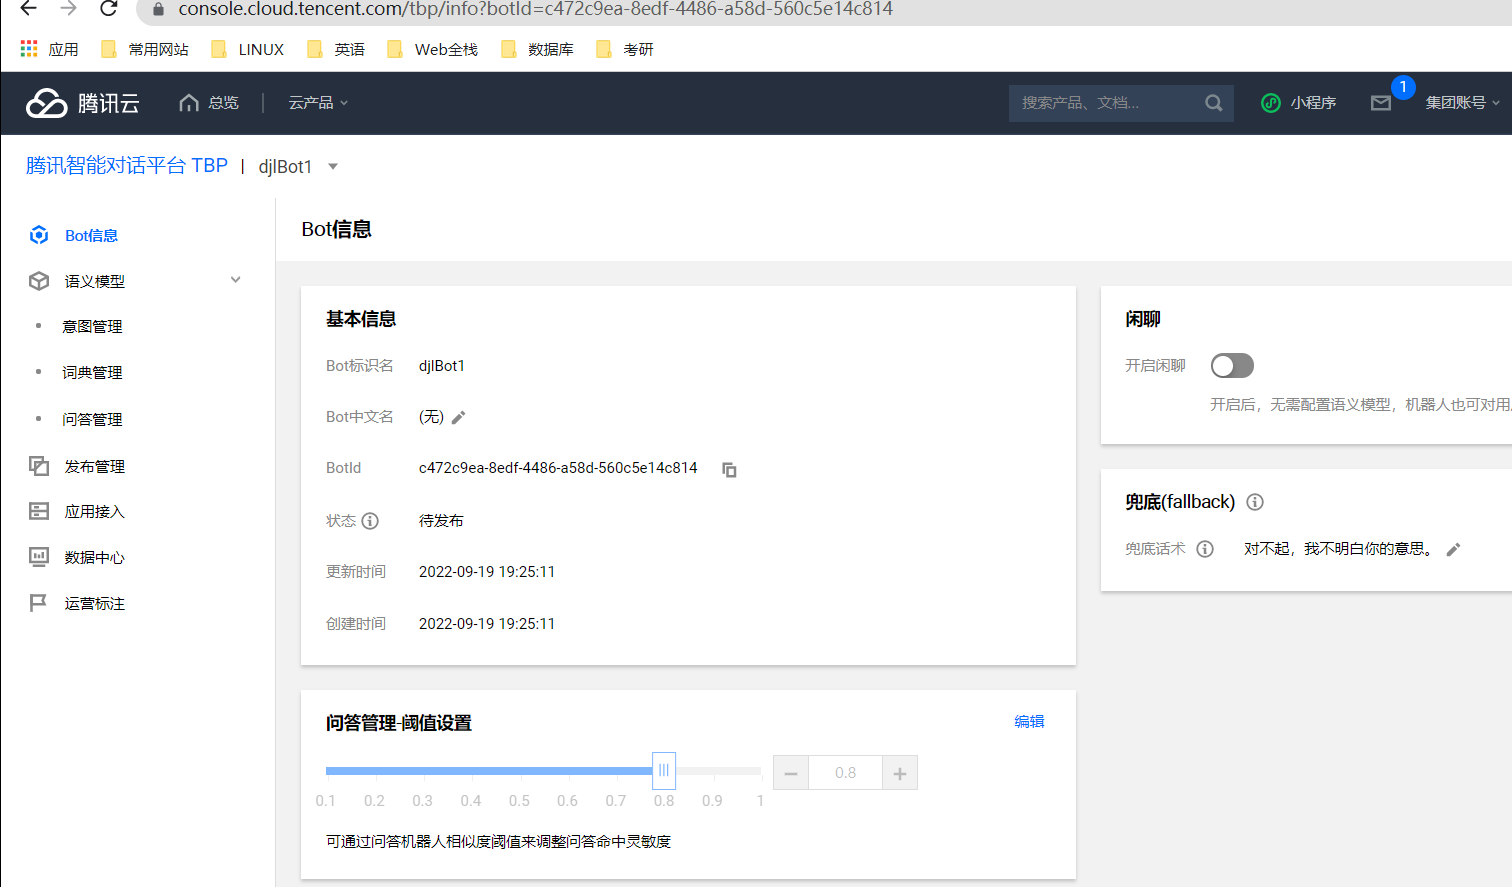
六、腾讯AI开发平台
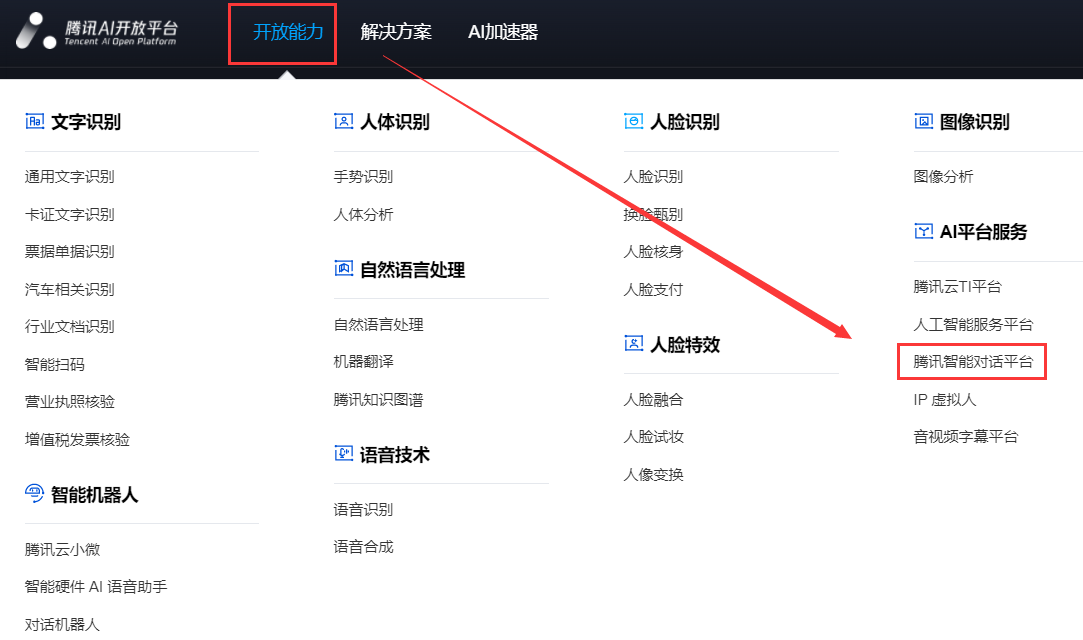
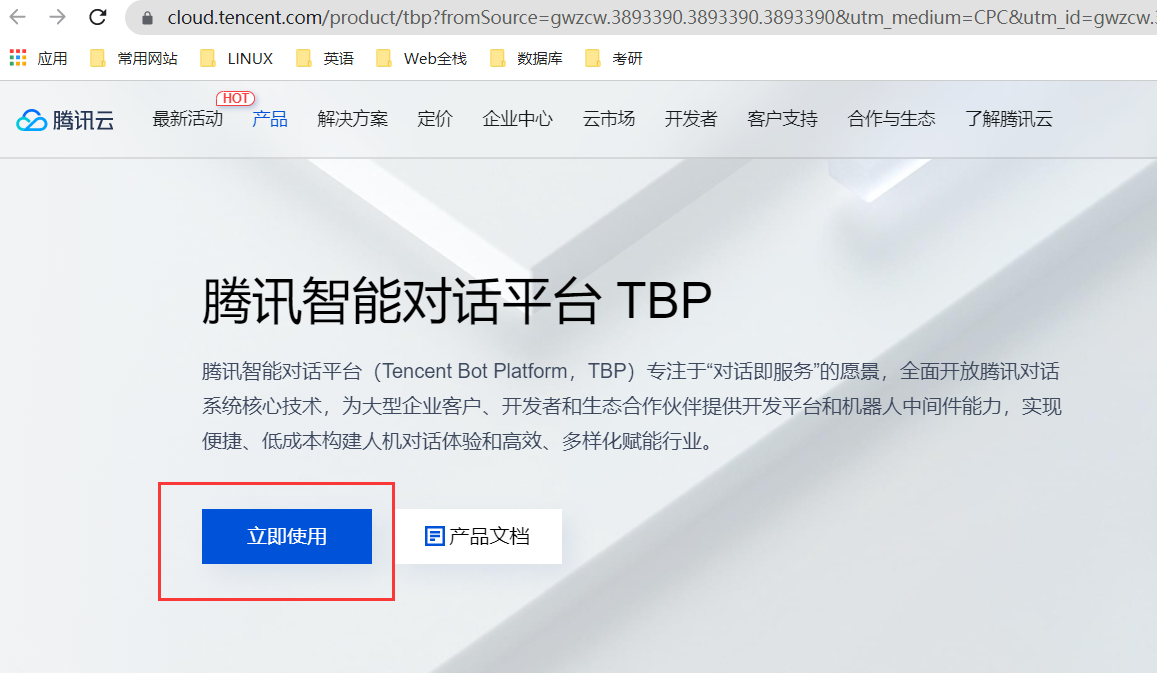
注册登录实名认证后即可创建Bot开始使用了
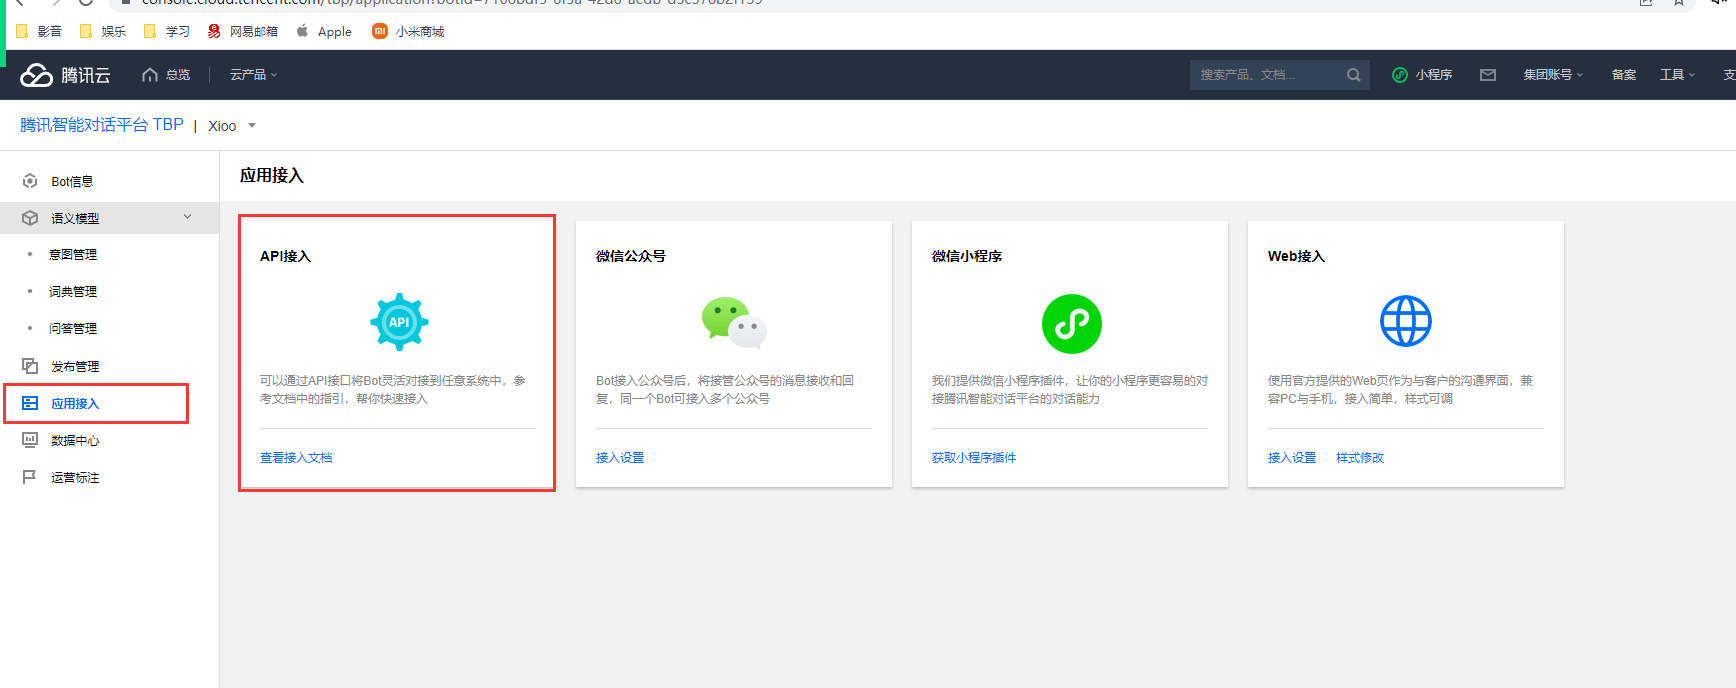
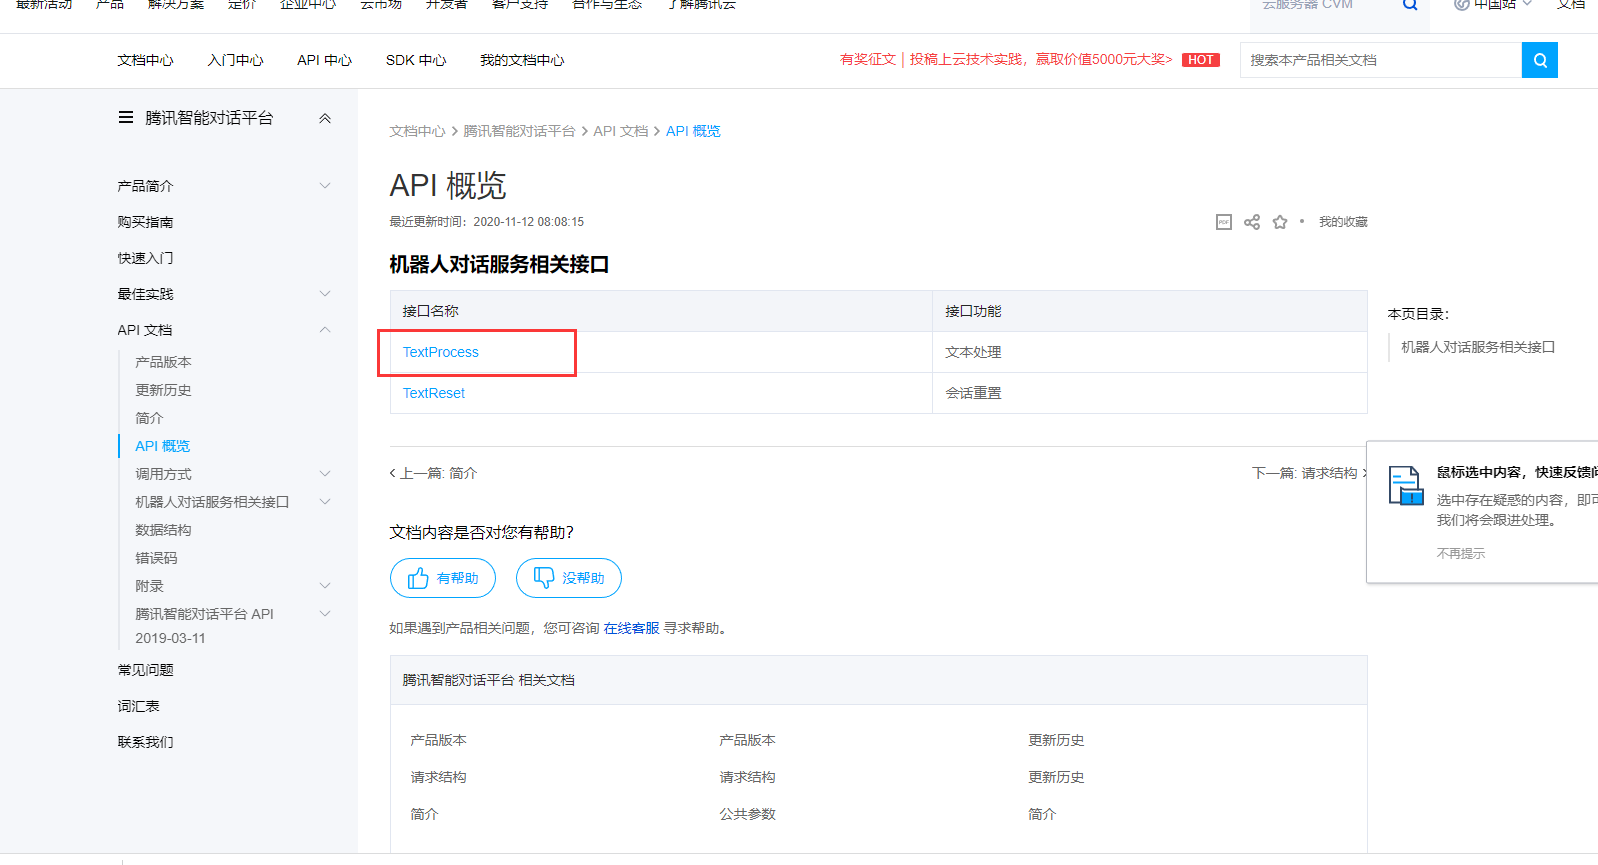
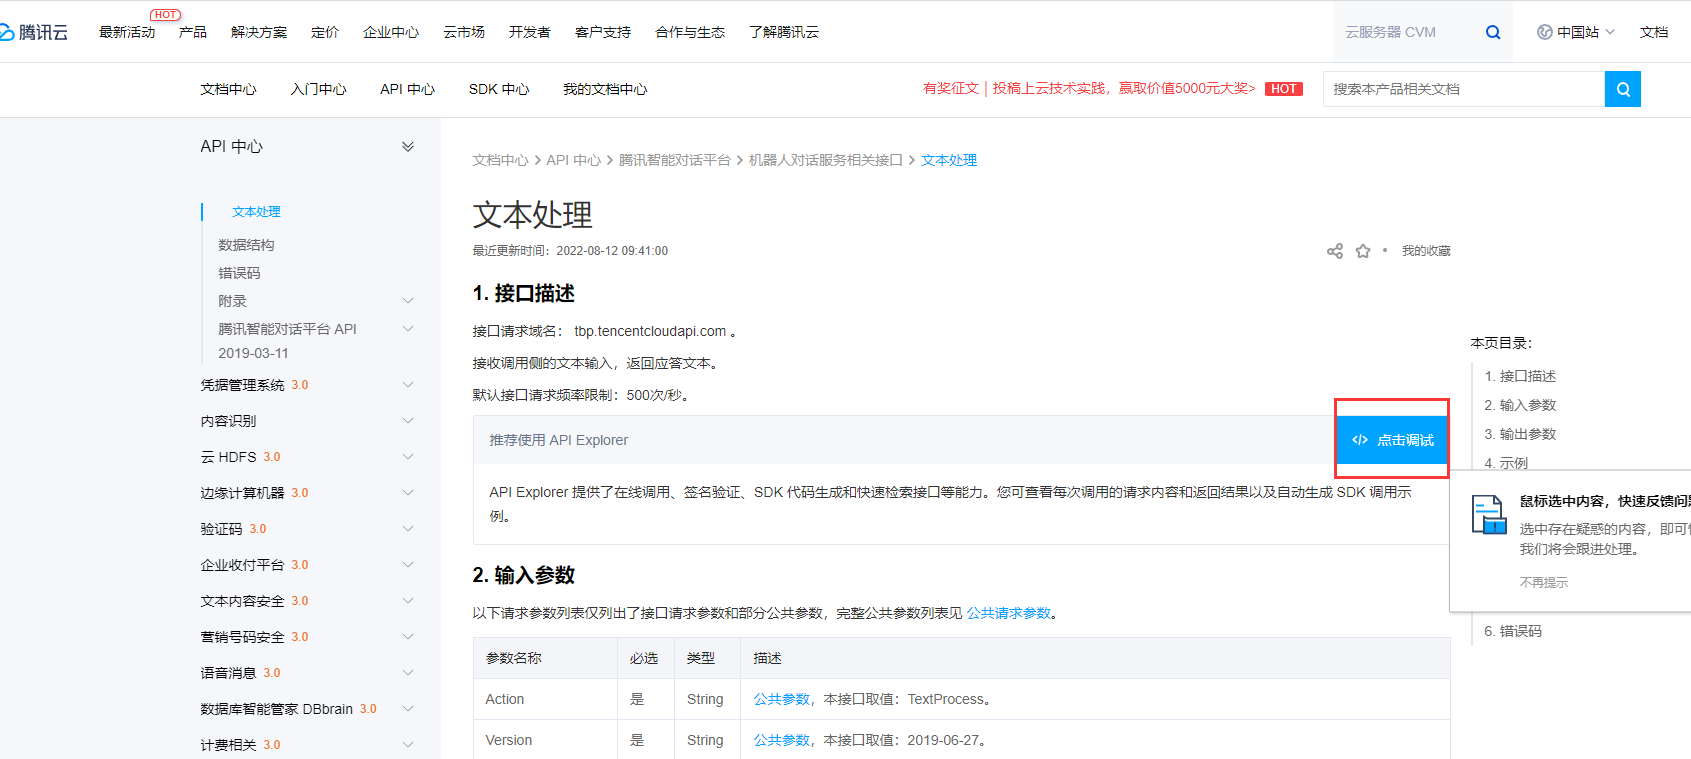
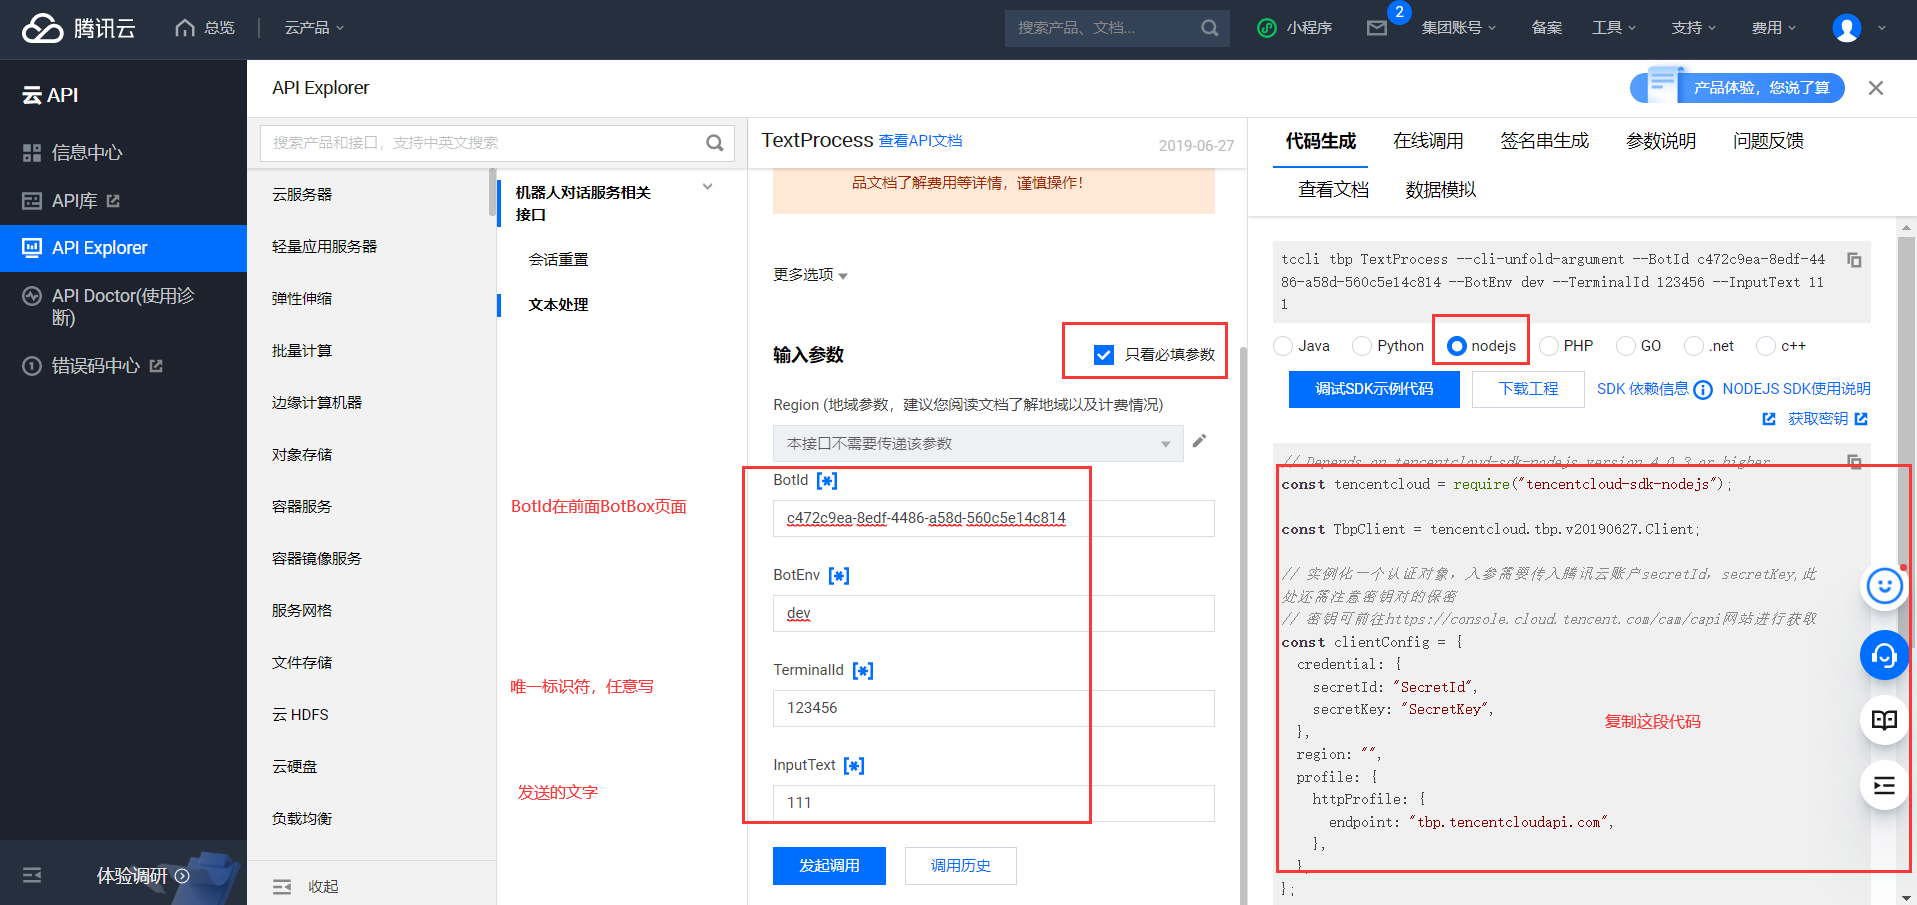
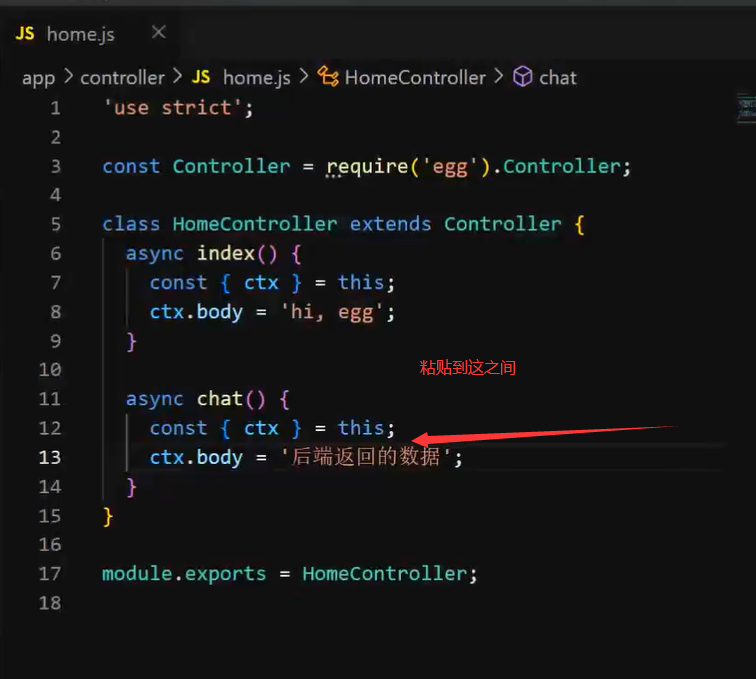
复制右侧那段代码,并粘贴到以下位置:
下载方法:
打开刚刚启动的服务器的cmd界面按ctrl+c终止服务器
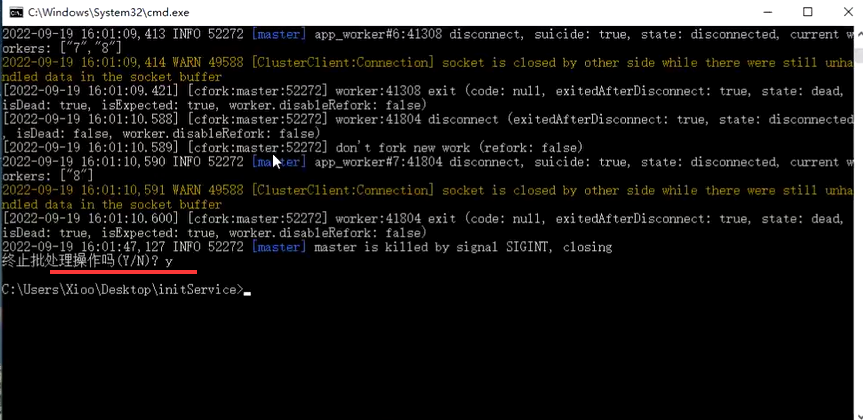
cls代码表示清屏
下载成功如下图:
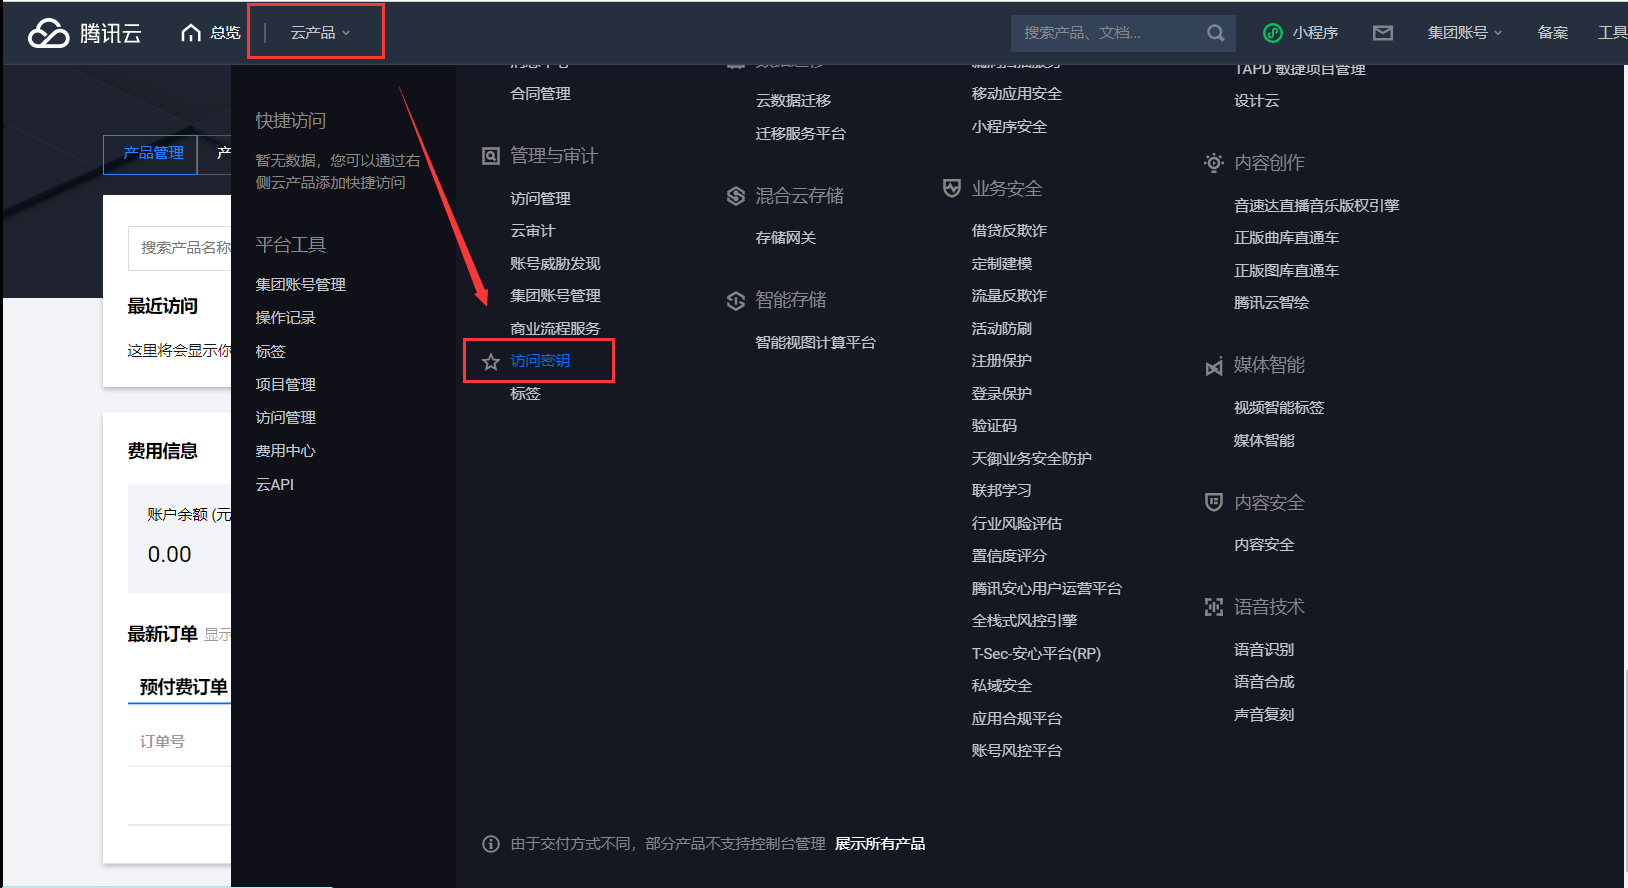
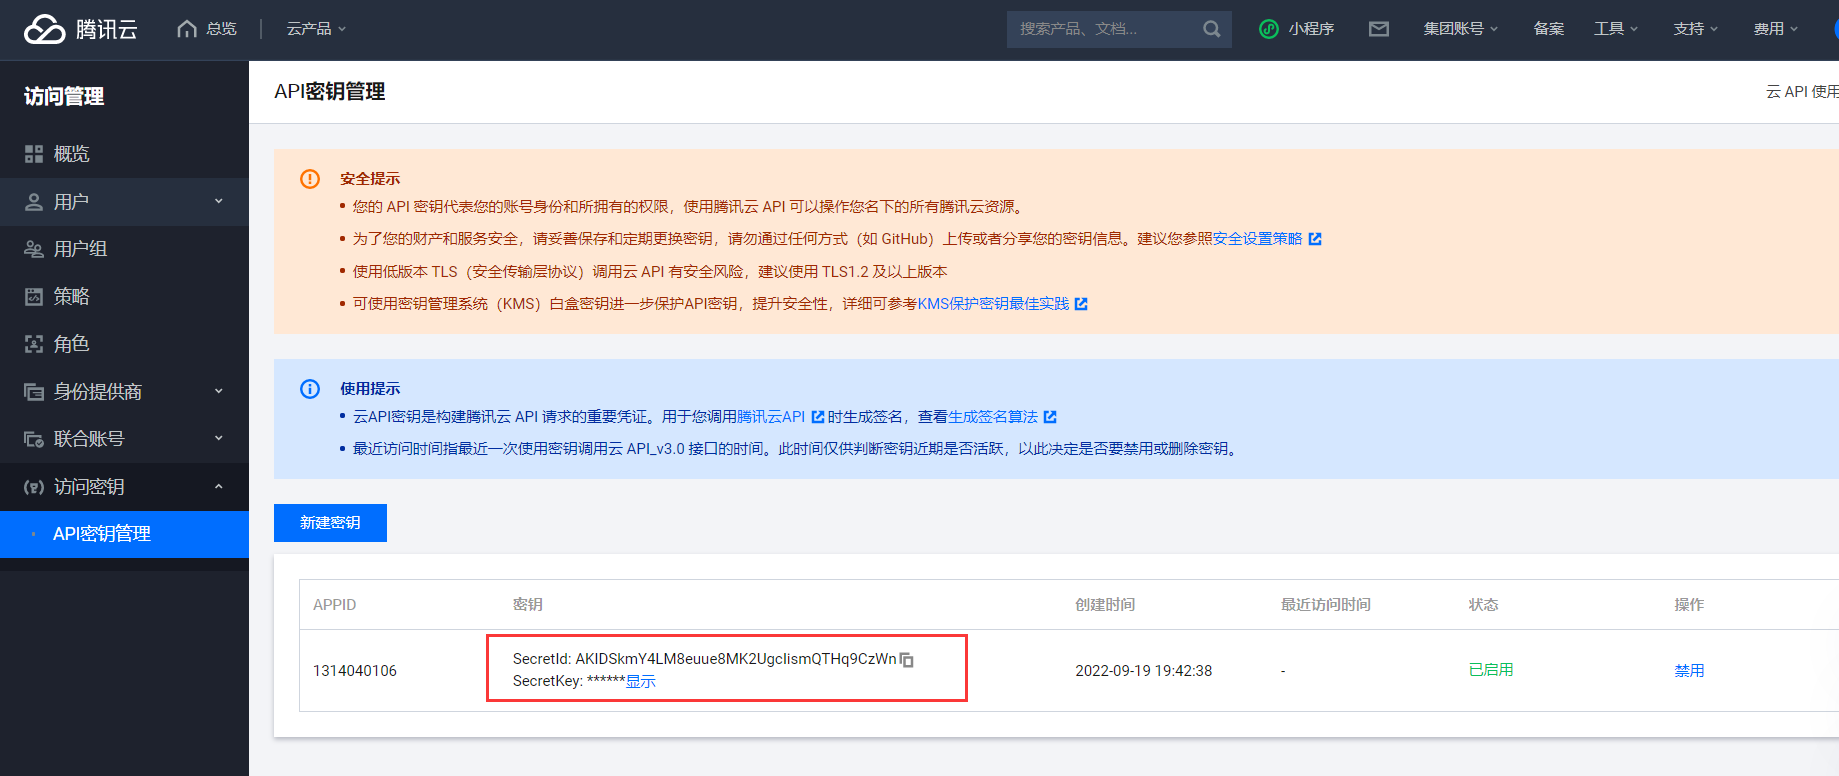
拿到密钥id和key粘贴到刚刚复制的代码里面的secretId 和 secretKey里面
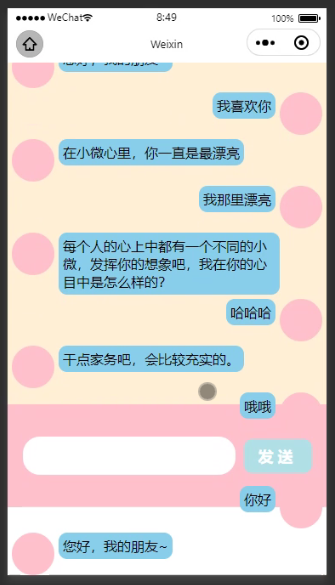
七、实现效果
八、聊天框当消息多了时实现消失滚动和发消息时自动滚动到底部
1、问题效果
2、解决方法
给聊天框这部分使用<scroll-view>滚动区域
3、实现自动滚动到最底部
当聊天记录到底部时,再次发送聊天会发现没有自动滚动。
![]()
max是根据聊天记录的增加而动态的增加的,
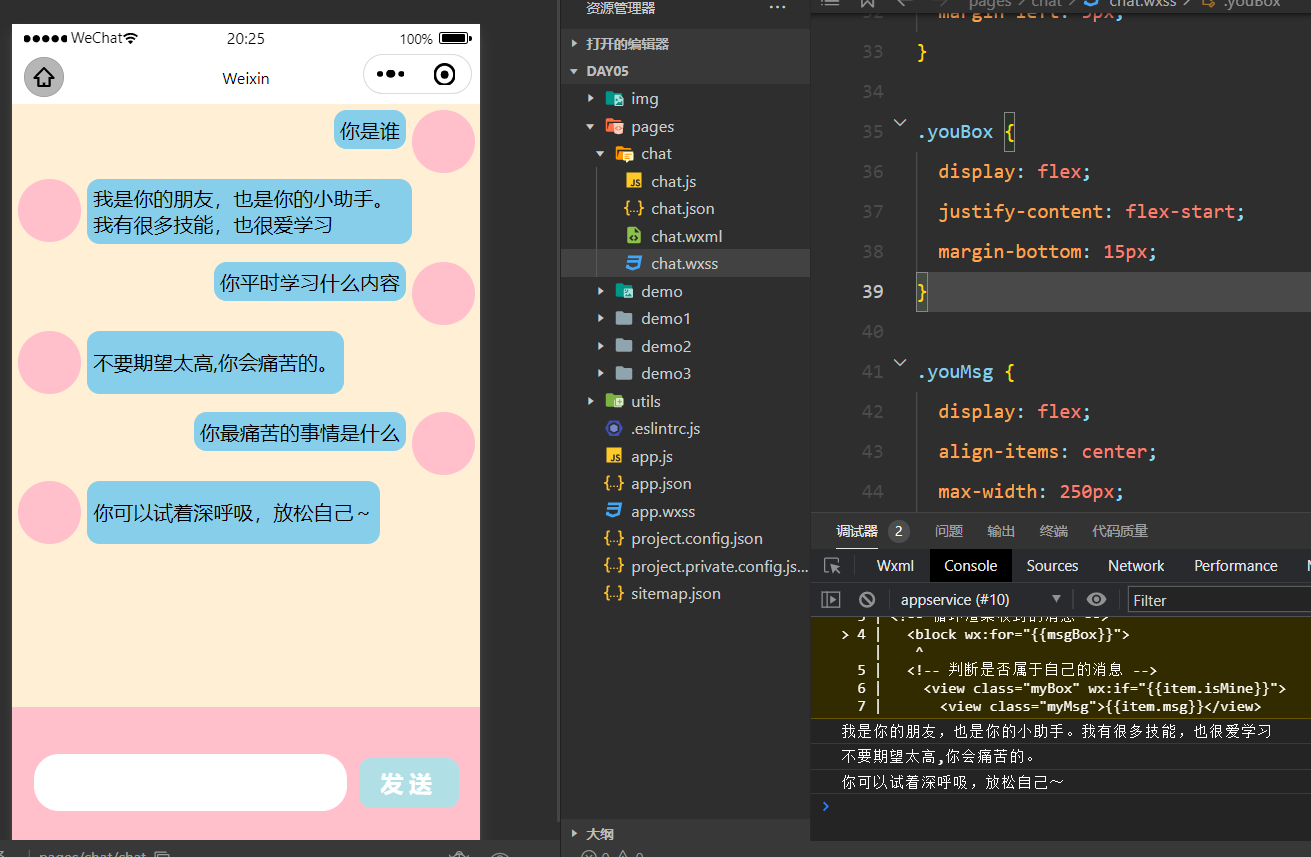
九、代码
wxml代码
<!-- 聊天盒子 -->
<view class="chatBox">
<scroll-view class="gd" scroll-y scroll-top="{

   {max}}" scroll-with-animation>
<!-- 循环渲染收到的消息 -->
  <block wx:for="{

   {msgBox}}">
  <!-- 判断是否属于自己的消息 -->
    <view class="myBox" wx:if="{

   {item.isMine}}">
      <view class="myMsg">{

   {item.msg}}</view>
      <view class="myHd"></view>
    </view>
    <!-- 判断是否属于别人的消息 -->
    <view class="youBox" wx:else>
      <view class="youHd"></view>
      <view class="youMsg">{

   {item.msg}}</view>
    </view>
  </block>
</scroll-view>
</view>
<!-- 发送消息盒子 -->
<view class="sendBox">
  <input type="text" class="iptBox" model:value="{

   {msg}}" bindinput="aa" />
  <view class="sendBtn" bindtap="sendMsg">发送</view>
</view>
wxss代码
.chatBox {
  height: 80vh;
  width: 100vw;
  background-color: papayawhip;
  padding: 5px 5px;
  box-sizing: border-box;
}
.gd{
  height: 80vh;
}
.myBox {
  display: flex;
  justify-content: flex-end;
  margin-bottom: 5px;
  align-items: flex-start;
}

.myMsg {
  display: flex;
  align-items: center;
  max-width: 250px;
  /* width: 200px;
  height: 100px; */
  background-color: skyblue;
  border-radius: 10px;
  padding: 5px;
}

.myHd {
  height: 50px;
  width: 50px;
  border-radius: 50%;
  background-color: pink;
  margin-left: 5px;
}

.youBox {
  display: flex;
  justify-content: flex-start;
  margin-bottom: 15px;
}

.youMsg {
  display: flex;
  align-items: center;
  max-width: 250px;
  background-color: skyblue;
  border-radius: 10px;
  padding: 5px;
}

.youHd {
  height: 50px;
  width: 50px;
  border-radius: 50%;
  background-color: pink;
  margin-right: 5px;
}

.sendBox {
  display: flex;
  justify-content: center;
  align-items: center;
  height: 20vh;
  width: 100vw;
  background-color: pink;
}

.iptBox {
  height: 45px;
  width: 250px;
  background-color: #fff;
  border-radius: 20px;
  padding-left: 20px;
  box-sizing: border-box;
}

.sendBtn {
  height: 40px;
  width: 80px;
  background-color: powderblue;
  border-radius: 10px;
  text-align: center;
  line-height: 40px;
  font-size: 18px;
  color: #fff;
  font-weight: bold;
  letter-spacing: 5px;
  margin-left: 10px;
}
js代码
// pages/chat/chat.js
Page({

  /**
   * 页面的初始数据
   */
  data: {
    msg:"",
    msgBox:[],
    max:""
  },
// 避免输入警告
  aa:function(){},
  sendMsg:function(){
    // 判断用户是否输入了值
    if(this.data.msg) {
      var that=this
      // 缓存用户输入的值
      var myMsg = this.data.msg;
      // 自定义对象
      var myObj = {
        msg:myMsg,
        isMine:true
      }
      // 将自定义对象放入消息盒子
      this.data.msgBox.push(myObj);
      // 将消息盒子重新赋值,将用户输入的值赋值为空
      this.setData({
        msg:"",
        msgBox:this.data.msgBox,
        max:10000+this.data.msgBox.length
      });

      wx.request({
        url: 'http://127.0.0.1:7001/chat',
        method:"POST",
        // data表示给后端传的数据
        data:{
          myMsg:myMsg
        },
        // success表示从后端获取的数据
        success(res){
           console.log(res.data.ResponseText);
           var myObj = {
            msg:res.data.ResponseText,
            isYour:false
          };

          // 将自定义对象放入消息盒子
          that.data.msgBox.push(myObj);
          // 将消息盒子重新赋值,将用户输入的值赋值为空
          that.setData({
            // msg:"",
            msgBox:that.data.msgBox,
            max:10000+that.data.msgBox.length
          });
        }
      })


    }

  },

  /**
   * 生命周期函数--监听页面加载
   */
  onLoad(options) {

  },

  /**
   * 生命周期函数--监听页面初次渲染完成
   */
  onReady() {

  },

  /**
   * 生命周期函数--监听页面显示
   */
  onShow() {

  },

  /**
   * 生命周期函数--监听页面隐藏
   */
  onHide() {

  },

  /**
   * 生命周期函数--监听页面卸载
   */
  onUnload() {

  },

  /**
   * 页面相关事件处理函数--监听用户下拉动作
   */
  onPullDownRefresh() {

  },

  /**
   * 页面上拉触底事件的处理函数
   */
  onReachBottom() {

  },

  /**
   * 用户点击右上角分享
   */
  onShareAppMessage() {

  }
})
node.js代码
router.js代码
'use strict';

/**
 * @param {Egg.Application} app - egg application
 */
module.exports = app => {
  const { router, controller } = app;
  router.post('/',controller.home.index);
  router.post('/chat',controller.home.chat)
};
home.js代码
'use strict';
const Controller = require('egg').Controller;
class HomeController extends Controller {
async index() {
const { ctx } = this;
ctx.body = 'hi, egg';
}
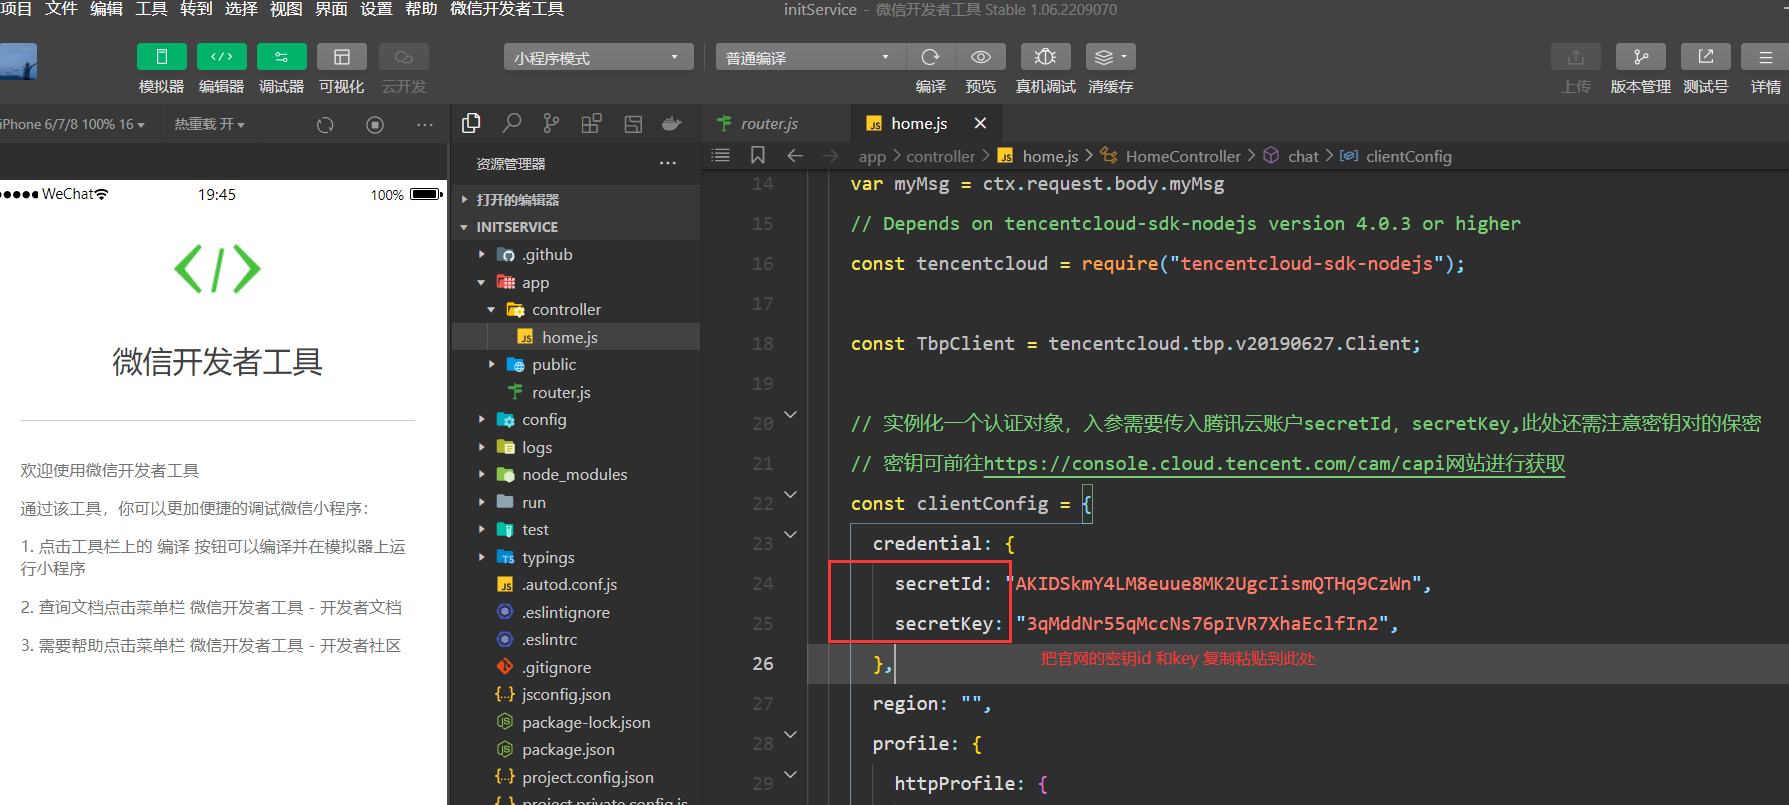
// 结合腾讯AI开发平台的智能对话,首先前端发送聊天内容后端服务器接收到后再通过InputText把聊天数据发送到腾讯服务器获取智能AI的回复聊天内容,再把该内容返回到前端
async chat() {
const { ctx } = this;
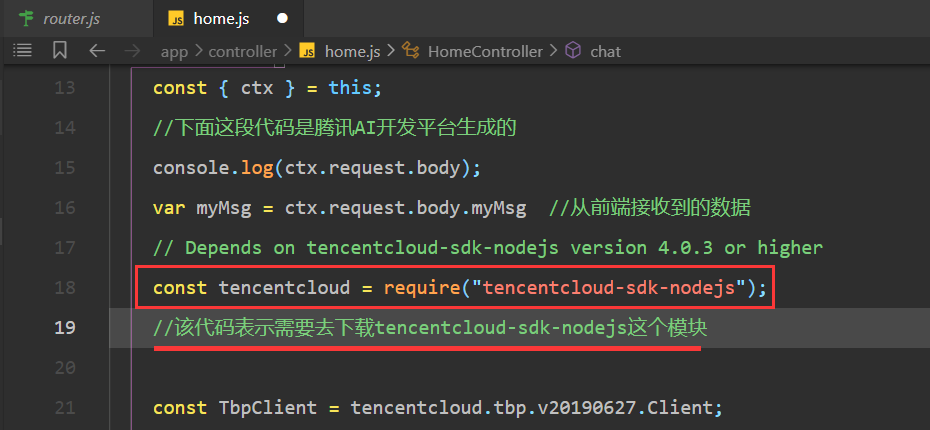
//下面这段代码是腾讯AI开发平台生成的
console.log(ctx.request.body);
var myMsg = ctx.request.body.myMsg //从前端接收到的数据
// Depends on tencentcloud-sdk-nodejs version 4.0.3 or higher
const tencentcloud = require("tencentcloud-sdk-nodejs");
//该代码表示需要去下载tencentcloud-sdk-nodejs这个模块
const TbpClient = tencentcloud.tbp.v20190627.Client;
// 实例化一个认证对象,入参需要传入腾讯云账户secretId,secretKey,此处还需注意密钥对的保密
// 密钥可前往https://console.cloud.tencent.com/cam/capi网站进行获取
const clientConfig = {
credential: {
secretId: "AKIDSkmY4LM8euue8MK2UgcIismQTHq9CzWn",
secretKey: "3qMddNr55qMccNs76pIVR7XhaEclfIn2",
},
region: "",
profile: {
httpProfile: {
endpoint: "tbp.tencentcloudapi.com",
},
},
};
// 实例化要请求产品的client对象,clientProfile是可选的
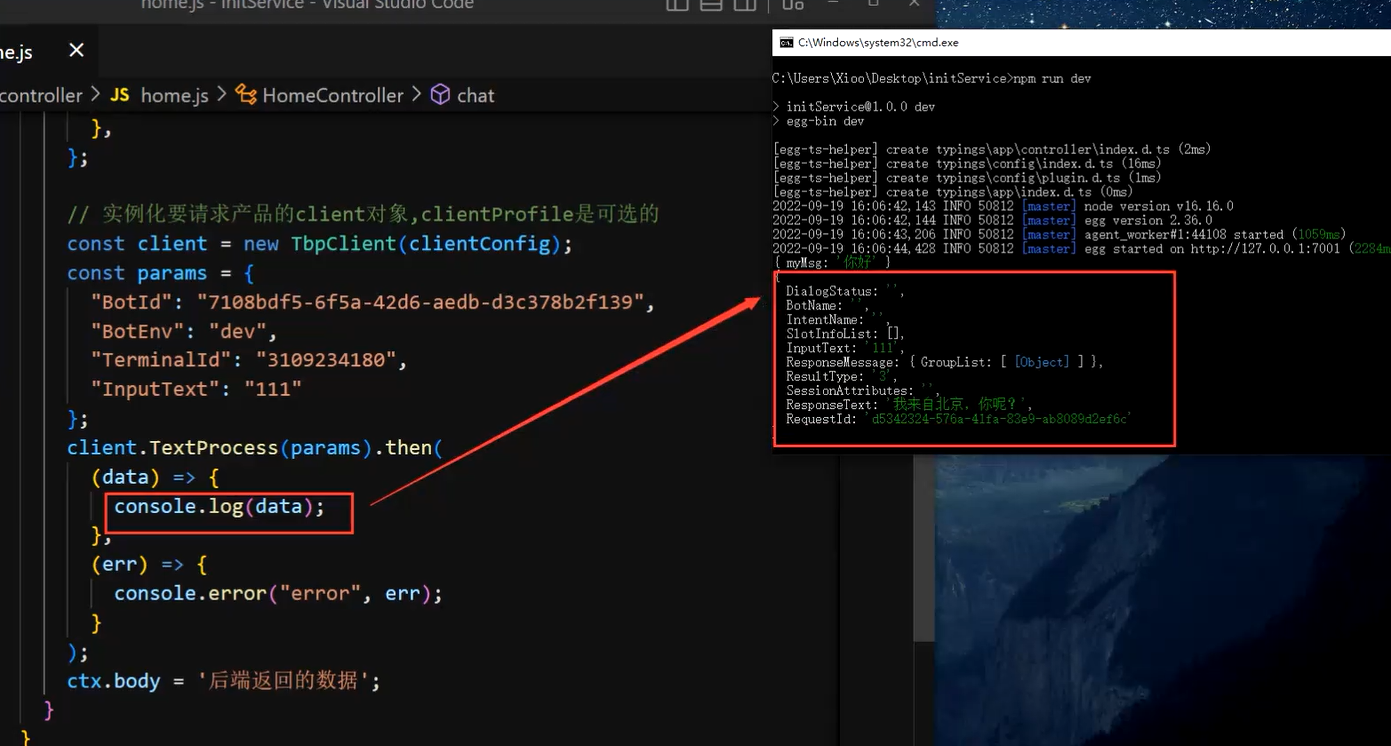
const client = new TbpClient(clientConfig);
const params = {
"BotId": "c472c9ea-8edf-4486-a58d-560c5e14c814",
"BotEnv": "dev",
"TerminalId": "1447608208",
"InputText": myMsg
// 前端传过来的数据,再传给腾讯服务器,以获取智能AI回复的数据
};
// await是等待执行,等返回数据后再执行
await client.TextProcess(params).then(
(data) => {
console.log(data);
ctx.body = data; //返回到前端的数据
},
(err) => {
console.error("error", err);
}
);
}
}
module.exports = HomeController;