目录
1、Spring整合SSH
2、常用的增删改查
3、延迟加载问题
4、复制项目
内容
1、三大框架的配置文件
1.1. Struts2框架
在web.xml中配置核心的过滤器
         <filter>

              <filter-name>struts2</filter-name>

              <filter-class>org.apache.struts2.dispatcher.ng.filter.StrutsPrepareAndExecuteFilter</filter-class>

           </filter>

           <filter-mapping>

              <filter-name>struts2</filter-name>

              <url-pattern>/*</url-pattern>

           </filter-mapping>
在src目录下创建struts.xml,用来配置Action
<package name="crm" extends="struts-default" namespace="/">
		<!-- 最初的Struts写法 -->
		<action name="customer_*" class="com.chuantao.web.action.CustomerAction" method="{1}"></action>
	</package>
1.2.Hibernate框架
* 在src目录创建hibernate.cfg.xml配置文件
<hibernate-configuration>

	<session-factory>
		<!-- 必须配置 -->
		<property name="hibernate.connection.driver_class">com.mysql.jdbc.Driver</property>
		<property name="hibernate.connection.url">jdbc:mysql:///day38_ssh1</property>
		<property name="hibernate.connection.username">root</property>
		<property name="hibernate.connection.password">1234</property>
		<property name="hibernate.dialect">org.hibernate.dialect.MySQLDialect</property>

		<!-- 可选配置 -->
		<property name="hibernate.show_sql">true</property>
		<property name="hibernate.format_sql">true</property>
		<property name="hibernate.hbm2ddl.auto">update</property>

		<!-- 配置C3P0的连接池 -->
		<property name="connection.provider_class">org.hibernate.connection.C3P0ConnectionProvider</property>

		<!-- 映射配置文件 -->
		<mapping resource="com/chuantao/domain/Customer.hbm.xml"/>
	</session-factory>

</hibernate-configuration>
* 在JavaBean所在的包下映射的配置文件
<hibernate-mapping>
	<!-- 名字必须彻底 -->
	<class name="com.chuantao.domain.Customer" table="cst_customer">
		<id name="cust_id" column="cust_id">
			<generator class="native"/>
		</id>

		<property name="cust_name" column="cust_name"/>
		<property name="cust_user_id" column="cust_user_id"/>
		<property name="cust_create_id" column="cust_create_id"/>
		<property name="cust_source" column="cust_source"/>
		<property name="cust_industry" column="cust_industry"/>
		<property name="cust_level" column="cust_level"/>
		<property name="cust_linkman" column="cust_linkman"/>
		<property name="cust_phone" column="cust_phone"/>
		<property name="cust_mobile" column="cust_mobile"/>

	</class>

</hibernate-mapping>
1.3. Spring框架
* 在web.xml配置整合WEB的监听器
  <listener>

              <listener-class>org.springframework.web.context.ContextLoaderListener</listener-class>

           </listener>

           <context-param>

              <param-name>contextConfigLocation</param-name>

              <param-value>classpath:applicationContext.xml</param-value>

           </context-param>
* 在src目录下创建applicationContext.xml
* 在src目录下log4j.proerties
2、Spring整合Struts2框架
1. 导入CRM项目的UI页面,找到添加客户的页面,修改form表单,访问Action
2. 编写CustomerAction接收请求,在struts.xml中完成Action的配置
3. 在Action中获取到service(开发不会使用,因为麻烦)
/*		使用老工厂的方式进行Action和Service进行关联
		WebApplicationContext context = WebApplicationContextUtils.getWebApplicationContext(ServletActionContext.getServletContext());
		CustomerService bean = (CustomerService) context.getBean("customerService");
		bean.add();
*/
		System.out.println("添加客户");
4. Spring整合Struts2框架的第一种方式(Action由Struts2框架来创建)
* 因为导入的struts2-spring-plugin-2.3.24.jar 包自带一个配置文件struts-plugin.xml ,该配置文件中有如下代码
* <constantname="struts.objectFactory" value="spring" /> 开启一个常量,如果该常量开启,那么下面的常量就可以使用
*struts.objectFactory.spring.autoWire = name,该常量是可以让Action的类来自动装配Bean对象!!
5. Spring整合Struts2框架的第二种方式(Action由Spring框架来创建)(推荐大家来使用的)
* 把具体的Action类配置文件applicatonContext.xml的配置文件中,但是注意:struts.xml需要做修改
<!-- 方法二使用IOC进行管理Action,在Struts.xml方面只需要id值就可以了,同时注意action是多例的 -->
	<bean id="customerAction" class="com.chuantao.web.action.CustomerAction" scope="prototype">
		<!-- 将业务层进行注入 -->
		<property name="customerService" ref="customerService"></property>
	</bean>
* struts.xml中的修改,把全路径修改成ID值
* <action name="customer_*"class="customerAction" method="{1}">
* 第二种方式需要有两个注意的地方
* Spring框架默认生成CustomerAction是单例的,而Struts2框架是多例的。所以需要配置 scope="prototype"
* CustomerService现在必须自己手动注入了
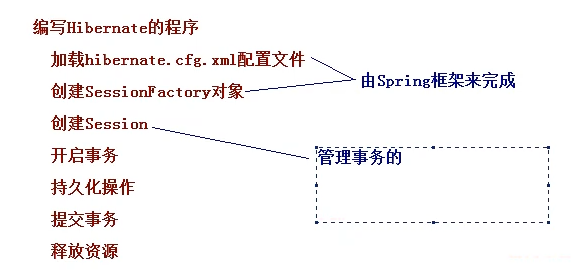
3、Spring整合Hibernate框架(带有hibernate.cfg.xml的配置文件。强调:不能加绑定当前线程的配置)
1. 编写CustomerDaoImpl的代码,加入配置并且在CustomerServiceImpl中完成注入
2. 编写映射的配置文件,并且在hibernate.cfg.xml的配置文件中引入映射的配置文件
3. 在applicationContext.xml的配置文件,配置加载hibernate.cfg.xml的配置
<!--编写bean,名称都是固定,加载hibernate.cfg.xml的配置文件 ,并且构建sessionFactory对象-->
<bean id="sessionFactory" class="org.springframework.orm.hibernate5.LocalSessionFactoryBean">
<!-- 指定加载路径 -->
<property name="configLocation" value="classpath:hibernate.cfg.xml"/>
</bean>
4. 在CustomerDaoImpl中想完成数据的添加,Spring框架提供了一个HibernateDaoSupport的工具类,以后DAO都可以继承该类!!
public class CustomerDaoImp extends HibernateDaoSupport implements CustomerDao  {
	/**
	 * 在HibernateDaoSupport类中有对HibernateTemplate的set方法.所以与自己创建的会产生错误
	 * public final void setHibernateTemplate(HibernateTemplate hibernateTemplate) {
		this.hibernateTemplate = hibernateTemplate;
		}
		同时有对是否传入HibernateTemplate对象的判断,所以在配置文件中,可以直接注入sessionFactory。
		public final void setSessionFactory(SessionFactory sessionFactory) {
			if (this.hibernateTemplate == null || sessionFactory != this.hibernateTemplate.getSessionFactory()) {
				this.hibernateTemplate = createHibernateTemplate(sessionFactory);
			}
		}
	 */
/*	通过模板的方式进行注入属性,
	private HibernateTemplate hibernateTemplate;
	public void setHibernateTemplate(HibernateTemplate hibernateTemplate) {
		this.hibernateTemplate = hibernateTemplate;
	}
	修改代码的时候要彻底,hbm中的class也需要修改
*/

	@Override
	public void add(Customer customer) {
		System.out.println("持久层来也");
		this.getHibernateTemplate().save(customer);


	}


}
6. 开启事务的配置
* 先配置事务管理器,注意现在使用的是Hibernate框架,所以需要使用Hibernate框架的事务管理器
// 在Service类中添加事务注解
@Transactional
4、Spring整合Hibernate不带有hibernate.cfg.xml的配置文件
1. Hibernate配置文件中
* 数据库连接基本参数(4大参数)
* Hibernate相关的属性
* 连接池
* 映射文件
2. 开始进行配置
* 先配置连接池相关的信息
5、Spring模板的常用办法
1. 增删改的操作:
* 添加:
* save(Object obj);
* 修改:
* update(Object obj);
* 删除:
* delete(Object obj);
2. 查询的操作:
* 查询一条记录:
* Object get(Class c,Serializableid);
* Object load(Class c,Serializableid);
3. 查询多条记录:
* List find(String hql,Object... args);
6、延迟加载的问题
1. 使用延迟加载的时候,再WEB层查询对象的时候程序会抛出异常!
* 原因是延迟加载还没有发生SQL语句,在业务层session对象就已经销毁了,所以查询到的JavaBean对象已经变成了托管态对象!
* 注意:一定要先删除javassist-3.11.0.GA.jar包(jar包冲突了)
2. 解决办法非常简单,Spring框架提供了一个过滤器,让session对象在WEB层就创建,在WEB层销毁。只需要配置该过滤器即可
* 但是:要注意需要在struts2的核心过滤器之前进行配置