一、创建好基本样式:
初始化这个元素:
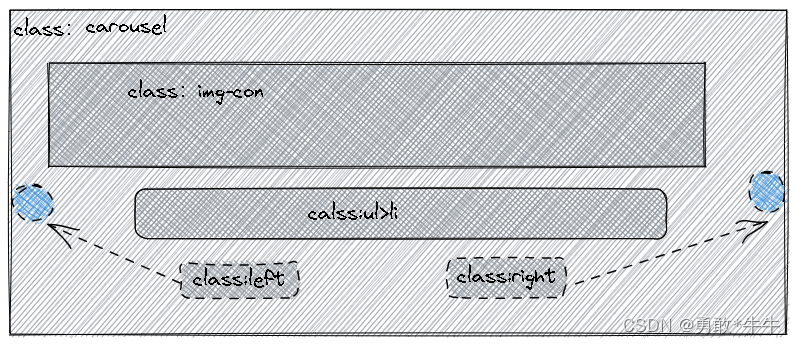
init():创建一个最大的div盒子。类名是carousel,放在这个 body里面。
- 然后在这个类名为
carousel的div里面添加img-inco(可以理解为图片条) - 再添加一个ul(根据数据的多少,生成li标签)
- 再添加两个左右按钮图片,其中特别注意类名书写和获取元素对象的顺序
此处的代码描述:
init();
/* 初始化 */
function init(){


    /* 创建最外层的大盒子 */
    var carousel = document.createElement('div');
    carousel.className = 'carousel';
    /* 给这个盒子添加一个内容img-con和ul>li */
    carousel.innerHTML=`
        <div class='img-con'></div>
        <ul>${

      arr.reduce(v=> v+'<li></li>','')}</ul>
        <img src='./img/left.png' class='left'>
        <img src='./img/right.png' class='right'>
    `
    document.body.appendChild(carousel)
}
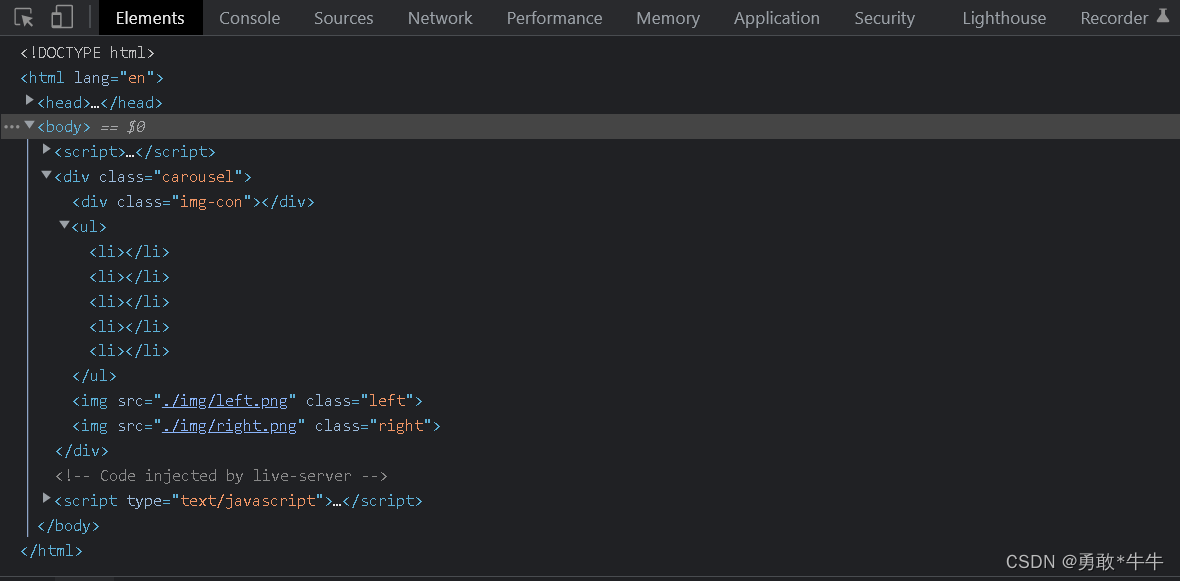
值得注意的是,这边全靠js生成html代码,难免会出现一些代码失误,最好就是开启控制台,边敲边看,是否成功的将数据渲染到页面上。
二、给所谓的这个滚动条,添加滚动块元素

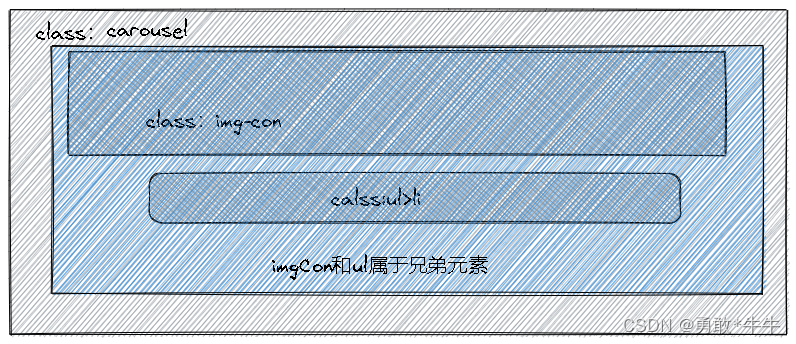
首先这块: getImgBlock(data) 这个函数会将这个进去的数据,打包成一个div返回出来.那么咱们用这个函数,传入对应的数据,生成一个img-block盒子。
然后调用这个函数将在初始化的时候进行插入这个div就行。
初始后面紧跟着。
/* 获取这个盒子的对象 */
imgCon = document.querySelector('.img-con')
/* 给imgCon中插入一个div */
imgCon.appendChild(getImgBlock(arr[1]))
function getImgBlock(data){


    if(blockList[data.id]) return blockList[data.id];
    /* 创建一个div元素,用来包裹一些内容 */
    var div = document.createElement('div');
    /* 给这个div添加样式img-block样式 */
    div.className = 'img-block';
    /* 根据数据添加内容, */
    div.innerHTML = `
        <img src='${

      data.img}'>
        <div>
            <!--这里的日期用正则分割-->
            <!--用这个字符串的斜杠分割成字符串数组,并获取第一个元素-->
            <span><i>${

      data.date.split('/').shift()}</i>${

      data.date.match(/\/.*/)[0].replace(/\/(?=\d+)/,".")}</span>
            <h1>${

      data.info}</h1>
    `
    /*将创建好的div用id存储在存储对象中,那在此之前就是这个是需要定义一个对象*/
    blockList[data.id] = div;
    /*返回这个div*/
    return div;
}

到这就做完了这个基本的布局;

第二小块 给最大的容器添加事件侦听,判断要到那个方向去,图片往那个方向移动 如果点击右,图片就得往左走 如果点击左箭头,图片就给往右走 pos就是定位到底选择那张图片的定位。
图片往左
if(--pos<0) pos =  arr.length-1
图片往右
if(++pos>arr.length-1) pos = 0
那么点击圆点的话,就得判断是否点击了哪个li;
var index = Array.from(e.target.parentElement.children).indexOf(e.target);
console.log(index);
判断下一次图片运行的方向
if(pos == index) return
/* 否则判断,direction的方向 */
/* 如果index大于pos,说明需要选择右边的图片,那图片移动的方向就是向左 */
direction = index>pos ? LEFT:RIGHT
/* 并且把index给pos */
pos = index;
切换小圆点背景色;
这个imgCon.nextElementSibling就是ul
function changePrev(){


	if(prev){


		prev.style.backgroundColor = 'transparent'
	}
	prev = imgCon.nextElementSibling.children[pos]
	prev.style.backgroundColor = 'red';
}
致此就完成了第二部分第二小块、
/* 消除魔术字符串 */
const LEFT = Symbol('LEFT'),RIGHT = Symbol('RIGHT');
var arr=[
{
id:1001,img:"./img/a.jpg",date:"28/Jul/2022",info:"与父母的47天自驾游|向疆而行2万里,我们依旧是过客"},
{
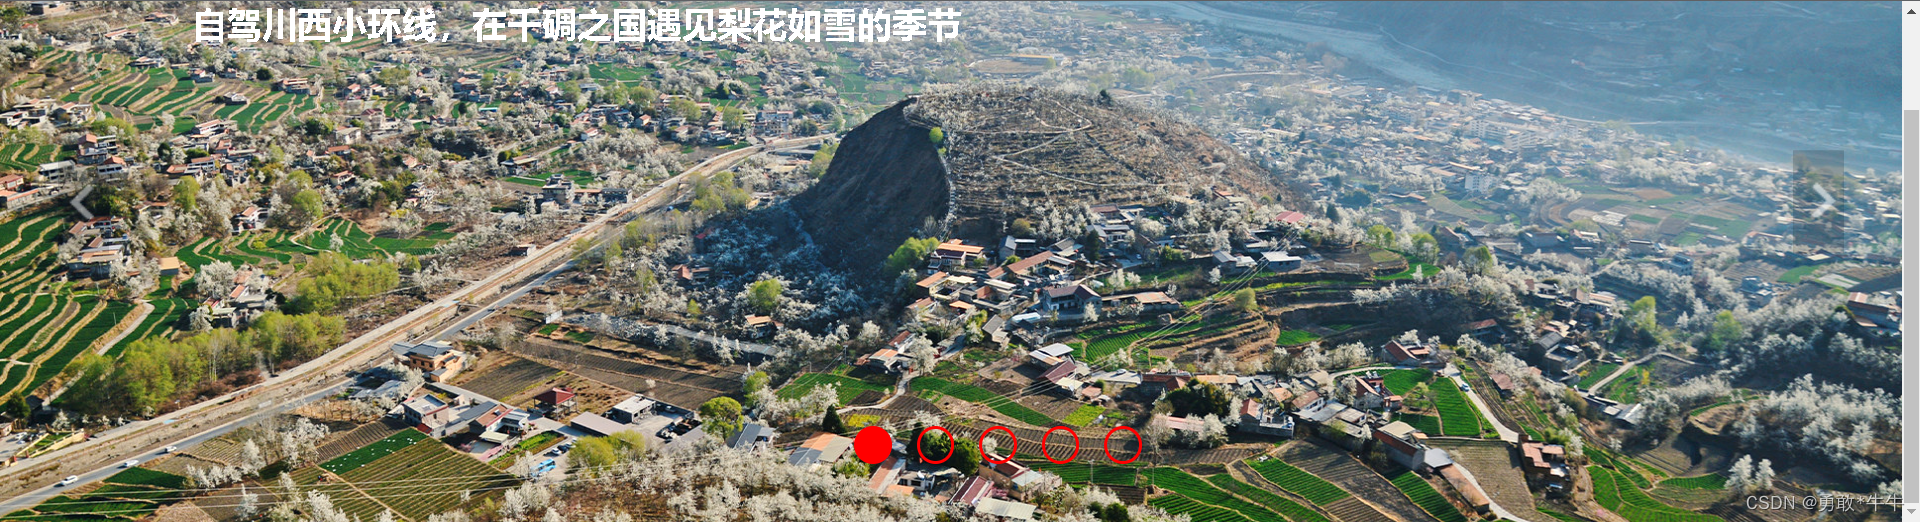
id:1002,img:"./img/b.jpg",date:"27/Jul/2022",info:"自驾川西小环线,在千碉之国遇见梨花如雪的季节"},
{
id:1003,img:"./img/c.jpg",date:"26/Jul/2022",info:"被误解的沙县,原来有这么多美食只有在当地才能吃到!"},
{
id:1004,img:"./img/d.jpg",date:"25/Jul/2022",info:"周末出逃计划 | 打卡美丽中国"},
{
id:1005,img:"./img/e.jpg",date:"24/Jul/2022",info:"寻迹山川湖海,邂逅云南的冬与夏"},
],
blockList= {
},//存储创建的img-block
pos = 0,//默认第一张图片
prev,//选择设置背景色元素对象
direction = LEFT;//图片往那个方向移动:默认点击右按钮朝左走
var imgCon;//获取img-con这个盒子对象
init();
/* 初始化 */
function init(){
/* 创建最外层的大盒子 */
var carousel = document.createElement('div');
carousel.className = 'carousel';
/* 给这个盒子添加一个内容img-con和ul>li */
carousel.innerHTML=`
<div class='img-con'></div>
<ul>${
arr.reduce(v=> v+'<li></li>','')}</ul>
<img src='./img/left.png' class='left'>
<img src='./img/right.png' class='right'>
`
/* 把盒子carousel渲染到页面上 */
document.body.appendChild(carousel)
/* 获取这个盒子里的img-con的对象 */
imgCon = document.querySelector('.img-con')
/* 给imgCon中插入一个div */
imgCon.appendChild(getImgBlock(arr[1]))
/* 给最外层的容器做事件委托点击,注意点击的是小圆点和左右标 */
carousel.addEventListener('click',clickHandler);
/* 初始化圆点背景色 */
changePrev()
}
/* 根据传进来的哪块的数据,创造一个块置元素赋值,并且返回 */
function getImgBlock(data){
if(blockList[data.id]) return blockList[data.id];
/* 创建一个div元素,用来包裹一些内容 */
var div = document.createElement('div');
/* 给这个div添加样式img-block样式 */
div.className = 'img-block';
/* 添加内容, */
div.innerHTML = `
<img src='${
data.img}'>
<div>
<!--这里的日期用正则分割-->
<!--用这个字符串的斜杠分割成字符串数组,并获取第一个元素-->
<span><i>${
data.date.split('/').shift()}</i>${
data.date.match(/\/.*/)[0].replace(/\/(?=\d+)/,".")}</span>
<h1>${
data.info}</h1>
`
blockList[data.id] = div;
return div;
}
function clickHandler(e){
/* 如果被点击的对象不是LI,left,right就跳出 */
if(!/left|right/.test(e.target.className) && e.target.nodeName !== "LI") return
if(e.target.className =='left'){
direction = RIGHT;/* 如果点击左按钮,图片往右移动 */
if(--pos<0) pos = arr.length-1 /* 如果pos小于0,pos定位到最右边 */
}else if(e.target.className == 'right'){
direction = LEFT;/* 如果点击右按钮,图片往左移动 */
if(++pos>arr.length-1) pos = 0;
}else{
/* 获取当前点击的li是ul的第几个 */
/* 找倒被点击的li的父容器ul的所有li。存在一个数组当中,然后查找这个li的下标 */
var index = Array.from(e.target.parentElement.children).indexOf(e.target);
/* 如果下标和当前的pos一致,那就跳出不执行跳转 */
if(pos == index) return
/* 否则判断,direction的方向 */
/* 如果index大于pos,说明需要选择右边的图片,那图片移动的方向就是向左 */
direction = index>pos ? LEFT:RIGHT
/* 并且把index给pos */
pos = index;
}
/* 触发事件改变背景色 */
changePrev()
}
/*改变元素颜色*/
function changePrev(){
if(prev){
prev.style.backgroundColor = 'transparent'
}
prev = imgCon.nextElementSibling.children[pos]
prev.style.backgroundColor = 'red';
}
三、元素点击时无缝滚动
准备阶段:
我们的视口carousel的宽度是100vw,而iimgCon是200%,也就是说这个位置上能插入两张img—block
而当我点击符合的按钮之后,我就先得创建好这个下一张要移动的图片;
当direction方向向左时:
直接在imgcon尾部插入子元素,然后向左移动就会显示3号图片

当direction方向向右时:
图片得自左向右移动,当前的不能里面给立马挤掉,(当前还是这个原来的图片)
移动imgcon的left坐标x为当前的负一半;

function createNextImg()函数就这样的用法
/* 创建下一张图片 */
function createNextImg(){


    /* 判断当前图片需要移动的方向 */
    if(direction === LEFT){


        /* 将当前点击的要变化的索引对应的div获取插入在轮播容器的尾部 */
        imgCon.appendChild(getImgBlock(arr[pos]));
        /*imgCon容器坐标赋值*/
        x=0;
    }else{


        /* 将当前点击的要变化的索引对应的div获取插入在轮播容器的子元素的前面 */
        imgCon.insertBefore(getImgBlock(arr[pos]),imgCon.firstElementChild);
        /* 并且重新设置轮播容器的位置 */
        x= -imgCon.offsetWidth/2
    }
    /*重新设置轮播容器的位置*/
    imgCon.style.left = x+'px'
       /* 如果说图片创建好了 */
            bool = true;
}
第二个就是得做好这个动画效果了
设置布尔值:false不进入 动画;

/* 执行图片向左的动画 */
 function animation(){


     requestAnimationFrame(animation);
     /*控制动画是否进入 */
     if(!bool) return ;
     /* 如果图片方向向左 轮播容器向左走*/
     if(direction === LEFT){


     /*控制动画移动速度 */
         x -= speed;
         /*如果x等于轮播图的一半就停止动画,并删除第一个子元素 */
         if(x<=-imgCon.offsetWidth/2){


             bool = false;
             imgCon.firstElementChild.remove();
             x = 0;
         }
     }else{


			………………………………………………………………………………………………………………………………………………………………………………
     }

 }

四、动画设置
/* 执行动画 */
function animation(){


    requestAnimationFrame(animation);
    /*控制动画是否进入 */
    if(!bool) return ;
    /* 如果图片方向向左 轮播容器向左走*/
    if(direction === LEFT){


        x -= speed;
        /* 当向左移动到一半时 */
        if(x<=-imgCon.offsetWidth/2){


            bool = false;
            /* 删除第一张图片,第二张掉在前面,这样 重新挪回到x=0的位置 */
            imgCon.firstElementChild.remove();
            x = 0;
        }
    }else{


        /* 如果图片方向向右 轮播容器向右走*/
        x += speed;
        /* 当x等于0时停下来 */
        if(x>=0){


            bool = false;
            /* 删除最后一个元素 */
            imgCon.lastElementChild.remove();
            x = 0;
        }
    }
    /* 每次移动left形成动画 */
    imgCon.style.left = x+'px'
}
至此完成了一个无缝的手动轮播图
无缝轮播图(数据驱动显示)
<!DOCTYPE html>
<html lang="en">
<head>
    <meta charset="UTF-8">
    <meta http-equiv="X-UA-Compatible" content="IE=edge">
    <meta name="viewport" content="width=device-width, initial-scale=1.0">
    <title>轮播图</title>
       <style>
        body{


            margin: 0;
            padding: 0;
        }
        .carousel{


            width: 100%;
            height: 33.3vw;
            position: relative;
            left: 0;
            top: 0;
            font-size: 0;
            min-width: 1000px;
            overflow: hidden;
        }
        .carousel>.img-con{


            width: 200%;
            height: 100%;
            position: absolute;
            left: 0;
        }
        .carousel .img-block{


            width: 50%;
            height: 100%;
            position: relative;
            float: left;

        }
        .carousel .img-block>img{


            width: 100%;
            height: 100%;
            position: absolute;
            left: 0;
            top: 0;
        }
        .carousel .img-block>div{


            position: absolute;
            left:10vw;
            top: 2vw;
            font-size: 20px;
            color: white;
        }
        .carousel .img-block>div>span>i{


            font-style:normal;
            font-size: 28px;
        }
        .carousel .img-block>div>h1{


            font-size: 20px;
        }
        .clear::after
        {


            content: "";
            display: block;
            visibility: hidden;
            height: 0;
            overflow: hidden;
            clear: both;
        }

        ul{


            list-style: none;
            position: absolute;
            bottom: 3vw;
            left: 50%;
            transform: translate(-50%,0);
        }
        ul li{


            width: 1.6vw;
            height: 1.6vw;
            border:2px solid red;
            margin-left: 1.3vw;
            float: left;
            border-radius: 1.6vw;

        }
        .left,.right{


            position: absolute;
            top: 50%;
            transform: translate(0,-50%);
        }
        .left{


            left: 3vw;
        }

        .right{


            right: 3vw;
        }
    </style>
</head>
<body>
    <script>
        /* 消除魔术字符串 */
        const LEFT = Symbol('LEFT'),RIGHT = Symbol('RIGHT');
        var arr=[
            {

      id:1001,img:"./img/a.jpg",date:"28/Jul/2022",info:"与父母的47天自驾游|向疆而行2万里,我们依旧是过客"},
            {

      id:1002,img:"./img/b.jpg",date:"27/Jul/2022",info:"自驾川西小环线,在千碉之国遇见梨花如雪的季节"},
            {

      id:1003,img:"./img/c.jpg",date:"26/Jul/2022",info:"被误解的沙县,原来有这么多美食只有在当地才能吃到!"},
            {

      id:1004,img:"./img/d.jpg",date:"25/Jul/2022",info:"周末出逃计划 | 打卡美丽中国"},
            {

      id:1005,img:"./img/e.jpg",date:"24/Jul/2022",info:"寻迹山川湖海,邂逅云南的冬与夏"},
        ],
        blockList= {

      },//存储创建的img-block
        pos = 0,//默认第一张图片
        prev,//选择设置背景色元素对象
        x = 0,//imgCon坐标的意思
        bool=false,//判断动画是否可以执行
        speed= 5,
        direction = LEFT;//图片往那个方向移动:默认点击右按钮朝左走

        var imgCon;
        init();
        /* 初始化 */
        function init(){


            /* 创建最外层的大盒子 */
            var carousel = document.createElement('div');
            carousel.className = 'carousel';
            /* 给这个盒子添加一个内容img-con和ul>li */
            carousel.innerHTML=`
                <div class='img-con'></div>
                <ul>${
        arr.reduce(v=> v+'<li></li>','')}</ul>
                <img src='./img/left.png' class='left'>
                <img src='./img/right.png' class='right'>
            `
            /* 把盒子carousel渲染到页面上 */
            document.body.appendChild(carousel)


            /* 获取这个盒子里的img-con的对象 */
            imgCon = document.querySelector('.img-con')
            /* 给imgCon中插入一个div */
            imgCon.appendChild(getImgBlock(arr[0]))
            /* 给最外层的容器做事件委托点击,注意点击的是小圆点和左右标 */
            carousel.addEventListener('click',clickHandler);
            /* 初始化圆点背景色 */
            changePrev();
            /* 执行动画 */
            animation();


        }
        /* 根据传进来的哪块的数据,创造一个块置元素赋值,并且返回 */
        function getImgBlock(data){


            if(blockList[data.id]) return blockList[data.id];
            /* 创建一个div元素,用来包裹一些内容 */
            var div = document.createElement('div');
            /* 给这个div添加样式img-block样式 */
            div.className = 'img-block';
            /* 添加内容, */
            div.innerHTML = `
                <img src='${
        data.img}'>
                <div>
                    <!--这里的日期用正则分割-->
                    <!--用这个字符串的斜杠分割成字符串数组,并获取第一个元素-->
                    <span><i>${
        data.date.split('/').shift()}</i>${
        data.date.match(/\/.*/)[0].replace(/\/(?=\d+)/,".")}</span>
                    <h1>${
        data.info}</h1>
            `
            blockList[data.id] = div;
            return div;
        }

        /* 点击事件函数 */
        function clickHandler(e){


            /* 如果动画正在播放,不能点击 */
            if(bool) return;

            /* 如果被点击的对象不是LI,left,right就跳出 */
            if(!/left|right/.test(e.target.className) && e.target.nodeName !== "LI") return
            if(e.target.className =='left'){


                direction = RIGHT;/* 如果点击左按钮,图片往右移动 */
                if(--pos<0) pos =  arr.length-1 /* 如果pos小于0,pos定位到最右边 */
            }else if(e.target.className == 'right'){


                direction = LEFT;/* 如果点击右按钮,图片往左移动 */
                if(++pos>arr.length-1) pos = 0;
            }else{


                /* 获取当前点击的li是ul的第几个 */
                /* 找倒被点击的li的父容器ul的所有li。存在一个数组当中,然后查找这个li的下标 */
                var index = Array.from(e.target.parentElement.children).indexOf(e.target);
                /* 如果下标和当前的pos一致,那就跳出不执行跳转 */
                if(pos == index) return
                /* 否则判断,direction的方向 */
                /* 如果index大于pos,说明需要选择右边的图片,那图片移动的方向就是向左 */
                direction = index>pos ? LEFT:RIGHT
                /* 并且把index给pos */
                pos = index;
            }
            /* 触发事件改变背景色 */
            changePrev()
            createNextImg()//创建下一张图片
        }
        /* 改变圆点背景色 */
        function changePrev(){


            if(prev){


                prev.style.backgroundColor = 'transparent'
            }
            prev = imgCon.nextElementSibling.children[pos]
            prev.style.backgroundColor = 'red';
        }

        /* 动画之前预创建下一张图片 */
        function createNextImg(){


            /* 判断当前图片需要移动的方向 */
            if(direction === LEFT){


                /* 将当前点击的要变化的索引对应的div获取插入在轮播容器的尾部 */
                imgCon.appendChild(getImgBlock(arr[pos]));

                /*imgCon容器坐标赋值*/
                x=0;
            }else{


                /* 将当前点击的要变化的索引对应的div获取插入在轮播容器的子元素的前面 */
                imgCon.insertBefore(getImgBlock(arr[pos]),imgCon.firstElementChild);
                /* 并且重新设置轮播容器的位置 */
                x= -imgCon.offsetWidth/2
            }
            imgCon.style.left = x+'px'

            /* 如果说图片创建好了 */
            bool = true;
        }

        /* 执行动画 */
        function animation(){


            requestAnimationFrame(animation);
            /*控制动画是否进入 */
            if(!bool) return ;
            /* 如果图片方向向左 轮播容器向左走*/
            if(direction === LEFT){


                x -= speed;
                /* 当向左移动到一半时 */
                if(x<=-imgCon.offsetWidth/2){


                    bool = false;
                    /* 删除第一张图片,第二张掉在前面,这样 重新挪回到x=0的位置 */
                    imgCon.firstElementChild.remove();
                    x = 0;
                }
            }else{


                /* 如果图片方向向右 轮播容器向右走*/
                x += speed;
                /* 当x等于0时停下来 */
                if(x>=0){


                    bool = false;
                    /* 删除最后一个元素 */
                    imgCon.lastElementChild.remove();
                    x = 0;
                }
            }
            /* 每次移动left形成动画 */
            imgCon.style.left = x+'px'
        }


    </script>
</body>
</html>
六、自动轮播图
function autoPlay(){


     /* 自动轮播关闭的时候不进入autoPlay,当 打开的时候进入,并且执行 --time */
     if(!autoBool || --time > 0) return;
     time = MAX_TIME;
     console.log('aaa');
     var evt = new MouseEvent('click',{

    bubbles:true});
     /* imgCon.parentElement.lastElementChild就是右按钮 */
     imgCon.parentElement.lastElementChild.dispatchEvent(evt);
 }
 function mouseHandler(e){


     /* 当鼠标离开容器时:true */
    autoBool = e.type === 'mouseleave';
 }
七、全部代码
<!DOCTYPE html>
<html lang="en">
<head>
    <meta charset="UTF-8">
    <meta http-equiv="X-UA-Compatible" content="IE=edge">
    <meta name="viewport" content="width=device-width, initial-scale=1.0">
    <title>轮播图</title>
       <style>
        body{


            margin: 0;
            padding: 0;
        }
        .carousel{


            width: 100%;
            height: 33.3vw;
            position: relative;
            left: 0;
            top: 0;
            font-size: 0;
            min-width: 1000px;
            overflow: hidden;
        }
        .carousel>.img-con{


            width: 200%;
            height: 100%;
            position: absolute;
            left: 0;
        }
        .carousel .img-block{


            width: 50%;
            height: 100%;
            position: relative;
            float: left;

        }
        .carousel .img-block>img{


            width: 100%;
            height: 100%;
            position: absolute;
            left: 0;
            top: 0;
        }
        .carousel .img-block>div{


            position: absolute;
            left:10vw;
            top: 2vw;
            font-size: 20px;
            color: white;
        }
        .carousel .img-block>div>span>i{


            font-style:normal;
            font-size: 28px;
        }
        .carousel .img-block>div>h1{


            font-size: 20px;
        }
        .clear::after
        {


            content: "";
            display: block;
            visibility: hidden;
            height: 0;
            overflow: hidden;
            clear: both;
        }

        ul{


            list-style: none;
            position: absolute;
            bottom: 3vw;
            left: 50%;
            transform: translate(-50%,0);
        }
        ul li{


            width: 1.6vw;
            height: 1.6vw;
            border:2px solid red;
            margin-left: 1.3vw;
            float: left;
            border-radius: 1.6vw;

        }
        .left,.right{


            position: absolute;
            top: 50%;
            transform: translate(0,-50%);
        }
        .left{


            left: 3vw;
        }

        .right{


            right: 3vw;
        }
    </style>
</head>
<body>
    <script>
        /* 消除魔术字符串 */
        const LEFT = Symbol('LEFT'),RIGHT = Symbol('RIGHT'),MAX_TIME=200;
        var arr=[
            {

      id:1001,img:"./img/a.jpg",date:"28/Jul/2022",info:"与父母的47天自驾游|向疆而行2万里,我们依旧是过客"},
            {

      id:1002,img:"./img/b.jpg",date:"27/Jul/2022",info:"自驾川西小环线,在千碉之国遇见梨花如雪的季节"},
            {

      id:1003,img:"./img/c.jpg",date:"26/Jul/2022",info:"被误解的沙县,原来有这么多美食只有在当地才能吃到!"},
            {

      id:1004,img:"./img/d.jpg",date:"25/Jul/2022",info:"周末出逃计划 | 打卡美丽中国"},
            {

      id:1005,img:"./img/e.jpg",date:"24/Jul/2022",info:"寻迹山川湖海,邂逅云南的冬与夏"},
        ],
        blockList= {

      },//存储创建的img-block
        pos = 0,//默认第一张图片
        prev,//选择设置背景色元素对象
        x = 0,//imgCon坐标的意思
        bool=false,//判断动画是否可以执行
        speed= 5,//速度
        autoBool = true,//自动轮播控制
        time = MAX_TIME;
        direction = LEFT;//图片往那个方向移动:默认点击右按钮朝左走


        var imgCon;
        init();
        /* 初始化 */
        function init(){


            /* 创建最外层的大盒子 */
            var carousel = document.createElement('div');
            carousel.className = 'carousel';
            /* 给这个盒子添加一个内容img-con和ul>li */
            carousel.innerHTML=`
                <div class='img-con'></div>
                <ul>${
        arr.reduce(v=> v+'<li></li>','')}</ul>
                <img src='./img/left.png' class='left'>
                <img src='./img/right.png' class='right'>
            `
            /* 把盒子carousel渲染到页面上 */
            document.body.appendChild(carousel)


            /* 获取这个盒子里的img-con的对象 */
            imgCon = document.querySelector('.img-con')
            /* 给imgCon中插入一个div */
            imgCon.appendChild(getImgBlock(arr[0]))
            /* 给最外层的容器做事件委托点击,注意点击的是小圆点和左右标 */
            carousel.addEventListener('click',clickHandler);

            /* 给最外层的容器做事件委托点击 */
            carousel.addEventListener('mouseenter',mouseHandler)
            carousel.addEventListener('mouseleave',mouseHandler)
            /* 初始化圆点背景色 */
            changePrev();
            /* 执行动画 */
            animation();


        }
        /* 根据传进来的哪块的数据,创造一个块置元素赋值,并且返回 */
        function getImgBlock(data){


            if(blockList[data.id]) return blockList[data.id];
            /* 创建一个div元素,用来包裹一些内容 */
            var div = document.createElement('div');
            /* 给这个div添加样式img-block样式 */
            div.className = 'img-block';
            /* 添加内容, */
            div.innerHTML = `
                <img src='${
        data.img}'>
                <div>
                    <!--这里的日期用正则分割-->
                    <!--用这个字符串的斜杠分割成字符串数组,并获取第一个元素-->
                    <span><i>${
        data.date.split('/').shift()}</i>${
        data.date.match(/\/.*/)[0].replace(/\/(?=\d+)/,".")}</span>
                    <h1>${
        data.info}</h1>
            `
            blockList[data.id] = div;
            return div;
        }

        /* 点击事件函数 */
        function clickHandler(e){


            /* 如果动画正在播放,不能点击 */
            if(bool) return;

            /* 如果被点击的对象不是LI,left,right就跳出 */
            if(!/left|right/.test(e.target.className) && e.target.nodeName !== "LI") return
            if(e.target.className =='left'){


                direction = RIGHT;/* 如果点击左按钮,图片往右移动 */
                if(--pos<0) pos =  arr.length-1 /* 如果pos小于0,pos定位到最右边 */
            }else if(e.target.className == 'right'){


                direction = LEFT;/* 如果点击右按钮,图片往左移动 */
                if(++pos>arr.length-1) pos = 0;
            }else{


                /* 获取当前点击的li是ul的第几个 */
                /* 找倒被点击的li的父容器ul的所有li。存在一个数组当中,然后查找这个li的下标 */
                var index = Array.from(e.target.parentElement.children).indexOf(e.target);
                /* 如果下标和当前的pos一致,那就跳出不执行跳转 */
                if(pos == index) return
                /* 否则判断,direction的方向 */
                /* 如果index大于pos,说明需要选择右边的图片,那图片移动的方向就是向左 */
                direction = index>pos ? LEFT:RIGHT
                /* 并且把index给pos */
                pos = index;
            }
            /* 触发事件改变背景色 */
            changePrev()
            createNextImg()//创建下一张图片
        }
        /* 改变圆点背景色 */
        function changePrev(){


            if(prev){


                prev.style.backgroundColor = 'transparent'
            }
            prev = imgCon.nextElementSibling.children[pos]
            prev.style.backgroundColor = 'red';
        }

        /* 动画之前预创建下一张图片 */
        function createNextImg(){


            /* 判断当前图片需要移动的方向 */
            if(direction === LEFT){


                /* 将当前点击的要变化的索引对应的div获取插入在轮播容器的尾部 */
                imgCon.appendChild(getImgBlock(arr[pos]));

                /*imgCon容器坐标赋值*/
                x=0;
            }else{


                /* 将当前点击的要变化的索引对应的div获取插入在轮播容器的子元素的前面 */
                imgCon.insertBefore(getImgBlock(arr[pos]),imgCon.firstElementChild);
                /* 并且重新设置轮播容器的位置 */
                x= -imgCon.offsetWidth/2
            }
            imgCon.style.left = x+'px'

            /* 如果说图片创建好了 */
            bool = true;
        }

        /* 执行动画 */
        function animation(){


            requestAnimationFrame(animation);
            imgMove();
            autoPlay();


        }
        /* carousel移动控制  */
        function imgMove(){


            /*控制动画是否进入 */
            if(!bool) return ;
            /* 如果图片方向向左 轮播容器向左走*/
            if(direction === LEFT){


                x -= speed;
                /* 当向左移动到一半时 */
                if(x<=-imgCon.offsetWidth/2){


                    bool = false;
                    /* 删除第一张图片,第二张掉在前面,这样 重新挪回到x=0的位置 */
                    imgCon.firstElementChild.remove();
                    x = 0;
                }
            }else{


                /* 如果图片方向向右 轮播容器向右走*/
                x += speed;
                /* 当x等于0时停下来 */
                if(x>=0){


                    bool = false;
                    /* 删除最后一个元素 */
                    imgCon.lastElementChild.remove();
                    x = 0;
                }
            }
            /* 每次移动left形成动画 */
            imgCon.style.left = x+'px'
        }
        /*  */
        function autoPlay(){


            /* 自动轮播关闭的时候不进入autoPlay,当 打开的时候进入,并且执行 --time */
            if(!autoBool || --time > 0) return;
            time = MAX_TIME;
            console.log('aaa');
            var evt = new MouseEvent('click',{

      bubbles:true});
            /* imgCon.parentElement.lastElementChild就是右按钮 */
            imgCon.parentElement.lastElementChild.dispatchEvent(evt);
        }
        function mouseHandler(e){


            /* 当鼠标离开容器时:true */
           autoBool = e.type === 'mouseleave';
        }


    </script>
</body>
</html>
