在前面一篇文章中,我们讲解了audioTrack方式播放音频:audioTrack方式播放,本文使用openSLES方式来播放FFmpeg解码后的音频数据。
一、音频解码播放流程图
首先是关于FFmpeg音频解码的流程图,这个与解码流程基本一致:
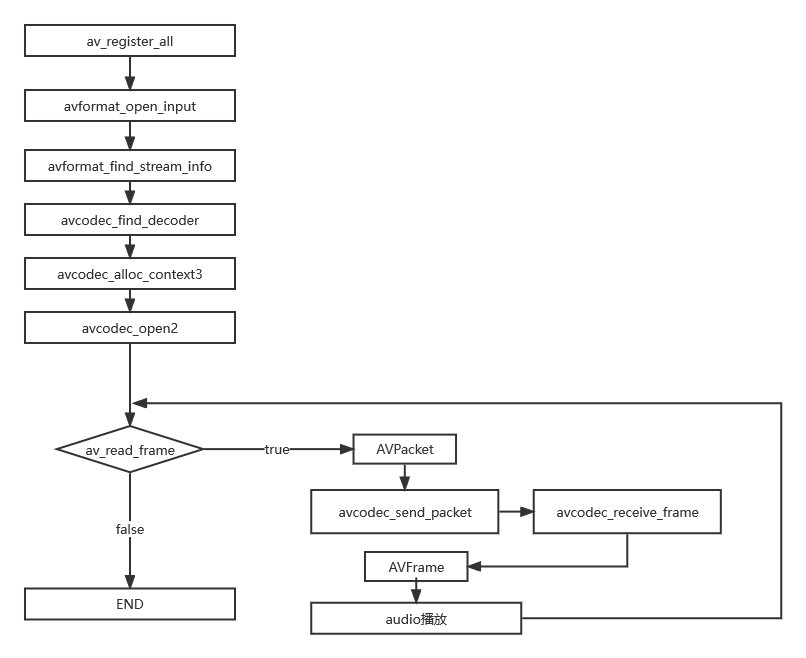
然后与audioTrack方式不同的是,播放的那一步是采用openSLES,openSLES接口不在java层,而是在JNI层的,这个相对复杂一些。这里也做一下openSLES播放音频相关的流程图:
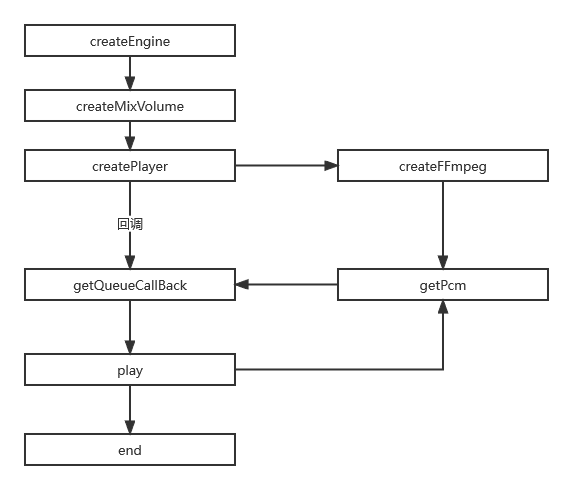
两者的流程是结合在一起,互相配合的。
二、音频解码并用openSLES播放整体流程
1、openSLES播放相关流程
先大概讲一下openSLES播放的相关流程:
(1)、创建引擎
创建openSLES引擎
//创建引擎
void createEngine(){
    slCreateEngine(&engineObject,0,NULL,0,NULL,NULL);//创建引擎
    (*engineObject)->Realize(engineObject,SL_BOOLEAN_FALSE);//实现engineObject接口对象
    (*engineObject)->GetInterface(engineObject,SL_IID_ENGINE,&engineEngine);//通过引擎调用接口初始化SLEngineItf
}
(2)、创建混音器
创建openSLES混音器
//创建混音器
void createMixVolume(){
    (*engineEngine)->CreateOutputMix(engineEngine,&outputMixObject,0,0,0);//用引擎对象创建混音器接口对象
    (*outputMixObject)->Realize(outputMixObject,SL_BOOLEAN_FALSE);//实现混音器接口对象
    SLresult   sLresult = (*outputMixObject)->GetInterface(outputMixObject,SL_IID_ENVIRONMENTALREVERB,&outputMixEnvironmentalReverb);//利用混音器实例对象接口初始化具体的混音器对象
    //设置
    if (SL_RESULT_SUCCESS == sLresult) {
        (*outputMixEnvironmentalReverb)->
                SetEnvironmentalReverbProperties(outputMixEnvironmentalReverb, &settings);
    }
}
(3)、创建播放器并播放
创建播放器并播放
//创建播放器
void createPlayer(JNIEnv *env,jstring input){
    //初始化ffmpeg
    unsigned int rate;
    unsigned int channels;
    createFFmpeg(env,(int *)&rate,(int *)&channels,input);
    LOGE("RATE %d",rate);
    LOGE("channels %d",channels);
    /**
     * typedef struct SLDataLocator_AndroidBufferQueue_ {
    SLuint32    locatorType;//缓冲区队列类型
    SLuint32    numBuffers;//buffer位数
    }
     */

    SLDataLocator_AndroidBufferQueue android_queue = {SL_DATALOCATOR_ANDROIDSIMPLEBUFFERQUEUE,2};
    /**
    typedef struct SLDataFormat_PCM_ {
        SLuint32 		formatType;  pcm
        SLuint32 		numChannels;  通道数
        SLuint32 		samplesPerSec;  采样率
        SLuint32 		bitsPerSample;  采样位数
        SLuint32 		containerSize;  包含位数
        SLuint32 		channelMask;     立体声
        SLuint32		endianness;    end标志位
    } SLDataFormat_PCM;
     */
    SLDataFormat_PCM pcm = {SL_DATAFORMAT_PCM,channels,rate*1000
            ,SL_PCMSAMPLEFORMAT_FIXED_16
            ,SL_PCMSAMPLEFORMAT_FIXED_16
            ,SL_SPEAKER_FRONT_LEFT|SL_SPEAKER_FRONT_RIGHT,SL_BYTEORDER_LITTLEENDIAN};

    /**
      typedef struct SLDataSource_ {
	        void *pLocator;//缓冲区队列
	        void *pFormat;//数据样式,配置信息
        } SLDataSource;
     * */
    SLDataSource dataSource = {&android_queue,&pcm};


    SLDataLocator_OutputMix slDataLocator_outputMix={SL_DATALOCATOR_OUTPUTMIX,outputMixObject};


    SLDataSink slDataSink = {&slDataLocator_outputMix,NULL};


    const SLInterfaceID ids[3]={SL_IID_BUFFERQUEUE,SL_IID_EFFECTSEND,SL_IID_VOLUME};
    const SLboolean req[3]={SL_BOOLEAN_FALSE,SL_BOOLEAN_FALSE,SL_BOOLEAN_FALSE};

    /**
     * SLresult (*CreateAudioPlayer) (
		SLEngineItf self,
		SLObjectItf * pPlayer,
		SLDataSource *pAudioSrc,//数据设置
		SLDataSink *pAudioSnk,//关联混音器
		SLuint32 numInterfaces,
		const SLInterfaceID * pInterfaceIds,
		const SLboolean * pInterfaceRequired
	);
     * */

    (*engineEngine)->CreateAudioPlayer(engineEngine,&audioplayer,&dataSource,&slDataSink,3,ids,req);
    (*audioplayer)->Realize(audioplayer,SL_BOOLEAN_FALSE);

    (*audioplayer)->GetInterface(audioplayer,SL_IID_PLAY,&slPlayItf);//初始化播放器
    //注册缓冲区,通过缓冲区里面 的数据进行播放
    (*audioplayer)->GetInterface(audioplayer,SL_IID_BUFFERQUEUE,&slBufferQueueItf);
    //设置回调接口
    (*slBufferQueueItf)->RegisterCallback(slBufferQueueItf,getQueueCallBack,NULL);
    //播放
    (*slPlayItf)->SetPlayState(slPlayItf,SL_PLAYSTATE_PLAYING);

    //开始播放
    getQueueCallBack(slBufferQueueItf,NULL);

}
这其中,最终是回调getQueueCallBack进行播放
//将pcm数据添加到缓冲区中
void getQueueCallBack(SLAndroidSimpleBufferQueueItf  slBufferQueueItf, void* context){

    buffersize=0;

    getPcm(&buffer,&buffersize);
    if(buffer!=NULL&&buffersize!=0){
        //将得到的数据加入到队列中
        (*slBufferQueueItf)->Enqueue(slBufferQueueItf,buffer,buffersize);
    }
}
(4)、结束播放释放资源
//释放资源
void realseResource(){
    if(audioplayer!=NULL){
        (*audioplayer)->Destroy(audioplayer);
        audioplayer=NULL;
        slBufferQueueItf=NULL;
        slPlayItf=NULL;
    }
    if(outputMixObject!=NULL){
        (*outputMixObject)->Destroy(outputMixObject);
        outputMixObject=NULL;
        outputMixEnvironmentalReverb=NULL;
    }
    if(engineObject!=NULL){
        (*engineObject)->Destroy(engineObject);
        engineObject=NULL;
        engineEngine=NULL;
    }
    realseFFmpeg();
}
2、FFmpeg音频解码配合
在上面这个openSLES播放过程中,ffmpeg在这里的音频解码,和数据传输是怎么样的呢。
(1)、创建FFmpeg相关解码器
在创建播放器createPlayer这一步中,会调用createFFmpeg去创建ffmpeg相关的解码参数和解码器。这一步的流程跟 FFmpeg_Android音频播放demo--audioTrack方式 中的FFmpeg解码器配置相关流程是一致的,这里就不多说,需要可以回去参考下。代码如下:
//opensl es调用 int * rate,int *channel
int createFFmpeg(JNIEnv *env,int *rate,int *channel,jstring filename){

    //注册各大组件
    av_register_all();
    LOGE("注册成功")

    const char *inputPath = env->GetStringUTFChars(filename, JNI_FALSE);
    //char *input = "/sdcard/input.mp3";

    avFormatContext = avformat_alloc_context();
    LOGE("--> %s",inputPath);
    LOGE("xxx %p",avFormatContext);

    int error;
    char buf[] = "";
    //打开音频地址并获取里面的内容(解封装)
    error = avformat_open_input(&avFormatContext, inputPath, NULL, NULL);
    if (error != 0) {
        av_strerror(error, buf, 1024);
        LOGE("Couldn't open file %s: %d(%s)", inputPath, error, buf);
        LOGE("打开音频文件失败")
    }
    if(avformat_find_stream_info(avFormatContext,NULL) < 0){
        LOGE("获取内容失败")
        return -1;
    }

    //show
    av_dump_format(avFormatContext, 0, inputPath, 0);

    //获取音频的编码信息
    int i=0;
    for (int i = 0; i < avFormatContext->nb_streams; ++i) {
        if (avFormatContext->streams[i]->codec->codec_type == AVMEDIA_TYPE_AUDIO) {
            LOGE("  找到音频id %d", avFormatContext->streams[i]->codec->codec_type);
            mAudioStreamIdx=i;
            break;
        }
    }

    // 寻找解码器 {start
    //获取解码器上下文
    mAvContext=avFormatContext->streams[mAudioStreamIdx]->codec;
    //获取解码器
    mAcodec = avcodec_find_decoder(mAvContext->codec_id);

#if ABSFILTER_ENABLE
    //过滤器相关配置,这个与音频码流格式相关,也可以不用
    absFilter = av_bsf_get_by_name("mp3decomp");
    //过滤器分配内存
    av_bsf_alloc(absFilter, &absCtx);
    //添加解码器属性
    codecpar = avFormatContext->streams[mAudioStreamIdx]->codecpar;
    avcodec_parameters_copy(absCtx->par_in, codecpar);
    absCtx->time_base_in = avFormatContext->streams[mAudioStreamIdx]->time_base;
    //初始化过滤器上下文
    av_bsf_init(absCtx);
#endif

    // 打开解码器
    if (avcodec_open2(mAvContext, mAcodec, NULL) != 0){
        LOGE("打开失败")
        return -1;
    }
    LOGE("解码器打开成功")
    // 寻找解码器 end}

    //申请AVPacket
    packet = (AVPacket *) av_malloc(sizeof(AVPacket));
    av_init_packet(packet);
    //申请AVFrame
    frame = av_frame_alloc();//分配一个AVFrame结构体,AVFrame结构体一般用于存储原始数据,指向解码后的原始帧

    //得到SwrContext ,进行重采样 {start
    swrContext = swr_alloc();
    //缓存区
    out_buffer = (uint8_t *) av_malloc(44100 * 2);
    //输出的声道布局(立体声)
    uint64_t  out_ch_layout=AV_CH_LAYOUT_STEREO;
    //输出采样位数  16位
    enum AVSampleFormat out_formart=AV_SAMPLE_FMT_S16;
    //输出的采样率必须与输入相同
    int out_sample_rate = mAvContext->sample_rate;
    //swr_alloc_set_opts将PCM源文件的采样格式转换为自己希望的采样格式
    swr_alloc_set_opts(swrContext, out_ch_layout, out_formart, out_sample_rate,
                       mAvContext->channel_layout, mAvContext->sample_fmt, mAvContext->sample_rate, 0,
                       NULL);
    swr_init(swrContext);
    LOGE("设置重采样成功")
    //end}

    //获取通道数  2
    out_channer_nb = av_get_channel_layout_nb_channels(AV_CH_LAYOUT_STEREO);
    *rate = mAvContext->sample_rate;
    *channel = mAvContext->channels;
    return 0;
}
(2)、解码并返回数据给openSLES播放
在getQueueCallBack回调函数中,最终是通过getPcm函数去将FFmpeg解码后的数据拿过来的。这个getPcm中其实就是解码的核心代码,这里也不展开阐述,需要可以去看上面所述的往期文章,代码如下:
int getPcm(void **pcm,size_t *pcm_size){
    char buf[256];
    while(1)
    {
        int ret = av_read_frame(avFormatContext, packet);
        if (ret != 0){
            av_strerror(ret,buf,sizeof(buf));
            LOGE("--%s--\n",buf);
            av_packet_unref(packet);
            break;
        }


        if (ret >= 0 && packet->stream_index != mAudioStreamIdx){
            av_packet_unref(packet);
            continue;
        }

#if ABSFILTER_ENABLE
        if (av_bsf_send_packet(absCtx, packet) < 0){
            LOGE("av_bsf_send_packet faile \n");
            av_packet_unref(packet);
            continue;
        }
        if (av_bsf_receive_packet(absCtx, packet) < 0) {
            LOGE("av_bsf_receive_packet faile \n");
            av_packet_unref(packet);
            continue;
        }
#endif
        {
            // 发送待解码包
            int result = avcodec_send_packet(mAvContext, packet);
            av_packet_unref(packet);
            if (result < 0){
                av_log(NULL, AV_LOG_ERROR, "Error submitting a packet for decoding\n");
                continue;
            }

            // 接收解码数据
            while (result >= 0){
                result = avcodec_receive_frame(mAvContext, frame);
                if (result == AVERROR_EOF)
                    break;
                else if (result == AVERROR(EAGAIN)){
                    result = 0;
                    break;
                }
                else if (result < 0){
                    av_log(NULL, AV_LOG_ERROR, "Error decoding frame\n");
                    av_frame_unref(frame);
                    break;
                }

                LOGE("解码播放")
                swr_convert(swrContext, &out_buffer, 44100 * 2, (const uint8_t **) frame->data, frame->nb_samples);
                //缓冲区的大小
                int size = av_samples_get_buffer_size(NULL, out_channer_nb, frame->nb_samples,
                                                      AV_SAMPLE_FMT_S16, 1);
                *pcm = out_buffer;
                *pcm_size = size;

                av_frame_unref(frame);
                return 0;
            }
        }

    }

    return 0;
}
(3)、结束播放释放ffmpeg相关资源
void realseFFmpeg(){
    av_free_packet(packet);
    av_free(out_buffer);
    av_frame_free(&frame);
    swr_free(&swrContext);
    avcodec_close(mAvContext);
    avformat_close_input(&avFormatContext);
}
至此,mp3文件就可以解码,并通过openSLES对解码后的数据进行播放。
三、demo运行
demo中指定了播放的文件是/sdcard/input.mp3,如下代码,若要改文件,可以在此处修改:
findViewById(R.id.btnStart).setOnClickListener(new View.OnClickListener() {
	@Override
	public void onClick(View view) {
		String PATH = Environment.getExternalStorageDirectory().getPath();
		String input = PATH + File.separator + "input.mp3";
		musicPlay.play(input);
	}
});
运行后截图如下:

点击“PLAY MUSIC”按钮进行播放,可以听到音乐,说明demo运行正常。
过程中log如下:
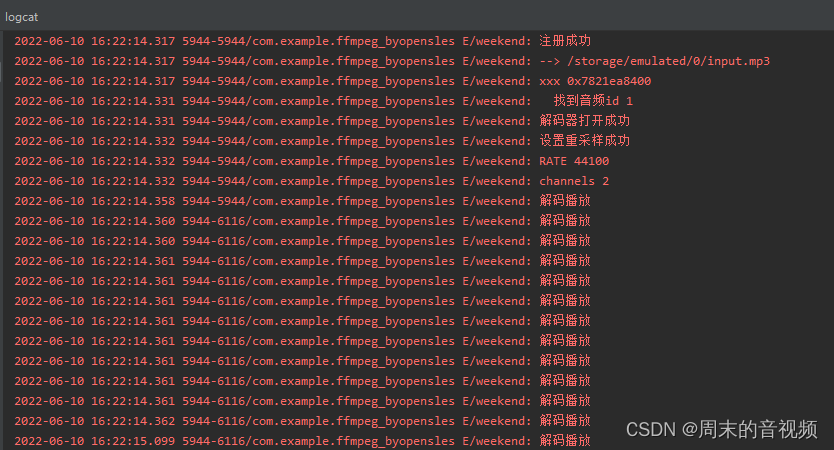
此外,这里多加了个“STOP”按钮,点击可以结束播放。
完整例子已经放到github上,如下:
https://github.com/weekend-y/FFmpeg_Android_Demo/tree/master/demo9_byOpenSLES