图像轮廓
什么是图像轮廓?
具有相同颜色或强度的连续点的曲线

轮廓的作用:
- 可以用于图形分析
- 物体的识别和检测(找到车的轮廓,然后进行定位)
注意:
1.为了检测的准确性,需要先对图像进行二值化或Canny操作
使用 print(img.shape) 查看图片属性
2.画轮廓时会修改输入的图像
如果不想改变原图像,则把原图像进行深拷贝一份
轮廓查找 API
findContours(img, mode, ApproximationMode...)
该API有两个返回值 contours和hierarchy
contours 查找到的所有轮廓的列表
hierarchy 层级,查找到的轮廓之间的关系

一般情况下选择使用 LIST或者TREE
 只检测外部大的边缘
 从里到外进行编号

 用该种方式的情况最多,因为数顺序的时候好数

一般使用第二种较多,比如四边形只保存四个脚,数据量会少很多,但不会减少相应的信息
【实战】查找轮廓
import cv2
from matplotlib.pyplot import gray
import numpy as np

# 读取文件
img = cv2.imread('E:\\contours1.jpeg')
print(img.shape)

# 将图片转化为单通道
gray = cv2.cvtColor(img, cv2.COLOR_BGR2GRAY )
print(gray.shape)

#二值化
ret, binary = cv2.threshold(gray, 150, 255, cv2.THRESH_BINARY)
# ret为转化是否成功判断,binary为二值化图像,150为阈值
print(ret)

# 轮廓查找
contours, hierarchy = cv2.findContours(binary, cv2.RETR_EXTERNAL, cv2.CHAIN_APPROX_SIMPLE)
# contours 为轮廓    hierarchy为层级
print(contours)

# cv2.imshow('img',img)
# #cv2.imshow('gray',gray)
# cv2.imshow('binary',binary)

cv2.waitKey(0)
绘制轮廓API

img 在那张图上进行绘制轮廓
contours 坐标点
contourIdx 轮廓顺序号,-1表示绘制所有轮廓
color 轮廓颜色 (0,0,255)
thickness 线宽, -1表示全部填充
# 轮廓查找
contours, hierarchy = cv2.findContours(binary, cv2.RETR_TREE, cv2.CHAIN_APPROX_SIMPLE)
# contours 为轮廓    hierarchy为层级
print(contours)

# 绘制轮廓
cv2.drawContours(img,contours, -1 ,(0,0,255), 1)

cv2.imshow('img',img)
# #cv2.imshow('gray',gray)
# cv2.imshow('binary',binary)

cv2.waitKey(0)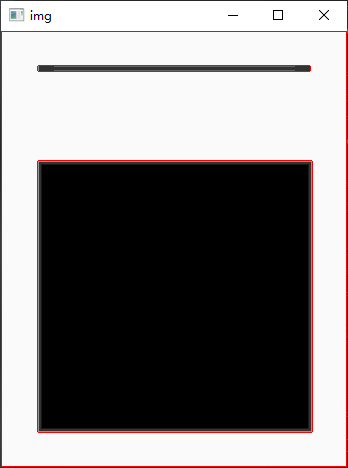
计算轮廓的面积和周长
实用场景:通过判断轮廓的面积来过滤小的轮廓,计算物体的面积
 若要计算实际面积,需要有一个参照物进行比例换算。

闭合:true 不闭合:false
# 计算面积
area = cv2.contourArea(contours[0])
print("area = %d"%(area))

# 计算周长
len = cv2.arcLength(contours[0], True)
# 若为false,则会少计算一条边
print("len = %d"%(len))
多边形逼近与凸包
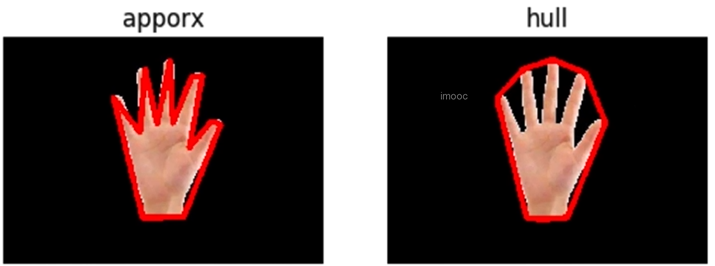
多边形逼近更接近真实的物体
多边形逼近 API
approxPolyDP(curve, epsilon, closed)
curve 轮廓
epsilon 精度
closed 轮廓是否闭合
凸包 API
convexHull(points, clockwise)
points 轮廓
clockwise true为顺时针,false为逆时针
import cv2
from matplotlib.pyplot import gray
import numpy as np

# 读取文件
img = cv2.imread('E:\\opencv_photo\\hand.png')
print(img.shape)

# 将图片转化为单通道
gray = cv2.cvtColor(img, cv2.COLOR_BGR2GRAY )
print(gray.shape)

#二值化
ret, binary = cv2.threshold(gray, 150, 255, cv2.THRESH_BINARY)
# ret为转化是否成功判断,binary为二值化图像,150为阈值
# print(ret)

# 轮廓查找
contours, hierarchy = cv2.findContours(binary, cv2.RETR_TREE, cv2.CHAIN_APPROX_SIMPLE)
# contours 为轮廓    hierarchy为层级
# print(contours)

# 绘制轮廓
# cv2.drawContours(img,contours, 0 ,(255,255,0), 1)

# # 计算面积
# area = cv2.contourArea(contours[0])
# print("area = %d"%(area))

# # 计算周长
# len = cv2.arcLength(contours[0], True)
# # 若为false,则会少计算一条边
# print("len = %d"%(len))

# 多边形逼近
e = 20
approx = cv2.approxPolyDP(contours[0], e, True)

def drawShape(src, points):
    i = 0
    while i < len(points):
        if(i == len(points) - 1):
            x, y = points[i][0]
            x1, y1 = points[0][0]
            cv2.line(src, (x, y), (x1, y1), (0, 0, 255), 3)
        else:
            x, y = points[i][0]
            x1, y1 = points[i+1][0]
            cv2.line(src, (x, y), (x1, y1), (0, 0, 255), 3)
        i = i+1

drawShape(img, approx)

# 凸包
hull = cv2.convexHull(contours[0])
drawShape(img, hull)

cv2.imshow('img',img)
# #cv2.imshow('gray',gray)
# cv2.imshow('binary',binary)

cv2.waitKey(0)

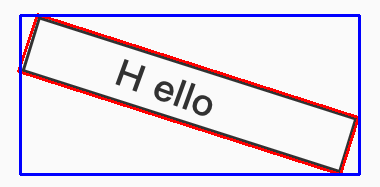
外接矩形
最小外接矩形、最大外接矩形

最小外接矩形:红框,按照最小面积进行连接,判断物体是否发生了旋转,采用该种方式
最大外接矩形:绿框,按照最大面积进行连接
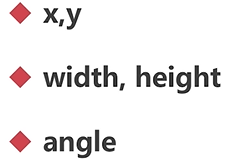
最小外接矩形 API
minAreaRect(points)
points 轮廓
返回值 RotatedRect 矩形的旋转角度,具体参数:
#最小外界矩形
r = cv2.minAreaRect(contours[1])
box = cv2.boxPoints(r)  #取出其中的宽和高
box = np.int0(box)
cv2.drawContours(img, [box], 0, (0,0,255),2)    #轮廓绘制

cv2.imshow('img',img)
# #cv2.imshow('gray',gray)
# cv2.imshow('binary',binary)

cv2.waitKey(0)
最大外界矩形
boundingRect(array)
array 轮廓
返回值 Rect (宽、高)
# 最大外界矩形
x, y , w, h = cv2.boundingRect(contours[1])
cv2.rectangle(img, (x,y),(x+w, y+h), (255, 0, 0), 2)