目录
1.Thread 类
在Java标准库中,提供有一个Thread,来表示/操作线程。
Thread 类也可以视为Java 标准库提供的API。
创建好的 Thread 实例,其实和操作系统中的线程是一一对应的关系。
操作系统,提供了一组关于线程API(C语言风格),Java对于这组API进一步封装了,就成了Thread类
2.创建线程
2.1继承Thread 类
通过Thread 类创建线程,最基本的做法就是创建子类,继承自Thread ,并且重写run方法
(1)继承Thread 来创建一个线程类
重写run方法里面的输出是描述了这个线程内部要执行的代码,每个线程都是并发执行的(各自执行各自的代码),因此就需要告知这个线程,你要执行的是什么
class MyThread extends Thread {
    @Override
    public void run() {
        System.out.println("Hello thread");
    }
}
(2) 创建MyThread 类的实例
Thread t = new MyThread();(3)调用 start 方法启动线程
这一步才是真正的在系统中创建了线程,才能执行上诉的 run 方法
在调用 start 之前,系统中是没有创建出线程的
这里的创建线程,都是在同一个进程内部创建的
t.start(); // 线程开始运行总的线程代码如下:
class MyThread extends Thread {
    @Override
    public void run() {
        System.out.println("Hello thread");
    }
}
//最基本的创建线程的方法,都在同一个进程内
public class Test1 {
    public static void main(String[] args) {
        Thread t = new MyThread();
        t.start();
    }
}

2.2并发执行
在一个进程中,至少会有一个线程
在一个Java 进程中,也至少会有一个调用 main 方法的线程 (IDEA 自动创建的main 线程)
自己创建的 t 线程 和自动的 main 线程,就是并发执行的关系(宏观上看起来是并发执行的)
并发 = 并行 + 并发 。(宏观上区分不了并行和并发都取决于系统内部的调度)
class MyThread2 extends Thread {
    @Override
    public void run() {
        while (true) {
            System.out.println("hello thread");
            try {
                Thread.sleep(1000);//单位ms,即休眠一秒
            } catch (InterruptedException e) {
                e.printStackTrace();
            }
        }
    }
}

/**
 * 并发执行
 * 创建的Thread线程 和 本身的 main 线程一起执行
 */
public class Test2 {
    public static void main(String[] args) {
        Thread t2 = new MyThread2();
        t2.start();//Thread线程开始

        //main本身的线程
        while (true) {
            System.out.println("hello main");
            try {
                Thread.sleep(1000);
            } catch (InterruptedException e) {
                e.printStackTrace();
            }
        }
    }
}
在创建 t 线程中加入了 Thread.sleep(1000); //单位ms,即休眠一秒。就是为了让线程进入 1s 的阻塞状态,不然线程执行的很快,打印出来的看不过来。
每一轮 1s 时间过后,线程恢复,main 线程 和 thread 线程 都是随机唤醒的

2.3实现Runnable 接口
(1)实现Runnable 接口
(2)创建 Thread 类实例, 调用 Thread 的构造方法时将 Runnable 对象作为 target 参数.
(3)调用 t.start(); // 线程开始运行
//Runnable 就是在描述一个 "任务"
class MyRunnable implements Runnable {
    @Override
    public void run() {
        System.out.println("hello runnable");
    }
}
//创建一个类实现Runnable 接口,再创建实例转化给Thread 类
public class Test3 {
    public static void main(String[] args) {
        Thread t3 = new Thread(new MyRunnable());
        t3.start();
    }
}
2.4匿名内部类
(1)匿名内部类创建 Thread 子类对象
创建一个匿名内部类,继承自 Thread 类,同时重写 run 方法, 同时在new 出这个匿名内部类的实例
public class Test4 {
    public static void main(String[] args) {
        Thread t4 = new Thread() {
            @Override
            public void run() {
                System.out.println("内部类");
            }
        };
        t4.start();
    }
}(2)匿名内部类创建 Runnable 子类对象
new 的Runnable 针对这个创建的匿名内部类,同时 new 出的 Runnable 实例传给 Thread 的构造方法
public class Test4 {
    public static void main(String[] args) {
        Thread t5 = new Thread(new Runnable() {
            @Override
            public void run() {
                System.out.println("runnable");
            }
        });
        t5.start();
    }
}
针对上述两种匿名内部类,通常认为 Runnable 的写法更好一点,其能够做到让线程和进程执行任务的时候,更好的进行解耦
(3) lambda 表达式创建 Runnable 子类对象
lambda 代替了Runnable
//使用 lambda 表达式
public class Test5 {
    public static void main(String[] args) {
        Thread t5 = new Thread(() -> {
            System.out.println("lambda");
        });
        t5.start();
    }
}
3.多线程的优势
多线程可以增加运行速度,可以观察多线程在一些场合下是可以提高程序的整体运行效率的。
记录时间,可以使用时间戳函数 currentTimeMillis()
(1)举个例子,先创建一个线程让 a 、b 变量进行自增 100亿次,然后看看所消耗的时间
public class Test6 {
    //一个线程运行两个变量
    private static final long count = 100_0000_0000L;

    public static void serial() {
        //记录程序执行时间
        long beg = System.currentTimeMillis();
        long a = 0;
        for (long i = 0; i < count; i++) {
            a++;
        }
        long b = 0;
        for (long i = 0; i < count; i++) {
            b++;
        }
        long end = System.currentTimeMillis();
        System.out.println("消耗时间 : " + (end - beg) + "ms");
    }


    public static void main(String[] args) throws InterruptedException {
        serial();

    }
}
使用了11784 ms

(2)创建两个线程,一个线程对一个变量进行自增
join 效果就是等待线程结束. t1.join 就是让 main 线程等待 t1 结束. t2.join 让 main 线程等待 t2 结束.
public class Test6 {

    //两个线程
    public static void concurrency() throws InterruptedException {
        long beg = System.currentTimeMillis();
        //线程一
        Thread t1 = new Thread(() ->{
            long a = 0;
            for (long i = 0; i < count; i++) {
                a++;
            }
        });
        t1.start();

        //线程二
        Thread t2 = new Thread(() ->{
            long b = 0;
            for (long i = 0; i < count; i++) {
                b++;
            }
        });
        t2.start();

        // 此处不能直接这么记录结束时间. 别忘了, 现在这个求时间戳的代码是在 main 线程中.
        // main 和 t1 t2 之间是并发执行的关系, 此处 t1 和 t2 还没执行完呢, 这里就开始记录结束时间了. 这显然是不准确的.
        // 正确做法应该是让 main 线程等待 t1 和 t2 跑完了, 再来记录结束时间.
        // join 效果就是等待线程结束. t1.join 就是让 main 线程等待 t1 结束. t2.join 让 main 线程等待 t2 结束.
        t1.join();
        t2.join();
        long end = System.currentTimeMillis();
        System.out.println("消耗时间 : " + (end - beg) + "ms");
    }
    public static void main(String[] args) throws InterruptedException {

        concurrency();//多线程,要抛出异常 throws
    }
}
使用了 7438 ms

4.Thread 类及常见方法
Thread 类是 JVM 用来管理线程的一个类,换句话说,每个线程都有一个唯一的 Thread 对象与之关联。
4.1 Thread 的常见构造方法
|
方法
|
说明
|
|
Thread()
|
创建线程对象
|
|
Thread(Runnable target)
|
使用
Runnable
对象创建线程对象
|
|
Thread(String name)
|
创建线程对象,并命名
|
|
Thread(Runnable target, String name)
|
使用
Runnable
对象创建线程对象,并命名
|
使用如下
Threadt1 = new Thread ();Threadt2 = new Thread ( new MyRunnable ());Threadt3 = new Thread ( " 这是我的名字 " );Threadt4 = new Thread ( new MyRunnable (), " 这是我的名字 " );
对 Thread(String name) 进行使用说明
public class Test7 {
public static void main(String[] args) {
Thread t1 = new Thread(() ->{
while (true) {
System.out.println("hello thread1");
try {
Thread.sleep(1000);
} catch (InterruptedException e) {
e.printStackTrace();
}
}
}, "Thread1");
t1.start();
Thread t2 = new Thread(() ->{
while (true) {
System.out.println("hello thread2");
try {
Thread.sleep(1000);
} catch (InterruptedException e) {
e.printStackTrace();
}
}
}, "Thread2");
t2.start();
}
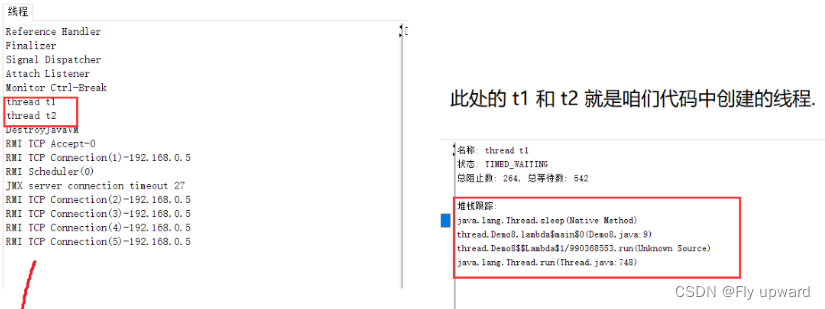
}代码中的 thread t1 、 thread t2 就可以通过以下方式查看

4.2Thread 的几个常见属性
|
属性
|
获取方法
|
|
ID
|
getId()
|
|
名称
|
getName( )
|
|
状态
|
getState( )
|
|
优先级
|
getPriority( )
|
|
是否后台线程
|
isDaemon( )
|
|
是否存活
|
isAlive( )
|
|
是否被中断
|
isInterrupted( )
|
(1)是否后台线程
如果线程是后台线程,就不影响进程退出。是前台线程,就会影响进程退出
现在所创建的线程默认都是前台的线程,即使main 方法,进程也不能退出,得等到 t1、 t2都执行完,整个进程才能退出。
(2)是否存活
操作系统中对应的线程是否正在运行,
Thread t 对象的生命周期和内核中对应的线程,生命周期并不完全一致,创建出t 对象之后,在调用 start 之前,系统中是没有对应线程的。在 run 方法执行之后,系统中的线程就销毁了,但是 t 这个对象可能还存在。通过 isAlive 就能判断当前系统的相差的运行情况。
如果 调用 start 之后,run执行完之前,isAlive 就是返回 true
如果 调用 start 之前,run执行完之后,isAlive 就是返回 false
4.3启动一个线程-start()
start 是一个特殊的方法,内部会在系统中创建线程。
run 单纯是一个普通的方法,描述了任务的内容
(1)先看start 方法的效果
public class Test8 {
    public static void main(String[] args) {
        Thread t = new Thread(() -> {
            for (int i = 0; i < 5; i++){
                System.out.println("hello thread");
                try {
                    Thread.sleep(1000);
                } catch (InterruptedException e) {
                    e.printStackTrace();
                }
            }
        });
        //t.run();//run 没有创建新的线程,只是一个普通的方法
        //同在一个main线程中,按先后顺序执行
        t.start();

        for (int i = 0; i < 3; i++) {
            System.out.println("main");
            try {
                Thread.sleep(1000);
            } catch (InterruptedException e) {
                e.printStackTrace();
            }
        }
    }
}
看运行结果可知,已经创建的一个线程,和本身的main线程并发执行

(2)run 方法的效果
将上述代码的 t.start( ) 替换成 t.run( ).
run只是执行方法,按先后运行,向将 "hello thread" 执行完一个循环,在进行下一个循环。

4.4中断一个线程
中断线程就是让一个线程停下来,关键就是让run方法执行完
(1)手动的设置一个标志位(自己创建变量,boolean),来控制线程是否要结束。
通过main 本身线程向进入阻塞5s,然后和创建的 t 线程并发执行,isQuit = true 就会阻挡 t 线程的循环,从而将线程中断
//在main线程中做个休眠唤醒来终止创建的线程
public class Test9 {
    private static boolean isQuit = false;//main 线程
    public static void main(String[] args) {

        Thread t = new Thread(() -> {
            while (!isQuit) {
                System.out.println("hello thread");
                try {
                    Thread.sleep(1000);
                } catch (InterruptedException e) {
                    e.printStackTrace();
                }
            }

        });
        t.start();//创新线程,开始执行

        // 只要把这个 isQuit 设为 true, 此时这个循环就退出了, 进一步的 run 就执行完了, 再进一步就是线程执行结束了.

        try {
            Thread.sleep(5000);//main线程休眠5s
        } catch (InterruptedException e) {
            e.printStackTrace();
        }

        isQuit = true;
        System.out.println("终止 t 线程");
    }
}
(2)Thread.interrupted() 或者 hread.currentThread().isInterrupted()
//线程中断
public class Test10 {
    public static void main(String[] args) {
        Thread t = new Thread(() -> {
            while (!Thread.currentThread().isInterrupted()) {
                System.out.println("hello thread");
                try {
                    Thread.sleep(1000);
                } catch (InterruptedException e) {
                    e.printStackTrace();
                    //当触发异常之后, 立即就退出循环~
                    System.out.println("线程中止");
                    break;
                }
            }
        });
        t.start();

        //main线程休眠5s
        try {
            Thread.sleep(5000);
        } catch (InterruptedException e) {
            e.printStackTrace();
        }
        // 在主线程中,休眠5s后 调用 interrupt 方法, 来中断这个线程.
        // t.interrupt 的意思就是让 t 线程被中断!!
        t.interrupt();
    }
}
调用 t. interrupt( ) 这个方法,可能产生两种情况:
如果 t 线程是处于就绪状态,就是设置线程的标志位为 true
如果 t 线程处于阻塞状态(sleep休眠了),就会触发一个InterruptedException,从而退出线程

4.5等待一个线程 join()
有时,我们需要等待一个线程完成它的工作后,才能进行自己的下一步工作。
通过调用 join 的时候,那个线程调用 join ,哪个线程就会阻塞等待,等到对应的线程执行完毕为止(对应的run 执行完毕)
如下最多阻塞10s,如果Thread线程还没结束就直接强制结束
t.join(10000)public class Test11 {
public static void main(String[] args) {
Thread t = new Thread(() -> {
for (int i = 0; i < 5; i++) {
System.out.println("thread");
try {
Thread.sleep(1000);
} catch (InterruptedException e) {
e.printStackTrace();
}
}
});
t.start();
// 在主线程中就可以使用一个等待操作. 来等待 t 线程执行结束.
try {
t.join(10000);//最多等待10s,如果Thread线程还没结束就直接强制结束。
} catch (InterruptedException e) {
e.printStackTrace();
}
}
}
4.6获取当前线程引用
Thread.currentThread().getName() 就能获取到当前线程的引用(Thread 实例的引用)。
那个线程调用 currentThread , 就获取到的是那个线程的实例
 Thread t = new Thread() {
            @Override
            public void run() {
                // System.out.println(Thread.currentThread().getName());
                System.out.println(this.getName());
            }
        };
4.7线程休眠 sleep
Thread.sleep(1000);