前言:
今天是5月7号,真的好久没有写博客了,时光匆匆,我总感觉自己忙忙碌碌似的,静想片刻确实是挺忙的,但是在繁忙当中却缺少了总结归纳,相信大家都知道总结归纳的重要性了,今天我要和大家分享我的自定义Dialog提示框,仿QQ浏览器版本更新提示框,查看其源码可知Dialog是对话框的基类,Dialog在开发中是非常常见的,Android系统为我们提供的样式有时却不能满足我们的需求,所以这时就需要我们去自定义了。
一、自定义对话框样式:
在styles.xml中
<!-- 定义对话框样式 -->
<style name="Dialog" parent="android:style/Theme.Dialog">
    <item name="android:windowBackground">@android:color/transparent</item>
    <item name="android:windowNoTitle">true</item>
    <item name="android:windowIsFloating">true</item>
</style>
其解释为:WindowBackground为透明,因为要用到自定义的布局,所以必须要把系统的背景颜色设置为透明;WindowNoTitle为true,设置为无标题,因为布局完全是自己自定义的了,WindowIsFloating为true,浮于其他界面之上。好了,这样就简单设置了自定义对话框的样式了。
二、自定义对话框布局:
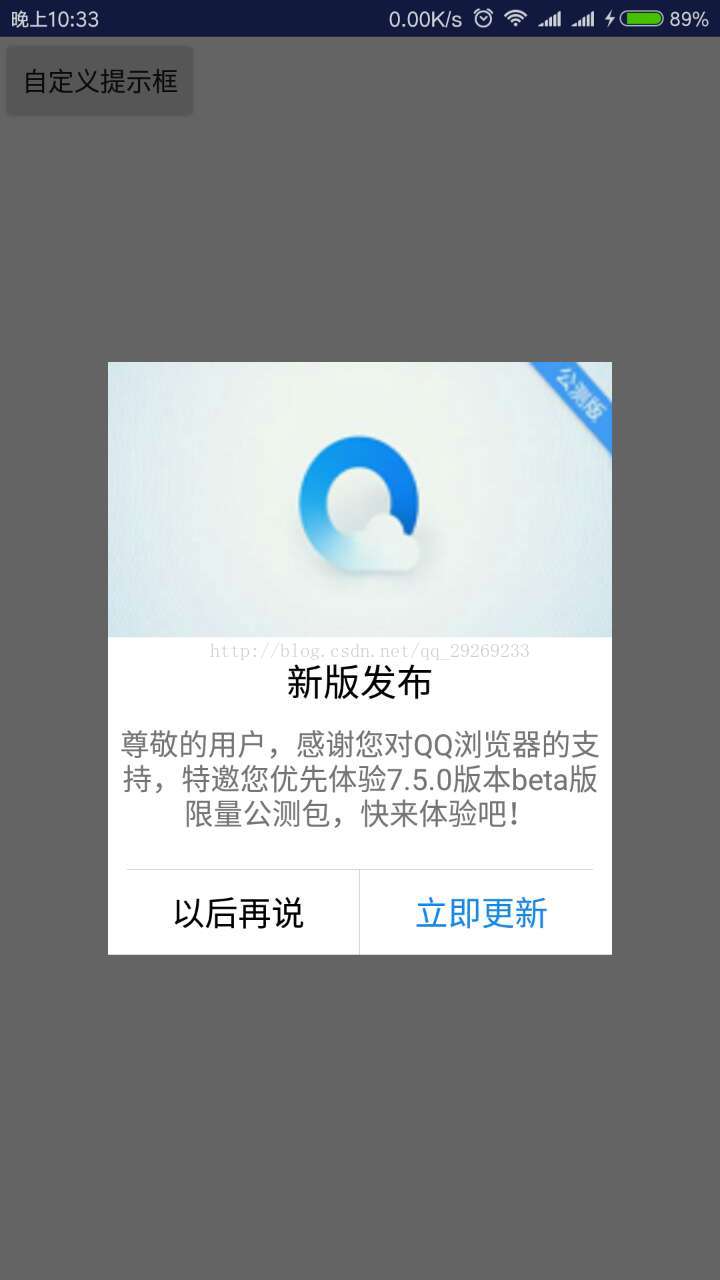
<?xml version="1.0" encoding="utf-8"?>
<LinearLayout xmlns:android="http://schemas.android.com/apk/res/android"
              android:orientation="vertical"
              android:layout_width="match_parent"
              android:layout_height="match_parent"
    android:background="#ffffff">

    <ImageView
        android:layout_width="match_parent"
        android:layout_height="150dp"
        android:src="@mipmap/custom"
        android:layout_gravity="center"
        android:scaleType="fitXY"/>

    <TextView
        android:layout_width="wrap_content"
        android:layout_height="wrap_content"
        android:layout_marginTop="10dp"
        android:layout_marginBottom="10dp"
        android:text="新版发布"
        android:textSize="20sp"
        android:textColor="#000"
        android:gravity="center"
        android:layout_gravity="center"/>
    <TextView
        android:id="@+id/tv_tips"
        android:layout_width="match_parent"
        android:layout_height="wrap_content"
        android:visibility="visible"
        android:layout_gravity="center"
        android:gravity="center"
        android:textSize="16sp"
        android:singleLine="false"
        android:layout_centerInParent="true"
        android:text="尊敬的用户,感谢您对QQ浏览器的支持,特邀您优先体验7.5.0版本beta版限量公测包,快来体验吧!"/>

    <View
        android:layout_width="match_parent"
        android:layout_height="0.5dp"
        android:layout_marginLeft="10dp"
        android:layout_marginRight="10dp"
        android:layout_marginTop="20dp"
        android:background="#ccc"/>

    <LinearLayout
        android:layout_width="match_parent"
        android:layout_height="wrap_content"
        android:orientation="horizontal"
        android:gravity="center">

        <TextView
            android:id="@+id/tv_cancel"
            android:layout_width="0dp"
            android:layout_weight="1"
            android:layout_height="wrap_content"
            android:layout_marginLeft="5dp"
            android:paddingTop="11dp"
            android:paddingBottom="11dp"
            android:gravity="center"
            android:text="以后再说"
            android:textSize="18sp"
            android:textColor="#000"
            android:background="@drawable/shape_bg"/>
        <View
            android:layout_width="0.5dp"
            android:layout_height="match_parent"
            android:background="#ccc"/>

        <TextView
            android:id="@+id/tv_update"
            android:layout_width="0dp"
            android:layout_weight="1"
            android:layout_height="wrap_content"
            android:layout_marginRight="5dp"
            android:gravity="center"
            android:paddingTop="11dp"
            android:paddingBottom="11dp"
            android:textSize="18dp"
            android:text="立即更新"
            android:textColor="#1586f2"
            android:background="@drawable/shape_bg"/>

    </LinearLayout>

</LinearLayout>
效果图仿QQ浏览器版本更新的布局。
三、创建Dialog,并关联自定义的样式和布局:
final Dialog customDialog = new Dialog(this, R.style.Dialog);
View dialogView = LayoutInflater.from(this).inflate(R.layout.dialog_custom, null);
TextView btn_update = (TextView) dialogView.findViewById(R.id.tv_update);
TextView btn_cancel = (TextView) dialogView.findViewById(R.id.tv_cancel);
//将自定义布局加载到dialog上
customDialog.setContentView(dialogView);

btn_cancel.setOnClickListener(new View.OnClickListener() {
    @Override
    public void onClick(View v) {
        customDialog.cancel();
    }
});
btn_update.setOnClickListener(new View.OnClickListener() {
    @Override
    public void onClick(View v) {
        Toast.makeText(MainActivity.this, "点击了确定", Toast.LENGTH_SHORT).show();
    }
});

//设置点击dialog外是否可以取消
customDialog.setCancelable(false);
customDialog.show();
到这里就完成了自定义Dialog了,最后还不完美,还可以设置Dialog的显示大小和位置,如所示代码:
//获得dialog的window窗口
Window window = customDialog.getWindow();
//设置dialog在屏幕中间
window.setGravity(Gravity.CENTER);
//获得window窗口的属性
WindowManager.LayoutParams lp = window.getAttributes();
//设置窗口高度为包裹内容
lp.height = WindowManager.LayoutParams.WRAP_CONTENT;
//宽度设置为屏幕的0.7
Display defaultDisplay = getWindowManager().getDefaultDisplay();//
lp.width = (int) (defaultDisplay.getWidth() * 0.7);
//将设置好的属性set回去
window.setAttributes(lp);
这里我把Dialog居中(Gravity.CENTER)显示了,当然还可以显示在底部等其他位置;然后就是显示宽和高了,当然要先获取屏幕的窗口大小才能设置其宽高。
自定义Dialog对话框差不多就是这样了,最后就看看效果图吧!
最后加上本案例的demo地址:https://gitee.com/zsml/CustomDialog
更多精彩内容请关注我:luoweichao.top