(一)Spring MVC简介
Spring MVC框架是一个开源的Java平台,为开发强大的基于Java的Web应用程序提供全面的基础架构支持非常容易和非常快速。Spring web MVC框架提供了MVC(模型 - 视图 - 控制器)架构和用于开发灵活和松散耦合的Web应用程序的组件。 MVC模式导致应用程序的不同方面(输入逻辑,业务逻辑和UI逻辑)分离,同时提供这些元素之间的松散耦合。
- 模型(Model)封装了应用程序数据,通常它们将由POJO类组成。
- 视图(View)负责渲染模型数据,一般来说它生成客户端浏览器可以解释HTML输出。
- 控制器(Controller)负责处理用户请求并构建适当的模型,并将其传递给视图进行渲染。
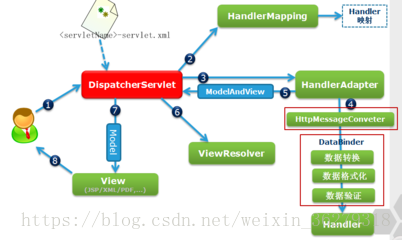
(二)Spring MVC工作原理
1.参考:Spring MVC工作原理
2.执行Spring MVC的顺序:Spring Web MVC DispatcherServlet的请求处理工作流程
3.Spring MVC工作原理图:
(三)实现第一个Spring MVC应用程序
参考:Spring MVC官方文档
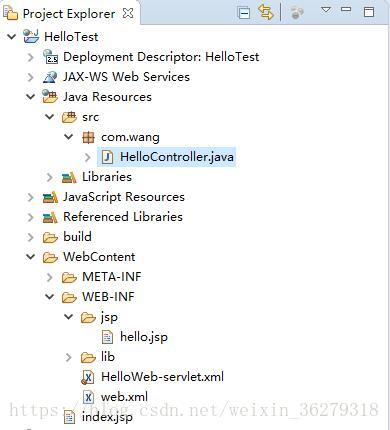
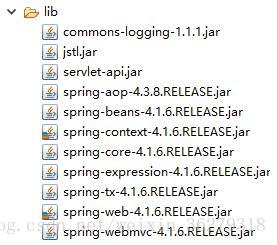
工程的目录结构如下图所示
1.在web.xml中 配置Spring MVC核心控制类DispatcherServlet
<?xml version="1.0" encoding="UTF-8"?>
<web-app xmlns:xsi="http://www.w3.org/2001/XMLSchema-instance"
 xmlns="http://java.sun.com/xml/ns/j2ee"
 xmlns:web="http://xmlns.jcp.org/xml/ns/javaee"
 xsi:schemaLocation="http://java.sun.com/xml/ns/j2ee http://java.sun.com/xml/ns/j2ee/web-app_2_4.xsd"
 id="WebApp_ID" version="2.4">
  <display-name>Spring MVC Application</display-name>
  <servlet>
    <!--Servlet名称配置为HelloWeb,那么配置文件必须是HelloWeb-servlet.xml-->
    <servlet-name>HelloSpringMVC</servlet-name>

    <!-- 配置Spring MVC核心控制类DispatcherServlet -->
    <servlet-class>
         org.springframework.web.servlet.DispatcherServlet
    </servlet-class>
     <init-param>
            <param-name>contextConfigLocation</param-name>
            <param-value>classpath:Springmvc-config.xml</param-value>

        </init-param>
      <!--启动容器时立即加载servlet-->
    <load-on-startup>1</load-on-startup>
  </servlet>
  <servlet-mapping>
    <servlet-name>HelloSpringMVC</servlet-name>
    <!--拦截所有URL请求-->
    <url-pattern>/</url-pattern>
  </servlet-mapping>
  <welcome-file-list>
    <welcome-file>index.jsp</welcome-file>
  </welcome-file-list>
</web-app>
2.配置HelloWeb-servlet.xml文件
<?xml version="1.0" encoding="UTF-8"?>
<beans xmlns="http://www.springframework.org/schema/beans"
   xmlns:context="http://www.springframework.org/schema/context"
   xmlns:xsi="http://www.w3.org/2001/XMLSchema-instance"
   xsi:schemaLocation="
   http://www.springframework.org/schema/beans
   http://www.springframework.org/schema/beans/spring-beans-3.0.xsd
   http://www.springframework.org/schema/context
   http://www.springframework.org/schema/context/spring-context-3.0.xsd">

   <!--扫描com.wamg包下的所有类的注解-->
   <context:component-scan base-package="com.wang" />

   <!--配置视图解析器-->
   <bean class="org.springframework.web.servlet.view.InternalResourceViewResolver">

      <!--前缀是/WEB-INF/jsp/-->
      <property name="prefix" value="/WEB-INF/jsp/" />

      <!-- 后缀以.jsp结尾 -->
      <property name="suffix" value=".jsp" />
   </bean>

</beans>
3.编写HelloController控制类
package com.wang;
import org.springframework.stereotype.Controller;
import org.springframework.web.bind.annotation.RequestMapping;
import org.springframework.web.bind.annotation.RequestMethod;
import org.springframework.ui.ModelMap;

//使用@Controller声明HelloController类是一个控制类
@Controller

//请求映射URL
@RequestMapping("/one")
public class HelloController{

   //请求映射一下方法
   @RequestMapping(value="/hello1", method = RequestMethod.GET)

   //将数据显示在前端页面使用ModelMap类,该类不需要配置试图解析器
   public String printHello(ModelMap model) {

      //在model中设值数据以便前端页面使用EL表达式获取数据
      model.addAttribute("message", "Hello Spring MVC Framework!");

      //默认跳转方式为:转发
      return "hello";
   }

}
4.在WEB-INF/jsp创建hello.jsp页面
<%@ page language="java" contentType="text/html; charset=UTF-8"
pageEncoding="UTF-8"%>
<!DOCTYPE html PUBLIC "-//W3C//DTD HTML 4.01 Transitional//EN" "http://www.w3.org/TR/html4/loose.dtd">
<html>
<head>
<meta http-equiv="Content-Type" content="text/html; charset=UTF-8">
<title>演示</title>
</head>
<body>
<!--使用EL表达式获取ModelMap对象中的数据-->
<h2>Hello, ${message}</h2>
</body>
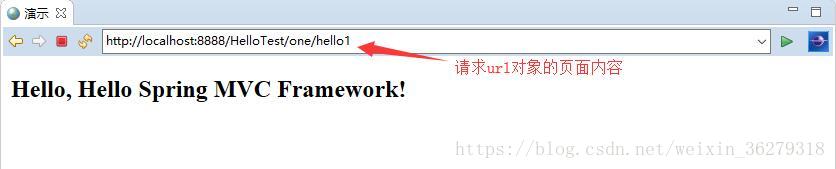
</html>5.在/HelloTest/WebContent/下创建index.jsp页面
<body>
   <!--请求url为one/hello1-->
   <a href="one/hello1">点击访问hello.jsp页面</a>
</body>
结果:

(四)Spring MVC表单处理
1.创建model
package com.wang;
public class User {
    private String name;
    private int age;
------省略setter和getter方法------
    @Override
    public String toString() {
        return "User [name=" + name + ", age=" + age + "]";
    }

}
2.在 HelloController类中编写
注意:
  1.表单中的字段名称必须和User类中的字段名称一致,否则设值不是。
@RequestMapping(value="/user", method = RequestMethod.POST)
public String showUserData(User user,ModelMap model) {
System.out.println(user);
<!--使用ModelMap对象保存user数据以便前台页面显示-->
model.addAttribute("user",user);
return"hello";
}3.在浏览器地址栏中输入以下内容
http://localhost:8888/HelloTest/one/user?name=Tom&age=184.hello.jsp页面
<body>
      <!--使用EL表达式获取model中的user数据-->
      <h2>用户信息:  ${user}</h2>
</body>
结果显示
