Shader "Unity Shaders Book/Chapter 14/Hatching" {
Properties {
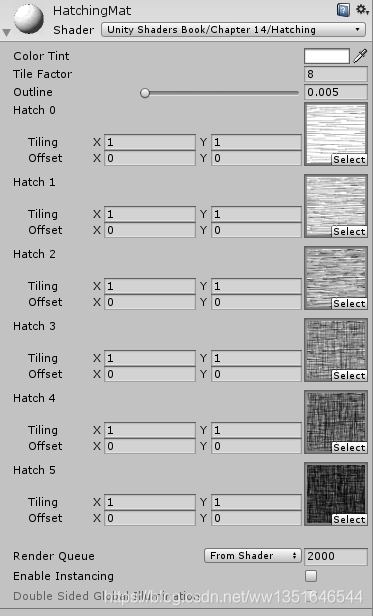
_Color ("Color Tint", Color) = (1, 1, 1, 1)
_TileFactor ("Tile Factor", Float) = 1 //纹理平铺系数,数值越大,素描线条越密集
_Outline ("Outline", Range(0, 1)) = 0.1
_Hatch0 ("Hatch 0", 2D) = "white" {}
_Hatch1 ("Hatch 1", 2D) = "white" {}
_Hatch2 ("Hatch 2", 2D) = "white" {}
_Hatch3 ("Hatch 3", 2D) = "white" {}
_Hatch4 ("Hatch 4", 2D) = "white" {}
_Hatch5 ("Hatch 5", 2D) = "white" {}
}
SubShader {
Tags { "RenderType"="Opaque" "Queue"="Geometry"}
//调用渲染轮廓线的Pass
UsePass "Unity Shaders Book/Chapter 14/Toon Shading/OUTLINE"
Pass {
Tags { "LightMode"="ForwardBase" }
CGPROGRAM
#pragma vertex vert
#pragma fragment frag
#pragma multi_compile_fwdbase
#include "UnityCG.cginc"
#include "Lighting.cginc"
#include "AutoLight.cginc"
#include "UnityShaderVariables.cginc"
fixed4 _Color;
float _TileFactor;
sampler2D _Hatch0;
sampler2D _Hatch1;
sampler2D _Hatch2;
sampler2D _Hatch3;
sampler2D _Hatch4;
sampler2D _Hatch5;
struct a2v {
float4 vertex : POSITION;
float4 tangent : TANGENT;
float3 normal : NORMAL;
float2 texcoord : TEXCOORD0;
};
struct v2f {
float4 pos : SV_POSITION;
float2 uv : TEXCOORD0;
fixed3 hatchWeights0 : TEXCOORD1;
fixed3 hatchWeights1 : TEXCOORD2;
float3 worldPos : TEXCOORD3;
SHADOW_COORDS(4)
};
v2f vert(a2v v) {
v2f o;
o.pos = UnityObjectToClipPos(v.vertex);
o.uv = v.texcoord.xy * _TileFactor;
fixed3 worldLightDir = normalize(WorldSpaceLightDir(v.vertex));
fixed3 worldNormal = UnityObjectToWorldNormal(v.normal);
fixed diff = max(0, dot(worldLightDir, worldNormal));
o.hatchWeights0 = fixed3(0, 0, 0);
o.hatchWeights1 = fixed3(0, 0, 0);
float hatchFactor = diff * 7.0;
if (hatchFactor > 6.0) {
// Pure white, do nothing
} else if (hatchFactor > 5.0) {
o.hatchWeights0.x = hatchFactor - 5.0;
} else if (hatchFactor > 4.0) {
o.hatchWeights0.x = hatchFactor - 4.0;
o.hatchWeights0.y = 1.0 - o.hatchWeights0.x;
} else if (hatchFactor > 3.0) {
o.hatchWeights0.y = hatchFactor - 3.0;
o.hatchWeights0.z = 1.0 - o.hatchWeights0.y;
} else if (hatchFactor > 2.0) {
o.hatchWeights0.z = hatchFactor - 2.0;
o.hatchWeights1.x = 1.0 - o.hatchWeights0.z;
} else if (hatchFactor > 1.0) {
o.hatchWeights1.x = hatchFactor - 1.0;
o.hatchWeights1.y = 1.0 - o.hatchWeights1.x;
} else {
o.hatchWeights1.y = hatchFactor;
o.hatchWeights1.z = 1.0 - o.hatchWeights1.y;
}
o.worldPos = mul(unity_ObjectToWorld, v.vertex).xyz;
TRANSFER_SHADOW(o);
return o;
}
fixed4 frag(v2f i) : SV_Target {
fixed4 hatchTex0 = tex2D(_Hatch0, i.uv) * i.hatchWeights0.x;
fixed4 hatchTex1 = tex2D(_Hatch1, i.uv) * i.hatchWeights0.y;
fixed4 hatchTex2 = tex2D(_Hatch2, i.uv) * i.hatchWeights0.z;
fixed4 hatchTex3 = tex2D(_Hatch3, i.uv) * i.hatchWeights1.x;
fixed4 hatchTex4 = tex2D(_Hatch4, i.uv) * i.hatchWeights1.y;
fixed4 hatchTex5 = tex2D(_Hatch5, i.uv) * i.hatchWeights1.z;
fixed4 whiteColor = fixed4(1, 1, 1, 1) * (1 - i.hatchWeights0.x - i.hatchWeights0.y - i.hatchWeights0.z -
i.hatchWeights1.x - i.hatchWeights1.y - i.hatchWeights1.z);
fixed4 hatchColor = hatchTex0 + hatchTex1 + hatchTex2 + hatchTex3 + hatchTex4 + hatchTex5 + whiteColor;
UNITY_LIGHT_ATTENUATION(atten, i, i.worldPos);
return fixed4(hatchColor.rgb * _Color.rgb * atten, 1.0);
}
ENDCG
}
}
FallBack "Diffuse"
}
顶点着色器:
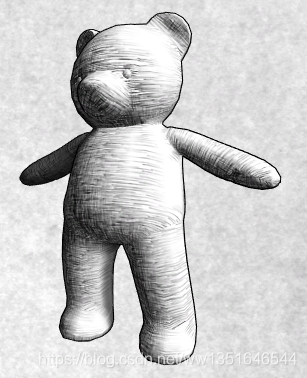
我们首先对顶点进行了基本的坐标变换。然后,使用_TileFactor 得到了纹理采样坐标。在计算6张纹理的混合权重之前,我们首先需要计算逐顶点光照。因此,我们使用世界空间下的光照方向和法线方向得到漫反射系数diff。之后,我们把权重值初始化为0,并把diff缩放到[0,7]范围,得到hatchFactor。我们把[0, 7]的区间均匀划分为7个子区间,通过判断hatchFactor所处的子区间来计算对应的纹理混合权重。最后,我们计算了顶点的世界坐标,并使用TRANSFER SHADOW宏来计算阴影纹理的采样坐标。
//每一位存储一张图的权重,共六张图
o.hatchWeights0 = fixed3(0, 0, 0);
o.hatchWeights1 = fixed3(0, 0, 0);
//漫反射系数越大,说明该部分越亮,素描线条越稀疏
if (hatchFactor > 6.0) {
// Pure white, do nothing
} else if (hatchFactor > 5.0) {
o.hatchWeights0.x = hatchFactor - 5.0; //大于5的部分分配给第一张图
} else if (hatchFactor > 4.0) {
o.hatchWeights0.x = hatchFactor - 4.0; //大于4的部分分配给第一张图
o.hatchWeights0.y = 1.0 - o.hatchWeights0.x; //其余部分分配给第二张图
} else if (hatchFactor > 3.0) {
o.hatchWeights0.y = hatchFactor - 3.0; //大于3的部分分配给第二张图
o.hatchWeights0.z = 1.0 - o.hatchWeights0.y; //其余部分分配给第三张图
} else if (hatchFactor > 2.0) { //下同
o.hatchWeights0.z = hatchFactor - 2.0;
o.hatchWeights1.x = 1.0 - o.hatchWeights0.z;
} else if (hatchFactor > 1.0) {
o.hatchWeights1.x = hatchFactor - 1.0;
o.hatchWeights1.y = 1.0 - o.hatchWeights1.x;
} else {
o.hatchWeights1.y = hatchFactor;
o.hatchWeights1.z = 1.0 - o.hatchWeights1.y;
}片元着色器:
当得到了6六张纹理的混合权重后,我们对每张纹理进行采样并和它们对应的权重值相乘得到每张纹理的采样颜色。我们还计算了纯白在渲染中的贡献度,这是通过从1中减去所有6张纹理的权重来得到的。这是因为素描中往往有留白的部分,因此我们希望在最后的渲染中光照最亮的部分是纯白色的。最后,我们混合了各个颜色值,并和阴影值atten、模型颜色Color 相乘后返回最终的渲染结果。