Ubuntu搭建交叉编译环境
说点什么吧
为什么需要交叉编译
如果要做设备、嵌入式等工作,交叉编译必不可少,
嵌入式设备的内存小甚至无法启动编译,只好在主机上编译,再将编译后的程序放到嵌入式设备中。
交叉编译环境简介
架构-厂商-平台 区分程序
例如:i386-pc-linux2.4.3
架构-平台-编译器 区分编译环境
例如:arm-linux-gcc
Arm交叉编译环境搭建
我们搭建arm-linux-gcc编译环境:
首先Ctrl+Alt+T弹出终端,使用如下命令进行arm-linux-gcc的安装:
方法一(不推荐,往往出错):
sudo apt-get install gcc-arm-linux-gnueabihf
使用如下命令进行arm-linux-g++的安装:
sudo apt-get install g++-arm-linux-gnueabihf
方法二(推荐):
一、下载解压
下载arm-linux-gcc-4.4.3.tar.gz
放到/home/darui/Desktop/arm-linux-gcc中解压
二、配置系统环境变量
sudo gedit /etc/profile
最后一行加上
扫描二维码关注公众号,回复:
13730395 查看本文章

export PATH=$PATH:/home/darui/Desktop/arm-linux-gcc/opt/FriendlyARM/toolschain/4.4.3/bin
保存生效
source /etc/profile
三、检查一下
arm-linux-gcc -v
Using built-in specs.
Target: arm-none-linux-gnueabi
Configured with: /opt/FriendlyARM/mini2440/build-toolschain/working/src/gcc-4.4.3/configure --build=i386-build_redhat-linux-gnu --host=i386-build_redhat-linux-gnu --target=arm-none-linux-gnueabi --prefix=/opt/FriendlyARM/toolschain/4.4.3 --with-sysroot=/opt/FriendlyARM/toolschain/4.4.3/arm-none-linux-gnueabi//sys-root --enable-languages=c,c++ --disable-multilib --with-arch=armv4t --with-cpu=arm920t --with-tune=arm920t --with-float=soft --with-pkgversion=ctng-1.6.1 --disable-sjlj-exceptions --enable-__cxa_atexit --with-gmp=/opt/FriendlyARM/toolschain/4.4.3 --with-mpfr=/opt/FriendlyARM/toolschain/4.4.3 --with-ppl=/opt/FriendlyARM/toolschain/4.4.3 --with-cloog=/opt/FriendlyARM/toolschain/4.4.3 --with-mpc=/opt/FriendlyARM/toolschain/4.4.3 --with-local-prefix=/opt/FriendlyARM/toolschain/4.4.3/arm-none-linux-gnueabi//sys-root --disable-nls --enable-threads=posix --enable-symvers=gnu --enable-c99 --enable-long-long --enable-target-optspace
Thread model: posix
gcc version 4.4.3 (ctng-1.6.1)
四、交叉编译下
引入环境变量
source /etc/profile
安装库
sudo apt-get install lib32stdc++6
sudo apt-get install lib32z1
编译
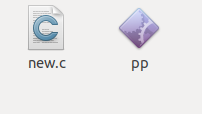
arm-linux-gcc -o new.c pp
成功
Mips交叉编译环境搭建
一、下载解压
OpenWrt SDK for C/C++ for Linux(还是建议在64位下使用)
https://docs.labs.mediatek.com/resource/linkit-smart-7688/zh_cn/downloads
解压
tar -jxvf OpenWrt-SDK-ramips-mt7688_gcc-4.8-linaro_uClibc-0.9.33.2.Linux-x86_64.tar.bz2
二、配置环境变量
gedit ~/.bashrc
导粗解压的文件夹(注:到四级文件夹了)
export PATH=$PATH:/home/darui/Desktop/mips-linux-gcc/OpenWrt-SDK-ramips-mt7688_gcc-4.8-linaro_uClibc-0.9.33.2.Linux-x86_64/staging_dir/toolchain-mipsel_24kec+dsp_gcc-4.8-linaro_uClibc-0.9.33.2/bin
保存
source ~/.bashrc
(注:bashrc是用户的环境变量,添加root下的bashrc变量,普通用户是没有添加变量的 /etc/profile是全体的环境变量)
三、交叉编译下

Powerpc交叉编译环境搭建
一、安装apt管理器
sudo add-apt-repository univers
sudo apt update
sudo apt install synaptic
二、下载环境
sudo synaptic


选择完点击上面的应用/apply,apply完成安装
在命令终端输入“powerpc-linux-gnu-”按“TAB”补全可以查看到“powerpc-linux-gnu-gcc”工具链

三、交叉编译下

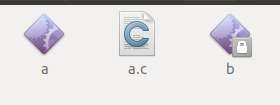
成功,三个交叉编译的环境都配好了