http://blog.csdn.net/qq1084283172/article/details/68950682
为了能在我们熟悉的windows或者ubuntu下开发mips架构的程序,需要搭建mips程序的交叉编译环境。mips程序的交叉编译环境的构建需要用编译Buildroot,Buildroot在编译的过程中,会下载一些依赖包,所以在Buildroot的编译安装过程中必须确保网络畅通。
(1) what is Buildroot ?
(2) Buildroot 源码工程下载和编译
Buildroot工程的官方下载地址:https://buildroot.org/download
Buildroot工程github下载地址:https://github.com/buildroot/buildroot
Buildroot各版本的源码下载地址:https://buildroot.org/downloads/
Buildroot工程的官方帮助指南:https://buildroot.org/docs.html
Buildroot工程的官方博客地址:http://free-electrons.com/blog/
Buildroot工程的详细介绍和使用说明的buildroot-labs:http://free-electrons.com/doc/training/buildroot/buildroot-labs.pdf
Buildroot工程的详细介绍和使用说明的buildroot-slides:http://free-electrons.com/doc/training/buildroot/buildroot-slides.pdf
Buildroot工程的详细介绍和使用说明的user manual:https://buildroot.org/downloads/manual/manual.pdf
Buildroot工程的详细介绍和使用说明的html版user manual:https://buildroot.org/downloads/manual/manual.html
///////////////////////////////////////////////////////////////////////////////////////////////////////////////////////////////////////////////////////////////////////////////////////////////////
Buildroot工程源码的下载,官方提供了两种方法。
1.通过github的方式获取:

2.直接下载的方式
Buildroot工程源码的简单编译说明,参考Buildroot的github说明:https://github.com/shuixi2013/buildroot/blob/master/README。
Buildroot工程源码的下载和编译配置:
1.github的方式
# 安装依赖库
$ sudo apt-get update
$ sudo apt-get install libncurses5-dev patch

# 下载源码
$ git clone https://github.com/buildroot/buildroot.git

# 进行编译的配置
$ cd buildroot
$ make clean
$ make menuconfig
2.直接下载解压
# 安装依赖库
$ sudo apt-get update
$ sudo apt-get install libncurses5-dev patch

# 下载源码
$ wget https://buildroot.org/downloads/snapshots/buildroot-snapshot.tar.bz2
$ tar -jxvf buildroot-snapshot.tar.bz2

# 进行编译的配置
$ cd buildroot
$ make clean
$ make menuconfig
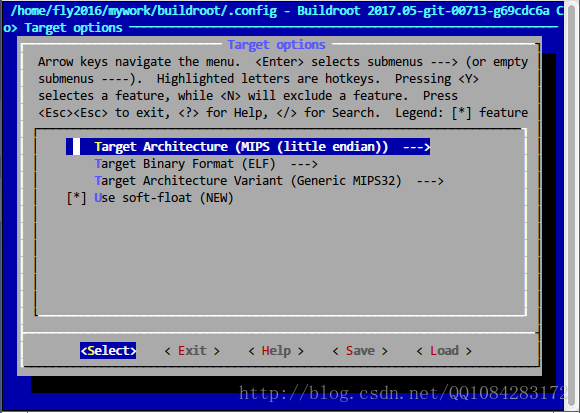
执行make menuconfig命令以后会出现Buildroot的编译配置界面,截图如下:
选择 Target options--->Target Architecture (MIPS (little endian)),配置 Target Architecture 为 MIPS (little endian),Target Architecture Variant 自动配置为 (Generic MIPS32) ,不需要修改。其实,最后生成的编译器在编译程序的时,可以添加选项供用户进行大端或者小端的设置。
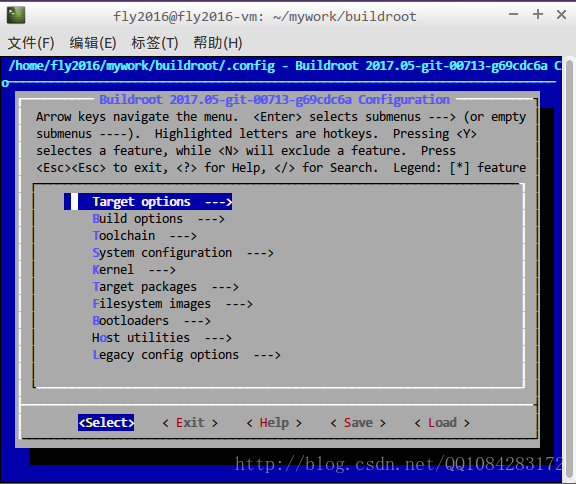
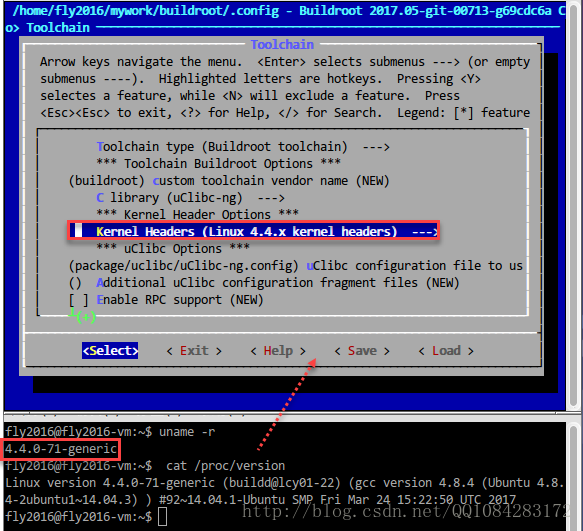
选择 “Toolchain”, 将 “kernel headers” 改成 机器环境的Kernel版本(即改为编译当前Buildroot的主机内核版本)。可以在主机上通过uname -r 或者cat /proc/version 查看当前主机的内核版本。
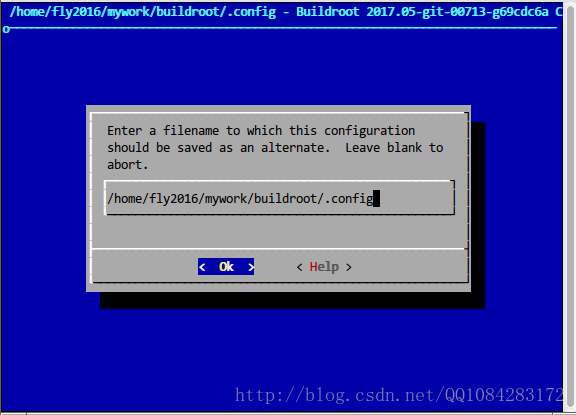
上面操作完成以后,保存、退出Buildroot的编译配置界面。
执行 ./configure 命令根据设置的配置参数生成编译需要的Makefile文件。
$ ./configure
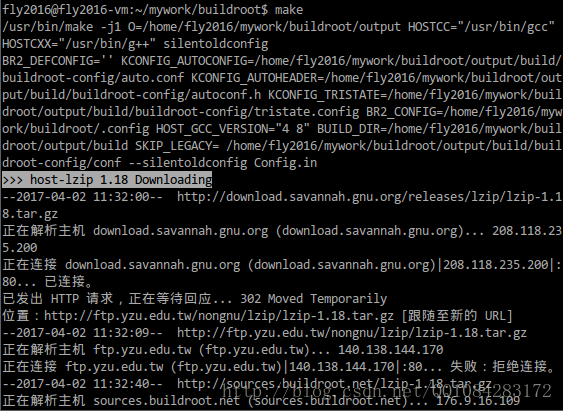
根据自己的具体需求配置好Buildroot的编译配置参数之后,执行make进行编译。在进行Buildroot编译的过程中,一定要保持网络的畅通,因为在Buildroot的编译过程中,会下载一些依赖包参与编译。
$ make
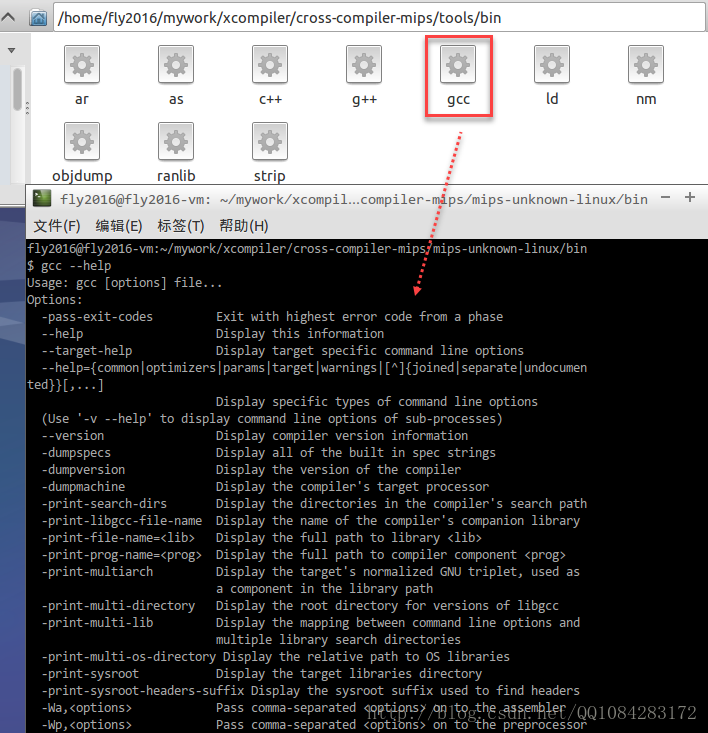
经过一段时间的编译完成以后,在Buildroot的根目录下会增加一个output文件,其中包含已经编译好的文件。可以在 buildroot/output/host/usr/bin目录下找到生成的交叉编译工具,mips的编译器就是该目录下的mipsel-linux-gcc。
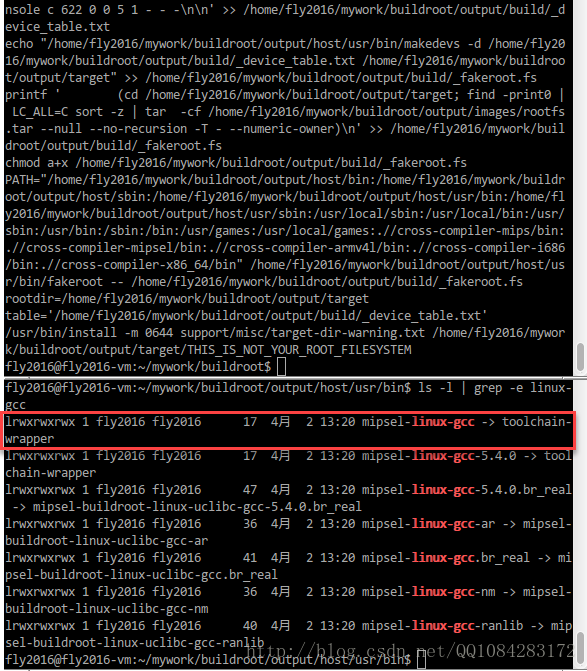
通过如下的命令,查看一下 mipsel-linux-gcc的版本信息。
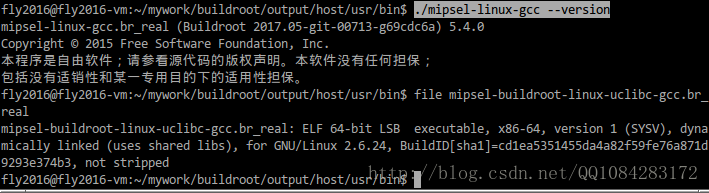
$ ./mipsel-linux-gcc --version
有关mipsel-linux-gcc的命令使用帮助:
fly2016@fly2016-vm:~/mywork/buildroot/output/host/usr/bin$ ./mipsel-linux-gcc --h
用法:mipsel-linux-gcc.br_real [选项] 文件...
选项:
  -pass-exit-codes         在某一阶段退出时返回最高的错误码
  --help                   显示此帮助说明
  --target-help            显示目标机器特定的命令行选项
  --help={common|optimizers|params|target|warnings|[^]{joined|separate|undocumented}}[,...]
                           显示特定类型的命令行选项
  (使用‘-v --help’显示子进程的命令行参数)
  --version                显示编译器版本信息
  -dumpspecs               显示所有内建 spec 字符串
  -dumpversion             显示编译器的版本号
  -dumpmachine             显示编译器的目标处理器
  -print-search-dirs       显示编译器的搜索路径
  -print-libgcc-file-name  显示编译器伴随库的名称
  -print-file-name=<库>    显示 <库> 的完整路径
  -print-prog-name=<程序>  显示编译器组件 <程序> 的完整路径
  -print-multiarch         显示目标的标准化 GNU 三元组(被用于库路径的一部分)
  -print-multi-directory   显示不同版本 libgcc 的根目录
  -print-multi-lib         显示命令行选项和多个版本库搜索路径间的映射
  -print-multi-os-directory 显示操作系统库的相对路径
  -print-sysroot           显示目标库目录
  -print-sysroot-headers-suffix 显示用于寻找头文件的 sysroot 后缀
  -Wa,<选项>               将逗号分隔的 <选项> 传递给汇编器
  -Wp,<选项>               将逗号分隔的 <选项> 传递给预处理器
  -Wl,<选项>               将逗号分隔的 <选项> 传递给链接器
  -Xassembler <参数>       将 <参数> 传递给汇编器
  -Xpreprocessor <参数>    将 <参数> 传递给预处理器
  -Xlinker <参数>          将 <参数> 传递给链接器
  -save-temps              不删除中间文件
  -save-temps=<arg>        不删除中间文件
  -no-canonical-prefixes   生成其他 gcc 组件的相对路径时不生成规范化的
                           前缀
  -pipe                    使用管道代替临时文件
  -time                    为每个子进程计时
  -specs=<文件>            用 <文件> 的内容覆盖内建的 specs 文件
  -std=<标准>              指定输入源文件遵循的标准
  --sysroot=<目录>         将 <目录> 作为头文件和库文件的根目录
  -B <目录>                将 <目录> 添加到编译器的搜索路径中
  -v                       显示编译器调用的程序
  -###                     与 -v 类似,但选项被引号括住,并且不执行命令
  -E                       仅作预处理,不进行编译、汇编和链接
  -S                       编译到汇编语言,不进行汇编和链接
  -c                       编译、汇编到目标代码,不进行链接
  -o <文件>                输出到 <文件>
  -pie                     生成位置无关可执行文件
  -shared                  生成一个共享库
  -x <语言>                指定其后输入文件的语言
                           允许的语言包括:c c++ assembler none
                           ‘none’意味着恢复默认行为,即根据文件的扩展名猜测
                           源文件的语言

以 -g、-f、-m、-O、-W 或 --param 开头的选项将由 mipsel-linux-gcc.br_real 自动传递给其调用的
 不同子进程。若要向这些进程传递其他选项,必须使用 -W<字母> 选项。

报告程序缺陷的步骤请参见:
<http://bugs.buildroot.net/>.
mipsel-linux-gcc其实是一个软连接,mipsel-linux-gcc真实连接到的是mipsel-buildroot-linux-uclibc-cc.br_real程序。使用mipsel-linux-gcc交叉编译工具进行mips程序的编译测试,下面是测试的代码 hello.c:
#include <stdio.h>
#include <string.h>

int vul(char *src)
{
	char output[20] = {0};
	strcpy(output, src);
	printf("%s\n", output);

	return 0;
}


int main(int argc, char *argv[])
{
	if (argc < 2)
	{
		printf("need more arguments\n");

		return 1;
	}

	vul(argv[1]);

	return 0;
}
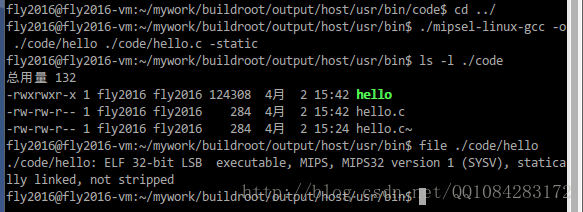
运行编译命令,为了让生成的二进制程序 hello 不依赖动态库,在编译选项中加入 "-static",示例如下:
# 静态-static 编译
$ ./mipsel-linux-gcc -o ./code/hello ./code/hello.c -static

# 查看编译后生成的程序
$ ls -l ./code

# 查看编译后生成的程序的格式
$ file ./code/hello
结果截图:
参考资料:
《解密家用路由器0day漏洞挖掘技术》小错误不少,感觉有些都是不该犯的低级错误。
(3) 直接下载MIPS程序的交叉编译工具链
其实MIPS程序的交叉编译工具gcc不必非得自己编译得到,网站https://uclibc.org/上已经有编译后的mips程序的交叉编译工具提供给我们下载,在ubuntu系统上,可以使用脚本 config.sh进行下载,脚本文件的内容如下:
#!/bin/bash
#this file aim to download xcompiler and install it
download_url="https://www.uclibc.org/downloads/binaries/0.9.30.1/cross-compiler-"
function download_bins {
echo "ready to download: $1.tar.bz2"
wget "${download_url}$1.tar.bz2" "--no-check-certificate"
echo "ready to tar: $1.tar.bz2"
tar -jxf $install_path/cross-compiler-$1.tar.bz2
sed -i '$a\export PATH=$PATH:'$install_path'/cross-compiler-'$1'/bin' /etc/profile
}
if [ $# == 0 ]
then
echo "Usage: $0 intall_path"
exit -1
elif [ $# == 1 ]
then
install_path=$1
fi
cd $install_path
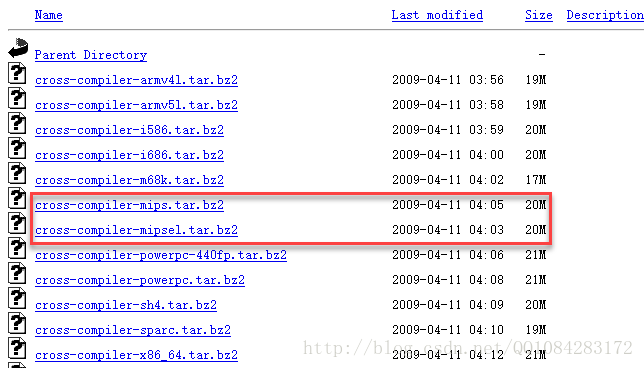
download_bins mips
download_bins mipsel
download_bins armv4l
download_bins i686
download_bins x86_64
source /etc/profile
echo "Done"
结果截图:
脚本中交叉编译工具链的下载地址为:https://www.uclibc.org/downloads/binaries/0.9.30.1/。

这个config.sh脚本来自于《IoT设备程序开发及编译环境搭建初体验》的作者scu-igroup的github上 IoT_bot工程 代码的脚本。config.sh脚本执行完成以后,各种平台的交叉编译链的工具都下载下来了,在 /cross-compiler-mips/tools/bin 目录和 /cross-compiler-mipsel/tools/bin目录下有mips程序的交叉编译工具链,直接拿来使用就可以。IoT_bot工程 的github下载地址为:https://github.com/scu-igroup/IoT_bot。