生命周期、服务、网络请求
一、生命周期
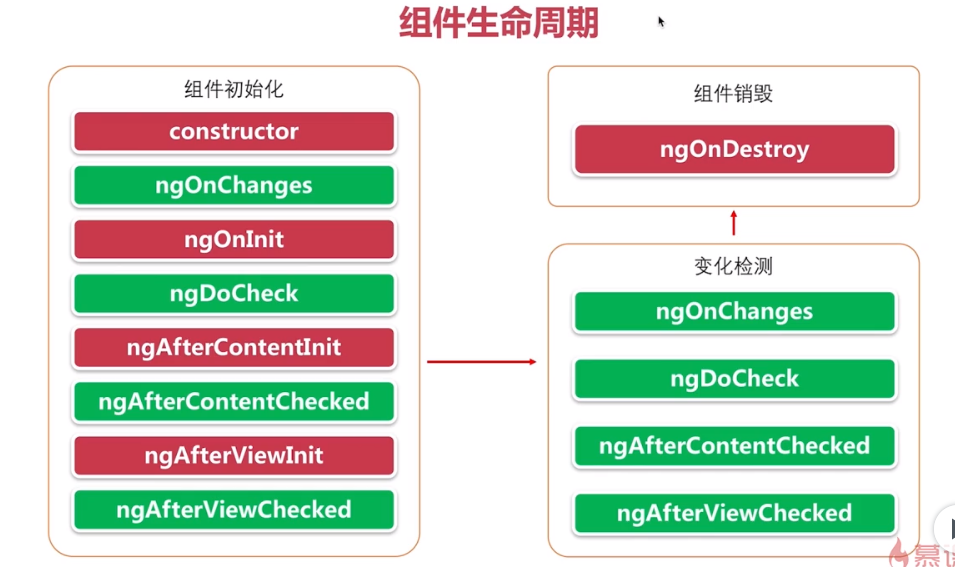
常用的生命周期
constructor:构造方法,组件出生的第一时间触发
ngOnInit:组件中的内容开始初始化
ngAfterContentInit:组件中的数据初始化时触发
ngAfterViewInit:组件上的UI界面初始化时
ngAfterContentChecked:组件上的数据变化时
ngAfterViewChecked:组件上的UI随着数据变化而更新
ngOnDestroy:组件销毁
二、Service 服务
服务的作用:组件之间的数据共享
创建服务的命令行:ng g s xxx
angular的服务机制就是依赖注入机制
需求:将NameService中的姓名遍历到页面,并实现各组件之间的传值
步骤:
1)ng g s services/name(新建一个services的文件夹,并在services文件夹中新建name的服务文件)
2)在组件ts文件中引入NameService
3)在组件html文件中进行显示
4)在另一个组件设置新增姓名的操作
name.service.ts
import {

     Injectable } from '@angular/core';

@Injectable({


  providedIn: 'root'
})
export class NameService {


  names = ['Dai','小明'];
  constructor() {

     }
}
xxx.component.ts
import {

     Component, OnInit } from '@angular/core';
import {

     NameService } from 'src/app/services/name.service';

@Component({


  selector: 'app-address',
  templateUrl: './address.component.html',
  styleUrls: ['./address.component.scss']
})
export class AddressComponent implements OnInit {


  //声明names变量
  names;
  constructor(nameS: NameService) {


    //将服务中的数据进行赋值
    this.names = nameS.names;
  }

  ngOnInit(): void {


  }
}
xxx.component.html
<ul>
    <li *ngFor="let item of names">{

   {item}}</li>
</ul>
效果:
将service中的数据显示成功!!!
xxx1.component.ts
import {

     Component, OnInit } from '@angular/core';
import {

     NameService } from 'src/app/services/name.service';

@Component({


  selector: 'app-order',
  templateUrl: './order.component.html',
  styleUrls: ['./order.component.scss']
})
export class OrderComponent implements OnInit {


  constructor( public names: NameService) {

     }

  ngOnInit(): void {


  }

  add(){


    this.names.names.push('前端')
  }
}
xxx1.component.html
<p>order works!</p>
<ul>
    <li *ngFor="let item of names.names">{

   {item}}</li>
</ul>
<button (click)="add()">新增</button>
效果:
新增姓名成功!!
三、httpClient网络服务(使用自身的rxjs进行请求网络)
步骤:
1)在配置文件(app.module.ts)中引入网络模块:httpClientModule
2)在组件ts文件中引入httpClient
3)将httpClient进行依赖注入
app.module.ts
import {

     HttpClientModule } from '@angular/common/http'
xxx.component.ts
import {

     HttpClient } from '@angular/common/http';
constructor(public http: HttpClient) {

     }
requestGet() {


    //接口
    let url = 'http://localhost:3000/user/list';
    //
    this.http.get(url).subscribe(res => {


      console.log(res)
    })
  }
xxx.component.html
<button (click)="requestGet()">GET</button>
效果:

POST同GET
以上就是生命周期、服务、网络请求的知识,大家请关注《Angular 学习》专栏。
我会将自己平时项目中常见的问题以及笔试面试的知识在CSDN与大家分享,一起进步,加油。