32.OpenCV的人脸检测和识别——人脸检测
文章目录
前言
人脸检测是指在图像中完成人脸定位的过程。
一、基于Haar的人脸检测
使用OpenCV提供的Haar级联分类器来进行人脸检测。在OpenCV源代码中的“\data\haarcascades”文件夹中包含了训练好的Haar级联分类器文件:

haarcascade_eye.xml:人眼检测
haarcascade_eye_tree_eyeglasses.xml:眼镜检测
haarcascade_frontalcatface.xml:猫脸检测
haarcascade_frontalface_alt.xml:人脸检测
haarcascade_frontalface_default.xml:人脸检测
haarcascade_profileface.xml:侧脸检测
OpenCV中的cv2.CascadeClassifier()函数用于加载分类器,其基本格式如下:
faceClassifier = cv2.CascadeClassifier(filename)

faceClassifier为返回的级联分类器对象
filename为级联分类器文件名
级联分类器对象的detectMultiScale()函数用于执行检测,其基本格式如下:
object = faceClassifier.detectMultiScale(image[, scaleFactor[, minNeighbors[, flags[, minSize[, maxSize]]]]])

object为返回的目标矩形, 矩形中为人脸
image为输入图像, 通常为灰度图像
scaleFactor为图像缩放比例
minNeighbors为构成目标矩形的最少相邻矩形个数
flags在低版本的OpenCV 1.x 中使用, 高版本中通常省略该参数
minSize为目标矩形的最小尺寸
maxSize为目标矩形的最大尺寸
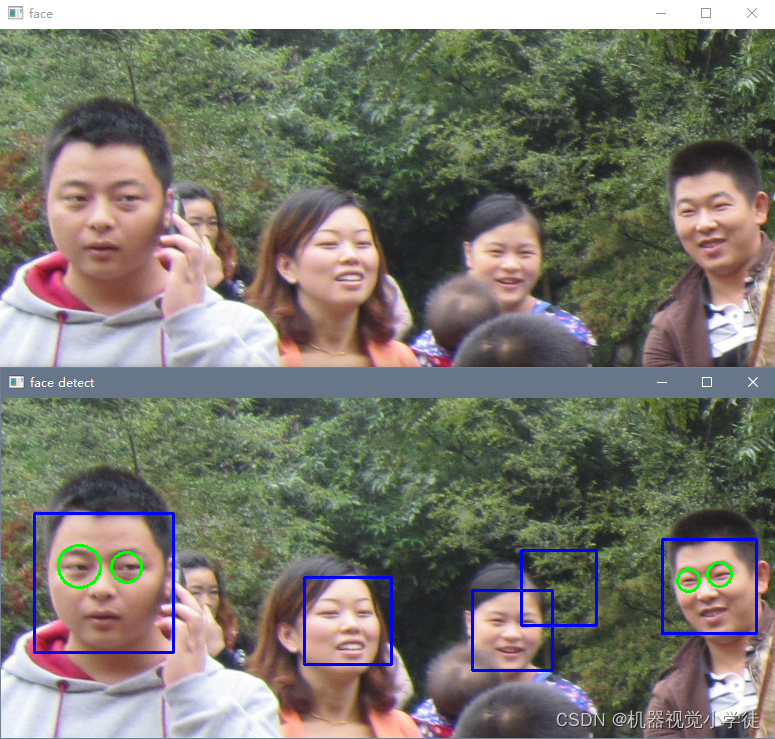
1、使用Haar级联分类器检测人脸
使用haarcascade_frontalface_default.xml和haarcascade_eye.xml分类检测器检测图像中的人脸和眼睛。
# 使用Haar级联检测器(人脸-眼睛)
import cv2

img = cv2.imread("heard.jpg")
gray = cv2.cvtColor(img, cv2.COLOR_BGR2GRAY)
cv2.imshow("face", img)

face = cv2.CascadeClassifier("haarcascade_frontalface_default.xml")

eye = cv2.CascadeClassifier("haarcascade_eye.xml")

faces = face.detectMultiScale(gray)
for x, y, w, h in faces:
    cv2.rectangle(img, (x, y), (x + w, y + h),(255, 0, 0), 2)
    roi_eye = gray[y : y + h , x : x + w]
    eyes = eye.detectMultiScale(roi_eye)
    for ex, ey, ew, eh in eyes:
        cv2.circle(img[y : y + h , x : x + w], (int(ex + ew / 2) , int(ey + eh / 2)), int(max(ew, eh) / 2), (0,255,0), 2)

cv2.imshow("face detect", img)
cv2.waitKey(0)
cv2.destroyAllWindows()
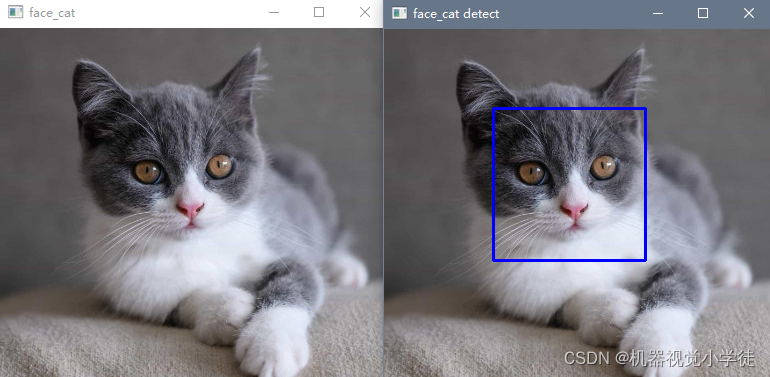
2、使用Haar级联分类器检测猫脸
下面的代码使用haarcascade_frontalcatface.xml分类检测器检测图像中的猫脸。
# 使用Haar级联检测器(猫脸)
import cv2
img = cv2.imread("cat2.jpg")
gray = cv2.cvtColor(img, cv2.COLOR_BGR2GRAY)
cv2.imshow("face_cat", img)

face = cv2.CascadeClassifier("haarcascade_frontalcatface.xml")

faces = face.detectMultiScale(gray)
for x, y, w, h in faces:
    cv2.rectangle(img, (x, y), (x + w, y + h),(255, 0, 0), 2)

cv2.imshow("face_cat detect", img)
cv2.waitKey(0)
cv2.destroyAllWindows()
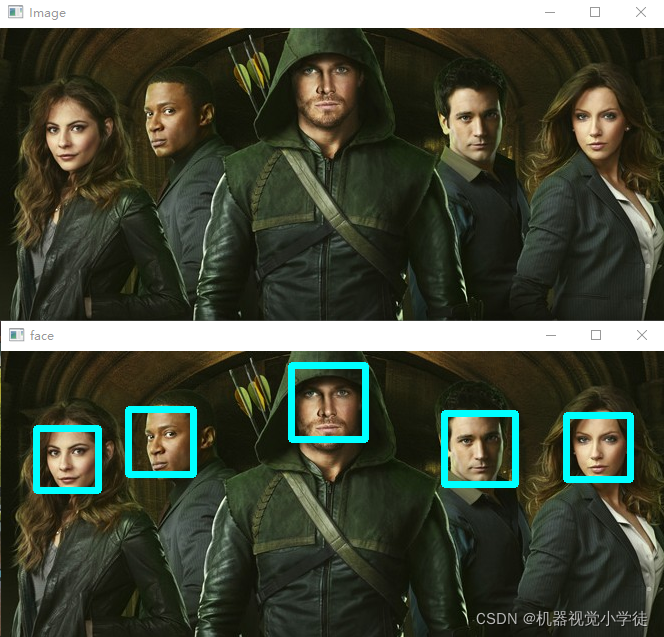
3、使用Haar级联分类器检测人脸的框架式程序
Haar级联分类器也可用以用框架式式程序进行运行,示例代码如下:
import cv2

def plot_rectangle(image, faces):
    for (x, y, w, h) in faces:
        cv2.rectangle(image, (x, y), (x+w, y+h), (255, 255, 0), 5)
    return image

def main():
    image = cv2.imread("2.jpg")
    cv2.imshow("Image",image)
    gray = cv2.cvtColor(image, cv2.COLOR_BGR2GRAY)
    face_alt2 = cv2.CascadeClassifier("haarcascade_frontalface_default.xml")
    face_alt2_detect = face_alt2.detectMultiScale(gray)
    face_alt2_result = plot_rectangle(image.copy(), face_alt2_detect)
    cv2.imshow("face", face_alt2_result)
    cv2.waitKey(0)
    cv2.destroyAllWindows()

if __name__ == '__main__':
    main()
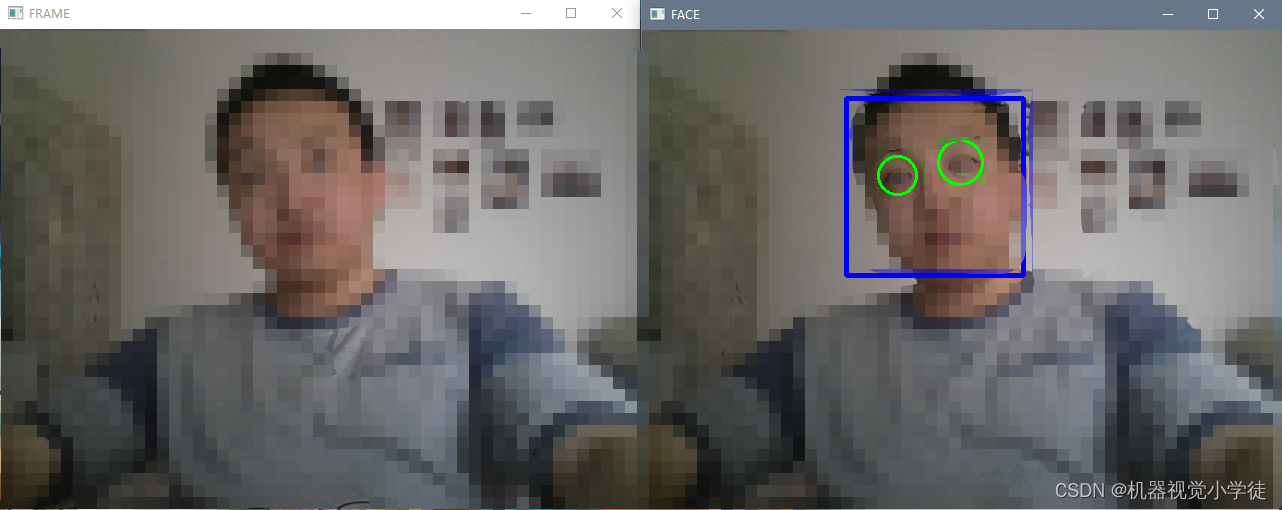
4、使用Haar级联分类器检测摄像头视频中的人脸和眼睛
Haar级联分类器也可用以用于检测视频中的人脸和眼睛,示例代码如下:
# 使用Haar级联检测器(人脸-眼睛——视频)
import cv2

capture = cv2.VideoCapture(0)

frame_width = capture.get(cv2.CAP_PROP_FRAME_WIDTH)
frame_height = capture.get(cv2.CAP_PROP_FRAME_HEIGHT)
fps = capture.get(cv2.CAP_PROP_FPS)

face = cv2.CascadeClassifier("haarcascade_frontalface_default.xml")
eye = cv2.CascadeClassifier("haarcascade_eye.xml")

if capture.isOpened() is False:
    print('CAMERA ERROR !')
    exit(0)

while capture.isOpened():

    ret, frame = capture.read()

    if ret is True:

        cv2.imshow('FRAME', frame)

        gray_frame = cv2.cvtColor(frame, cv2.COLOR_BGR2GRAY)

        faces = face.detectMultiScale(gray_frame)
        for x,y,w,h in faces:
            cv2.rectangle(frame, (x,y),(x+w,y+h),(255,0,0),3)
            roi_eye = gray_frame[y:y*h, x:x+w]
            eyes = eye.detectMultiScale(roi_eye)
            for ex,ey,ew,eh in eyes:
                cv2.circle(frame[y : y + h , x : x + w], (int(ex + ew / 2) , int(ey + eh / 2)), int(max(ew, eh) / 2), (0,255,0), 2)

        cv2.imshow('FACE', frame)
        k = cv2.waitKey(100)
        if k == ord('q'):
            break
    else:
        break
capture.release()
cv2.destroyAllWindows()
二、基于深度学习的人脸检测
OpenCV的深度神经网络(Deep Neural Network,DNN)模块提供了基于深度学习的人脸检测器。DNN模块中使用了广受欢迎的深度学习框架,包括Caffe、TensorFlow、Torch和Darknet等。
OpenCV提供了两个预训练的人脸检测模型:Caffe和TensorFlow模型。
Caffe模型需要加载以下两个文件:
deploy.prototxt:定义模型结构的配置文件
res10_300x300_ssd_iter_140000_fp16.caffemodel:包含实际层权重的训练模型文件
TensorFlow模型需要加载以下两个文件:
opencv_face_detector_uint8.pb:定义模型结构的配置文件
opencv_face_detector.pbtxt:包含实际层权重的训练模型文件
在OpenCV源代码的“\samples\dnn\face_detector”的文件夹中提供了模型配置文件,但未提供模型训练文件。可运行该文件夹中的download_models.py文件下载上述两个训练模型文件。
使用预训练的模型执行人脸检测时主要包含下列步骤:
(1) 调用cv2.dnn.readNetFromCaffe()或cv2.dnn.readNetFromTensorflow()函数加载模型,创建检测器。
(2) 调用cv2.dnn.blobFromImage()函数将待检测图像转换为图像块数据。
(3) 调用检测器的setInput()方法将图像块数据设置为模型的输入数据。
(4) 调用检测器的forward()方法执行计算,获得预测结果。
(5) 将可信度高于指定值的预测结果作为检测结果,在原图中标注人脸,同时输出可信度作为参考。
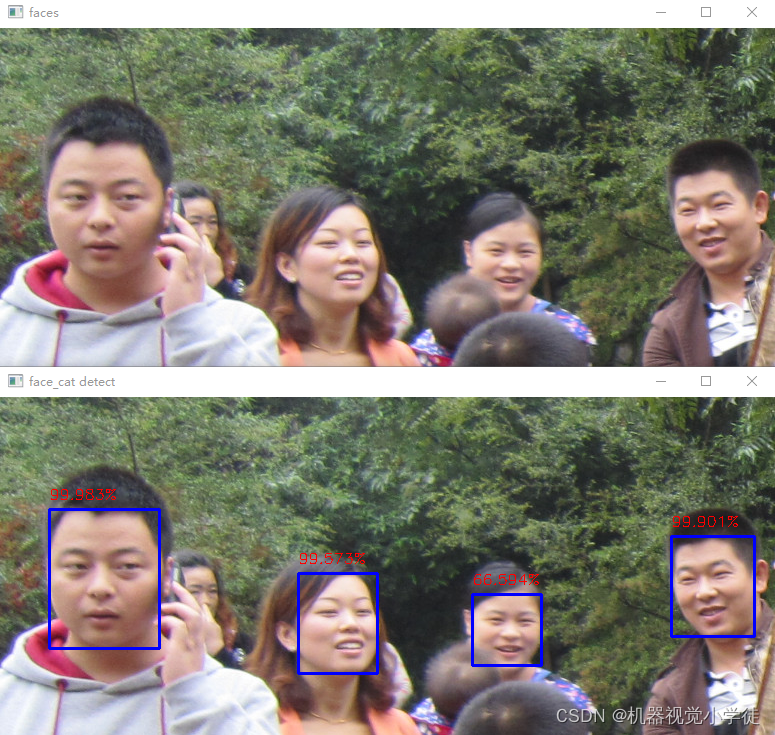
1、基于深度学习的人脸检测(图片)
# 基于深度学习的人脸检测(脸-眼_视频)
import cv2
import numpy as np
from matplotlib import pyplot as plt

#dnnnet = cv2.dnn.readNetFromCaffe("deploy.prototxt", "res10_300x300_ssd_iter_140000_fp16.caffemodel")
dnnnet = cv2.dnn.readNetFromTensorflow("opencv_face_detector_uint8.pb", "opencv_face_detector.pbtxt")

img = cv2.imread("heard.jpg")
h, w = img.shape[:2]
blobs = cv2.dnn.blobFromImage(img, 1.0, (300, 300), [104., 117., 123.], False, False)
dnnnet.setInput(blobs)
detections = dnnnet.forward()
faces = 0
for i in range(0, detections.shape[2]):
    confidence = detections[0, 0, i, 2]
    if confidence > 0.6:
        faces += 1
        box = detections[0, 0, i, 3:7] * np.array([w, h, w, h])
        x1,y1,x2,y2 = box.astype("int")
        y = y1 - 10 if y1 - 10 > 10 else y1 + 10
        text = "%.3f"%(confidence * 100)+'%'
        cv2.rectangle(img, (x1, y1), (x2, y2), (255, 0, 0), 2)
        cv2.putText(img,text, (x1, y), cv2.FONT_HERSHEY_SIMPLEX, 0.5, (0, 0, 255), 1)
cv2.imshow('faces',img)
cv2.waitKey(0)
cv2.destroyAllWindows()
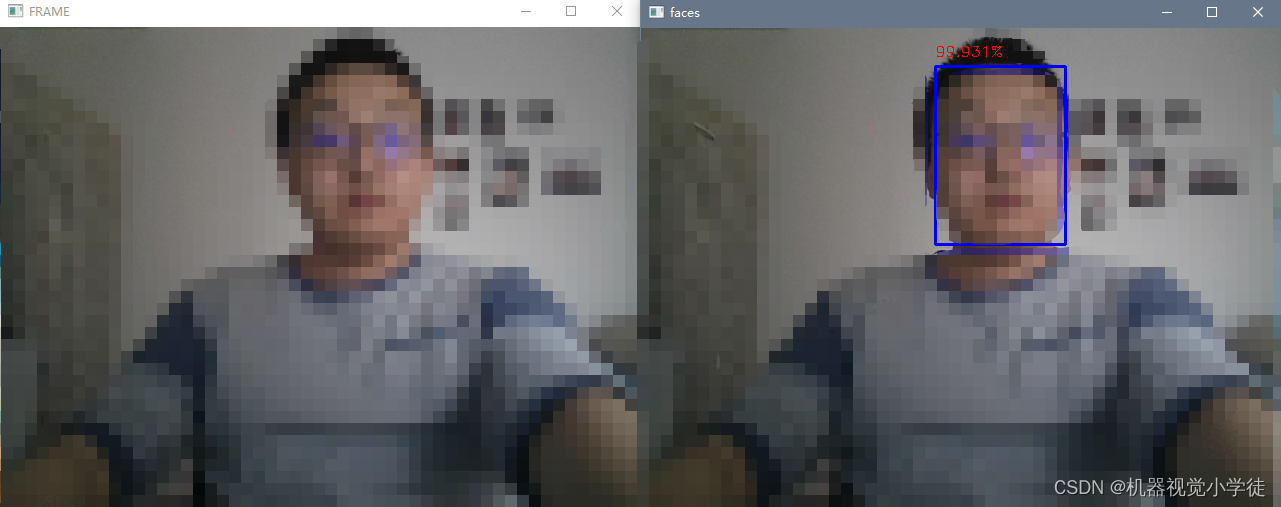
2、基于深度学习的人脸检测(视频)
import cv2

capture = cv2.VideoCapture(0)
frame_width = capture.get(cv2.CAP_PROP_FRAME_WIDTH)
frame_height = capture.get(cv2.CAP_PROP_FRAME_HEIGHT)
fps = capture.get(cv2.CAP_PROP_FPS)

dnnnet = cv2.dnn.readNetFromTensorflow("opencv_face_detector_uint8.pb", "opencv_face_detector.pbtxt")

if capture.isOpened() is False:
    print('CAMERA ERROR !')
    exit(0)

while capture.isOpened():

    ret, frame = capture.read()

    if ret is True:

        cv2.imshow('FRAME', frame) # 显示捕获的帧

        h, w = frame.shape[:2]
        blobs = cv2.dnn.blobFromImage(frame, 1.0, (300, 300), [104., 117., 123.], False, False)
        dnnnet.setInput(blobs)
        detections = dnnnet.forward()
        faces = 0
        for i in range(0, detections.shape[2]):
            confidence = detections[0, 0, i, 2]
            if confidence > 0.6:
                faces += 1
                box = detections[0, 0, i, 3:7] * np.array([w, h, w, h])
                x1,y1,x2,y2 = box.astype("int")
                y = y1 - 10 if y1 - 10 > 10 else y1 + 10
                text = "%.3f"%(confidence * 100)+'%'
                cv2.rectangle(frame, (x1, y1), (x2, y2), (255, 0, 0), 2)
                cv2.putText(frame,text, (x1, y), cv2.FONT_HERSHEY_SIMPLEX, 0.5, (0, 0, 255), 1)

        cv2.imshow('faces',frame)
        k = cv2.waitKey(100)
        if k == ord('q'):
            break
    else:
        break
capture.release()
cv2.destroyAllWindows()
三、OpenCV-Python资源下载
OpenCV-Python测试用图片、中文官方文档、opencv-4.5.4源码
总结
以上内容介绍了OpenCV-Python的人脸检测,有关Python、数据科学、人工智能等文章后续会不定期发布,请大家多多关注,一键三连哟(●’◡’●)。