接上篇文章《kettle在windows上安装与实践案例》https://blog.csdn.net/Allenzyg/article/details/106308363
2.4 Linux下安装使用
2.4.1 单机
1)jdk安装
2)安装包上传到服务器,解压
注意:1. 把mysql驱动拷贝到lib目录下
2. 将本地用户家目录下的隐藏目录C:\Users\自己用户名\.kettle,整个上传到linux的家目录/home/allen/下
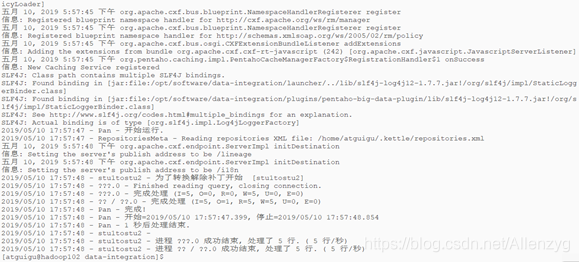
3)运行数据库资源库中的转换:
[root@node4 data-integration]#./pan.sh -rep=my_repo -user=admin -pass=admin -trans=stu1tostu2 -dir=/
参数说明:
-rep 资源库名称
-user 资源库用户名
-pass 资源库密码
-trans 要启动的转换名称
-dir 目录(不要忘了前缀 /)
4)运行资源库里的作业:
记得把作业里的转换变成资源库中的资源
[root@node4 data-integration]#./kitchen.sh -rep=repo1 -user=admin -pass=admin -job=jobDemo1 -logfile=./logs/log.txt -dir=/
参数说明:
-rep - 资源库名
-user - 资源库用户名
-pass – 资源库密码
-job – job名
-dir – job路径
-logfile – 日志目录
2.4.2 集群模式(了解)
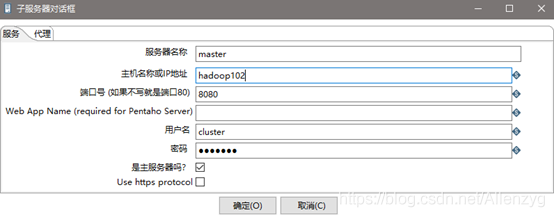
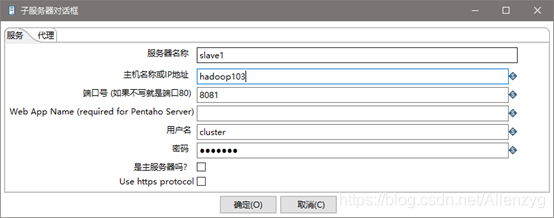
1) 准备三台服务器,hadoop102作为Kettle主服务器,服务器端口号为8080,hadoop103和hadoop104作为两个子服务器,端口号分别为8081和8082。
2) 安装部署jdk
3) hadoop完全分布式环境搭建,并启动进程(因为要使用hdfs)
4) 上传解压kettle的安装包
5) 进到/opt/module/data-integration/pwd目录,修改配置文件
修改主服务器配置文件carte-config-master-8080.xml
<slaveserver>
<name>master</name>
<hostname>hadoop102</hostname>
<port>8080</port>
<master>Y</master>
<username>cluster</username>
<password>cluster</password>
</slaveserver>
修改从服务器配置文件carte-config-8081.xml
<masters>
<slaveserver>
<name>master</name>
<hostname>hadoop102</hostname>
<port>8080</port>
<username>cluster</username>
<password>cluster</password>
<master>Y</master>
</slaveserver>
</masters>
<report_to_masters>Y</report_to_masters>
<slaveserver>
<name>slave1</name>
<hostname>hadoop103</hostname>
<port>8081</port>
<username>cluster</username>
<password>cluster</password>
<master>N</master>
</slaveserver>
修改从配置文件carte-config-8082.xml
<masters>
<slaveserver>
<name>master</name>
<hostname>hadoop102</hostname>
<port>8080</port>
<username>cluster</username>
<password>cluster</password>
<master>Y</master>
</slaveserver>
</masters>
<report_to_masters>Y</report_to_masters>
<slaveserver>
<name>slave2</name>
<hostname>hadoop104</hostname>
<port>8082</port>
<username>cluster</username>
<password>cluster</password>
<master>N</master>
</slaveserver>
6) 分发整个kettle的安装目录,xsync data-integration
7) 启动相关进程,在hadoop102,hadoop103,hadoop104上执行
[atguigu@hadoop102 data-integration]$./carte.sh hadoop102 8080
[atguigu@hadoop103 data-integration]$./carte.sh hadoop103 8081
[atguigu@hadoop104 data-integration]$./carte.sh hadoop104 8082
8) 访问web页面
http://hadoop102:8080
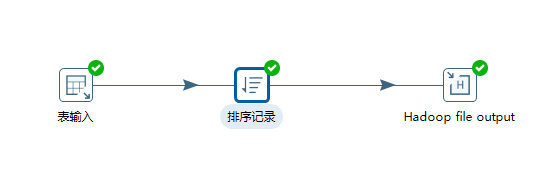
9) 案例:读取hive中的emp表,根据id进行排序,并将结果输出到hdfs上
注意:因为涉及到hive和hbase的读写,需要修改相关配置文件。
修改解压目录下的data-integration\plugins\pentaho-big-data-plugin下的plugin.properties,设置active.hadoop.configuration=hdp26,并将如下配置文件拷贝到data-integration\plugins\pentaho-big-data-plugin\hadoop-configurations\hdp26下

(1) 创建转换,编辑步骤,填好相关配置
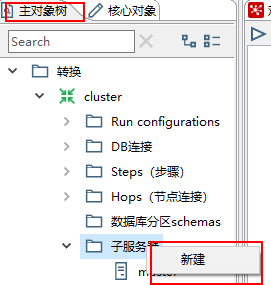
(2) 创建子服务器,填写相关配置,跟集群上的配置相同

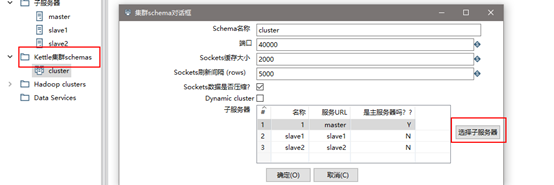
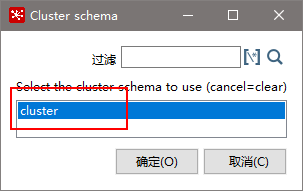
(3) 创建集群schema,选中上一步的几个服务器
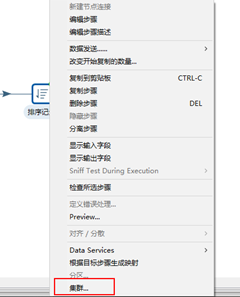
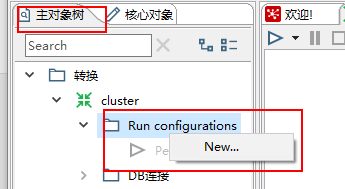
(4) 对于要在集群上执行的步骤,右键选择集群,选中上一步创建的集群schema
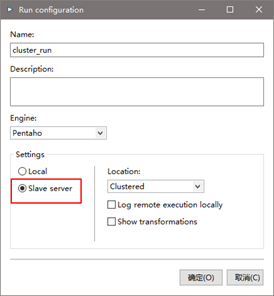
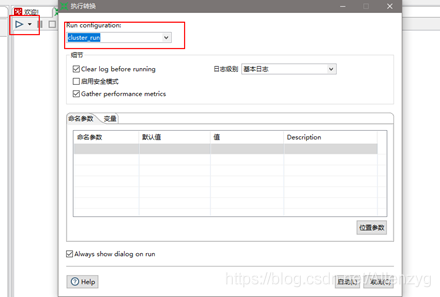
(5) 创建Run Configuration,选择集群模式,直接运行
第3章 调优
1、调整JVM大小进行性能优化,修改Kettle根目录下的Spoon脚本。

参数参考:
-Xmx2048m:设置JVM最大可用内存为2048M。
-Xms1024m:设置JVM促使内存为1024m。此值可以设置与-Xmx相同,以避免每次垃圾回收完成后JVM重新分配内存。
-Xmn2g:设置年轻代大小为2G。整个JVM内存大小=年轻代大小 + 年老代大小 + 持久代大小。持久代一般固定大小为64m,所以增大年轻代后,将会减小年老代大小。此值对系统性能影响较大,Sun官方推荐配置为整个堆的3/8。
-Xss128k:设置每个线程的堆栈大小。JDK5.0以后每个线程堆栈大小为1M,以前每个线程堆栈大小为256K。更具应用的线程所需内存大小进行调整。在相同物理内存下,减小这个值能生成更多的线程。但是操作系统对一个进程内的线程数还是有限制的,不能无限生成,经验值在3000~5000左右。
2、 调整提交(Commit)记录数大小进行优化,Kettle默认Commit数量为:1000,可以根据数据量大小来设置Commitsize:1000~50000
3、尽量使用数据库连接池;
4、尽量提高批处理的commit size;
5、尽量使用缓存,缓存尽量大一些(主要是文本文件和数据流);
6、Kettle是Java做的,尽量用大一点的内存参数启动Kettle;
7、可以使用sql来做的一些操作尽量用sql;
Group , merge , stream lookup,split field这些操作都是比较慢的,想办法避免他们.,能用sql就用sql;
8、插入大量数据的时候尽量把索引删掉;
9、尽量避免使用update , delete操作,尤其是update,如果可以把update变成先delete, 后insert;
10、能使用truncate table的时候,就不要使用deleteall row这种类似sql合理的分区,如果删除操作是基于某一个分区的,就不要使用delete row这种方式(不管是deletesql还是delete步骤),直接把分区drop掉,再重新创建;
11、尽量缩小输入的数据集的大小(增量更新也是为了这个目的);
12、尽量使用数据库原生的方式装载文本文件(Oracle的sqlloader, mysql的bulk loader步骤)。
第4章 kettle常用配置文件