1:错误提示:Could not find com.android.tools.build:gradle:3.5
解决方法:
我有google()都在buildscript和allprojects但是它仍然向我展示了Could not find gradle-3.5.3误差
最后我加入了maven { url "https://maven.google.com" }修正了错误!
项目级别build.gradle:
buildscript {
    ext {
        buildToolsVersion = "29.0.2"
        minSdkVersion = 16
        compileSdkVersion = 29
        targetSdkVersion = 29
    }
    repositories {
        maven { url "https://maven.google.com" }  // <= this line
        google()
        jcenter()
    }
    dependencies {
        classpath("com.android.tools.build:gradle:3.5.3")
        // NOTE: Do not place your application dependencies here; they belong
        // in the individual module build.gradle files
    }
}

allprojects {
    repositories {
        maven { url "https://maven.google.com" }  // <= this line
        mavenLocal()
        maven {
            // All of React Native (JS, Obj-C sources, Android binaries) is installed from npm
            url("$rootDir/../node_modules/react-native/android")
        }
        maven {
            // Android JSC is installed from npm
            url("$rootDir/../node_modules/jsc-android/dist")
        }

        google()
        jcenter()
        maven { url 'https://www.jitpack.io' }
    }
}
2:我正在开发一个应用程序。在我的应用程序中,代码中没有错误,但是当我试图运行我的项目时,它会给出以下错误。
错误提示:
Error:(1, 1) A problem occurred evaluating project ':app'.
Failed to apply plugin [id 'com.android.application']
Could not create plugin of type 'AppPlugin'.
解决方法:
在我的项目中有一个.gradle文件夹,该文件夹缓存了我使用的上一个Gradle版本(5.4.1),Gradle继续使用那而不是新下载的(5.6.4)。
简单地说:
- 关Android Studio
- 删除项目中的旧版本文件夹。
- 重新启动 Android Studio。一切都应该正常工作
如果这不起作用,您还可以尝试以下方法:
- 删除Project.gradle文件夹中的所有版本,因此只有新版本才会被重新下载,就像重新打开IDE时一样。
- 检查Gradle构建版本的项目设置,并确保它设置为最新版本。
- 检查其他模块是否使用较早版本的Gradle构建。可以使用项目搜索(Ctrl+Shift+F)
"distributionUrl"确保所有模块都有最新版本。 - 删除
.gradle/caches在根级文件夹下,通常C://Users/{you}/.gradle - 试一试
gradle build --stacktrace,--info,--scan或者--debug在你的AS终端获得帮助和更多的信息来调试你的问题。
3:如何通过单击左右箭头获取选定日期或当日日期的下一个日期的前一个日期:
Calendar c = Calendar.getInstance();
//for selected date add this line c.set(2021,2,2)
SimpleDateFormat df = new SimpleDateFormat("dd-MMM-yyyy");
String formattedDate = df.format(c.getTime());
textview.setText(formattedDate);
For next date
previous.setOnClickListener(new OnClickListener() {

        @Override
        public void onClick(View v) {
            c.add(Calendar.DATE, -1);
            formattedDate = df.format(c.getTime());
            textview.setText(formattedDate);
         }
      });
For previous date
next.setOnClickListener(new OnClickListener() {
@Override
public void onClick(View v) {
c.add(Calendar.DATE, 1);
formattedDate = df.format(c.getTime());
textview.setText(formattedDate);
}
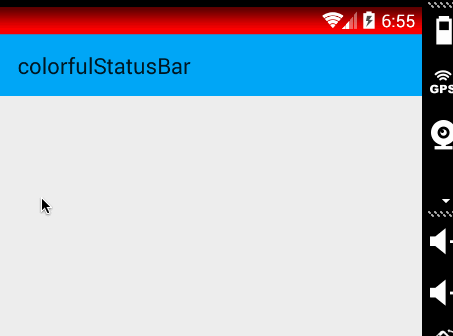
});4:Android 沉浸式状态栏攻略 让你的状态栏变色
三、实现半透明状态栏
因为本例使用了NavigationView,所以布局代码稍多,当然如果你不需要,可以自己进行筛减。
注意引入相关依赖:
 compile 'com.android.support:appcompat-v7:22.2.1'
 compile 'com.android.support:support-v4:22.2.1'
 compile 'com.android.support:design:22.2.0'
(一)colors.xml 和 styles.xml
首先我们定义几个颜色:
res/values/color.xml
<?xml version="1.0" encoding="utf-8"?>
<resources>
    <color name="primary">#FF03A9F4</color>
    <color name="primary_dark">#FF0288D1</color>
    <color name="status_bar_color">@color/primary_dark</color>
</resources>
下面定义几个styles.xml
注意文件夹的路径:
values/styles.xml
<resources>
    <style name="BaseAppTheme" parent="Theme.AppCompat.Light.NoActionBar">
        <!-- Customize your theme here. -->
        <item name="colorPrimary">@color/primary</item>
        <item name="colorPrimaryDark">@color/primary_dark</item>
        <item name="colorAccent">#FF4081</item>
    </style>

    <!-- Base application theme. -->
    <style name="AppTheme" parent="@style/BaseAppTheme">
    </style>
</resources>
values-v19
<resources>

    <style name="AppTheme" parent="@style/BaseAppTheme">
        <item name="android:windowTranslucentStatus">true</item>
    </style>
</resources>
ok,这个没撒说的。注意我们的主题是基于NoActionBar的,android:windowTranslucentStatus这个属性是v19开始引入的。
(二)布局文件
activity_main.xml
<android.support.v4.widget.DrawerLayout
    xmlns:android="http://schemas.android.com/apk/res/android"
    xmlns:app="http://schemas.android.com/apk/res-auto"
    xmlns:tools="http://schemas.android.com/tools"
    android:layout_width="match_parent"
    android:layout_height="match_parent"
    >


    <LinearLayout
        android:id="@+id/id_main_content"
        android:layout_width="match_parent"
        android:layout_height="match_parent"
        android:orientation="vertical">

        <android.support.v7.widget.Toolbar
            android:id="@+id/id_toolbar"
            android:layout_width="match_parent"
            android:layout_height="wrap_content"
            android:background="?attr/colorPrimary"
            android:fitsSystemWindows="true"
            app:popupTheme="@style/ThemeOverlay.AppCompat.Light"/>


        <TextView
            android:id="@+id/id_tv_content"
            android:layout_width="match_parent"
            android:layout_height="0dp"
            android:layout_weight="1"
            android:gravity="center"
            android:text="HelloWorld"
            android:textSize="30sp"/>
    </LinearLayout>


    <android.support.design.widget.NavigationView
        android:id="@+id/id_nv_menu"
        android:layout_width="match_parent"
        android:layout_height="match_parent"
        android:layout_gravity="start"
        android:fitsSystemWindows="true"
        app:headerLayout="@layout/header_just_username"
        app:menu="@menu/menu_drawer"
        />
</android.support.v4.widget.DrawerLayout>
DrawerLayout内部一个LinearLayout作为内容区域,一个NavigationView作为菜单。
注意下Toolbar的高度设置为wrap_content。
然后我们的NavigationView中又依赖一个布局文件和一个menu的文件。
header_just_username.xml
<?xml version="1.0" encoding="utf-8"?>
<RelativeLayout xmlns:android="http://schemas.android.com/apk/res/android"
                android:layout_width="match_parent"
                android:layout_height="192dp"
                android:background="?attr/colorPrimaryDark"
                android:orientation="vertical"
                android:padding="16dp"
                android:fitsSystemWindows="true"
                android:theme="@style/ThemeOverlay.AppCompat.Dark">

    <TextView
        android:id="@+id/id_link"
        android:layout_width="wrap_content"
        android:layout_height="wrap_content"
        android:layout_alignParentBottom="true"
        android:layout_marginBottom="16dp"
        android:text="http://blog.csdn.net/lmj623565791"/>

    <TextView
        android:id="@+id/id_username"
        android:layout_width="wrap_content"
        android:layout_height="wrap_content"
        android:layout_above="@id/id_link"
        android:text="Zhang Hongyang"/>

    <ImageView
        android:layout_width="72dp"
        android:layout_height="72dp"
        android:layout_above="@id/id_username"
        android:layout_marginBottom="16dp"
        android:src="@mipmap/ic_launcher"/>


</RelativeLayout>
menu的文件就不贴了,更加详细的可以去参考Android 自己实现 NavigationView [Design Support Library(1)]。
大体看完布局文件以后,有几个点要特别注意:
ToolBar高度设置为wrap_content
ToolBar添加属性android:fitsSystemWindows="true"
header_just_username.xml的跟布局RelativeLayout,添加属性android:fitsSystemWindows="true"
android:fitsSystemWindows这个属性,主要是通过调整当前设置这个属性的view的padding去为我们的status_bar留下空间。
根据上面的解释,如果你不写,那么状态栏和Toolbar就会有挤一块的感觉了,类似会这样:
ok,最后看下代码。
(三)Activity的代码
package com.zhy.colorfulstatusbar;

import android.os.Bundle;
import android.support.v7.app.AppCompatActivity;
import android.support.v7.widget.Toolbar;

public class MainActivity extends AppCompatActivity
{

    @Override
    protected void onCreate(Bundle savedInstanceState)
    {
        super.onCreate(savedInstanceState);
        setContentView(R.layout.activity_main);
        Toolbar toolbar = (Toolbar) findViewById(R.id.id_toolbar);
        setSupportActionBar(toolbar);
        //StatusBarCompat.compat(this, getResources().getColor(R.color.status_bar_color));
        //StatusBarCompat.compat(this);
    }

}
没撒说的,就是setSupportActionBar。
那么现在4.4的效果图是:
其实还不错,有个渐变的效果。
现在5.x的效果:
可以看到5.x默认并非是一个渐变的效果,类似是一个深一点的颜色。
在看看我们md的规范
状态栏应该是一个比Toolbar背景色,稍微深一点的颜色。
这么看来,我们还是有必要去为4.4做点适配工作,让其竟可能和5.x显示效果一致,或者说尽可能符合md的规范。
四、调整4.4的显示方案
那么问题来了?如何做呢?
咱们这么看,4.4之后加入windowTranslucentStatus的属性之后,也就是我们可以用到状态栏的区域了。
既然我们可以用到这块区域,那么我们只要在根布局去设置一个与状态栏等高的View,设置背景色为我们期望的颜色就可以了。
于是有了以下的代码:
package com.zhy.colorfulstatusbar;

import android.annotation.TargetApi;
import android.app.Activity;
import android.content.Context;
import android.graphics.Color;
import android.os.Build;
import android.view.View;
import android.view.ViewGroup;

/**
 * Created by zhy on 15/9/21.
 */
public class StatusBarCompat
{
    private static final int INVALID_VAL = -1;
    private static final int COLOR_DEFAULT = Color.parseColor("#20000000");

    @TargetApi(Build.VERSION_CODES.LOLLIPOP)
    public static void compat(Activity activity, int statusColor)
    {

        if (Build.VERSION.SDK_INT >= Build.VERSION_CODES.LOLLIPOP)
        {
            if (statusColor != INVALID_VAL)
            {
                activity.getWindow().setStatusBarColor(statusColor);
            }
            return;
        }

        if (Build.VERSION.SDK_INT >= Build.VERSION_CODES.KITKAT && Build.VERSION.SDK_INT < Build.VERSION_CODES.LOLLIPOP)
        {
            int color = COLOR_DEFAULT;
            ViewGroup contentView = (ViewGroup) activity.findViewById(android.R.id.content);
            if (statusColor != INVALID_VAL)
            {
                color = statusColor;
            }
            View statusBarView = new View(activity);
            ViewGroup.LayoutParams lp = new ViewGroup.LayoutParams(ViewGroup.LayoutParams.MATCH_PARENT,
                    getStatusBarHeight(activity));
            statusBarView.setBackgroundColor(color);
            contentView.addView(statusBarView, lp);
        }

    }

    public static void compat(Activity activity)
    {
        compat(activity, INVALID_VAL);
    }


    public static int getStatusBarHeight(Context context)
    {
        int result = 0;
        int resourceId = context.getResources().getIdentifier("status_bar_height", "dimen", "android");
        if (resourceId > 0)
        {
            result = context.getResources().getDimensionPixelSize(resourceId);
        }
        return result;
    }
}
代码的思路很简单,根据Activity找到android.R.content,在其中添加一个View(高度为statusbarHeight,背景色为我们设置的颜色,默认为半透明的黑色)。
那么只需要在Activity里面去写上:
StatusBarCompat.compat(this);就可以了。
如果你希望自己设置状态看颜色,那么就用这个方法:
StatusBarCompat.compat(this, getResources().getColor(R.color.status_bar_color));这样的话我们就解决了4.4到5.x的适配问题,一行代码解决,感觉还是不错的。
最后提一下,对于5.0由于提供了setStatusBarColor去设置状态栏颜色,但是这个方法不能在主题中设置windowTranslucentStatus属性。所以,可以编写一个value-v21文件夹,里面styles.xml写入:
<resources>
    <!-- Base application theme. -->
    <style name="AppTheme" parent="@style/BaseAppTheme">
    </style>
</resources>
其实就是不要有windowTranslucentStatus属性。
接下来,对于默认的效果就不测试了,参考上面的效果图。
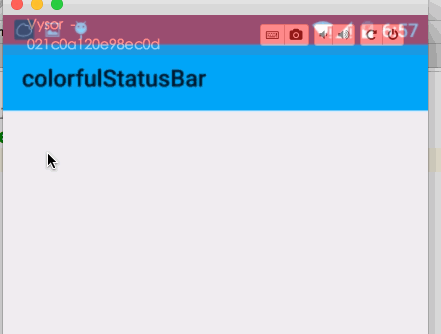
我们测试个设置状态栏颜色的,我们这里设置个红色。
- 4.4 模拟器
- 5.x 真机
ok,这样就结束啦~~
5: android 实现windowBackground打造闪屏页
在创建app的时候Android会立即显示一个backgroundwindow,然后再去创建app进程。这就会产生刚开始打开app的时候出现白屏现象。这篇文章就是为了解决这个白屏现象,如下几步轻松实现闪屏页。
1、新建SplashTheme style
2、在你的app起始页设置style风格
3、设置页面跳转
新建SplashTheme style
 <style name="SplashTheme" parent="AppTheme">
        <item name="android:windowIsTranslucent">false</item>
        <item name="android:background">@mipmap/we</item>
        <item name="android:windowFullscreen">true</item>
    </style>
在你的app起始页设置style风格
<activity
   android:name=".ui.WelcomeActivity"
   android:theme="@style/SplashTheme"
   android:configChanges="orientation|screenSize">
    <intent-filter>
        <actionandroid:name="android.intent.action.MAIN"/>

        <categoryandroid:name="android.intent.category.LAUNCHER"/>
    </intent-filter>
</activity>
设置页面跳转
public class WelcomeActivity extends FragmentActivity {
    @Override
    protected void onCreate(@Nullable Bundle savedInstanceState) {
        super.onCreate(savedInstanceState);

        getWindow().setFlags(
                WindowManager.LayoutParams.FLAG_FULLSCREEN,
                WindowManager.LayoutParams.FLAG_FULLSCREEN);

         /*采用handler创建子线程实现页面跳转*/
        new Handler().postDelayed(new Runnable() {
            @Override
            public void run() {
                Intent intent =new Intent(WelcomeActivity.this,LoginActivity.class);
                startActivity(intent);
                WelcomeActivity.this.finish();
            }
        },1000);

    }


}
注意一点的是设置该welcomeActivity的style后只能结束这个activity
6:Android:背景选择器selector及shape详解
这周是学校的创新创业周,一周没有课,正好可以有时间把Android基础知识都拿出来整理下。
刚学Android的时候,所有的界面都很丑,后来学了背景选择器,就大大改善下这种情况……恩,其实写起来挺费事的,因为在as或者eclipse中,有些内容没有提示,不能自动补全,这就让经常根据提示敲代码的我有点慌了……
so……这里正好总结一下,留作以后粘贴复制……嘿嘿。
所谓状态选择器,就是控件(view或者viewgroup)根据不同的选定状态来定义不同的现实效果,我们可以在指定的状态下,切换控件的背景属性(background),从而达到效果绚丽的目的。
| 属性 | 状态 |
| android:drawable | 放一个drawable资源 |
| android:state_pressed | 当前view是否被按下,如一个按钮触摸或者点击。 |
| android:state_focused | 官方解释为当前view获得焦点的时候,比如用户选择了一个文本框。 |
| android:state_hovered | 光标是否悬停,通常与focused state相同,它是4.0的新特性 |
| android:state_selected | 被选中,它与focus state并不完全一样,如一个list view 被选中的时候,它里面的各个子组件可能通过方向键,被选中了。 |
| android:state_checkable | 当前view是否可以被check。如:RadioButton是可以被check的。 |
| android:state_checked | 被checked了,如:一个RadioButton可以被check了。 |
| android:state_enabled | 当前view可以被点击或者触发触摸事件的时候,能够接受触摸或者点击事件 |
| android:state_activated | 被激活,官方解释是set when a view or its parent has been “activated” meaning the user has currently marked it as being of interest. |
| android:state_window_focused | 当前view所在的窗体获得焦点的时候,应用程序是否在前台,当有通知栏被拉下来或者一个对话框弹出的时候应用程序就不在前台了 |
有的需要加android:focusable和android:clickable为true才能获取焦点
button_select.xml
<selector xmlns:android="http://schemas.android.com/apk/res/android">
    <item android:state_pressed="true" android:drawable="@drawable/play_button"></item>
    <item android:state_focused="true" android:drawable="@drawable/play_button"></item>
    <item android:drawable="@drawable/button"></item>
</selector>
button.xml默认效果
<?xml version="1.0" encoding="utf-8"?>
<shape xmlns:android="http://schemas.android.com/apk/res/android" >
    <solid android:color="#E53B36"/>
</shape>
play_button.xml点击效果
<?xml version="1.0" encoding="utf-8"?>
<shape xmlns:android="http://schemas.android.com/apk/res/android" >
    <solid android:color="#E8B714"/>
</shape>
常用checkbox设置:
<?xml version="1.0" encoding="UTF-8"?>
<selector  xmlns:android="http://schemas.android.com/apk/res/android">
    <item android:state_window_focused="false"
     android:state_enabled="true"
     android:state_checked="true"
     android:drawable="@drawable/btn_check_on" />
    <item android:state_window_focused="false"
     android:state_enabled="true"
     android:state_checked="false"
     android:drawable="@drawable/btn_check_off" />
    <item android:state_enabled="true"
    android:state_checked="true"
    android:state_pressed="true"
    android:drawable="@drawable/btn_check_on_pressed" />
    <item android:state_enabled="true" android:state_checked="false" android:state_pressed="true" android:drawable="@drawable/btn_check_off_pressed" />
    <item android:state_focused="true"
    android:state_enabled="true"
    android:state_checked="true"
    android:drawable="@drawable/btn_check_on_selected" />
    <item android:state_focused="true" android:state_enabled="true" android:state_checked="false" android:drawable="@drawable/btn_check_off_selected" />
    <item android:state_enabled="true"
     android:state_checked="false"
     android:drawable="@drawable/btn_check_off" />
    <item android:state_enabled="true"
     android:state_checked="true"
     android:drawable="@drawable/btn_check_on" />
</selector>
常用ImageButton设置:
<?xml version="1.0" encoding="UTF-8"?>
<selector
  xmlns:android="http://schemas.android.com/apk/res/android">
    <item android:state_pressed="true" android:drawable="@drawable/button2_down" />
    <item android:state_focused="true" android:state_enabled="true" android:drawable="@drawable/button2_over" />
    <item android:state_enabled="true" android:drawable="@drawable/button2" />
</selector>
常用Button设置:
<?xml version="1.0" encoding="UTF-8"?>
<selector xmlns:android="http://schemas.android.com/apk/res/android">
    <item android:state_enabled="false" android:drawable="@drawable/login_input" />
    <item android:state_pressed="true" android:drawable="@drawable/login_input" />
    <item android:state_focused="true" android:drawable="@drawable/input_over" />
</selector>
设置TextView
<?xml version="1.0" encoding="utf-8"?>
<selector xmlns:android="http://schemas.android.com/apk/res/android" >
    <item android:color="@color/gray" android:state_pressed="false" android:state_enabled="true"/>
    <item android:color="@color/white" android:state_pressed="true" android:state_enabled="true"/>
    <item android:color="@color/gray" android:state_enabled="false"/>
</selector>
drawble资源,才是状态选择器的重点。首先,drawble资源比较复杂的时候,我们一般可以用.9patch图片来替代,完美适配。但比较简单的时候,我们可以自己去写背景的drawble资源的。那么,如何自定义一个drawble资源呢?下面来讲讲android下shape的使用。
先来看例子
<?xml version="1.0" encoding="utf-8"?>
<shape xmlns:android="http://schemas.android.com/apk/res/android"
    android:shape="" >

    <!-- 圆角 -->
    <corners
        android:radius="10dp"
        android:topLeftRadius="" />
    <!-- 描边 -->
    <stroke
        android:dashGap=""
        android:dashWidth=""
        android:width="2dp"
        android:color="@color/darkgray" />
    <!-- 实心 -->
    <solid android:color="#c4c4c4" />

    <!-- 大小 -->
    <size
        android:height=""
        android:width="" />
    <!-- 颜色渐变 -->

    <gradient
        android:angle=""
        android:centerColor=""
        android:endColor=""
        android:gradientRadius=""
        android:startColor=""
        android:type="" />
</shape>
首先是最开始的shape标签。在shape里面有个shape属性,这个属性可以设定,也可以不设定,不设定的时候默认是矩形。设定有四个值可以设定:
1、rectangle 矩形
2、oval 椭圆形 当宽高设定为相同的时候,就是圆
3、line 线性形状
4、ring 环形 可用作数据刷新时转圈的提示
当设定为ring环形的时候,还需要设定一下几个属性
 android:innerRadiusRatio="3"  //浮点型数据,以环的宽度比率来表示内环的半径
 android:thicknessRatio="8"    //浮点型数据,以环的宽度比率来表示环的厚度
 android:useLevel="false"  //如果当做是LevlListDrawable使用时为true,其他为false
接下来定义在shape标签里面的节点
<!-- 圆角 -->
   <corners
       android:radius="10dp"
       android:topLeftRadius="" />
这个表示圆角,可以一次性设定四个边角的大小。也分个设定四个角度的大小,这里只写了全部的和左上角的。
<!-- 描边 -->
<stroke
   android:dashGap=""
   android:dashWidth=""
   android:width="2dp"
   android:color="@color/darkgray" />
这个表示描边,在边界画线。width表示线的厚度,color表示颜色,dashWidth和dashGap是用来画虚线的时候用的,dashWidth表示虚线的宽度,dashGap表示虚线的间隔。
<!-- 实心 -->
  <solid android:color="#c4c4c4" />
这个没什么好说的。
<!-- 大小 -->
 <size
     android:height=""
     android:width="" />

<!-- 颜色渐变 -->
 <gradient
     android:angle=""
     android:centerColor=""
     android:endColor=""
     android:gradientRadius=""
     android:startColor=""
     android:centerX=""
     android:centerY=""
     android:gradientRadius=""
     android:type="" />
颜色渐变需要好好讲解一下。
angle表示颜色渐变的起始位置,0表示从左向右然后逆时针方向,90表示从上到下,以此类推,angle必须为45点整数倍
startColor endColor centerColor,颜色 渐变 过程的颜色值。
type,颜色渐变类型,有三个值
1、linear,线性渐变,这个是默认值
2、radial,放射性渐变,这个要配合android:gradientRadius属性使用,android:gradientRadius表示放射渐变的半径大小。
3、sweep,扫描石渐变,就像雷达扫描的那个效果。
centerX,centerY,表示渐变中心的X和Y点的坐标的相对位置。
7:解决Activity切换黑屏、白屏和设置窗体透明度,昏暗度,背景模糊处理:
解决Activity切换黑屏、白屏问题:
//1、设置背景图Theme
<style name="Theme.AppStartLoad" parent="android:Theme">
    <item name="android:windowBackground">@drawable/ipod_bg</item>
    <item name="android:windowNoTitle">true</item>
</style>

//2、设置透明Theme
<style name="Theme.AppStartLoadTranslucent" parent="android:Theme">
    <item name="android:windowIsTranslucent">true</item>
    <item name="android:windowNoTitle">true</item>
</style>
Theme1 程序启动快,界面先显示背景图,然后再刷新其他界面控件。给人刷新不同步感觉。
Theme2 给人程序启动慢感觉,界面一次性刷出来,刷新同步。
设置窗体透明度,昏暗度,背景模糊处理:
(一)透明度
WindowManager.LayoutParams lp=getWindow().getAttributes();
 lp.alpha=0.5f;
 getWindow().setAttributes(lp);
alpha在0.0f到1.0f之间。
(二)昏暗度
WindowManager.LayoutParams lp=getWindow().getAttributes();
   lp.dimAmount=0.5f;
  getWindow().setAttributes(lp);
   getWindow().addFlags(WindowManager.LayoutParams.FLAG_DIM_BEHIND);
dimAmount在0.0f和1.0f之间。
(三)背景模糊
    getWindow().setFlags(WindowManager.LayoutParams.FLAG_BLUR_BEHIND,
      WindowManager.LayoutParams.FLAG_BLUR_BEHIND);
View设置View view=...
view.getBackground().setAlpha(100);//0~255透明度值 ,0为完全透明,255为不透明
8:android 中theme.xml与style.xml使用总结
相同点:
两者的定义相同,继承方式也相同
<?xml version="1.0" encoding="utf-8"?>
<resources>

    <!--
     继承方式
     1、parent
       通过parent属性用来继承Android已经定义好的style
       比如:parent="android:Theme.Dialog" 或 parent="@android:style/Theme.Dialog"
     2、继承自定义的style,可以使用parent或 . 的方式
       比如  <style name="parent.child">  View中调用时 style="@style/parent.child"
             或 <style name="child" parent="@style/parent.child"> View中调用时 style="@style/child"
             或 <style name="child" parent="parent.child">  View中调用时 style="@style/child"
     -->
    <style name="myDialog" parent="android:Theme.Dialog">
        <item name="android:windowBackground">@mipmap/ic_launcher</item>
    </style>

    <style name="parent">
        <item name="android:textSize">30sp</item>
        <item name="android:text">parent</item>
    </style>
    <!--  .的继承方式  -->
    <style name="parent.child">
        <item name="android:text">child</item>
        <item name="android:textColor">#ff00ff</item>
    </style>

   <!-- parent的继承方式-->
    <style name="child" parent="@style/parent.child">
        <item name="android:text">childs</item>
    </style>
</resources>
不同点:
一、使用的地方不同
1.Theme 是用来设置应用全局主题风格的,对整个应用或某个Activity存在影响。 5.0 上可以让你局部的调整设计风格;
1) AndroidManifest.xml中:
<application android:theme="@android:style/theme">
<activity android:theme="@android:style/theme">
2) 在Activity通过代码设置:
setTheme(R.style.theme);
注意必须在setContentView()之前设置才有效
2.Style 主要是用在View上的,当你在view上设置 style 的时候,LayoutInflater会读取该 style 的内容并在任意单独设置的样式之前把该内容设置到 AttributeSet中。比如:
<EditText android:layout_height="wrap_content"
android:text="EditText"
style="@style/Title"
android:layout_width="fill_parent"
android:id="@+id/editText1">
</EditText>
二、 在R.attr定义中以window开头的一些属性只对theme有效。
三、如果一个应用使用了theme,同时应用下的view也使用了style,那么当theme与样式style发生冲突时,style的优先级高于主题。
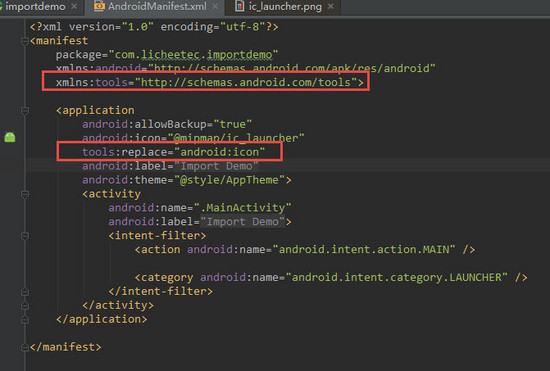
9:当在gradle导入第三方依赖(sweetalert)之后,编译出错
Error:Execution failed for task ':qq:processDebugManifest'.
> Manifest merger failed : Attribute application@icon value=(@mipmap/ic_launcher) from AndroidManifest.xml:45:9-43
	is also present at [com.pnikosis:materialish-progress:1.0] AndroidManifest.xml:13:9-45 value=(@drawable/ic_launcher).
	Suggestion: add 'tools:replace="android:icon"' to <application> element at AndroidManifest.xml:42:5-122:19 to override.
解决方案:
1、由于导入的第三方依赖也使用我们application的icon值的属性,具体修改步骤如下图,加上下面圈起来的语句
10:Git Push 提交到Github上发生错误
$ git push origin master
To https://github.com/AndroidHensen/NewsTemplate.git
 ! [rejected]        master -> master (fetch first)
error: failed to push some refs to 'https://github.com/AndroidHensen/NewsTemplate.git'
hint: Updates were rejected because the remote contains work that you do
hint: not have locally. This is usually caused by another repository pushing
hint: to the same ref. You may want to first integrate the remote changes
hint: (e.g., 'git pull ...') before pushing again.
hint: See the 'Note about fast-forwards' in 'git push --help' for details.
解决方案:
1、出现的主要原因是,本地没有update到最新版本的项目(git上有README.md文件没下载下来)
2、先进行代码合并,git pull --rebase origin master,再进行代码提交,git push -f origin master
11:创建了两个Module,其中一个Module依赖另一个Module而导致了出现该问题,如果在Android Studio中,有ModuleA和ModuleB,我们希望ModuleA依赖ModuleB,运行时候可能会出现该问题
Error:Dependency Boke:zXingProj:unspecified on project app3 resolves to an APK archive which is not supported as a compilation dependency. File: D:\workspace5\Boke\zXingProj\build\outputs\apk\zXingProj-release-unsigned.apk解决方法:
1、查看被依赖的ModuleB的build.gradle,里面可以看到
apply plugin: 'com.android.application' 将这一句改为即可
apply plugin: 'com.android.library' 接着会出现另一个错误
Error:Library projects cannot set applicationId. applicationId is set to 'com.dtr.zxing' in default config.解决方法:
1、需要将builde.gradle — android — defaultConfig中的applicationId删除
12:编译时发生
Error:(25, 0) Gradle DSL method not found: 'compile()'
Possible causes:<ul><li>The project 'AP' may be using a version of Gradle that does not contain the method.
<a href="openGradleSettings">Gradle settings</a></li><li>The build file may be missing a Gradle plugin.
<a href="apply.gradle.plugin">Apply Gradle plugin</a></li>
解决方法:
1、在最外层的Gradle中,删除如下的语句
dependencies {
    compile files('libs/xUtils-2.6.14.jar')
}
作者:黄才智