11.图像
定义图像的语法是:
<img src="url" />URL 指存储图像的位置。如果名为 "boat.gif" 的图像位于 www.w3school.com.cn 的 images 目录中,那么其 URL 为 http://www.w3school.com.cn/images/boat.gif。
浏览器将图像显示在文档中图像标签出现的地方。如果你将图像标签置于两个段落之间,那么浏览器会首先显示第一个段落,然后显示图片,最后显示第二段。
11.1.插入图像
<!DOCTYPE HTML>
<html>
<body>
<p>
一幅图像:
<img src="./image.jpg" width="128" height="128" />
</p>
<p>
一幅动画图像:
<img src="./image2.gif" width="50" height="50" />
</p>
<p>请注意,插入动画图像的语法与插入普通图像的语法没有区别。</p>
</body>
</html>
11.2.从不同位置插入图像
<html>
<body>
<p>
来自另一个文件夹的图像:
<img src="./image.jpg" />
</p>
<p>
来自 W3School.com.cn 的图像:
<img src="http://www.w3school.com.cn/i/w3school_logo_white.gif" />
</p>
</body>
</html>
11.3.背景图片
<html>
<body background="./img.jpg">
<h3>图像背景</h3>
<p>gif 和 jpg 文件均可用作 HTML 背景。</p>
<p>如果图像小于页面,图像会进行重复。</p>
</body>
</html>
11.4.排列图片
<html>
<body>
<h2>未设置对齐方式的图像:</h2>
<p>图像 <img src ="/i/eg_cute.gif"> 在文本中</p>
<h2>已设置对齐方式的图像:</h2>
<p>图像 <img src="/i/eg_cute.gif" align="bottom"> 在文本中</p>
<p>图像 <img src ="/i/eg_cute.gif" align="middle"> 在文本中</p>
<p>图像 <img src ="/i/eg_cute.gif" align="top"> 在文本中</p>
<p>请注意,bottom 对齐方式是默认的对齐方式。</p>
</body>
</html>
11.5.浮动图片
<html>
<body>
<p>
<img src ="/i/eg_cute.gif" align ="left">
带有图像的一个段落。图像的 align 属性设置为 "left"。图像将浮动到文本的左侧。
</p>
<p>
<img src ="/i/eg_cute.gif" align ="right">
带有图像的一个段落。图像的 align 属性设置为 "right"。图像将浮动到文本的右侧。
</p>
</body>
</html>
11.6.图片尺寸
<img src="/i/eg_mouse.jpg" width="200" height="200">
<p>通过改变 img 标签的 "height" 和 "width" 属性的值,您可以放大或缩小图像。</p>
11.7.为图片显示替换文本
<html>
<body>
<p>仅支持文本的浏览器无法显示图像,仅仅能够显示在图像的 "alt" 属性中指定的文本。在这里,"alt" 的文本是“向左转”。</p>
<p>请注意,如果您把鼠标指针移动到图像上,大多数浏览器会显示 "alt" 文本。</p>
<img src="/i/eg_goleft.gif" alt="向左转" />
<p>如果无法显示图像,将显示 "alt" 属性中的文本:</p>
<img src="/i/eg_goleft123.gif" alt="向左转" />
</body>
</html>
12.表格 由 <table> 标签来定义
表格由 <table> 标签来定义。每个表格均有若干行(由 <tr> 标签定义),每行被分割为若干单元格(由 <td> 标签定义)。字母 td 指表格数据(table data),即数据单元格的内容。数据单元格可以包含文本、图片、列表、段落、表单、水平线、表格等等。
border:边框粗细(或没有);bgcolor:背景颜色;cellpadding:单元格大小;cellspacing:单元格间距;background:背景图像;align:排列单元格内容
<html>
<body>
<h4>横跨两列的单元格:</h4>
<h4>border:边框粗细(或没有);bgcolor:背景颜色;align:对齐方式;</h4>
<table border="1"bgcolor="red">
<tr>
  <th>姓名</th>
  <th colspan="2">电话</th>
</tr>
<tr>
  <td align="left">Bill Gates</td>
  <td>555 77 854</td>
  <td>555 77 855</td>
</tr>
</table>
<h4>横跨两行的单元格:</h4>
<h4>cellpadding:单元格大小;cellspacing:单元格间距;background:背景图像;</h4>
<table border="1"cellpadding="10"cellspacing="30"background="./image.gif">
<tr>
  <th>姓名</th>
  <td>Bill Gates</td>
</tr>
<tr>
  <th rowspan="2">电话</th>
  <td>555 77 854</td>
</tr>
<tr>
  <td>555 77 855</td>
</tr>
</table>
</body>
</html>
| 表格 | 描述 |
|---|---|
| <table> | 定义表格 |
| <caption> | 定义表格标题。 |
| <th> | 定义表格的表头。 |
| <tr> | 定义表格的行。 |
| <td> | 定义表格单元。 |
| <thead> | 定义表格的页眉。 |
| <tbody> | 定义表格的主体。 |
| <tfoot> | 定义表格的页脚。 |
| <col> | 定义用于表格列的属性。 |
| <colgroup> | 定义表格列的组。 |
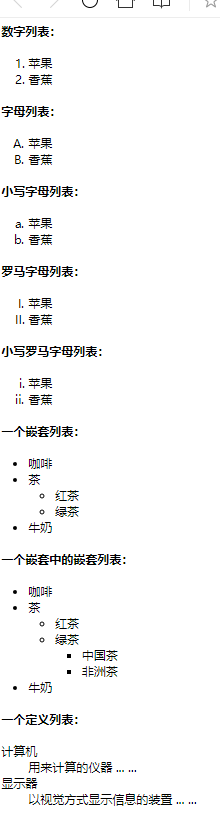
13.列表
<html>
<body>

<h4>数字列表:</h4>
<ol>
 <li>苹果</li>
 <li>香蕉</li>
</ol>

<h4>字母列表:</h4>
<ol type="A">
 <li>苹果</li>
 <li>香蕉</li>
</ol>

<h4>小写字母列表:</h4>
<ol type="a">
 <li>苹果</li>
 <li>香蕉</li>
</ol>

<h4>罗马字母列表:</h4>
<ol type="I">
 <li>苹果</li>
 <li>香蕉</li>
</ol>

<h4>小写罗马字母列表:</h4>
<ol type="i">
 <li>苹果</li>
 <li>香蕉</li>
</ol>

<h4>一个嵌套列表:</h4>
<ul>
  <li>咖啡</li>
  <li>茶
    <ul>
    <li>红茶</li>
    <li>绿茶</li>
    </ul>
  </li>
  <li>牛奶</li>
</ul>

<h4>一个嵌套中的嵌套列表:</h4>
<ul>
  <li>咖啡</li>
  <li>茶
    <ul>
    <li>红茶</li>
    <li>绿茶
      <ul>
      <li>中国茶</li>
      <li>非洲茶</li>
      </ul>
    </li>
    </ul>
  </li>
  <li>牛奶</li>
</ul>

<h4>一个定义列表:</h4>
<dl>
   <dt>计算机</dt>
   <dd>用来计算的仪器 ... ...</dd>
   <dt>显示器</dt>
   <dd>以视觉方式显示信息的装置 ... ...</dd>
</dl>

</body>
</html>
| 标签 | 描述 |
|---|---|
| <ol> | 定义有序列表。 |
| <ul> | 定义无序列表。 |
| <li> | 定义列表项。 |
| <dl> | 定义定义列表。 |
| <dt> | 定义定义项目。 |
| <dd> | 定义定义的描述。 |
| <dir> | 已废弃。使用 <ul> 代替它。 |
| <menu> | 已废弃。使用 <ul> 代替它。 |
14.类、块、布局
可以通过 <div> 和 <span> 将 HTML 元素组合起来。
14.1.<div> 元素
如果与 CSS 一同使用,<div> 元素可用于对大的内容块设置样式属性。
<!DOCTYPE html>
<html>
<head>
<style>
.cities{
    background-color:black;
    color:white;
    margin:20px;
    padding:20px;
}
</style>
</head>
<body>
<div class="cities">
<h2>London</h2>
<p>
    London is the capital city of England. </br>
    It is the most populous city in the United </br>
    Kingdom,with a metropolitan area of </br>
    over 13 million inhabitants. </br>

    Standing on the River Thames,London </br>
    has been a major settlement for two </br>
    millennia,its history going back to its </br>
    founding by the Romans, who named it </br>
    Londinium.
</p>
</div>
</body>
</html> 
<html>
<body>
<h3>This is a header</h3>
<p>This is a paragraph</p>
<div style="color:blue">
  <h3>This is a header</h3>
  <p>This is a header</p>
</div>
</body>
</html>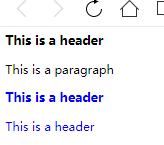
14.2.对 HTML 进行分类(设置类),使我们能够为元素的类定义 CSS 样式。
为相同的类设置相同的样式,或者为不同的类设置不同的样式。
<!DOCTYPE html>
<html>
<head>
<style>
.cities{
  background-color:black; /*黑色背景*/
  color:white;  /*白色字体*/
  margin:10px;  /*与边缘的距离*/
  padding:10px; /*内容与背景的边距*/
}
</style>
</head>

<body>
  <div class="cities">
    <h2>London</h2>
    <p>123</p>
    <p>456</p>
  <div>
</body>
</html>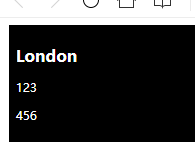
14.3.分类块级元素
HTML <div> 元素是块级元素。它能够用作其他 HTML 元素的容器。
设置 <div> 元素的类,使我们能够为相同的 <div> 元素设置相同的类:
<!DOCTYPE html>
<html>
<head>
  <style>
    .cities{
      background-color:black;
      color:white;
      margin:10px;
      padding:10px;
    }
  </style>
</head>
<body>
<div class="cities">
  <h2>h2标题1</h2>
  <p>段落2</p>
</div>
<div class="cities">
  <h2>h2标题2</h2>
  <p>段落2</p>
</div>
</body>
</html> 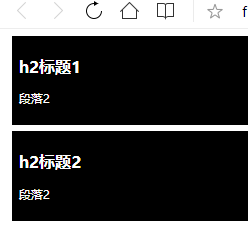
14.4.<div>元素布局
<!DOCTYPE html>
<html>

<head>
<!--css:-->
<style>
#header {
    background-color:black;
    color:white;
    text-align:center;
    padding:5px;
}
#nav {
    line-height:30px;
    background-color:#eeeeee;
    height:300px;
    width:100px;
    float:left;
    padding:5px;
}
#section {
    width:350px;
    float:right;
    padding:10px;
}
#footer {
    background-color:black;
    color:white;
    clear:both;
    text-align:center;
   padding:5px;
}
</style>
</head>

<body>

<div id="header">
<h1>11111</h1>
</div>

<div id="nav">
333<br>
333<br>
333<br>
</div>

<div id="section">
<h2>22222</h2>
<p>
1234567
</p>
<p>
1234567
</p>
</div>

<div id="footer">
44444
</div>

</body>
</html>

14.5.<span> 元素
HTML <span> 元素是内联元素,可用作文本的容器。
<span> 元素也没有特定的含义。
当与 CSS 一同使用时,<span> 元素可用于为部分文本设置样式属性。
14.6.<header>, <nav>, <section>, 以及 <footer> 来创建多列布局
<!DOCTYPE html>
<html>

<head>
<style>
header {
    background-color:black;
    color:white;
    text-align:center;
    padding:5px;
}
nav {
    line-height:30px;
    background-color:#eeeeee;
    height:300px;
    width:100px;
    float:left;
    padding:5px;
}
section {
    width:350px;
    float:left;
    padding:10px;
}
footer {
    background-color:black;
    color:white;
    clear:both;
    text-align:center;
    padding:5px;
}
</style>
</head>

<body>

<header>
<h1>City Gallery</h1>
</header>

<nav>
London<br>
Paris<br>
Tokyo<br>
</nav>

<section>
<h1>London</h1>
<p>
London is the capital city of England. It is the most populous city in the United Kingdom,
with a metropolitan area of over 13 million inhabitants.
</p>
<p>
Standing on the River Thames, London has been a major settlement for two millennia,
its history going back to its founding by the Romans, who named it Londinium.
</p>
</section>

<footer>
Copyright W3Schools.com
</footer>

</body>
</html>

15.表单
15.1.<input type="text"> 文本域(Text Fields)
15.2.<input type="password"> 密码字段
15.3.<input type="radio"> 单选按钮(Radio Buttons)
15.4.<input type="checkbox"> 复选框(Checkboxes)
15.5.<input type="submit"> 提交按钮(Submit Button)
15.6.带边框的表单
15.7.下拉列表
<!DOCTYPE html>
<html>
<body>
<p><b>注意:</b>表单本身是不可见的。并且注意一个文本字段的默认宽度是20个字符。</p>
<form action="">
    账号<input type="text" name="firstname"><br>
    密码<input type="password" name="pwd"><br>
    单选<input type="radio" name="sex" value="male">Male<br>
    单选<input type="radio" name="sex" value="female">Female<br>
    复选<input type="checkbox" name="vehicle" value="Bike">I have a bike<br>
    复选<input type="checkbox" name="vehicle" value="Car">I have a Car<br>
</form>
<form name="input" action="html_form_action.php" method="get">
    提交<input type="text" name="user"><br>
    按钮<input type="submit" value="Submit"><br>
</form>

<form action="">
    <fieldset>
    <legend>带边框的表单:</legend>
    名称<input type="text" size="30"><br>
    邮箱<input type="text" size="30"><br>
    </fieldset>
</form>

<form action="">
    下拉<select name="cars">
        <option value="volvo">Volvo</option>
        <option value="saab" selected>Saab</option><!---预先下拉菜单-->>
</form>
</body>
</html>
16.内联框架 框架
16.1. <iframe src="URL"></iframe>框架
<!DOCTYPE html>
<html>
<body>
<h4>1.有边框的:</h4>
<iframe src="iframe.html" width="500" height="80"></iframe>

<h4>2.没有边框的:</h4>
<iframe src="iframe.html" width="500" height="80" frameborder="0">
    <p>您的浏览器不支持  iframe 标签。</p>
</iframe>

<h4>3.使用iframe来显示目标链接页面:</h4>
<iframe src="iframe.html" name="iframe_a"></iframe>
<p><a href="https://www.runoob.com" target="iframe_a">RUNOOB.COM</a></p>

</body>
</html>
16.2.<frameset> 框架 <frame>框架结构标签
水平框架:<frameset rows="25%,*,25%"> ;垂直框架:<frameset cols="25%,*,25%">
<!DOCTYPE html>
<html>
<frameset cols="25%,*,25%">
  <frame src="frame_a.html">
  <frame src="frame_b.html">
  <frame src="frame_c.html">
</frameset>
</html>
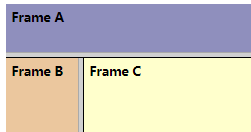
16.3.混合框架结构
<!DOCTYPE html>
<html>
<frameset rows="50%,50%">
  <frame src="frame_a.html">
  <frameset cols="25%,75%">
    <frame src="frame_b.html">
    <frame src="frame_c.html">
  </frameset>
</frameset>
</html>
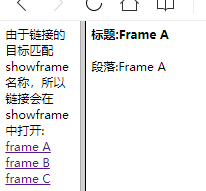
16.4.导航框架
contest.html
<html>
  由于链接的目标匹配 showframe 名称,所以链接会在 showframe 中打开:<br>
  <a href="frame_a.html" target="showframe">frame A</a>
  <a href="frame_b.html" target="showframe">frame B</a>
  <a href="frame_c.html" target="showframe">frame C</a>
</html>
<html>
<frameset cols="120,*">
  <frame src="contest.html">
  <frame src="frame_a.html" name="showframe">
</frameset>
</html>
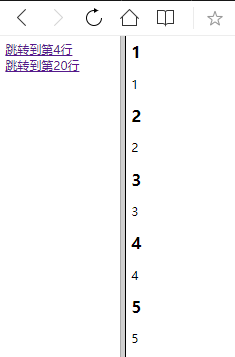
16.5.使用框架导航到指定的节
link.html
<html>
<h2>   1</h2><p> 1</p>
<h2>   2</h2><p> 2</p>
<h2>   3</h2><p> 3</p>
<h2><a name="C4">   4</a></h2><p> 4</p>
<h2>   5</h2><p> 5</p>
<h2>   6</h2><p> 6</p>
<h2>   7</h2><p> 7</p>
<h2>   8</h2><p> 8</p>
<h2>   9</h2><p> 9</p>
<h2>   10</h2><p> 10</p>
<h2>   11</h2><p> 11</p>
<h2>   12</h2><p> 12</p>
<h2>   13</h2><p> 13</p>
<h2>   14</h2><p> 14</p>
<h2>   15</h2><p> 15</p>
<h2>   16</h2><p> 16</p>
<h2>   17</h2><p> 17</p>
<h2>   18</h2><p> 18</p>
<h2>   19</h2><p> 19</p>
<h2><a name="C20">   20</a></h2><p> 20</p>
<h2>   21</h2><p> 21</p>
</html>
content.html
<html>
    <a href="link.html#C4" target="showframe">跳转到第4行</a><br>
    <a href="link.html#C20" target="showframe">跳转到第20行</a>
</html>
index.html
<html>
<frameset cols="180,*">
<frame src="./content.html">
<frame src="./link.html" name="showframe">
</frameset>
</html>
17.颜色
HTML 颜色由一个十六进制符号来定义,这个符号由红色、绿色和蓝色的值组成(RGB)。
每种颜色的最小值是0(十六进制:#00)。最大值是255(十六进制:#FF)。
这个表格给出了由三种颜色混合而成的具体效果:
<!DOCTYPE html>
<html>
<body>
<p style="background-color:#FFFF00">
通过十六进制设置背景颜色
</p>
<p style="background-color:rgb(255,255,0)">
通过 rbg 值设置背景颜色
</p>
<p style="background-color:yellow">
通过颜色名设置背景颜色
</p>
</body>
</html>
18.脚本 <script> 标签
<!DOCTYPE html>
<html>
<body>
<h3>不支持JavaScript会用 <noscript> 元素中定义的内容来替代:</h3>
<script> document.write("Hello World!")</script>
<noscript>抱歉,你的浏览器不支持 JavaScript!</noscript>
<h3>JavaScript 能够直接写入 HTML 输出流中: </h3>
<script>document.write("<p>这是一个段落。</p>");</script>
<p>只能在HTML输出流中使用 <strong>document.write</strong></p>
</body>
</html>
18.1.JavaScript 事件响应、处理HTML样式
<!DOCTYPE html>
<html>
<body>
<script>
function myFunction(){
	document.getElementById("demo").innerHTML="Hello JavaScript!";
}
function myFunction1(){
	x=document.getElementById("demo1")    // 找到元素
	x.style.color="#ff0000";              // 改变样式
}
</script>

<p id="demo">JavaScript 可以触发事件,就像按钮点击。</p>
<button type="button" onclick="myFunction()">触发事件</button>

<p id="demo1">JavaScript 能改变 HTML 元素的样式。</p>
<button type="button" onclick="myFunction1()">改变样式</button>

</body>
</html>
19.文件路径
19.1.绝对文件路径
绝对文件路径是指向一个因特网文件的完整 URL:
<img src="https://www.w3school.com.cn/images/picture.jpg" alt="flower"><img> 标签以及 src 和 alt 属性在 HTML 图像这一章做了讲解。
19.2.相对路径
相对路径指向了相对于当前页面的文件。
在本例中,文件路径指向了位于当前网站根目录中 images 文件夹里的一个文件:
<img src="/images/picture.jpg" alt="flower">在本例中,文件路径指向了位于当前文件夹中 images 文件夹里的一个文件:
<img src="images/picture.jpg" alt="flower">在本例中,文件路径指向了位于当前文件夹的上一级文件夹中 images 文件夹里的一个文件:
<img src="../images/picture.jpg" alt="flower">使用相对路径是个好习惯(如果可能)。
如果使用了相对路径,那么您的网页就不会与当前的基准 URL 进行绑定。所有链接在您的电脑上 (localhost) 或未来的公共域中均可正常工作。
20.字符实体
| 显示结果 | 描述 | 实体名称 | 实体编号 |
|---|---|---|---|
| 空格 | |   | |
| < | 小于号 | < | < |
| > | 大于号 | > | > |
| & | 和号 | & | & |
| " | 引号 | " | " |
| ' | 撇号 | ' (IE不支持) | ' |
| ¢ | 分 | ¢ | ¢ |
| £ | 镑 | £ | £ |
| ¥ | 人民币/日元 | ¥ | ¥ |
| € | 欧元 | € | € |
| § | 小节 | § | § |
| © | 版权 | © | © |
| ® | 注册商标 | ® | ® |
| ™ | 商标 | ™ | ™ |
| × | 乘号 | × | × |
| ÷ | 除号 | ÷ | ÷ |
| 音标符 | 字符 | Construct | 输出结果 |
|---|---|---|---|
| ̀ | a | à | à |
| ́ | a | á | á |
| ̂ | a | â | â |
| ̃ | a | ã | ã |
| ̀ | O | Ò | Ò |
| ́ | O | Ó | Ó |
| ̂ | O | Ô | Ô |
| ̃ | O | Õ | Õ |
ISO-8859-1 参考手册:https://www.runoob.com/tags/ref-entities.html