一、前言以及效果图:
这是一个简单的聊天界面,类似于QQ聊天的界面那样如下图:
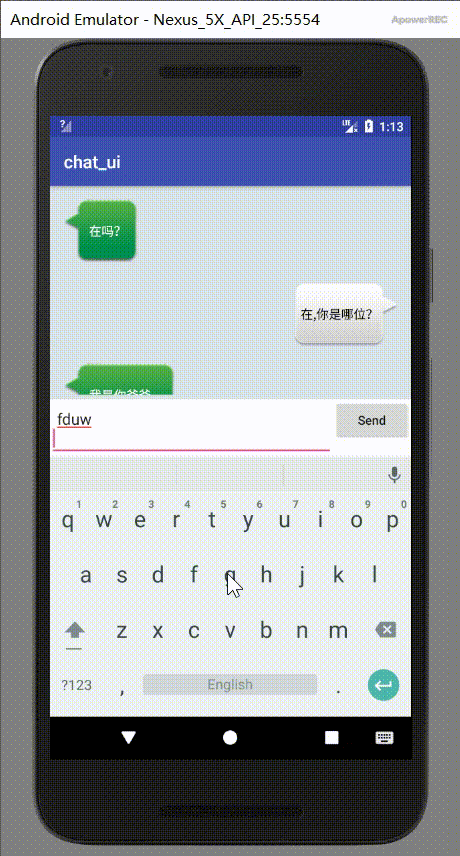
不过没人家那么高大上咯。毕竟作为一个新手的我还在路上奔跑,效果图就是上图所示了,接下来我们看看是怎么实现的。
二、实现代码
1.因为在布局中我么使用的是RecycleView控件,所以首先要在app/build.grade里面添加依赖库,代码如下:
dependencies {
    ...
    compile 'com.android.support:recyclerview-v7:26.1.0'
     ...
}
2.接下来我们定义一个消息的实体类Msg:
public class Msg {
    public static final int TYPE_RECEIVED = 0;//表示收到消息
    public static final int TYPE_SENT = 1;//表示发送的消息
    private String content;//消息内容
    private int type;//消息类型
    public Msg(String content,int type){
        this.content = content;
        this.type = type;
    }
    public String getContent(){
        return content;
    }
    public int getType(){
        return type;
    }
}
3. 修改activity_main.xml文件,在父布局中先放一个RecyclerView控件,在其下面添加一个子布局,放一个EditText和Button分别是消息输入框和发送按钮,代码如下:
<?xml version="1.0" encoding="utf-8"?>
<LinearLayout xmlns:android="http://schemas.android.com/apk/res/android"
    android:layout_width="match_parent"
    android:layout_height="match_parent"
    android:orientation="vertical"
    android:background="#d8e0e8"
   >
    <android.support.v7.widget.RecyclerView
        android:id="@+id/mRv"
        android:layout_width="match_parent"
        android:layout_height="0dp"
        android:layout_weight="1"
        android:layout_marginTop="5dp"
        android:layout_marginRight="5dp"
        android:layout_marginLeft="5dp"
        />
    <LinearLayout
        android:layout_width="match_parent"
        android:layout_height="wrap_content"
        android:background="#ffffff"
        android:layout_marginTop="5dp">
        <EditText
            android:id="@+id/mEt"
            android:layout_width="0dp"
            android:layout_height="wrap_content"
            android:layout_weight="1"
            android:hint="Type something here"
            android:maxLines="2"/>
        <Button
            android:id="@+id/send"
            android:layout_width="wrap_content"
            android:layout_height="wrap_content"
            android:text="Send"
            android:textAllCaps="false"/>
    </LinearLayout>
</LinearLayout>
4. 还需要写一个布局作为RecyclerView子项布局,新建布局文件msg_item.xml,代码如下:
<?xml version="1.0" encoding="utf-8"?>
<LinearLayout xmlns:android="http://schemas.android.com/apk/res/android"
    android:layout_width="match_parent"
    android:layout_height="wrap_content"
    android:orientation="vertical"
    android:padding="10dp">

    <LinearLayout
        android:id="@+id/layout_left"
        android:layout_width="wrap_content"
        android:layout_height="wrap_content"
        android:layout_gravity="left"
        android:background="@drawable/message_left">
        <TextView
            android:id="@+id/left_msg"
            android:layout_width="wrap_content"
            android:layout_height="wrap_content"
            android:layout_gravity="center"
            android:layout_margin="5dp"
            android:textColor="#fff"
            />
    </LinearLayout>
    <LinearLayout
        android:id="@+id/layout_right"
        android:layout_width="wrap_content"
        android:layout_height="wrap_content"
        android:layout_gravity="right"
        android:layout_marginTop="3dp"
        android:background="@drawable/message_right">
        <TextView
            android:id="@+id/right_msg"
            android:layout_width="wrap_content"
            android:layout_height="wrap_content"
            android:layout_gravity="center"
            android:layout_margin="5dp"
            android:textColor="#000"
            />
    </LinearLayout>
</LinearLayout>
这里我们把左右消息框都显示了出来,我们需要在代码中根据消息的类型将另外一个消息的布局隐藏掉就OK了。代码见第5步。
5. 然后我们需要创建一个RecyclerView的适配器,代码如下:
public class MsgAdapter extends RecyclerView.Adapter<MsgAdapter.ViewHolder>{

    private List<Msg>  mMsgLIst;
      //内部类
    static class ViewHolder  extends  RecyclerView.ViewHolder{
        LinearLayout leftLayout;
        LinearLayout rightLayout;

        TextView  leftMsg;
        TextView  rightMsg;

        //找到子项布局中的控件
        public ViewHolder(View view){
            super(view);
            leftLayout = (LinearLayout) view.findViewById ( R.id.layout_left );
            rightLayout = (LinearLayout) view.findViewById ( R.id.layout_right );
            leftMsg = (TextView) view.findViewById ( R.id.left_msg );
            rightMsg = (TextView) view.findViewById ( R.id.right_msg );
        }
    }
    //构造函数,用于把要展示的数据源传递进来
    public  MsgAdapter(List<Msg>  msgLIst){
        mMsgLIst = msgLIst;
    }
    //加载子项布局,返回一个View
    @Override
    public ViewHolder onCreateViewHolder(ViewGroup parent,int viewType){
        View view = LayoutInflater.from ( parent.getContext ())
                .inflate(R.layout.msg_item,parent,false);
        return new ViewHolder ( view );
    }
    //对子项中的数据赋值函数
    @Override
    public void onBindViewHolder(ViewHolder holder,int position){
        Msg msg = mMsgLIst.get ( position );//得到msg实例
        if (msg.getType()==Msg.TYPE_RECEIVED){//表示收到消息
            holder.leftLayout.setVisibility ( View.VISIBLE );//显示左边的消息布局
            holder.rightLayout.setVisibility ( View.GONE );//隐藏右边的消息布局
            holder.leftMsg.setText ( msg.getContent () );
        }else if (msg.getType()==Msg.TYPE_SENT){
            holder.rightLayout.setVisibility ( View.VISIBLE );
            holder.leftLayout.setVisibility ( View.GONE );
            holder.rightMsg.setText ( msg.getContent () );
        }
    }
    @Override
    public int getItemCount(){
        return mMsgLIst.size ();
    }
}
6. 最后就是MainActivity主代码了,
public class MainActivity extends AppCompatActivity {

    private List<Msg> msgList = new ArrayList<> (  );
    private EditText mEt;
    private Button send;
    private RecyclerView mRv;
    private MsgAdapter adapter;
    @Override
    protected void onCreate(Bundle savedInstanceState) {
        super.onCreate ( savedInstanceState );
        setContentView ( R.layout.activity_main );
        initMsg();//初始化消息数据

        mEt = findViewById ( R.id.mEt );
        send = findViewById ( R.id.send );
        mRv = findViewById ( R.id.mRv );

        //建立数据和RecyclerView之间的联系
        LinearLayoutManager layoutManager = new LinearLayoutManager ( this);
        mRv.setLayoutManager ( layoutManager );//制定RecyclerView的布局方式
        adapter = new MsgAdapter ( msgList );//将数据传递到MsgAdapter构造函数中
        mRv.setAdapter ( adapter );

        send.setOnClickListener ( new View.OnClickListener () {
            @Override
            public void onClick(View view) {
                String content = mEt.getText ().toString ();
                if(!"".equals ( content )){//如果输入框不为空,就执行以下内容
                    Msg msg = new Msg ( content,Msg.TYPE_SENT );
                    msgList.add ( msg );
                    adapter.notifyItemInserted (msgList.size ()-1);
                    mRv.scrollToPosition ( msgList.size ()-1 );//将显示的数据定位到 最后一行
                    mEt.setText ( "" );//点击发送后清空输入框的内容
                }
            }
        } );
    }
    private void initMsg(){
        Msg msg1 = new Msg ( "在吗?",Msg.TYPE_RECEIVED );
        msgList.add ( msg1 );//将msg1加入到列表msgList中
        Msg msg2 = new Msg ( "在,你是哪位?",Msg.TYPE_SENT );
        msgList.add ( msg2 );
        Msg msg3 = new Msg ( "我是你爸爸。",Msg.TYPE_RECEIVED );
        msgList.add ( msg3 );
    }
}
这样一个简单的聊天界面就完成了。