目录
一.装载gif动画文件
代码:
import sys
from PyQt5.QtWidgets import *
from PyQt5.QtGui import *
from PyQt5.QtCore import *

class loadingGif(QWidget):
    def __init__(self):
        super(loadingGif, self).__init__()
        self.label=QLabel("",self)
        #fixed  adj. 确定的;固执的
        self.setFixedSize(128,128)
        self.resize(400,300)#设置了固定尺寸之后,尺寸便不可修改!
        self.setWindowFlags(Qt.Dialog | Qt.CustomizeWindowHint)
        self.movie=QMovie('../picture/images/loading.gif')
        self.label.setMovie(self.movie)
        self.movie.start()


if __name__ == "__main__":
    app = QApplication(sys.argv)
    form = loadingGif()
    form.show()
    sys.exit(app.exec_())
运行结果:

二.缩放图片
QImage.scaled
代码:
from PyQt5.QtWidgets import QApplication, QLabel, QWidget, QVBoxLayout
from PyQt5.QtGui import QImage, QPixmap
from PyQt5.QtCore import Qt
import sys


class ScaleImage(QWidget):
    def __init__(self):
        super().__init__()
        self.setWindowTitle("图片大小缩放例子")
        filename = '../picture/images/Cloudy_72px.png'
        img = QImage(filename)
        label1 = QLabel(self)
        label1.setFixedWidth(200)
        label1.setFixedHeight(200)

        #参数三四:忽略比例,平滑显示
        result = img.scaled(label1.width(),label1.height(),Qt.IgnoreAspectRatio,Qt.SmoothTransformation)
        label1.setPixmap(QPixmap.fromImage(result))

        vbox = QVBoxLayout()
        vbox.addWidget(label1)

        self.setLayout(vbox)

if __name__ == "__main__":
    app = QApplication(sys.argv)
    win = ScaleImage()
    win.show()
    sys.exit(app.exec_())
运行结果:

三.用动画效果改变窗口的尺寸
QPropertyAnimation可以控制任何可视控件的尺寸的动态的变化,只要我们把控件的对象通过构造方法传入即可。
代码:
from PyQt5.QtCore import *
from PyQt5.QtWidgets import *
import sys


class AnimWindow(QWidget):
    def __init__(self):
        super(AnimWindow, self).__init__()
        self.OrigHeight = 50
        self.ChangeHeight = 150
        self.setGeometry(QRect(500, 400, 150, self.OrigHeight))
        self.btn = QPushButton('展开', self) #没用布局,直接将按钮放入
        self.btn.setGeometry(10, 10, 60, 35)

        self.btn.clicked.connect(self.change)

    def change(self):
        currentHeight = self.height()
        if self.OrigHeight == currentHeight:
            startHeight = self.OrigHeight
            endHeight = self.ChangeHeight
            self.btn.setText('收缩')
        else:
            startHeight = self.ChangeHeight
            endHeight= self.OrigHeight
            self.btn.setText('展开')

        self.animation = QPropertyAnimation(self,b'geometry')#将当前窗口传入
        self.animation.setDuration(500) #间隔时间:500毫秒
        #初始尺寸
        self.animation.setStartValue(QRect(500,400,150,startHeight))
        #变化后的尺寸
        self.animation.setEndValue(QRect(500,400,150,endHeight))
        self.animation.start()

        return


if __name__ == '__main__':
    app = QApplication(sys.argv)
    window = AnimWindow()
    window.show()
    sys.exit(app.exec_())
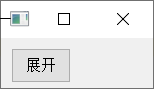
运行结果:

四.用动画效果——不同速度移动窗口
代码:
from PyQt5.QtGui import *
from PyQt5.QtCore import *
from PyQt5.QtWidgets import *
import sys

app = QApplication(sys.argv)

window1 = QMainWindow()
window1.show()
window2 = QMainWindow()
window2.show()

animation1 = QPropertyAnimation(window1, b'geometry')
animation2 = QPropertyAnimation(window2, b'geometry')

group = QParallelAnimationGroup()  # 并行 动画组,同时运行多个动画
#group = QSequentialAnimationGroup()  # 串行

group.addAnimation(animation1)
group.addAnimation(animation2)

animation1.setDuration(3000)
animation1.setStartValue(QRect(0,0,100,30))
animation1.setEndValue(QRect(250,250,100,30))
animation1.setEasingCurve(QEasingCurve.OutBounce) #动画特效

animation2.setDuration(4000)
animation2.setStartValue(QRect(250,150,100,30))
animation2.setEndValue(QRect(850,250,100,30))
animation2.setEasingCurve(QEasingCurve.CosineCurve)

group.start()

sys.exit(app.exec())
运行结果:
一组窗口的动画,自己试试吧!