一、从BIO到NIO
前面写过BIO的相关代码,BIO的问题很突出:
- 一个请求要对应一个线程,当并发数比较大时,需要大量的线程,造成系统资源占用比较大
- 当连接建立时,读写操作是阻塞的,所以当一个请求暂时不进行读写操作时,就会造成资源的浪费
为了解决上述的问题,jdk1.4引入了NIO
NIO全称为 java non-blocking IO看这个名字就可以知道是java的非阻塞IO,NIO是可以通过一个线程来处理多个请求的操作的,而不是像BIO一样必须要一请求 —一线程这种模型,NIO有以下特点:
- NIO有三大核心组件:Channel(通道)、Buffer(缓冲区)、Selector(选择器)
- NIO是面向缓冲区或者面向块的,这也好理解,NIO能是不阻塞的很大一部分原因就是因为有个缓冲区,使用Buffer可以提供非阻塞式的高伸缩性网络
下面在比较以下NIO与BIO两种网络IO的异同点:
- BIO是以流的方式来处理数据的,而NIO是以块的方式来处理数据的,块的效率显然要更大
- BIO是阻塞的,NIO是非阻塞的
- BIO是基于字节流和字符流进行操作,NIO是基于Channel和Buffer进行操作,数据总是从通道读取到缓冲区,或者从缓冲区读取到通道中,Selector(缓冲区)用于监听多个通道的事件,因此使用单个线程就可以监听多个客户端
二、NIO三大核心组件
首先看看NIO的三大核心组件之间的关系示意图
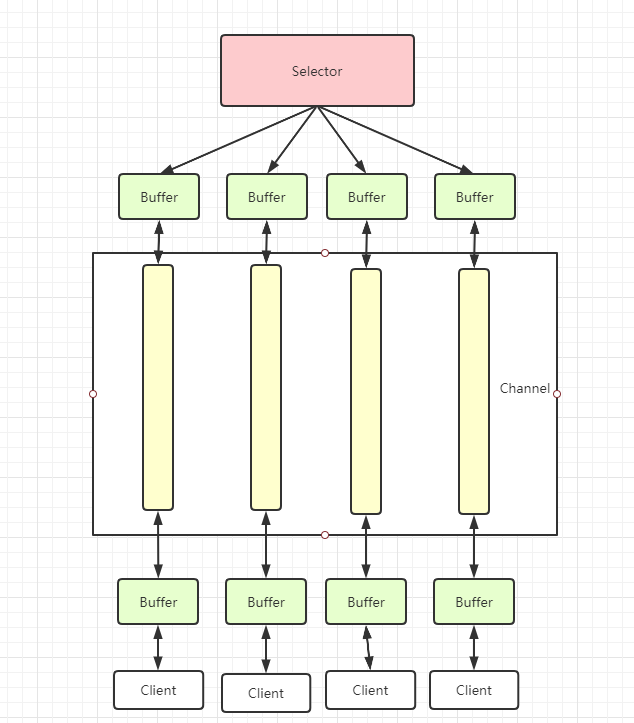
从上图中可以看出来:
- 每个Channel对应一个Buffer
- Selector对应一个线程,一个Selector可以对应多个Channel
- 数据的读写是通过Buffer,NIO中的Buffer是可以读也可以写的
三、Buffer
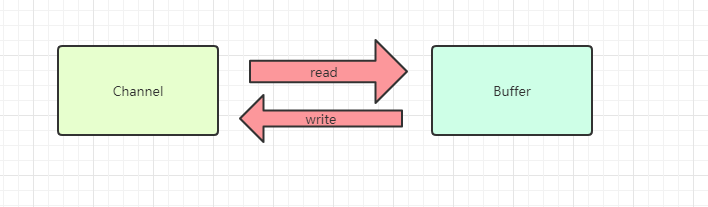
Buffer本质上是一个可以读写数据的内存块,其实就是一个数组,也可以理解为一个容器对象,该对象提供了一组方法,可以轻松的使用内存块,缓冲区对象内置了一些机制,能够跟踪和记录缓冲区的状态变化。从上面的示意图也可以知道Channel提供文件、网络读取数据的渠道,但是读取数据或者写入数据都必须经过Buffer
看看Buffer的继承结构
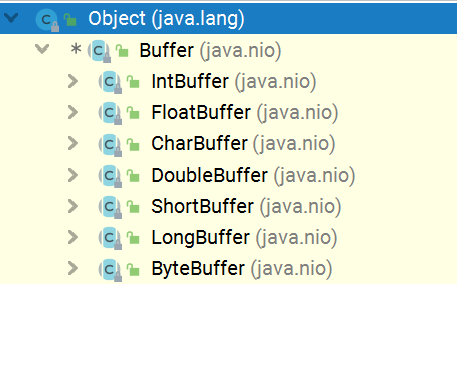
在NIO中,Buffer是一个父类,一个抽象类。NIO中提供了7中不同的类型用来存储不同的对象,其中用的最多的是ByteBuffer因为比较多的是传输的字符串。具体那种Buffer的作用看其名字就可以知道
3.1 Buffer的基本使用
public class BufferTest1 {


    public static void main(String[] args) {


        IntBuffer buffer = IntBuffer.allocate(5);   //创建IntBuffer
        for (int i = 0; i < buffer.capacity(); i++) {


            //写Buffer
            buffer.put(i);
        }
        //将Buffer转换,读写切换!!!!
        buffer.flip();
        while(buffer.hasRemaining()){


            System.out.println(buffer.get());
        }
    }
}
上面程序简单的向IntBuffer写入数据,并且读取数据
要注意的是,因为Buffer‘是双向的,在写入之后要进行读取必须要进行读写切换!!!否则读不出数据
Buffer类还提供了四个属性来控制其所包含的数据元素的信息

| 属性 | 描述 |
|---|---|
| Capacity | 容量,即可以容纳的最大数据量;在缓冲区创建时被设定并且不能改变 |
| Limit | 表示缓冲区的当前终点,不能对缓冲区超过极限的位置进行读写操作。且极限是可以修改的 |
| Position | 位置,下一个要被读或写的元素的索引,每次读写缓冲区数据时都会改变改值,为下次读写作准备 |
| Mark | 标记 |
具体这4个属性可以通过打上断点进行调试

下面看看flip方法,前面强调过要进行读写的切换一定要调用flip方法,flip方法很简单,只是做了buffer相关的4个属性的调整
public final Buffer flip() {


    limit = position;
    position = 0;
    mark = -1;
    return this;
}
3.2 Buffer的相关方法
| 方法 | 作用 |
|---|---|
| public final int capacity() | 返回此缓冲区的容量 |
| public final int position() | 返回此缓冲区的位置 |
| public final int limit() | 返回此缓冲区的限制 |
| public final Buffer mark() | 在此缓冲区的位置设置标记 |
| public final Buffer reset() | 将此缓冲区的位置重置为以前标记的位置 |
| public final Buffer clear() | 清除此缓冲区, 即将各个标记恢复到初始状态,但是数据并没有真正擦除, 后面操作会覆盖 |
| public final Buffer flip() | 反转此缓冲区 |
| public final int remaining() | 返回当前位置与限制之间的元素数 |
| public final boolean hasRemaining() | 告知在当前位置和限制之间是否有元素 |
| public abstract boolean isReadOnly() | 告知此缓冲区是否为只读缓冲区 |
| public abstract boolean hasArray() | 告知此缓冲区是否具有可访问的底层实现数组 |
| public abstract Object array() | 返回此缓冲区的底层实现数组 |
| public abstract int arrayOffset() | 返回此缓冲区的底层实现数组中第一个缓冲区元素的偏移量 |
| public abstract boolean isDirect() | 告知此缓冲区是否为直接缓冲区 |
3.3 ByteBuffer
从前面可以看出对于 Java 中的基本数据类型(boolean除外),都有一个 Buffer 类型与之相对应,最常用的自然是ByteBuffer 类(二进制数据),该类的主要方法如下
| 方法 | 属性 |
|---|---|
| public static ByteBuffer allocate(int capacity) | 创建缓冲区 |
| public static ByteBuffer allocateDirect(int capacity) | 创建直接缓冲区 |
| public static ByteBuffer wrap(byte[] array) | 把一个数组放到缓冲区中使用 |
| public abstract byte get( ) | 从当前位置position上get,get之后,position会自动+1 |
| public abstract ByteBuffer put (byte b) | 从当前位置上添加,put之后,position会自动+1 |
3.4 注意
- ByteBuffer 支持类型化的put 和 get, put 放入的是什么数据类型,get就应该使用相应的数据类型来取出,否则可能有 BufferUnderflowException 异常。
四、Channel
NIO是面向块的,中间要进行传输必须要经过通道,通道其实类似于BIO中的流,但是通道可以同时进行读或者写。
与Buffer相似,在NIO中也有一个父类Channel

而常用的Channel有:FileChannel(用于文件的读写)、DatagramChannel(用于UDP的数据读写)、ServerSocketChannel(类似于ServerSocket)、SocketChannel(类似于Socket)
4.1 FileChannel
FileChannel主要用来对本地文件进行 IO 操作,常见的方法有
| 方法 | 作用 |
|---|---|
| public int read(ByteBuffer dst) | 从通道读取数据并放到缓冲区中 |
| public int write(ByteBuffer src) | 把缓冲区的数据写到通道中 |
| public long transferFrom(ReadableByteChannel src, long position, long count) | 从目标通道中复制数据到当前通道 |
| public long transferTo(long position, long count, WritableByteChannel target) | 把数据从当前通道复制给目标通 |
Channel与Buffer的读写关系是以Buffer为基准的,那么这样就好理解了
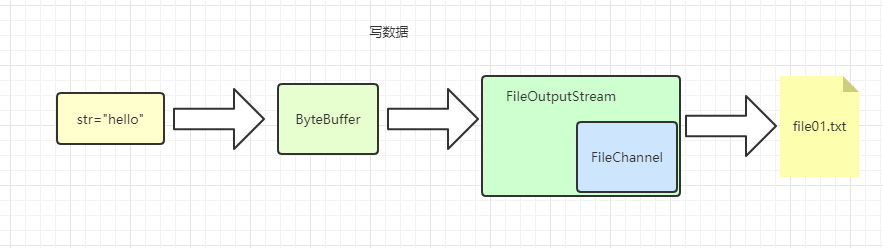
4.2 案例1-本地文件写数据
使用前面学习后的ByteBuffer(缓冲) 和 FileChannel(通道), 将 “hello” 写入到file01.txt 中
/**
 * 将字符串"hello"写入到当面根路径下的d:\\file01.txt中
 */
public class FileChannelDemo1 {


    public static void main(String[] args) throws IOException {


        String str = "hello";
        //创建输出流因为要与本地文件进行操作
        FileOutputStream outputStream = new FileOutputStream("d:\\file01.txt");
        //通过流获取Channel
        FileChannel channel = outputStream.getChannel();
        //创建buffer
        ByteBuffer buffer = ByteBuffer.allocate(1024);
        //将str写入buffer
        buffer.put(str.getBytes());
        //反转buffer
        buffer.flip();
        //将buffer数据写入到channel中
        channel.write(buffer);
        outputStream.close();
        channel.close();
    }
}
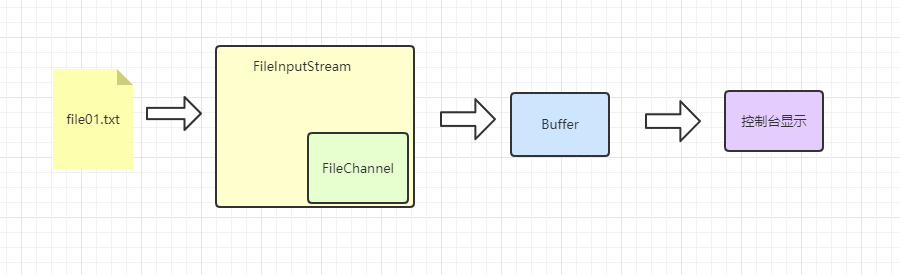
4.3 案例2-本地文件读数据
public class FileChannelDemo2 {


    public static void main(String[] args) throws IOException {


        //创建文件流
        File file = new File("d:\\file01.txt");
        FileInputStream inputStream = new FileInputStream(file);
        //获取文件Channel
        FileChannel fileChannel = inputStream.getChannel();
        //获取Buffer
        ByteBuffer buffer = ByteBuffer.allocate((int) file.length());
        //读取数据
        fileChannel.read(buffer);
        System.out.println(new String(buffer.array()));
    }
}
4.4 案例3-使用一个Buffer完成读写

public class FileChannelDemo3 {


    public static void main(String[] args) throws IOException {


        //获取文件file02.txt的输入流
        File file = new File("d:\\file01.txt");
        FileInputStream fileInputStream = new FileInputStream(file);
        //获取通道
        FileChannel channel = fileInputStream.getChannel();
        //获取Buffer
        ByteBuffer buffer = ByteBuffer.allocate((int) file.length());
        //读取数据
        channel.read(buffer);
        System.out.println(new String(buffer.array()));
        //!!!反转buffer
        buffer.flip();
        //获取文件file02.txt的输出流
        FileOutputStream fileOutputStream = new FileOutputStream("d:\\file02.txt");
        //获取输出Channel
        FileChannel channel1 = fileOutputStream.getChannel();
        //写数据
        channel1.write(buffer);
        channel.close();
        channel1.close();
        fileInputStream.close();
        fileOutputStream.close();
    }
}
4.5 案例4-文件的拷贝
public class FileChannelDemo4 {


    public static void main(String[] args) throws IOException {


        FileInputStream inputStream = new FileInputStream("C:\\Users\\VSUS\\Desktop\\proteus.png");
        FileChannel sourceChannel = inputStream.getChannel();
        FileOutputStream outputStream = new FileOutputStream("C:\\Users\\VSUS\\Desktop\\proteus2.png");
        FileChannel DestChannel = outputStream.getChannel();
        DestChannel.transferFrom(sourceChannel, 0, sourceChannel.size());
        sourceChannel.close();
        DestChannel.close();
        inputStream.close();
        outputStream.close();
    }
}
五、Selector
要通过一个线程来轮询多个请求的操作,将会使用到Selector。Selector能够检测多个注册到通道上的是否有事件发生,多个Channel也可以注册到同一个Selector,如果有事件发生,便能获取到相应的事件进行相应的处理,这样就能够实现用一个线程去监控多个通道
5.1 Selector的相关方法
Selector是一个抽象类,相关方法如下:
| 方法 | 描述 |
|---|---|
| public static Selector open() | 得到一个选择器对象 |
| public int select(long timeout) | 监控所有注册的通道,当其中有 IO 操作可以进行时,将对应的 SelectionKey 加入到内部集合中并返回,参数用来设置超时时间 |
| public Set< SelectionKey> selectedKeys() | 从内部集合中得到所有的 SelectionKey |
上面这些方法的具体使用会在nio的基本案例中体现
5.2 SelectionKey
SelectionKey表示的Selector和网络通道的注册关系,共四种:
| 注册关系 | 描述 |
|---|---|
| public static final int OP_READ = 1 << 0 | 代表读操作,值为 1 |
| public static final int OP_WRITE = 1 << 2 | 代表写操作,值为 4 |
| public static final int OP_CONNECT = 1 << 3 | 代表连接已经建立,值为 8 |
| public static final int OP_ACCEPT = 1 << 4; | 有新的网络连接可以 accept,值为 16 |
六、NIO编程案例
6.1 NIO 服务器端
下面通过一个案例来理解上面提到过的一些方法如何去使用,NIO客户端编写主要有以下几个步骤:
- 创建ServerSocketChannel,并且绑定端口
- 获取Selector对象
- 将ServerSocketChannel设置为非阻塞
- 将ServerSocketChannel注册到Selector上
- 通过Selector获取所有的请求selectedKeys对象
- 遍历selectedKeys判断该请求事件
- 通过请求事件做相应的逻辑处理
import java.io.IOException;
import java.net.InetSocketAddress;
import java.nio.ByteBuffer;
import java.nio.channels.*;
import java.util.Iterator;
import java.util.Set;

public class NIOServer {


    public static void main(String[] args) throws IOException {


        //创建ServerSocketChannel
        ServerSocketChannel serverSocketChannel = ServerSocketChannel.open();
        //得到Selector对象
        Selector selector = Selector.open();
        //绑定一个端口
        serverSocketChannel.bind(new InetSocketAddress(8888));
        //设置为非阻塞
        serverSocketChannel.configureBlocking(false);
        //把ServerSocketChannel注册到Selector 关心事件为连接
        serverSocketChannel.register(selector, SelectionKey.OP_ACCEPT);
        //循环等到客户端连接
        while(true){


            if(selector.select(1000) == 0){

         //没有事件发生
                System.out.println("服务器等待了1秒 无连接");
                continue;
            }
            //表示有事件连接
            Set<SelectionKey> selectionKeys = selector.selectedKeys();
            //获取迭代器对象
            Iterator<SelectionKey> selectionKeyIterator = selectionKeys.iterator();
            //
            while(selectionKeyIterator.hasNext()){


                //获取到每一个连接的SelectionKey
                SelectionKey key = selectionKeyIterator.next();
                //判断该连接是请求连接事件
                if(key.isAcceptable()){


                    //为该客户端申请一个SocketChannel 这里accept虽然是阻塞的,但是一维已经知道了有连接发生,所以也不阻塞
                    SocketChannel socketChannel = serverSocketChannel.accept();
                    System.out.println("客户端连接成功!!");
                    //将socketChannel设置为非阻塞
                    socketChannel.configureBlocking(false);
                    //将socketChannel注册到selector上并且为该socketChannel绑定一个Buffer
                    socketChannel.register(selector, SelectionKey.OP_READ);

                }
                //发生了读事件
                if(key.isReadable()){


                    //通过key返向获取socketChannel
                    SocketChannel socketChannel = (SocketChannel)key.channel();
                    //通过key获取该channel关联的buffer
                    ByteBuffer buffer = ByteBuffer.allocate(1024);
                    socketChannel.read(buffer);
                    System.out.println("从客户端读取" + new String(buffer.array()));
                }
                selectionKeyIterator.remove();
            }
        }
    }
}
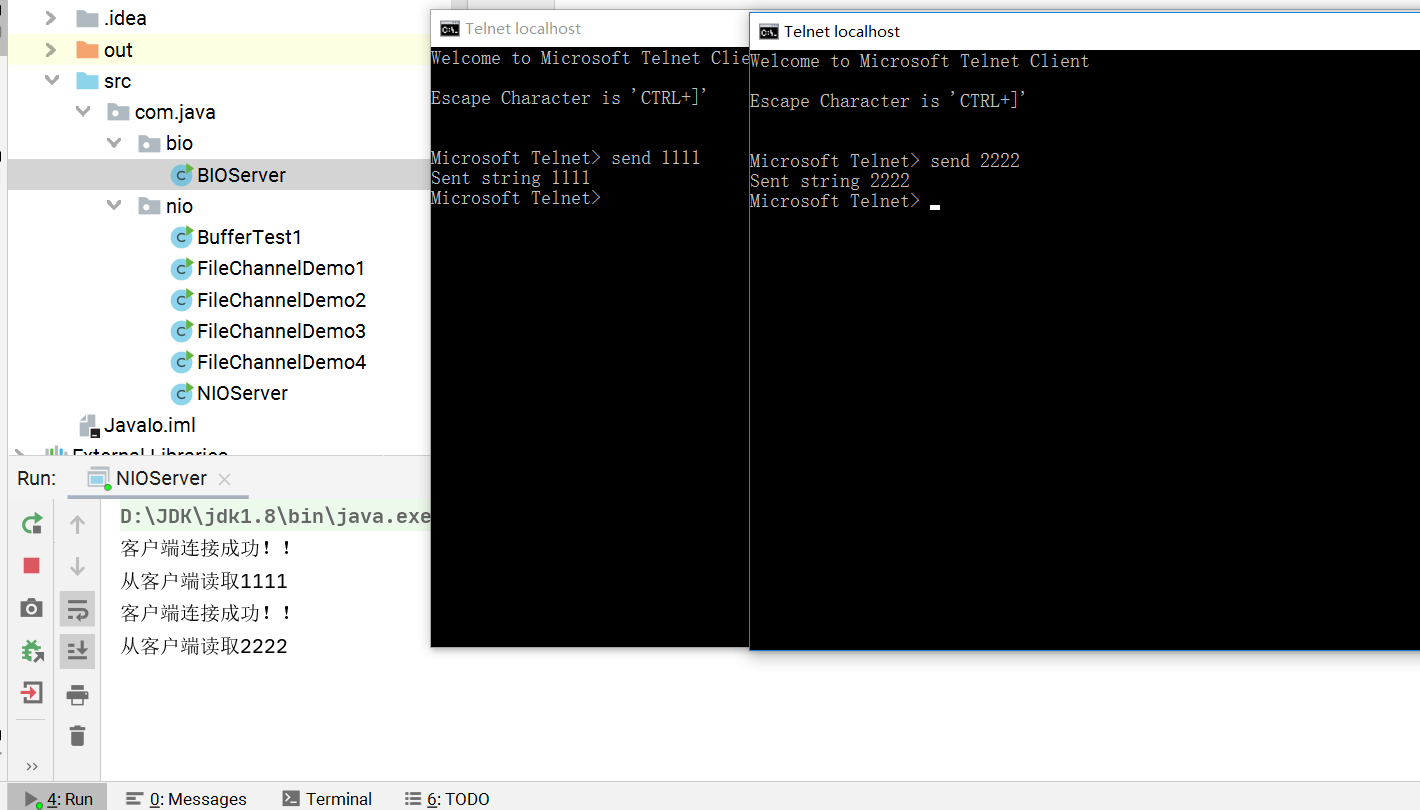
这里使用telnet客户端进行连接,通过测试可以发现,在没有使用多线程的情况下,也可以处理多个请求的连接
6.2 NIO 客户端
public class NIOClient {


    public static void main(String[] args) throws IOException {


        Scanner sc = new Scanner(System.in);
        //获取SocketChannel
        SocketChannel socketChannel = SocketChannel.open();
        socketChannel.configureBlocking(false);
        if(!socketChannel.connect(new InetSocketAddress("127.0.0.1", 8888))){


            while(!socketChannel.finishConnect()){


                System.out.println("连接中。。。");
            }
        }
        System.out.println("连接成功!");
        while(sc.hasNext()){


            String str = sc.nextLine();
            System.out.println("发送的数据为" + str);
            ByteBuffer buffer = ByteBuffer.wrap(str.getBytes());
            socketChannel.write(buffer);
        }
    }
}
6.3 ServerSocketChannel
ServerSocketChannel在服务器端监听新的客户端Socket连接,其中一些常用的方法
| 方法 | 描述 |
|---|---|
| public static ServerSocketChannel open() | 得到一个 ServerSocketChannel 通道 |
| public final ServerSocketChannel bind(SocketAddress local) | 设置服务器端端口号 |
| public final SelectableChannel configureBlocking(boolean block) | 设置阻塞或非阻塞模式,取值 false 表示采用非阻塞模式 |
| public SocketChannel accept() | 接受一个连接,返回代表这个连接的通道对象 |
| public final SelectionKey register(Selector sel, int ops) | 注册一个选择器并设置监听事件 |
6.4 SocketChannel
SocketChannel,网络 IO 通道,具体负责进行读写操作。NIO 把缓冲区的数据写入通道,或者把通道里的数据读到缓冲区。
| 方法 | 描述 |
|---|---|
| public static SocketChannel open() | 得到一个 SocketChannel 通道 |
| public final SelectableChannel configureBlocking(boolean block) | 设置阻塞或非阻塞模式,取值 false 表示采用非阻塞模式 |
| public boolean connect(SocketAddress remote) | 连接服务器 |
| public boolean finishConnect() | 如果上面的方法连接失败,接下来就要通过该方法完成连接操作 |
| public int write(ByteBuffer src) | 往通道里写数据 |
| public int read(ByteBuffer dst) | 从通道里读数据 |
| public final SelectionKey register(Selector sel, int ops, Object att) | 注册一个选择器并设置监听事件,最后一个参数可以设置共享数据 |
| public final void close() | 关闭通道 |
七、NIO群聊系统
需求:服务器端:
- 使用NIO的方式实现
- 多人群聊,能够检测客户端用户的上线,离线
- 能够实现消息转发
客户端:
- 能够收到来自服务器的消息
- 能够不停的发送消息
其实就是对NIO原理的深入理解,如果对NIO编程案例熟悉的话,这个也好写
NIO服务器端
public class GroupServer {


    private ServerSocketChannel serverSocketChannel;
    private Selector selector;
    private static final int PORT = 8888;
    public GroupServer() {


        try {


            //获取serverSocketChannel
            serverSocketChannel = ServerSocketChannel.open();
            //绑定端口
            serverSocketChannel.bind(new InetSocketAddress(PORT));
            //设置非阻塞
            serverSocketChannel.configureBlocking(false);
            //获取selector
            selector = Selector.open();
            //将serverSocketChannel注册到selector上
            serverSocketChannel.register(selector, SelectionKey.OP_ACCEPT);
        } catch (IOException e) {


            e.printStackTrace();
        }
    }
    public void listen(){


        try {


            while(true) {


                int count = selector.select(1000);
                //说明有事件发生
                if(count > 0){


                    //获取事件的迭代器对象
                    Iterator<SelectionKey> iterator = selector.selectedKeys().iterator();
                    while(iterator.hasNext()){


                        SelectionKey key = iterator.next();
                        //请求连接事件
                        if(key.isAcceptable()){


                            //获取socketChannel
                            SocketChannel socketChannel = serverSocketChannel.accept();
                            //设置为非阻塞
                            socketChannel.configureBlocking(false);
                            //将socketChannel注册到Selector上
                            socketChannel.register(selector , SelectionKey.OP_READ);
                            //打印信息
                            System.out.println(socketChannel.getRemoteAddress() + "上线");
                        }
                        if(key.isReadable()){


                            readData(key);
                        }
                        //移除当前的key!!!!
                        iterator.remove();
                    }
                }
            }
        } catch (IOException e) {


            e.printStackTrace();
        }

    }

    private void readData(SelectionKey key) {


        SocketChannel socketChannel = null;
        try {


            socketChannel = (SocketChannel)key.channel();
            ByteBuffer buffer = ByteBuffer.allocate(1024);
            int count = socketChannel.read(buffer);
            if(count > 0){


                String msg = new String(buffer.array());
                System.out.println(msg);
                sendToOtherClients(msg,socketChannel);
            }

        }catch (IOException e){


            try {


                System.out.println(socketChannel.getRemoteAddress() + "离线了");
                key.cancel();
                socketChannel.close();
            } catch (IOException ioException) {


                ioException.printStackTrace();
            }
        }finally {


        }

    }

    private void sendToOtherClients(String msg, SocketChannel self) {


        System.out.println("服务器转发消息中");

        //获取所有的key
        for(SelectionKey key : selector.keys()){


//            System.out.println(key.channel().getClass());
          	//注意这里的通道有SocketChannel和ServerSocketChannel所以要在后面转型
            Channel targetChannel = key.channel();
            if(targetChannel instanceof  SocketChannel && targetChannel != self){


                try {


                    //注意这里不能写在循环外面,因为每个Channel对应一个Buffer
                    ByteBuffer buffer = ByteBuffer.wrap(msg.getBytes());
                    ((SocketChannel) targetChannel).write(buffer);
                } catch (IOException e) {


                    e.printStackTrace();
                }
            }
        }
    }

    public static void main(String[] args) {


        GroupServer groupServer = new GroupServer();
        groupServer.listen();
    }
}
NIO客户端
public class GroupClient {


    private final String Host = "127.0.0.1";
    private static final int PORT = 8888;
    private SocketChannel socketChannel;
    //当前主机
    private String username;
    public GroupClient(){


        try {


            socketChannel = SocketChannel.open(new InetSocketAddress(Host, PORT));
            socketChannel.configureBlocking(false);
            username = socketChannel.getLocalAddress().toString().substring(1);
            System.out.println(username + "上线");
        } catch (IOException e) {


            e.printStackTrace();
        }

    }
    public void sendInfo(String info){


        info = username + "说" + info;
        ByteBuffer buffer = ByteBuffer.wrap(info.getBytes());
        try {


            socketChannel.write(buffer);
        } catch (IOException e) {


            e.printStackTrace();
        }
    }
    public void readInfo(){


        ByteBuffer buffer = ByteBuffer.allocate(1024);
        try {


            int count = socketChannel.read(buffer);
            if(count > 0){


                String msg = new String(buffer.array());
                System.out.println(msg.trim());
            }
        } catch (IOException e) {


            e.printStackTrace();
        }
    }

    public static void main(String[] args) {


        GroupClient groupClient = new GroupClient();
        new Thread((() -> {


            while(true){


                groupClient.readInfo();
                try {

     TimeUnit.SECONDS.sleep(2);} catch (InterruptedException e) {

    e.printStackTrace();}
            }
        })).start();
        Scanner sc = new Scanner(System.in);
        while(sc.hasNext()){


            String msg = sc.nextLine();
            groupClient.sendInfo(msg);
        }

    }

}
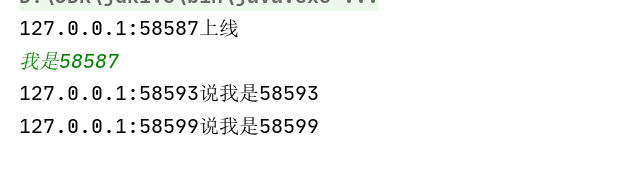
效果测试:服务端
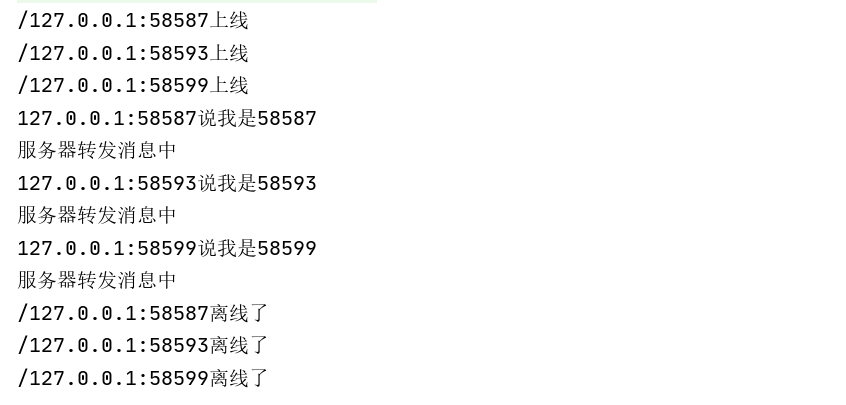
客户端: