1,NIO简介
NIO(Non-blocking I/O,非阻塞I/O,或者称为NewIO) 是在jdk1.4后提供的一项重要开发包-因为有了nio的出现才使得Java底层通信的性能得到大幅度的提升
因为在整个java的IO中,大部分操作都属于阻塞性操作,例如,键盘输入数据,程序必须一直等待输入数据,否则程序无法向下继续执行,还有就是网络中Socket程序必须通过accept()方法一直等待用户的连接。这样一来,势必造成大量系统资源的浪费。所以JAVA在jdk1.4之后增加了新IO,(说新,现在一点都不新了啊),NIO的操作基本上都是使用缓冲区完成的。
既然使用了缓冲区,那么操作的性能将是最高的。

Java NIO 由以下几个核心部分组成:
- Channel
- Buffer
- Selector
虽然Java NIO 中除此之外还有很多类和组件,但在我看来,Channel,Buffer 和 Selector 构成了核心的API。其它组件,如Pipe和FileLock,只不过是与三个核心组件共同使用的工具类。因此,在概述中我将集中在这三个组件上。
2,Buffer类
缓冲区(Buffer)是一个线性的,有序的数据集,一个缓冲区只能容纳一种数据类型。
在基本IO操作中,所有的数据都是以流的形式操作的,而在NIO中,则都是使用缓冲区,所有的读写操作都是使用缓冲区完成的。缓冲区本质上是一块可以写入数据,然后可以从中读取数据的内存。这块内存被包装成NIO Buffer对象,并提供了一组方法,用来方便的访问该块内存。
java.nio.Buffer下有七个子类,这些子类缓冲区分别用于存储不同类型的数据。
分别是:ByteBuffer, CharBuffer, DoubleBuffer, FloatBuffer, IntBuffer, LongBuffer, ShortBuffer ,都是针对基本数据类型,没有针对布尔型的。
(在ByteBuffer下还有一个MappedByteBuffer,用于表示内存映射文件)
在Buffer中的函数
| 方法 | 作用 |
|---|---|
| public final int capacity() | //Returns this buffer’s capacity. |
| public final int position() | //Returns this buffer’s position. |
| public final Buffer position(int newPosition) | //Sets this buffer’s position. If the mark is defined and larger than the new position then it is discarded. |
| public final int limit() | //Returns this buffer’s limit. |
| public final Buffer limit(int newLimit) | //Sets this buffer’s limit. If the position is larger than the new limit then it is set to the new limit. If the mark is defined and larger than the new limit then it is discarded. |
| public final Buffer flip() | //Flips this buffer. The limit is set to the current position and then the position is set to zero. |
| public final int remaining() | //Returns the number of elements between the current position and the limit. |
……
capacity的含义总是一样的,返回的是缓冲区的大小。而position和limit的含义取决于Buffer处在读模式还是写模式。
capacity
作为一个内存块,Buffer有一个固定的大小值,也叫"capacity".你只能往里写capacity个byte、long,char等类型。一旦Buffer满了,需要将其清空(通过读数据或者清除数据)才能继续写数据往里写数据。
position
当你写数据到Buffer中时,position表示当前可写入的位置,既此指针永远放到写入的最后一个元素之后(例如,你已经写入四个元素,那么此指针将指向第五个位置)。初始的position值为0.当一个byte、long等数据写到Buffer后, position会向前移动到下一个可插入数据的Buffer单元。position最大可为capacity – 1.(其实就是一个数组)
当读取数据时,也是从某个特定位置读。当将Buffer从写模式切换到读模式,position会被重置为0. 当从Buffer的position处读取数据时,position向前移动到下一个可读的位置。
limit
在写模式下,Buffer的limit表示你最多能往Buffer里写多少数据。 写模式下,limit等于Buffer的capacity。
当切换Buffer到读模式时, limit表示你最多能读到多少数据。因此,当切换Buffer到读模式时,limit会被设置成写模式下的position值。换句话说,你能读到之前写入的所有数据(limit被设置成已写数据的数量,这个值在写模式下就是position)
flip()方法
flip方法将Buffer从写模式切换到读模式。调用flip()方法会将position设回0,并将limit设置成之前position的值。
换句话说,position现在用于标记读的位置,limit表示之前写进了多少个byte、char等 —— 现在能读取多少个byte、char等。
缓冲区操作细节如下图所示:
A:开辟缓冲区

B:向缓冲区中增加一个数据

C:向缓冲区中增加一组数据

D:执行flip()方法,limit设置为position,position设置为0

注:0 <= position <= limit <= capacity
3,Channel类
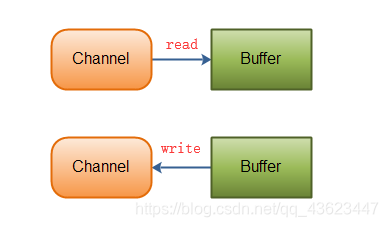
通道(Channel)可以用来读取数据和写入数据,通道类似于之前的输入输出流,但是程序不会直接操作通道,所有的内容都是先读取或者写入缓冲区中,再通过缓冲区取得或者写入
通道与传统的流操作不同,传统的流操作分为输入流和输出流,而通道本身是双向操作的,既可以完成输入也可以完成输出
Java NIO中最重要的几个Channel的实现:
- FileChannel: 用于文件的数据读写
- DatagramChannel: 用于UDP的数据读写
- SocketChannel: 用于TCP的数据读写,一般是客户端实现
- ServerSocketChannel: 允许我们监听TCP链接请求,每个请求会创建会一个SocketChannel,一般是服务器实现
类层次结构:
下面的UML图使用Idea生成的。

FileChannel
FileChannel是Channel的子类,可以进行文件的通道读写操作
使用FileChannel读取数据到Buffer(缓冲区)以及利用Buffer(缓冲区)写入数据到FileChannel,代码如下
package com.company;

import java.io.ByteArrayOutputStream;
import java.io.File;
import java.io.FileInputStream;
import java.io.FileNotFoundException;
import java.nio.ByteBuffer;
import java.nio.channels.FileChannel;

public class FileChannelDemo {
  public static void main(String[] args) throws Exception {
    File file=new File("C:\\Users\\张小飞\\Desktop\\888.sql");
    FileInputStream fileInputStream=new FileInputStream(file);
    FileChannel fileChannel=fileInputStream.getChannel();
    ByteBuffer buffer = ByteBuffer.allocate(20);
    ByteArrayOutputStream byteArrayOutputStream=new ByteArrayOutputStream();
    int count=0;
    while ((count=fileChannel.read(buffer))!=-1){
      buffer.flip();
      while (buffer.hasRemaining()){
        byteArrayOutputStream.write(buffer.get());
      }
      buffer.clear();
    }
    System.out.println(new String(byteArrayOutputStream.toByteArray()));
    fileChannel.close();
    fileInputStream.close();
  }
}
4,Selector类
NIO推出的的主要目的就是解决io的性能问题,而传统的io中最大的情况在于它属于同步阻塞io通信,也就是一个线程在进行操作的时候,其他的线程无法进行处理。如果说现在只是一个单机版的程序,那么没有任何问题;而如果该程序用于网络通信,那么这个问题就会很大,所以真正的NIO应该在高效的网络传输处理程序中。
网络通信就是一个基本的通道连接,在NIO中提供两个新的通道类:ServerSocketChannel,SocketChannel。为了方便进行所有通道的管理,NIO提供一个Selector通道管理类,这样所有的通道都可以直接向Selector进行注册,并且采用统一的模式进行读写操作,这样的设计被称为Reactor模式
Selector允许单线程处理多个 Channel。如果你的应用打开了多个连接(通道),但每个连接的流量都很低,使用Selector就会很方便。例如,在一个聊天服务器中。
这是在一个单线程中使用一个Selector处理3个Channel的图示:

要使用Selector,得向Selector注册Channel,然后调用它的select()方法。这个方法会一直阻塞到某个注册的通道有事件就绪。一旦这个方法返回,线程就可以处理这些事件,事件的例子有如新连接进来,数据接收等。
5,基于NIO实现一个Echo模型
1,实现服务器端程序
SocketClientChannelThread 类
package com.company;

import java.nio.ByteBuffer;
import java.nio.channels.SocketChannel;

/**
 * 客户端处理线程
 */
public class SocketClientChannelThread implements Runnable {
  private SocketChannel clientChannel;             //客户端通道
  private boolean flag = true;                       //循环标记

  public SocketClientChannelThread(SocketChannel clientChannel) throws Exception {
    this.clientChannel = clientChannel;              //保存客户端通道
    System.out.println("【客户端连接成功】,该客户端的地址为:" + clientChannel.getRemoteAddress());

  }

  /**
   * 线程任务
   */

  @Override
  public void run() {
    ByteBuffer buffer = ByteBuffer.allocate(50);            //创建缓冲区
    try {
      while (this.flag) {
        //可能会重复使用一个buffer,所以是使用之前做清空处理
        buffer.clear();
        int readCount = this.clientChannel.read(buffer);     //接收客户端发送数据
        String readMessage = new String(buffer.array(), 0, readCount).trim();
        System.out.println("【服务器接收到消息】" + readMessage);
        String writeMessage = "【echo】" + readMessage + "\n";
        if ("exit".equals(readMessage)) {
          writeMessage = "【exit】拜拜,下次再见";
          this.flag = false;                     //修改标记
        }
        buffer.clear();
        buffer.put(writeMessage.getBytes()); //缓冲区保存数据
        buffer.flip();                       //重置缓冲区
        this.clientChannel.write(buffer);    //回应信息
      }
      this.clientChannel.close();           //关闭通道
    } catch (Exception e) {
      e.printStackTrace();
    }
  }
}
EchoServer类 --服务器端启动类
package com.company;

import java.io.IOException;
import java.net.InetSocketAddress;
import java.nio.channels.SelectionKey;
import java.nio.channels.Selector;
import java.nio.channels.ServerSocketChannel;
import java.nio.channels.SocketChannel;
import java.util.Iterator;
import java.util.Set;
import java.util.concurrent.ExecutorService;
import java.util.concurrent.Executors;


public class EchoServer {
  public static final int  PORT=9999;       //绑定的端口

  public static void main(String[] args) throws Exception {
    //考虑到性能的优化,最多允许五个用户进行访问
    ExecutorService executorService= Executors.newFixedThreadPool(5);            //声明一个固定大小的线程池
    ServerSocketChannel serverSocketChannel=ServerSocketChannel.open();
    serverSocketChannel.configureBlocking(false);                                          //设置非阻塞模式
    serverSocketChannel.bind(new InetSocketAddress(PORT));                                 //服务绑定端口
    //打开一个选择器,随后所有的channel通道都要再次注册
    Selector selector=Selector.open();
    //将当前的serverSocketChannel统一注册到Selector中,接受统一的管理
    serverSocketChannel.register(selector, SelectionKey.OP_ACCEPT);
    System.out.println("服务器端启动程序,该程序在"+PORT+"端口上监听,等待客户端连接。。");
    //所有的连接处理都需要被selector管理,也就是说,只要有新的用户连接,那么就是通过selector处理
    int keySelect=0;
    while ((keySelect=selector.select())>0){
      Set<SelectionKey> selectionKeys = selector.selectedKeys();
      Iterator<SelectionKey> iterator = selectionKeys.iterator();
      while (iterator.hasNext()) {
        SelectionKey selectionKey =  iterator.next();
        if (selectionKey.isAcceptable()){                    //模式为接收连接模式
          SocketChannel clientChannel=serverSocketChannel.accept(); //等待接收
          if (clientChannel!=null){     //已经有了连接
            executorService.submit(new SocketClientChannelThread(clientChannel));
          }
        }
        iterator.remove();                     //移除此通道
      }
    }
    executorService.shutdown();     //关闭线程池
    serverSocketChannel.close();      //关闭服务器通道
  }

}
2,定义一个输入工具类,实现键盘数据接收
InputUtil类
package com.company;

import java.io.BufferedReader;
import java.io.IOException;
import java.io.InputStreamReader;

public class InputUtil {
  public static final BufferedReader KEYBOARD_INPUT=new BufferedReader(new InputStreamReader(System.in));   //键盘缓冲输入流
  private InputUtil(){}
  public static String getString(String prompt) throws IOException {
    boolean flag=true;
    String str=null;
    while (flag){
      System.out.println(prompt);
      str=KEYBOARD_INPUT.readLine();
      if(str==null||"".equals(str)){
        System.out.println("数据输入流错误,请重新输入!");

      }
      else {
        flag=false;
      }
    }
    return  str;
  }
}
3,实现客户端Socket
EchoClient类
package com.company;


import java.io.IOException;
import java.net.InetSocketAddress;
import java.nio.ByteBuffer;
import java.nio.channels.SocketChannel;

public class EchoClient {
  public static final String HOST="localhost";       //连接主机
  public static final int PORT=9999;                 //绑定端口

  public static void main(String[] args) throws IOException {
    SocketChannel clientChannel = SocketChannel.open();
    clientChannel.connect(new InetSocketAddress(HOST,PORT));       //连接服务器端
    ByteBuffer buffer = ByteBuffer.allocate(50);                   //开辟缓存
    boolean flag=true;
    while (flag){
      buffer.clear();
      String msg = InputUtil.getString("请输入要发送的信息:");
      buffer.put(msg.getBytes());
      buffer.flip();
      clientChannel.write(buffer);
      buffer.clear();
      int readCount = clientChannel.read(buffer);                //读取服务器端响应
      buffer.flip();
      System.err.println(new String(buffer.array(),0,readCount));
      if ("exit".equals(msg)){                                   //结束指令
        flag=false;                                              //结束循环
      }
    }
   clientChannel.close();
  }
}
最后的运行效果如下: