一、简介与架构
Eureka是一个基于REST (Representational State Transfer)的服务,主要用于AWS云中的服务定位,以实现中间层服务器的负载平衡和故障转移。也就是说Eureka在微服务中是一个服务发现注册的组件
Eureka是我们学习的第一个服务注册中心的组件,首先理解为什么要有注册中心?当微服务中的服务数量越来越多时,如果没有一个中心去管理这些微服务那么各个服务之间的调用则会变得杂乱无章,有一个服务配置中心来同意管理这些微服务的注册于调用。
Eureka是一款由Netflix公司开发的服务注册组件,但是很抱歉的是,Eureka已经停止更新了,下面是官方在github上的公告
但是停更不停用,我们还是需要学习Eureka的。
下面看看Eureka的结构图
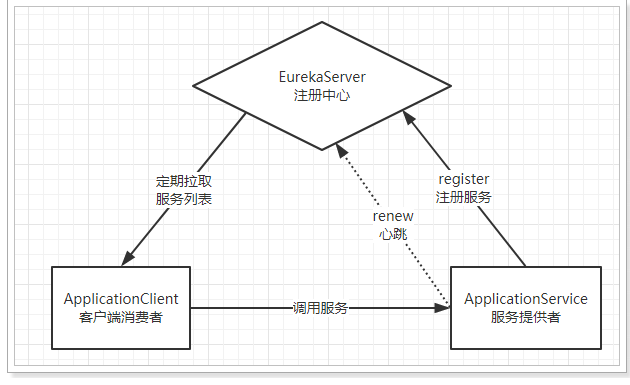
- EurekaServer:就是服务注册中心(可以是一个集群),对外暴露自己的地址
- 提供者:服务的提供者,向EurekaServer注册自己的信息,也叫EurekaClient
- 消费者:服务的消费者
EurekaServer是一个注册中心,服务的提供者需要向EurekaServer注册,并且定时的发送心跳以确保EurekaServer注册中心指导这个服务是active的,而EurekaServer注册中心则向消费者提供服务提供者的ip和端口号,以便消费者调用
就类似于开学时,老师和学生都需要向学校进行注册报到,而老师是服务的提供者,为学生提供教学服务,而学生是消费者,是学校这个注册中心告诉学生在哪里享受老师的教学服务。
二、Eureka的简单使用
2.1 前置准备-提供者
新建一个SpringBoot工程模块cloud-provider-payment8001,表示这是一个提供者模块在8001端口启动,pom依赖如下
    <artifactId>cloud-provider-payment8001</artifactId>
    <dependencies>
        <dependency>
            <groupId>cn.noteblogs</groupId>
            <artifactId>cloud-api-commons</artifactId>
            <version>1.0-SNAPSHOT</version>
        </dependency>
        <!--eureka-client-->

        <dependency>
            <groupId>org.springframework.boot</groupId>
            <artifactId>spring-boot-starter-web</artifactId>
        </dependency>
        <dependency>
            <groupId>org.springframework.boot</groupId>
            <artifactId>spring-boot-starter-actuator</artifactId>
        </dependency>
        <dependency>
            <groupId>org.mybatis.spring.boot</groupId>
            <artifactId>mybatis-spring-boot-starter</artifactId>
        </dependency>
        <dependency>
            <groupId>com.alibaba</groupId>
            <artifactId>druid-spring-boot-starter</artifactId>
            <version>1.1.10</version>
        </dependency>
        <!--mysql-connector-java-->
        <dependency>
            <groupId>mysql</groupId>
            <artifactId>mysql-connector-java</artifactId>
        </dependency>
        <!--jdbc-->
        <dependency>
            <groupId>org.springframework.boot</groupId>
            <artifactId>spring-boot-starter-jdbc</artifactId>
        </dependency>
        <dependency>
            <groupId>org.springframework.boot</groupId>
            <artifactId>spring-boot-devtools</artifactId>
            <scope>runtime</scope>
            <optional>true</optional>
        </dependency>
        <dependency>
            <groupId>org.projectlombok</groupId>
            <artifactId>lombok</artifactId>
            <optional>true</optional>
        </dependency>
        <dependency>
            <groupId>org.springframework.boot</groupId>
            <artifactId>spring-boot-starter-test</artifactId>
            <scope>test</scope>
        </dependency>
    </dependencies>
Controller层

@RestController
@Slf4j
public class PaymentController {


    @Autowired
    private PaymentService paymentService;

    @PostMapping("/payment/create")
    public CommonResult create(@RequestBody Payment payment){


        int result = paymentService.create(payment);
        return result > 0 ? new CommonResult(200,"插入数据成功",result) : new CommonResult(444,"插入数据库失败");
    }

    @GetMapping("/payment/{id}")
    public CommonResult getPaymentById(@PathVariable("id") Long id){


        Payment payment = paymentService.findById(id);
        return payment != null ? new CommonResult(200, "查询成功", payment) : new CommonResult(444,"没有记录");
    }

}
service层
@Service
public class PaymentServiceImpl implements PaymentService {


    @Autowired
    private PaymentDao paymentDao;

    @Override
    public int create(Payment payment) {


        return paymentDao.create(payment);
    }

    @Override
    public Payment findById(Long id) {


        return paymentDao.findById(id);
    }
}
public interface PaymentService {


    int create(Payment payment);
    Payment findById( Long id);
}
dao层
@Mapper
public interface PaymentDao {


    int create(Payment payment);
    Payment findById(@Param("id") Long id);
}
mapper/PaymentMapper.xml
<?xml version="1.0" encoding="UTF-8" ?>
<!DOCTYPE mapper
        PUBLIC "-//mybatis.org//DTD Mapper 3.0//EN"
        "http://mybatis.org/dtd/mybatis-3-mapper.dtd">
<mapper namespace="cn.noteblogs.springcloud.dao.PaymentDao">
    <select id="findById" parameterType="Long" resultType="cn.noteblogs.entities.Payment">
        select * from payment where id = #{id}
    </select>

    <insert id="create" parameterType="cn.noteblogs.entities.Payment" useGeneratedKeys="true" keyProperty="id">
        insert into payment(serial) values(#{serial})
    </insert>
</mapper>
配置文件application.yml如下
server:
  port: 8001

spring:
  application:
    name: cloud-payment-service
  datasource:
    type: com.alibaba.druid.pool.DruidDataSource
    driver-class-name: com.mysql.jdbc.Driver
    url: jdbc:mysql://localhost:3306/cloud2020?useUnicode=true&characterEncoding=utf-8&useSSL=false
    username: root
    password: 213213
mybatis:
  mapper-locations: classpath:mapper/*.xml
  type-aliases-package: cn.noteblogs.springcloud.entities  # 所有Entity 别名类所在包
主启动类:
@SpringBootApplication
@MapperScan("cn.noteblogs.springcloud.dao")
public class PaymentMain8001 {


    public static void main(String[] args) {


        SpringApplication.run(PaymentMain8001.class, args);
    }
}
那么提供者模块也就是Pyament创建完毕!具体的工程目录应该很清晰
2.2 前置准备-消费者
新建一个SpringBoot工程cloud-customer-order80,表示用户调用支付模块,具体的架构如下
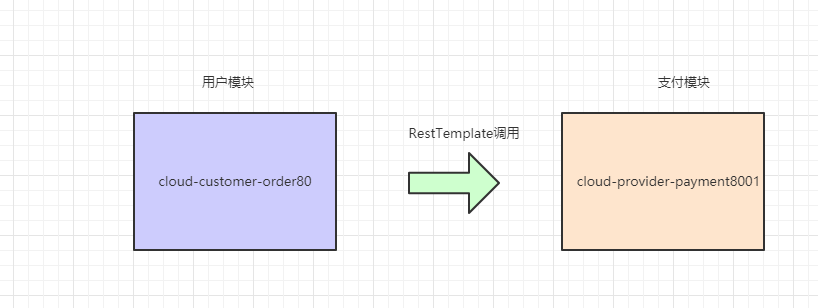
这里模块之间的调用先使用RestTemplate,RestTemplate调用是一个SpringCloud提供的一个基于RESTFul风格的远程调用,
pom文件
    <dependencies>
        <dependency>
            <groupId>org.springframework.boot</groupId>
            <artifactId>spring-boot-starter-web</artifactId>
        </dependency>
        <dependency>
            <groupId>org.springframework.boot</groupId>
            <artifactId>spring-boot-starter-actuator</artifactId>
        </dependency>

        <dependency>
            <groupId>org.springframework.boot</groupId>
            <artifactId>spring-boot-devtools</artifactId>
            <scope>runtime</scope>
            <optional>true</optional>
        </dependency>
        <dependency>
            <groupId>org.projectlombok</groupId>
            <artifactId>lombok</artifactId>
            <optional>true</optional>
        </dependency>
        <dependency>
            <groupId>org.springframework.boot</groupId>
            <artifactId>spring-boot-starter-test</artifactId>
            <scope>test</scope>
        </dependency>
    </dependencies>
config/ApplicationContextConfig配置类,用于添加RestTemplate组件
@Configuration
public class ApplicationContextConfig {


    @Bean
    public RestTemplate getRestTemplate(){


        return new RestTemplate();
    }
}
Controller/OrderController
@RestController
public class OrderController {


    public static final String URL = "http://localhost:8001";

    @Autowired
    private RestTemplate restTemplate;

    @GetMapping("/consume/payment/{id}")
    public CommonResult get(@PathVariable Long id){


        //远程调用
        return restTemplate.getForObject(URL + "/payment/" + id, CommonResult.class);
    }

    @GetMapping("/consume/payment/create")
    public CommonResult create(Payment payment){


         //远程调用
        return restTemplate.postForObject(URL + "/payment/create/" , payment, CommonResult.class);
    }
}
CustomerApplication启动类
@SpringBootApplication
public class CustomerApplication {


    public static void main(String[] args) {


        SpringApplication.run(CustomerApplication.class, args);
    }
}
测试两个服务之间是否通信
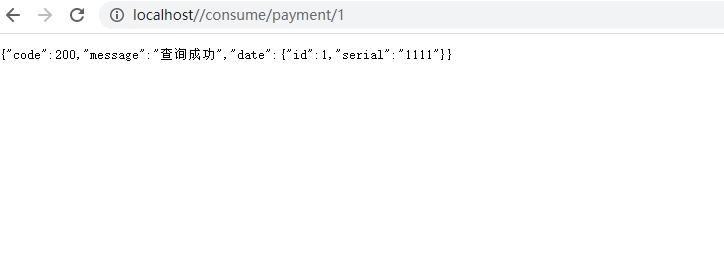
说明调用成功
2.3 EurekaServer搭建
通过第一章的架构图,我们可以知道要搭建Eureka配置中心,需要搭建EurekaServer端,那么新建一个Springboot工程
cloud-eureka-server7001,pom文件如下:
    <artifactId>cloud-eureka-server7001</artifactId>

    <dependencies>
        <dependency>
            <groupId>org.springframework.cloud</groupId>
            <artifactId>spring-cloud-starter-netflix-eureka-server</artifactId>
        </dependency>
        <dependency>
            <groupId>org.springframework.boot</groupId>
            <artifactId>spring-boot-starter-web</artifactId>
        </dependency>
        <dependency>
            <groupId>org.springframework.boot</groupId>
            <artifactId>spring-boot-starter-actuator</artifactId>
        </dependency>
        <dependency>
            <groupId>org.mybatis.spring.boot</groupId>
            <artifactId>mybatis-spring-boot-starter</artifactId>
        </dependency>
        <dependency>
            <groupId>org.springframework.boot</groupId>
            <artifactId>spring-boot-devtools</artifactId>
            <scope>runtime</scope>
            <optional>true</optional>
        </dependency>
        <dependency>
            <groupId>org.springframework.boot</groupId>
            <artifactId>spring-boot-starter-test</artifactId>
            <scope>test</scope>
        </dependency>
    </dependencies>
application.yml文件如下
server:
  port: 7001
eureka:
  instance:
    hostname: localhost
  client:
    # false 代表不向服务注册中心注册自己,因为它本身就是服务中心
    register-with-eureka: false
    # false 代表自己就是服务注册中心,自己的作用就是维护服务实例,并不需要去检索服务
    fetch-registry: false
    service-url:
      # 设置与 Eureka Server 交互的地址,查询服务 和 注册服务都依赖这个地址
      defaultZone: http://${

    eureka.instance.hostname}:${

    server.port}/eureka/
EurekaServerMain7001启动类如下
// exclude :启动时不启用 DataSource的自动配置检查
@SpringBootApplication(exclude = DataSourceAutoConfiguration.class)
@EnableEurekaServer   // 表示它是服务注册中心
public class EurekaServerMain7001 {


    public static void main(String[] args){


        SpringApplication.run(EurekaServerMain7001.class, args);
    }
}
直接运行启动类,浏览器访问localhost:7001
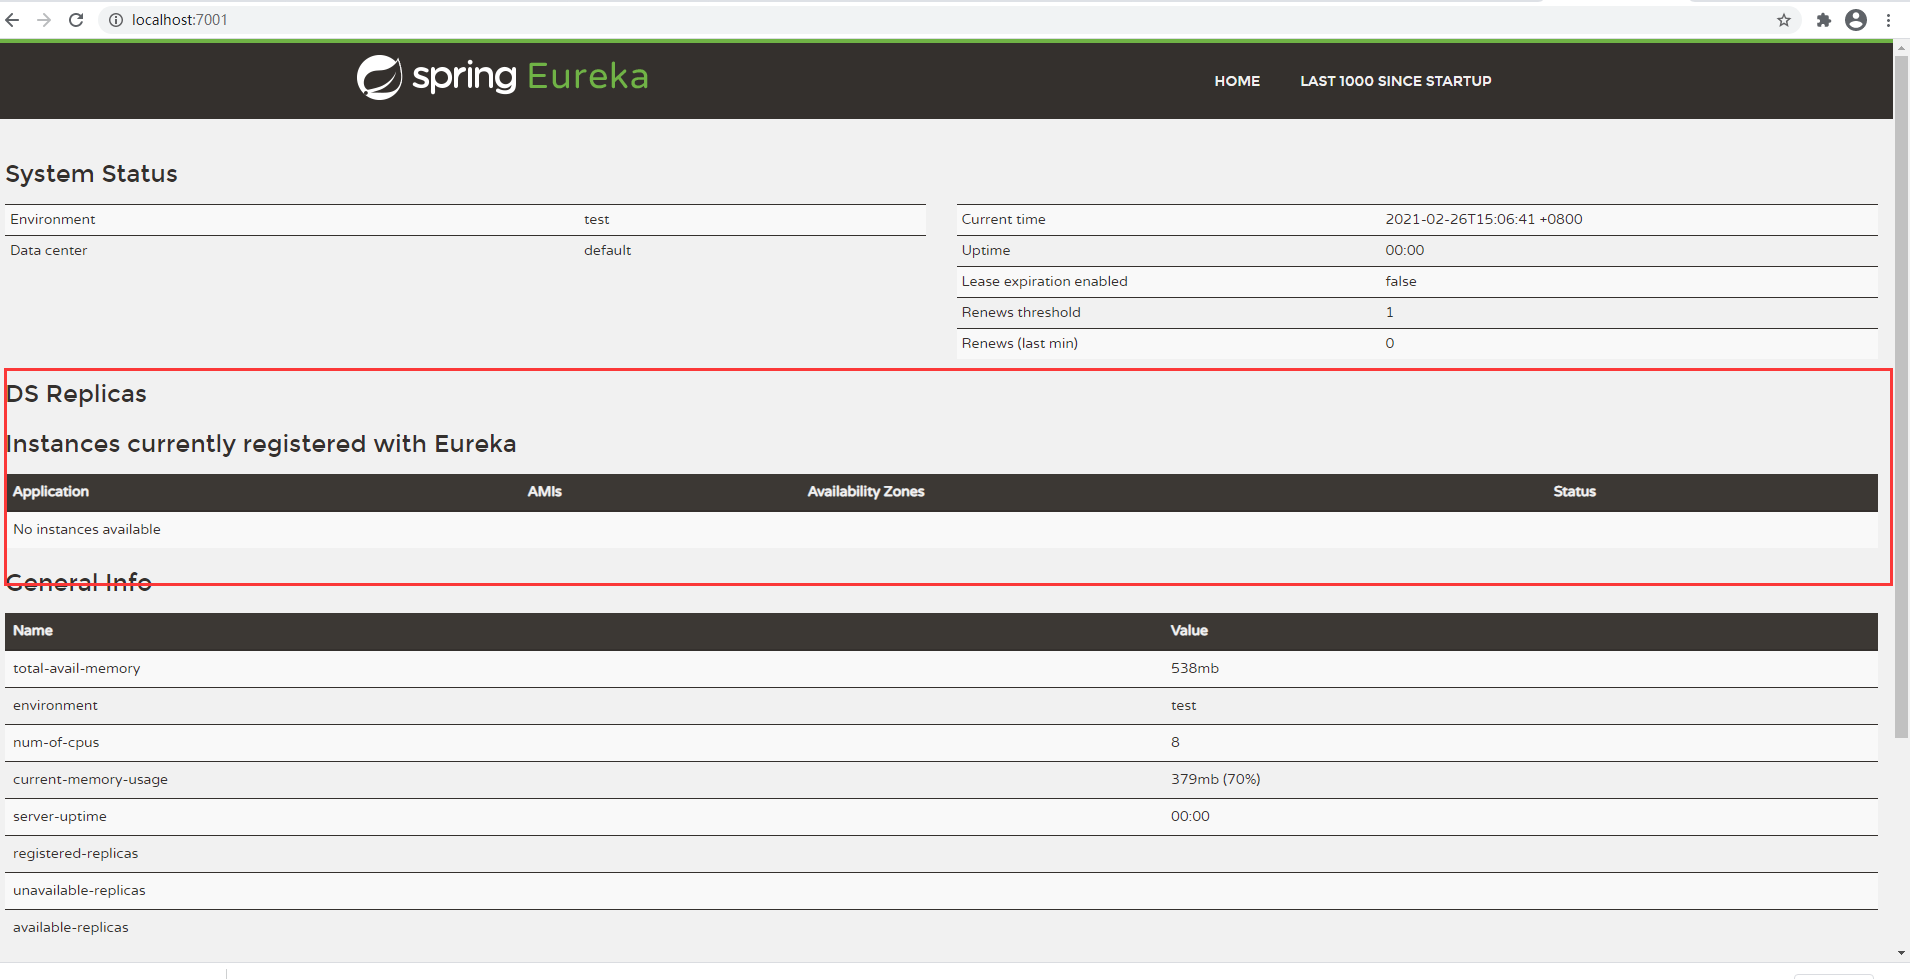
说明Eureka配置成功,如上图还没有对应的服务加入
2.4 提供者服务入驻Eureka
在架构图中可以明白如果由服务向入驻进Eureka,那么就是EurekaClient,所以首先应该导入对应的pom依赖坐标
步骤为:
- 导入pom坐标
- 主启动类上添加@EnableEurekaClient
- 修改applica.yml配置文件
pom坐标
<!--eureka-client-->
<dependency>
    <groupId>org.springframework.cloud</groupId>
    <artifactId>spring-cloud-starter-netflix-eureka-client</artifactId>
</dependency>
主启动类上添加@EnableEurekaClient
@SpringBootApplication
@MapperScan("cn.noteblogs.springcloud.dao")
@EnableEurekaClient
public class PaymentMain8001 {


    public static void main(String[] args) {


        SpringApplication.run(PaymentMain8001.class, args);
    }
}
application.yml配置文件
server:
  port: 8001

spring:
  application:
    name: cloud-payment-service
  datasource:
    type: com.alibaba.druid.pool.DruidDataSource
    driver-class-name: com.mysql.jdbc.Driver
    url: jdbc:mysql://localhost:3306/cloud2020?useUnicode=true&characterEncoding=utf-8&useSSL=false
    username: root
    password: 213213
mybatis:
  mapper-locations: classpath:mapper/*.xml
  type-aliases-package: cn.noteblogs.springcloud.entities  # 所有Entity 别名类所在包
#eureka配置
eureka:
  client:
    # 注册进 Eureka 的服务中心
    register-with-eureka: true
    # 检索 服务中心 的其它服务
    fetch-registry: true
    service-url:
      # 设置与 Eureka Server 交互的地址
      defaultZone: http://localhost:7001/eureka/
其中需要说明的是spring.application.name必不可少的,因为这是代表这个服务在Eureka上的名字,上面配置好了之后刷新localhhost:7001
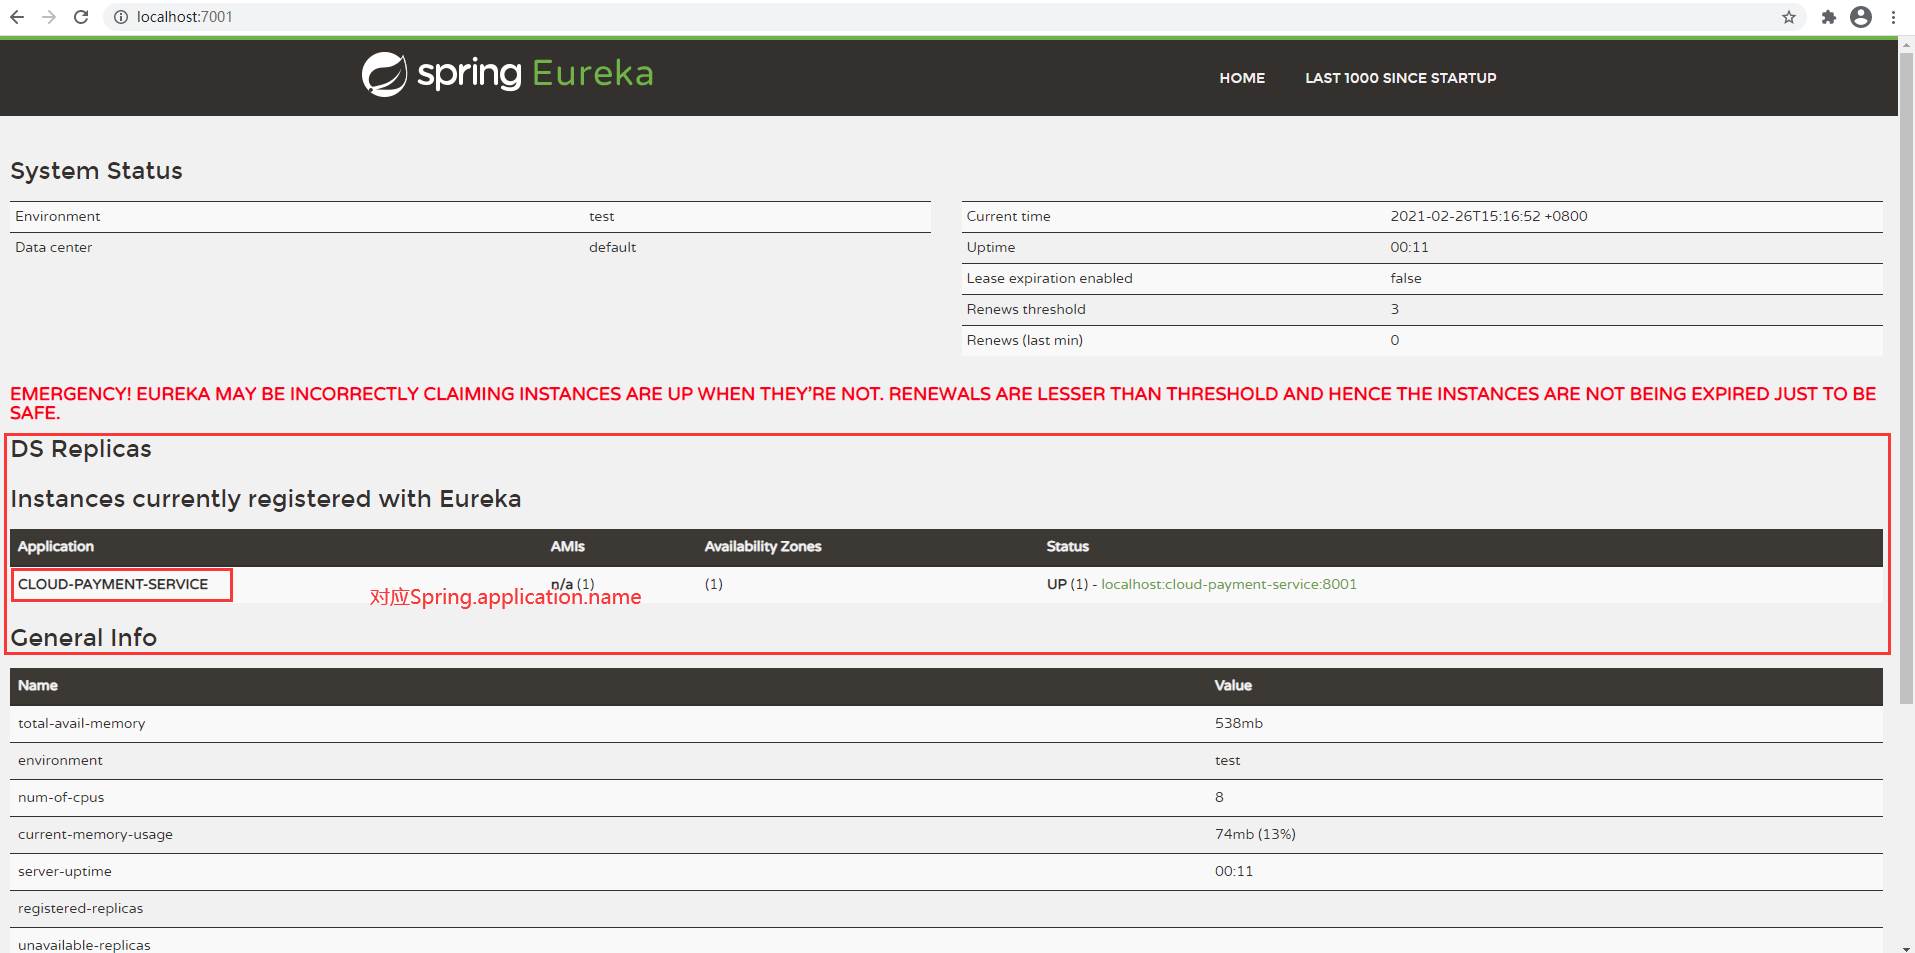
说明配偶成功!而上面的红色文字表示Eureka的自我保护机制,下面会介绍
三、Eureka集群搭建
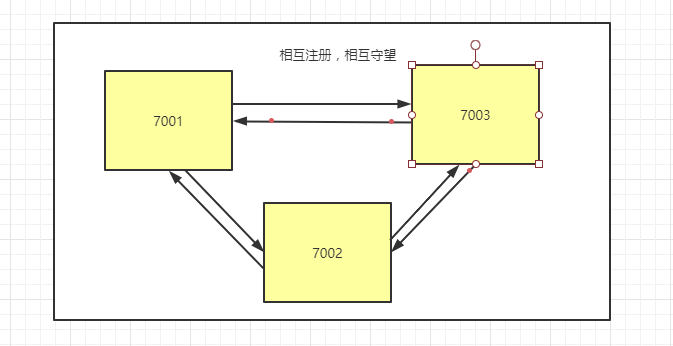
作为一个注册中心,在实际的生产环境下肯定是高可用的,所以需要搭建Eureka集群,Eureka集群的配置原理是相互守望,相互注册,例如有端口号为7001、7002、7003的Eureka机器,那么7001要分别与7002、7003分享在自己注册中心上注册的服务,7002与7003也如此
首先梳理一下流程,既然是搭建集群,那么只需要修改配置文件即可,观察单机环境下的配置文件
server:
  port: 7001
eureka:
  instance:
    hostname: localhost
  client:
    # false 代表不向服务注册中心注册自己,因为它本身就是服务中心
    register-with-eureka: false
    # false 代表自己就是服务注册中心,自己的作用就是维护服务实例,并不需要去检索服务
    fetch-registry: false
    service-url:
      # 设置与 Eureka Server 交互的地址,查询服务 和 注册服务都依赖这个地址
      defaultZone: http://${eureka.instance.hostname}:${server.port}/eureka/
发现如果是两台机器那么hostname不能一样,还有交互的地址应该是多台机器的才对,那么搭建Eureka第一步修改本地主机下的hosts文件,添加以下配制项
127.0.0.1 eureka7001.com
127.0.0.1 eureka 7002.com
新建一个Springboot工程cloud-eureka-server7002,除了配置文件其他都一样
cloud-eureka-server7002#application.yml
server:
  port: 7002
eureka:
  instance:
    hostname: eureka7002.com
  client:
    # false 代表不向服务注册中心注册自己,因为它本身就是服务中心
    register-with-eureka: false
    # false 代表自己就是服务注册中心,自己的作用就是维护服务实例,并不需要去检索服务
    fetch-registry: false
    service-url:
      # 设置与 Eureka Server 交互的地址,查询服务 和 注册服务都依赖这个地址
      defaultZone: http://eureka7001.com:7001/eureka/
cloud-eureka-server7001#application.yml
server:
  port: 7001
eureka:
  instance:
    hostname: eureka7001.com
  client:
    # false 代表不向服务注册中心注册自己,因为它本身就是服务中心
    register-with-eureka: false
    # false 代表自己就是服务注册中心,自己的作用就是维护服务实例,并不需要去检索服务
    fetch-registry: false
    service-url:
      # 设置与 Eureka Server 交互的地址,查询服务 和 注册服务都依赖这个地址
      defaultZone: http://eureka7002.com:7002/eureka/
cloud-provider-payment8001#application.yml
server:
  port: 8001

spring:
  application:
    name: cloud-payment-service
  datasource:
    type: com.alibaba.druid.pool.DruidDataSource
    driver-class-name: com.mysql.jdbc.Driver
    url: jdbc:mysql://localhost:3306/cloud2020?useUnicode=true&characterEncoding=utf-8&useSSL=false
    username: root
    password: 213213
mybatis:
  mapper-locations: classpath:mapper/*.xml
  type-aliases-package: cn.noteblogs.springcloud.entities  # 所有Entity 别名类所在包

eureka:
  client:
    # 注册进 Eureka 的服务中心
    register-with-eureka: true
    # 检索 服务中心 的其它服务
    fetch-registry: true
    service-url:
      # 设置与 Eureka Server 交互的地址
      defaultZone: http://eureka7001.com:7001/eureka/,http://eureka7002.com:7002/eureka/
重启服务,访问localhost:7001和localhost:7002
这里需要注意的是http://eureka7002.com已经指向了一个网络上的ip,需要刷新电脑上的dns缓存和浏览器缓存才可访问成功