1 HDFS 概述
1.1 HDFS 产出背景及定义
1)HDFS 产生背景
随着数据量越来越大,在一个操作系统存不下所有的数据,那么就分配到更多的操作系
统管理的磁盘中,但是不方便管理和维护,迫切需要一种系统来管理多台机器上的文件,这
就是分布式文件管理系统。HDFS 只是分布式文件管理系统中的一种。
2)HDFS 定义
HDFS(Hadoop Distributed File System),它是一个文件系统,用于存储文件,通过目
录树来定位文件;其次,它是分布式的,由很多服务器联合起来实现其功能,集群中的服务
器有各自的角色。
HDFS 的使用场景:适合一次写入,多次读出的场景。一个文件经过创建、写入和关闭
之后就不需要改变。
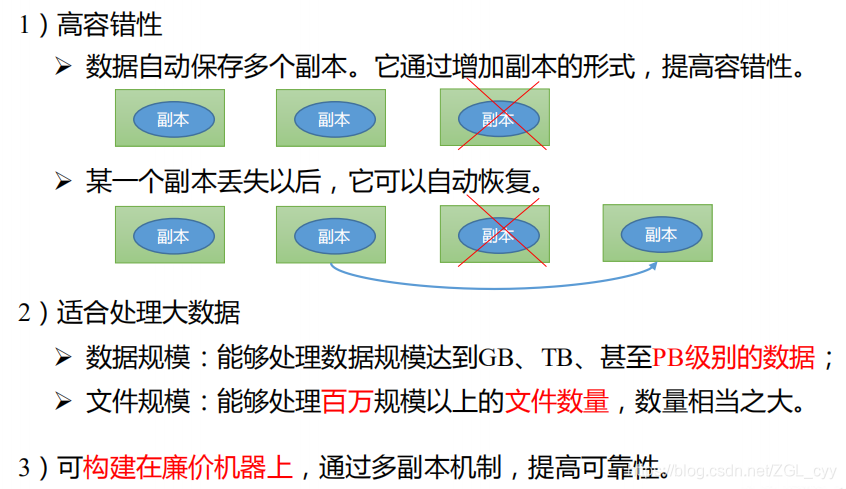
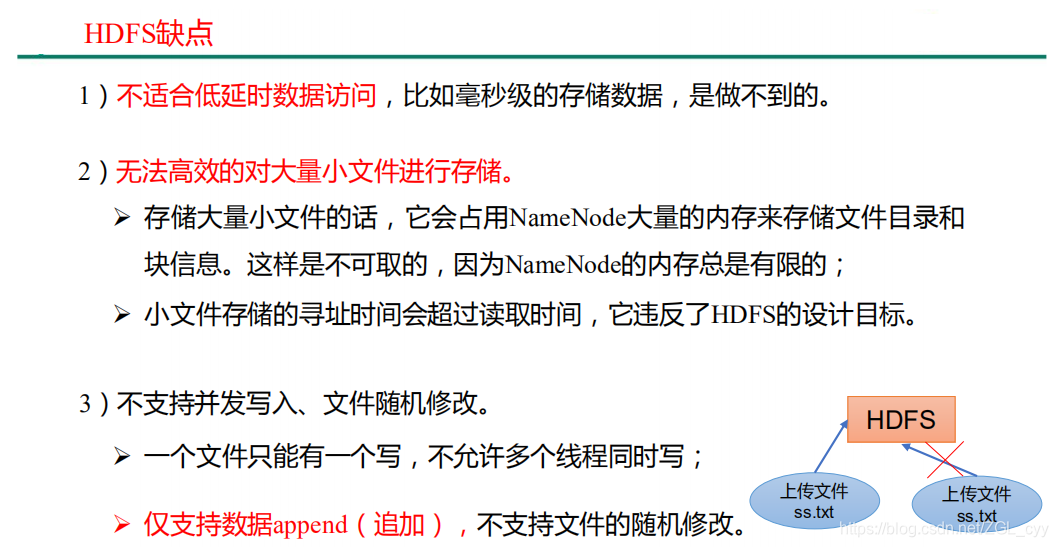
1.2 HDFS 优缺点
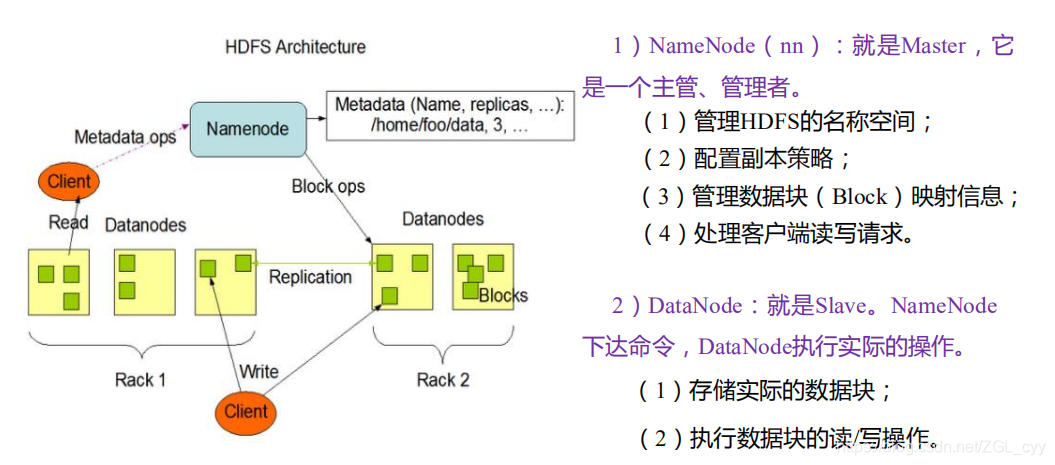
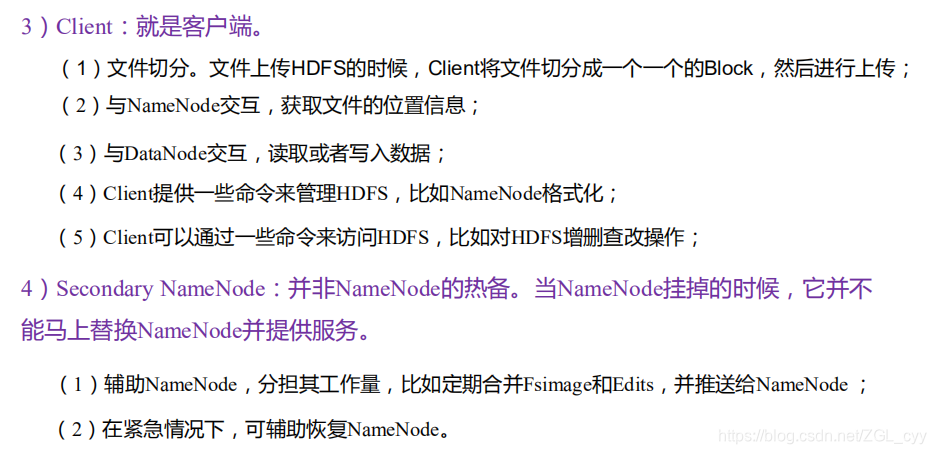
1.3 HDFS 组成架构
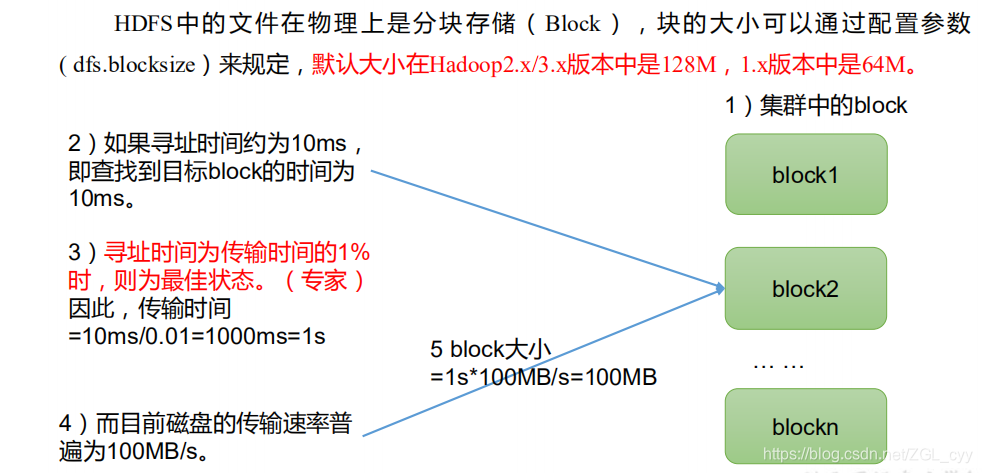
1.4 HDFS 文件块大小(面试重点)

2 HDFS 的 Shell 操作(开发重点)
2.1 基本语法
hadoop fs 具体命令 OR hdfs dfs 具体命令
两个是完全相同的。
2.2 命令大全
[atguigu@hadoop102 hadoop-3.1.3]$ bin/hadoop fs
[-appendToFile … ]
[-cat [-ignoreCrc] …]
[-chgrp [-R] GROUP PATH…]
[-chmod [-R] <MODE[,MODE]… | OCTALMODE> PATH…]
[-chown [-R] [OWNER][:[GROUP]] PATH…]
[-copyFromLocal [-f] [-p] … ]
[-copyToLocal [-p] [-ignoreCrc] [-crc] … ]
[-count [-q]
[-cp [-f] [-p] … ]
[-df [-h] [
[-du [-s] [-h]
[-get [-p] [-ignoreCrc] [-crc] … ]
[-getmerge [-nl] ]
[-help [cmd …]]
[-ls [-d] [-h] [-R] [
[-mkdir [-p]
[-moveFromLocal … ]
[-moveToLocal ]
[-mv … ]
[-put [-f] [-p] … ]
[-rm [-f] [-r|-R] [-skipTrash] …]
[-rmdir [–ignore-fail-on-non-empty]
<acl_spec>
[-setrep [-R] [-w]
[-stat [format]
[-tail [-f] ]
[-test -[defsz]
[-text [-ignoreCrc] …]
2.3 常用命令实操
2.3.1 准备工作
1)启动 Hadoop 集群(方便后续的测试)
[atguigu@hadoop102 hadoop-3.1.3]$ sbin/start-dfs.sh
[atguigu@hadoop103 hadoop-3.1.3]$ sbin/start-yarn.sh
2)-help:输出这个命令参数
[atguigu@hadoop102 hadoop-3.1.3]$ hadoop fs -help rm
3)创建/sanguo 文件夹
[atguigu@hadoop102 hadoop-3.1.3]$ hadoop fs -mkdir /sanguo
2.3.2 上传
1)-moveFromLocal:从本地剪切粘贴到 HDFS
[atguigu@hadoop102 hadoop-3.1.3]$ vim shuguo.txt
输入:
shuguo
[atguigu@hadoop102 hadoop-3.1.3]$ hadoop fs -moveFromLocal ./shuguo.txt
/sanguo
2)-copyFromLocal:从本地文件系统中拷贝文件到 HDFS 路径去
[atguigu@hadoop102 hadoop-3.1.3]$ vim weiguo.txt
输入:
weiguo
[atguigu@hadoop102 hadoop-3.1.3]$ hadoop fs -copyFromLocal weiguo.txt
/sanguo
3)-put:等同于 copyFromLocal,生产环境更习惯用 put
[atguigu@hadoop102 hadoop-3.1.3]$ vim wuguo.txt
输入:
wuguo
[atguigu@hadoop102 hadoop-3.1.3]$ hadoop fs -put ./wuguo.txt /sanguo
4)-appendToFile:追加一个文件到已经存在的文件末尾
[atguigu@hadoop102 hadoop-3.1.3]$ vim liubei.txt
输入:
liubei
[atguigu@hadoop102 hadoop-3.1.3]$ hadoop fs -appendToFile liubei.txt
/sanguo/shuguo.txt
2.3.3 下载
1)-copyToLocal:从 HDFS 拷贝到本地
[atguigu@hadoop102 hadoop-3.1.3]$ hadoop fs -copyToLocal
/sanguo/shuguo.txt ./
2)-get:等同于 copyToLocal,生产环境更习惯用 get
[atguigu@hadoop102 hadoop-3.1.3]$ hadoop fs -get
/sanguo/shuguo.txt ./shuguo2.txt
2.3.4 HDFS 直接操作
1)-ls: 显示目录信息
[atguigu@hadoop102 hadoop-3.1.3]$ hadoop fs -ls /sanguo
2)-cat:显示文件内容
[atguigu@hadoop102 hadoop-3.1.3]$ hadoop fs -cat /sanguo/shuguo.txt
3)-chgrp、-chmod、-chown:Linux 文件系统中的用法一样,修改文件所属权限
[atguigu@hadoop102 hadoop-3.1.3]$ hadoop fs -chmod 666
/sanguo/shuguo.txt
[atguigu@hadoop102 hadoop-3.1.3]$ hadoop fs -chown atguigu:atguigu
/sanguo/shuguo.txt
4)-mkdir:创建路径
[atguigu@hadoop102 hadoop-3.1.3]$ hadoop fs -mkdir /jinguo
5)-cp:从 HDFS 的一个路径拷贝到 HDFS 的另一个路径
[atguigu@hadoop102 hadoop-3.1.3]$ hadoop fs -cp /sanguo/shuguo.txt
/jinguo
6)-mv:在 HDFS 目录中移动文件
[atguigu@hadoop102 hadoop-3.1.3]$ hadoop fs -mv /sanguo/wuguo.txt /jinguo
[atguigu@hadoop102 hadoop-3.1.3]$ hadoop fs -mv /sanguo/weiguo.txt
/jinguo
7)-tail:显示一个文件的末尾 1kb 的数据
[atguigu@hadoop102 hadoop-3.1.3]$ hadoop fs -tail /jinguo/shuguo.txt
8)-rm:删除文件或文件夹
[atguigu@hadoop102 hadoop-3.1.3]$ hadoop fs -rm /sanguo/shuguo.txt
9)-rm -r:递归删除目录及目录里面内容
[atguigu@hadoop102 hadoop-3.1.3]$ hadoop fs -rm -r /sanguo
10)-du 统计文件夹的大小信息
[atguigu@hadoop102 hadoop-3.1.3]$ hadoop fs -du -s -h /jinguo
27 81 /jinguo
[atguigu@hadoop102 hadoop-3.1.3]$ hadoop fs -du -h /jinguo
14 42 /jinguo/shuguo.txt
7 21 /jinguo/weiguo.txt
6 18 /jinguo/wuguo.tx
说明:27 表示文件大小;81 表示 27*3 个副本;/jinguo 表示查看的目录
11)-setrep:设置 HDFS 中文件的副本数量
[atguigu@hadoop102 hadoop-3.1.3]$ hadoop fs -setrep 10 /jinguo/shuguo.txt

这里设置的副本数只是记录在 NameNode 的元数据中,是否真的会有这么多副本,还得
看 DataNode 的数量。因为目前只有 3 台设备,最多也就 3 个副本,只有节点数的增加到 10
台时,副本数才能达到 10。 第 3 章 HDFS 的 API 操作
3.1 客户端环境准备
1)找到资料包路径下的 Windows 依赖文件夹,拷贝 hadoop-3.1.0 到非中文路径(比如 d:\)。 2)配置 HADOOP_HOME 环境变量

3)配置 Path 环境变量。
注意:如果环境变量不起作用,可以重启电脑试试。

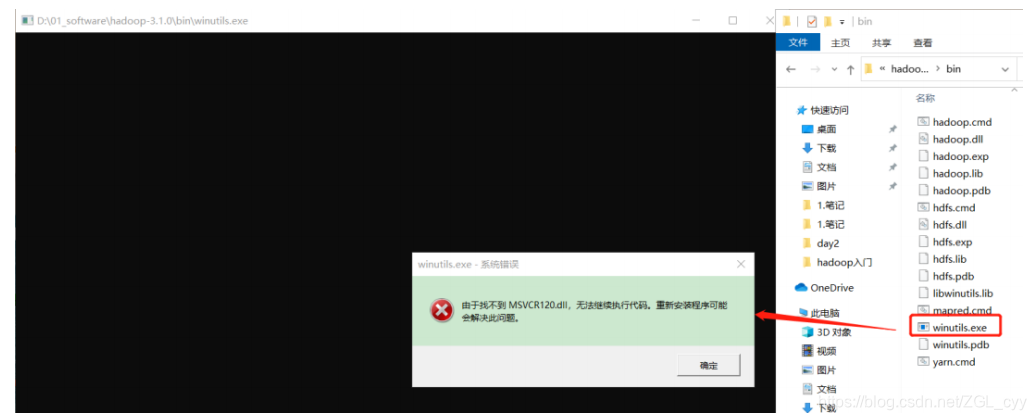
验证 Hadoop 环境变量是否正常。双击 winutils.exe,如果报如下错误。说明缺少微软运
行库(正版系统往往有这个问题)。再资料包里面有对应的微软运行库安装包双击安装即可。
4)在 IDEA 中创建一个 Maven 工程 HdfsClientDemo,并导入相应的依赖坐标+日志添加
org.apache.hadoop
hadoop-client
3.1.3
junit
junit
4.12
org.slf4j
slf4j-log4j12
1.7.30
在项目的 src/main/resources 目录下,新建一个文件,命名为“log4j.properties”,在文件
中填入
log4j.rootLogger=INFO, stdout
log4j.appender.stdout=org.apache.log4j.ConsoleAppender
log4j.appender.stdout.layout=org.apache.log4j.PatternLayout
log4j.appender.stdout.layout.ConversionPattern=%d %p [%c] - %m%n
log4j.appender.logfile=org.apache.log4j.FileAppender
log4j.appender.logfile.File=target/spring.log
log4j.appender.logfile.layout=org.apache.log4j.PatternLayout
log4j.appender.logfile.layout.ConversionPattern=%d %p [%c] - %m%n
5)创建包名:com.atguigu.hdfs
6)创建 HdfsClient 类
public class HdfsClient {
@Test
public void testMkdirs() throws IOException, URISyntaxException,
InterruptedException {
// 1 获取文件系统
Configuration configuration = new Configuration();
// FileSystem fs = FileSystem.get(new
URI(“hdfs://hadoop102:8020”), configuration);
FileSystem fs = FileSystem.get(new URI(“hdfs://hadoop102:8020”),
configuration,“atguigu”);
// 2 创建目录
fs.mkdirs(new Path("/xiyou/huaguoshan/"));
// 3 关闭资源
fs.close();
} } 7)执行程序
客户端去操作 HDFS 时,是有一个用户身份的。默认情况下,HDFS 客户端 API 会从采 用 Windows 默认用户访问 HDFS,会报权限异常错误。所以在访问 HDFS 时,一定要配置
用户。
org.apache.hadoop.security.AccessControlException: Permission denied:
user=56576, access=WRITE,
inode="/xiyou/huaguoshan":atguigu:supergroup:drwxr-xr-x
3.2 HDFS 的 API 案例实操
3.2.1 HDFS 文件上传(测试参数优先级)
1)编写源代码
@Test
public void testCopyFromLocalFile() throws IOException,
InterruptedException, URISyntaxException {
// 1 获取文件系统
Configuration configuration = new Configuration();
configuration.set(“dfs.replication”, “2”);
FileSystem fs = FileSystem.get(new URI(“hdfs://hadoop102:8020”),
configuration, “atguigu”);
// 2 上传文件
fs.copyFromLocalFile(new Path(“d:/sunwukong.txt”), new
Path("/xiyou/huaguoshan"));
// 3 关闭资源
fs.close();
} 2)将 hdfs-site.xml 拷贝到项目的 resources 资源目录下
3.2.2 HDFS 文件下载
@Test
public void testCopyToLocalFile() throws IOException,
InterruptedException, URISyntaxException{
// 1 获取文件系统
Configuration configuration = new Configuration();
FileSystem fs = FileSystem.get(new URI(“hdfs://hadoop102:8020”),
configuration, “atguigu”);
// 2 执行下载操作
// boolean delSrc 指是否将原文件删除
// Path src 指要下载的文件路径
// Path dst 指将文件下载到的路径
// boolean useRawLocalFileSystem 是否开启文件校验
fs.copyToLocalFile(false, new
Path("/xiyou/huaguoshan/sunwukong.txt"), new Path(“d:/sunwukong2.txt”),
true);
// 3 关闭资源
fs.close();
}
注意:如果执行上面代码,下载不了文件,有可能是你电脑的微软支持的运行库少,需
要安装一下微软运行库。
3.2.3 HDFS 文件更名和移动
@Test
public void testRename() throws IOException, InterruptedException,
URISyntaxException{
// 1 获取文件系统
Configuration configuration = new Configuration();
FileSystem fs = FileSystem.get(new URI(“hdfs://hadoop102:8020”),
configuration, “atguigu”);
// 2 修改文件名称
fs.rename(new Path("/xiyou/huaguoshan/sunwukong.txt"), new
Path("/xiyou/huaguoshan/meihouwang.txt"));
// 3 关闭资源
fs.close();
}
3.2.4 HDFS 删除文件和目录
@Test
public void testDelete() throws IOException, InterruptedException,
URISyntaxException{
// 1 获取文件系统
Configuration configuration = new Configuration();
FileSystem fs = FileSystem.get(new URI(“hdfs://hadoop102:8020”),
configuration, “atguigu”);
// 2 执行删除
fs.delete(new Path("/xiyou"), true);
// 3 关闭资源
fs.close();
}
3.2.5 HDFS 文件详情查看
查看文件名称、权限、长度、块信息
@Test
public void testListFiles() throws IOException, InterruptedException,
URISyntaxException {
// 1 获取文件系统
Configuration configuration = new Configuration();
FileSystem fs = FileSystem.get(new URI(“hdfs://hadoop102:8020”),
configuration, “atguigu”);
// 2 获取文件详情
RemoteIterator listFiles = fs.listFiles(new Path("/"),
true);
while (listFiles.hasNext()) {
LocatedFileStatus fileStatus = listFiles.next();
System.out.println("" + fileStatus.getPath() + "=");
System.out.println(fileStatus.getPermission());
System.out.println(fileStatus.getOwner());
System.out.println(fileStatus.getGroup());
System.out.println(fileStatus.getLen());
System.out.println(fileStatus.getModificationTime());
System.out.println(fileStatus.getReplication());
System.out.println(fileStatus.getBlockSize());
System.out.println(fileStatus.getPath().getName());
// 获取块信息
BlockLocation[] blockLocations = fileStatus.getBlockLocations();
System.out.println(Arrays.toString(blockLocations));
}
// 3 关闭资源
fs.close();
}
3.2.6 HDFS 文件和文件夹判断
@Test
public void testListStatus() throws IOException, InterruptedException,
URISyntaxException{
// 1 获取文件配置信息
Configuration configuration = new Configuration();
FileSystem fs = FileSystem.get(new URI(“hdfs://hadoop102:8020”),
configuration, “atguigu”);
// 2 判断是文件还是文件夹
FileStatus[] listStatus = fs.listStatus(new Path("/"));
for (FileStatus fileStatus : listStatus) {
// 如果是文件
if (fileStatus.isFile()) {
System.out.println(“f:”+fileStatus.getPath().getName());
}else {
System.out.println(“d:”+fileStatus.getPath().getName());
}
}
// 3 关闭资源
fs.close();
}
4 HDFS 的读写流程(面试重点)
4.1 HDFS 写数据流程
4.1.1 剖析文件写入
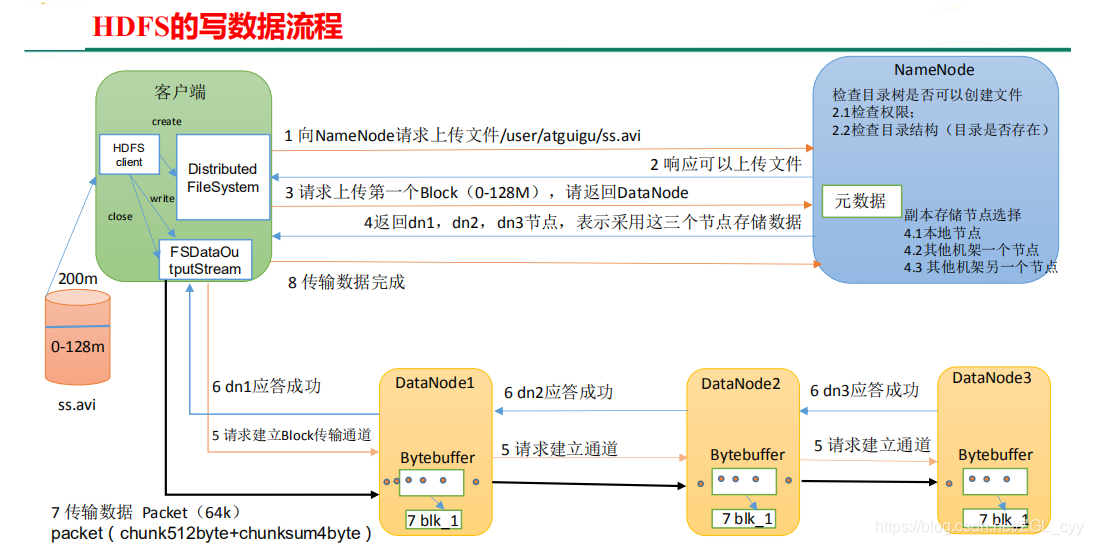
(1)客户端通过 Distributed FileSystem 模块向 NameNode 请求上传文件,NameNode 检
查目标文件是否已存在,父目录是否存在。
(2)NameNode 返回是否可以上传。
(3)客户端请求第一个 Block 上传到哪几个 DataNode 服务器上。
(4)NameNode 返回 3 个 DataNode 节点,分别为 dn1、dn2、dn3。 (5)客户端通过 FSDataOutputStream 模块请求 dn1 上传数据,dn1 收到请求会继续调用
dn2,然后 dn2 调用 dn3,将这个通信管道建立完成。
(6)dn1、dn2、dn3 逐级应答客户端。
(7)客户端开始往 dn1 上传第一个 Block(先从磁盘读取数据放到一个本地内存缓存),
以 Packet 为单位,dn1 收到一个 Packet 就会传给 dn2,dn2 传给 dn3;dn1 每传一个 packet
会放入一个应答队列等待应答。 (8)当一个 Block 传输完成之后,客户端再次请求 NameNode 上传第二个 Block 的服务
器。(重复执行 3-7 步)。
4.1.2 网络拓扑-节点距离计算
在 HDFS 写数据的过程中,NameNode 会选择距离待上传数据最近距离的 DataNode 接
收数据。那么这个最近距离怎么计算呢?
节点距离:两个节点到达最近的共同祖先的距离总和。

例如,假设有数据中心 d1 机架 r1 中的节点 n1。该节点可以表示为/d1/r1/n1。利用这种
标记,这里给出四种距离描述。
大家算一算每两个节点之间的距离。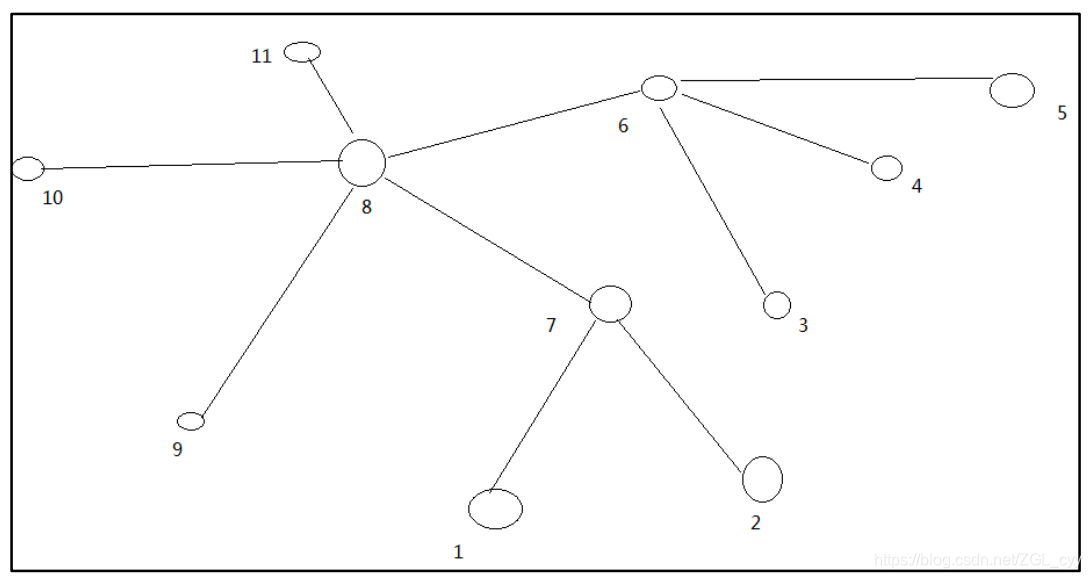
4.1.3 机架感知(副本存储节点选择)
1)机架感知说明
(1)官方说明
http://hadoop.apache.org/docs/r3.1.3/hadoop-project-dist/hadoop-hdfs/HdfsDesign.html#Data_Replication
For the common case, when the replication factor is three, HDFS’s
placement policy is to put one replica on the local machine if the writer
is on a datanode, otherwise on a random datanode, another replica on a
node in a different (remote) rack, and the last on a different node in
the same remote rack. This policy cuts the inter-rack write traffic which
generally improves write performance. The chance of rack failure is far
less than that of node failure; this policy does not impact data
reliability and availability guarantees. However, it does reduce the
aggregate network bandwidth used when reading data since a block is
placed in only two unique racks rather than three. With this policy, the
replicas of a file do not evenly distribute across the racks. One third
of replicas are on one node, two thirds of replicas are on one rack, and
the other third are evenly distributed across the remaining racks. This
policy improves write performance without compromising data reliability
or read performance.
(2)源码说明
Crtl + n 查找 BlockPlacementPolicyDefault,在该类中查找 chooseTargetInOrder 方法。 2)Hadoop3.1.3 副本节点选择

4.2 HDFS 读数据流程
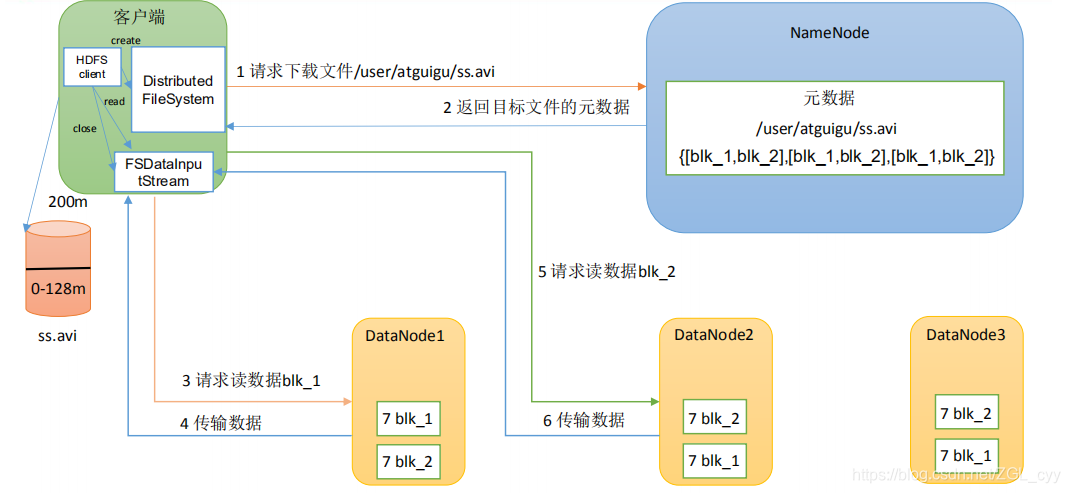
(1)客户端通过 DistributedFileSystem 向 NameNode 请求下载文件,NameNode 通过查
询元数据,找到文件块所在的 DataNode 地址。
(2)挑选一台 DataNode(就近原则,然后随机)服务器,请求读取数据。 (3)DataNode 开始传输数据给客户端(从磁盘里面读取数据输入流,以 Packet 为单位
来做校验)。
(4)客户端以 Packet 为单位接收,先在本地缓存,然后写入目标文件。
5 NameNode 和 SecondaryNameNode
5.1 NN 和 2NN 工作机制
思考:NameNode 中的元数据是存储在哪里的?
首先,我们做个假设,如果存储在 NameNode 节点的磁盘中,因为经常需要进行随机访
问,还有响应客户请求,必然是效率过低。因此,元数据需要存放在内存中。但如果只存在
内存中,一旦断电,元数据丢失,整个集群就无法工作了。因此产生在磁盘中备份元数据的
FsImage。
这样又会带来新的问题,当在内存中的元数据更新时,如果同时更新 FsImage,就会导
致效率过低,但如果不更新,就会发生一致性问题,一旦 NameNode 节点断电,就会产生数
据丢失。因此,引入 Edits 文件(只进行追加操作,效率很高)。每当元数据有更新或者添
加元数据时,修改内存中的元数据并追加到 Edits 中。这样,一旦 NameNode 节点断电,可
以通过 FsImage 和 Edits 的合并,合成元数据。
但是,如果长时间添加数据到 Edits 中,会导致该文件数据过大,效率降低,而且一旦
断电,恢复元数据需要的时间过长。因此,需要定期进行 FsImage 和 Edits 的合并,如果这
个操作由NameNode节点完成,又会效率过低。因此,引入一个新的节点SecondaryNamenode,
专门用于 FsImage 和 Edits 的合并。
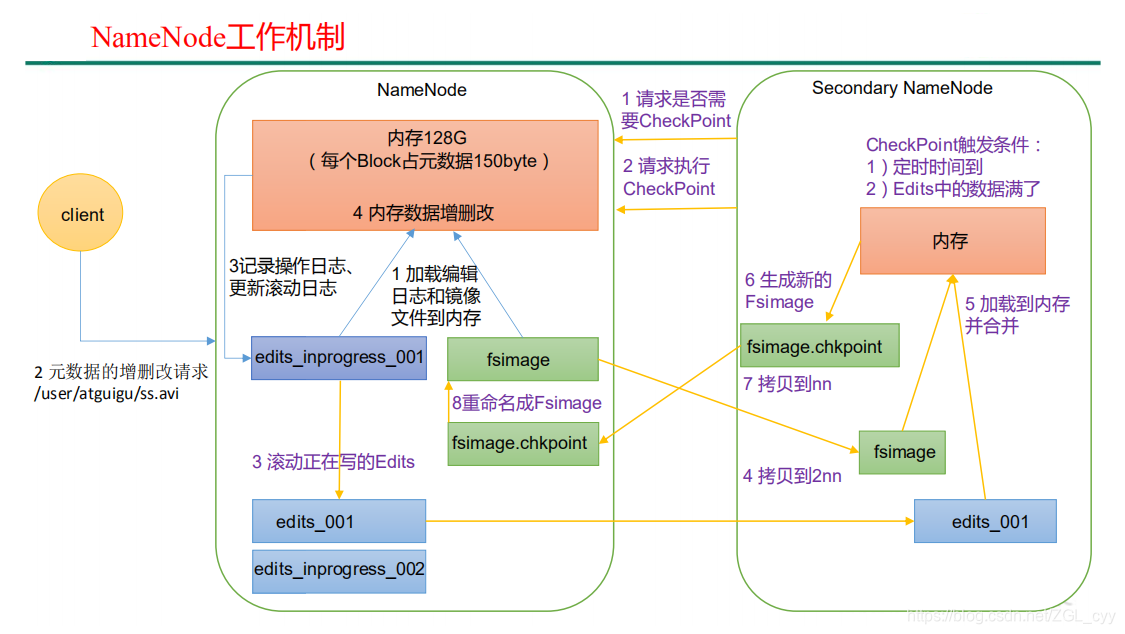
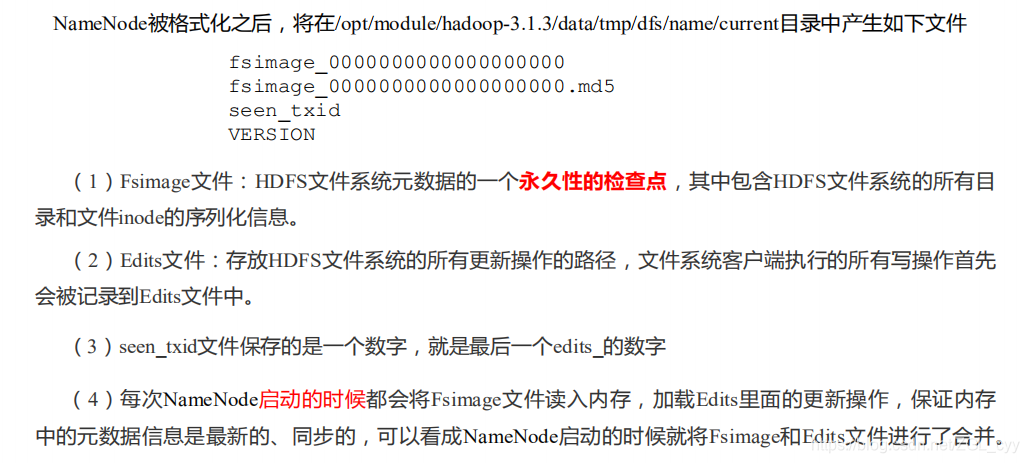
1)第一阶段:NameNode 启动
(1)第一次启动 NameNode 格式化后,创建 Fsimage 和 Edits 文件。如果不是第一次启
动,直接加载编辑日志和镜像文件到内存。
(2)客户端对元数据进行增删改的请求。 (3)NameNode 记录操作日志,更新滚动日志。 (4)NameNode 在内存中对元数据进行增删改。 2)第二阶段:Secondary NameNode 工作
(1)Secondary NameNode 询问 NameNode 是否需要 CheckPoint。直接带回 NameNode
是否检查结果。
(2)Secondary NameNode 请求执行 CheckPoint。 (3)NameNode 滚动正在写的 Edits 日志。 (4)将滚动前的编辑日志和镜像文件拷贝到 Secondary NameNode。 (5)Secondary NameNode 加载编辑日志和镜像文件到内存,并合并。
(6)生成新的镜像文件 fsimage.chkpoint。 (7)拷贝 fsimage.chkpoint 到 NameNode。 (8)NameNode 将 fsimage.chkpoint 重新命名成 fsimage。
5.2 Fsimage 和 Edits 解析
Fsimage和Edits概念
1)oiv 查看 Fsimage 文件
(1)查看 oiv 和 oev 命令
[atguigu@hadoop102 current]$ hdfs
oiv apply the offline fsimage viewer to an fsimage
oev apply the offline edits viewer to an edits file
(2)基本语法
hdfs oiv -p 文件类型 -i 镜像文件 -o 转换后文件输出路径
(3)案例实操
[atguigu@hadoop102 current]$ pwd
/opt/module/hadoop-3.1.3/data/dfs/name/current
[atguigu@hadoop102 current]$ hdfs oiv -p XML -i
fsimage_0000000000000000025 -o /opt/module/hadoop-3.1.3/fsimage.xml
[atguigu@hadoop102 current]$ cat /opt/module/hadoop-3.1.3/fsimage.xml
将显示的 xml 文件内容拷贝到 Idea 中创建的 xml 文件中,并格式化。部分显示结果如
下。
16386
DIRECTORY
user
1512722284477
atguigu:supergroup:rwxr-xr-x
-1
-1
16387
DIRECTORY
atguigu
1512790549080
atguigu:supergroup:rwxr-xr-x
-1
-1
16389
FILE
wc.input
3
1512722322219
1512722321610
134217728
atguigu:supergroup:rw-r–r--
1073741825
1001
59
思考:可以看出,Fsimage 中没有记录块所对应 DataNode,为什么?
在集群启动后,要求 DataNode 上报数据块信息,并间隔一段时间后再次上报。 2)oev 查看 Edits 文件
(1)基本语法
hdfs oev -p 文件类型 -i 编辑日志 -o 转换后文件输出路径
(2)案例实操
[atguigu@hadoop102 current]$ hdfs oev -p XML -i
edits_0000000000000000012-0000000000000000013 -o /opt/module/hadoop-
3.1.3/edits.xml
[atguigu@hadoop102 current]$ cat /opt/module/hadoop-3.1.3/edits.xml
将显示的 xml 文件内容拷贝到 Idea 中创建的 xml 文件中,并格式化。显示结果如下。
6 DataNode
6.1 DataNode 工作机制
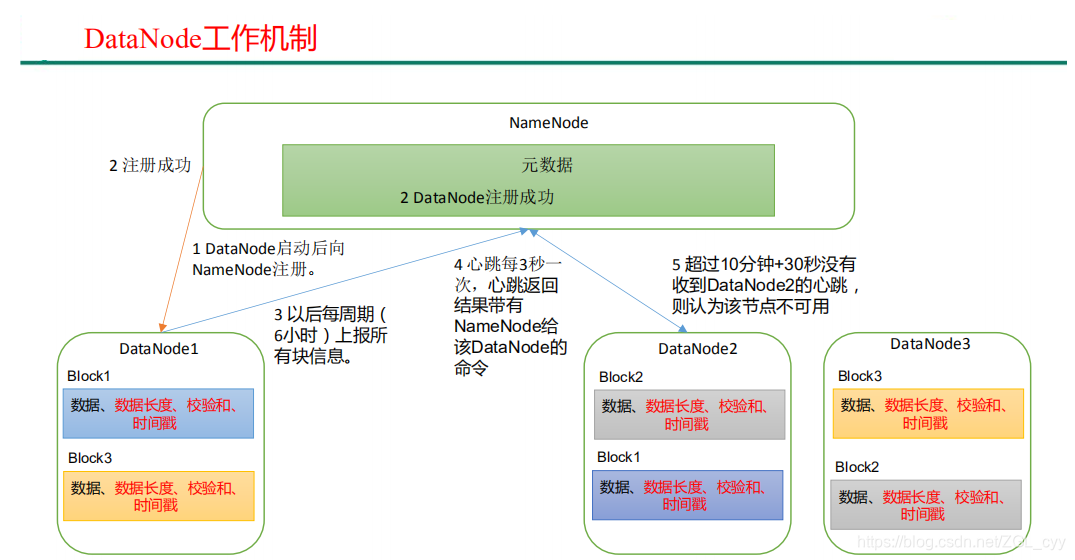
(1)一个数据块在 DataNode 上以文件形式存储在磁盘上,包括两个文件,一个是数据
本身,一个是元数据包括数据块的长度,块数据的校验和,以及时间戳。 (2)DataNode 启动后向 NameNode 注册,通过后,周期性(6 小时)的向 NameNode 上
报所有的块信息。
DN 向 NN 汇报当前解读信息的时间间隔,默认 6 小时;
dfs.blockreport.intervalMsec
21600000
Determines block reporting interval in
milliseconds.
DN 扫描自己节点块信息列表的时间,默认 6 小时
dfs.datanode.directoryscan.interval
21600s
Interval in seconds for Datanode to scan data
directories and reconcile the difference between blocks in memory and on
the disk.
Support multiple time unit suffix(case insensitive), as described
in dfs.heartbeat.interval.
(3)心跳是每 3 秒一次,心跳返回结果带有 NameNode 给该 DataNode 的命令如复制块
数据到另一台机器,或删除某个数据块。如果超过 10 分钟没有收到某个 DataNode 的心跳,
则认为该节点不可用。
(4)集群运行中可以安全加入和退出一些机器。
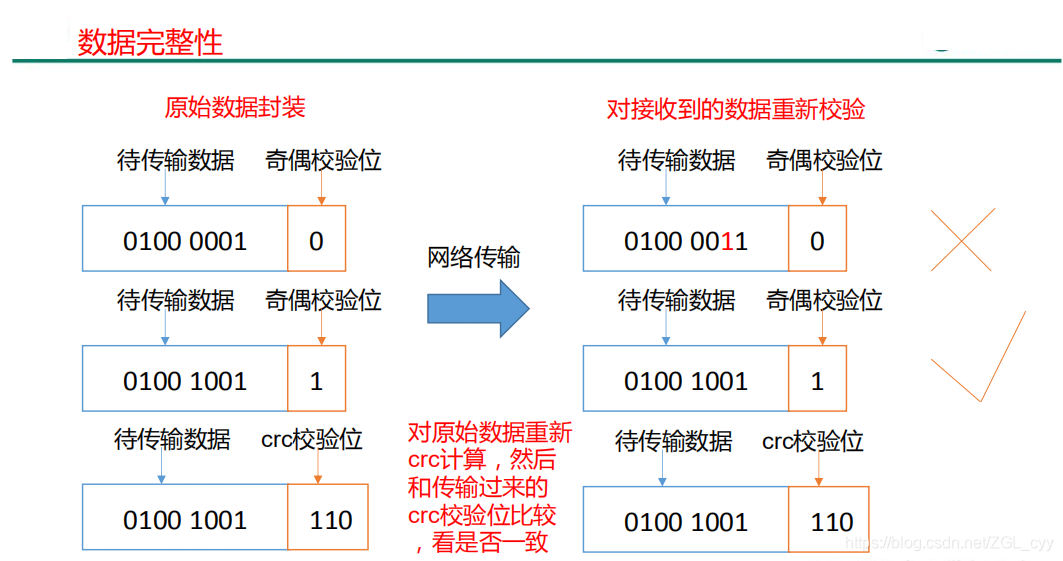
6.2 数据完整性
思考:如果电脑磁盘里面存储的数据是控制高铁信号灯的红灯信号(1)和绿灯信号(0),
但是存储该数据的磁盘坏了,一直显示是绿灯,是否很危险?同理 DataNode 节点上的数据
损坏了,却没有发现,是否也很危险,那么如何解决呢?
如下是 DataNode 节点保证数据完整性的方法。
(1)当 DataNode 读取 Block 的时候,它会计算 CheckSum。 (2)如果计算后的 CheckSum,与 Block 创建时值不一样,说明 Block 已经损坏。
(3)Client 读取其他 DataNode 上的 Block。 (4)常见的校验算法 crc(32),md5(128),sha1(160) (5)DataNode 在其文件创建后周期验证 CheckSum。
6.3 掉线时限参数设置
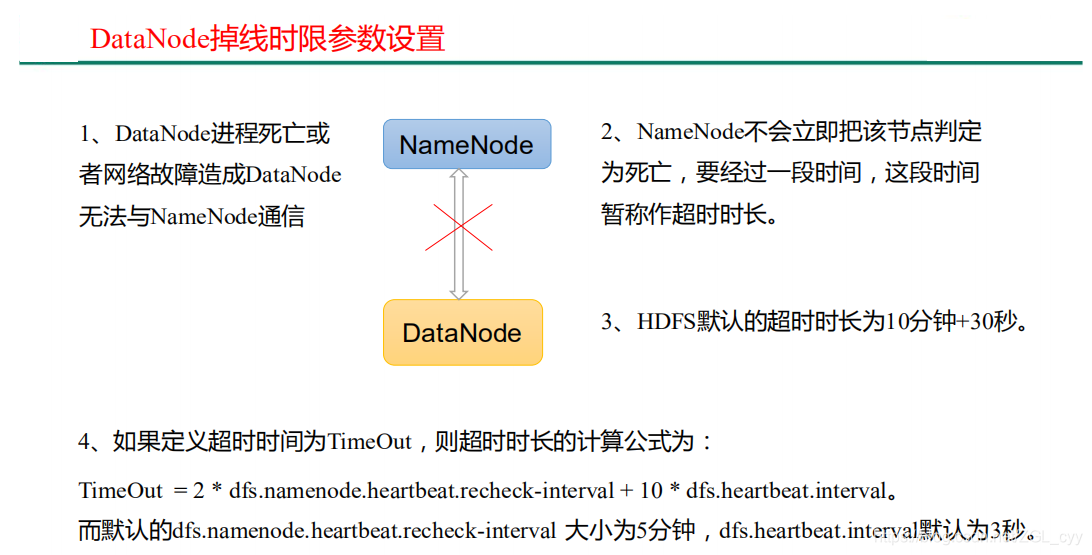
需要注意的是 hdfs-site.xml 配置文件中的 heartbeat.recheck.interval 的单位为毫秒,
dfs.heartbeat.interval 的单位为秒。
dfs.namenode.heartbeat.recheck-interval
300000
dfs.heartbeat.interval
3