1、Flume安装
1.1 解压
将下载的 flume 包,解压到software/hadoop等自定义目录中
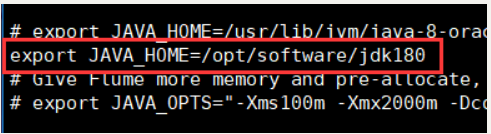
1.2 配置jdk关联
复制 conf/ flume-env.sh.template 为 flume-env.sh ,修改flume-env.sh 配置文件,主要是 JAVA_HOME 变量设置。
1.3 验证是否安装成功
./bin/flume-ng version

1.4 测试数据收集
1.4.1、编写配置文件
重命名 conf/flume-conf.properties.template 文件为 simple.conf,并修改
为以下内容
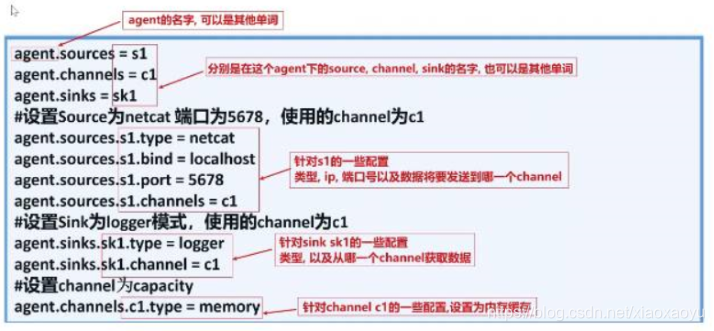
# Name the components on this agent
a1.sources = r1
a1.sinks = k1
a1.channels = c1

# Describe/configure the source
a1.sources.r1.type = netcat
a1.sources.r1.bind = localhost
a1.sources.r1.port = 5678

# Describe the sink
a1.sinks.k1.type = logger

# Use a channel which buffers events in memory
a1.channels.c1.type = memory
a1.channels.c1.capacity = 1000
a1.channels.c1.transactionCapacity = 100

# Bind the source and sink to the channel
a1.sources.r1.channels = c1
a1.sinks.k1.channel = c1
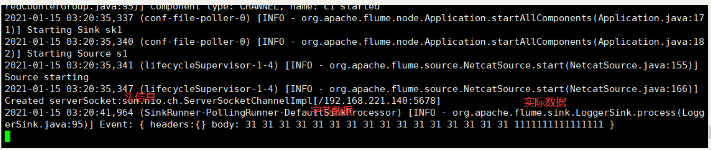
1.4.2、启动flume
[root@chust01 flume180]# bin/flume-ng agent --conf conf/ --name a1 --conf-file job/flume-netcat-logger.conf Dflume.root.logger=INFO,console

[root@chust01 flume180]# bin/flume-ng agent -c conf/ -n a1 -f job/flume-netcat-logger.conf -Dflume.root.logger=INFO,console
参数说明:
扫描二维码关注公众号,回复:
12886755 查看本文章

--conf/-c:表示配置文件存储在 conf/目录
--name/-n:表示给 agent 起名为 a1
--conf-file/-f:flume 本次启动读取的配置文件是在 job 文件夹下的 flume-telnet.conf 文件。
-Dflume.root.logger=INFO,console :-D 表示flume 运行时动态修改flume.root.logger 参数属性值,并将控制台日志打印级别设置为INFO 级别。日志级别包括:log、info、warn、error。
1.4.3、启动telnet发送数据
# 新开窗口
# 安装telnet
yum -y install telnet.x86_64
# 启动telnet
telnet chust01 5678
# 发送数据
[root@chust01 conf]# telnet chust01 5678
Trying 192.168.221.140...
Connected to chust01.
Escape character is '^]'.
111111111111111111
OK
1.4.4、查看Flume日志输出
2、读取文件内容
2.1 编写conf
vi source_exec.conf
--------------------------------
# 定义 source, channel, 和sink的名字
a1.sources = s1
a1.channels = c1
a1.sinks = sk1
# 对source的一些设置
# 设置source的类型为exec, 代表需要执行一条命令, 所以需要给定一个command
a1.sources.s1.type = exec
a1.sources.s1.command = tail -F /root/flume_conf/xxx.log
a1.sources.s1.channels = c1
# 对channel的一些设置
a1.channels.c1.type = memory
# 对sink的一些设置
a1.sinks.sk1.type = logger
a1.sinks.sk1.channel = c1
2.2 启动flume
直接启动Flume,由于没有/root/flume_conf/xxx.log文件,会显示exited with 1 所以应该先创建/root/flume_conf/xxx.log,然后再启动Flume
flume-ng agent --name agent -f source_exec.conf -Dflume.root.logger=INFO,console
2.3 对文件追加数据
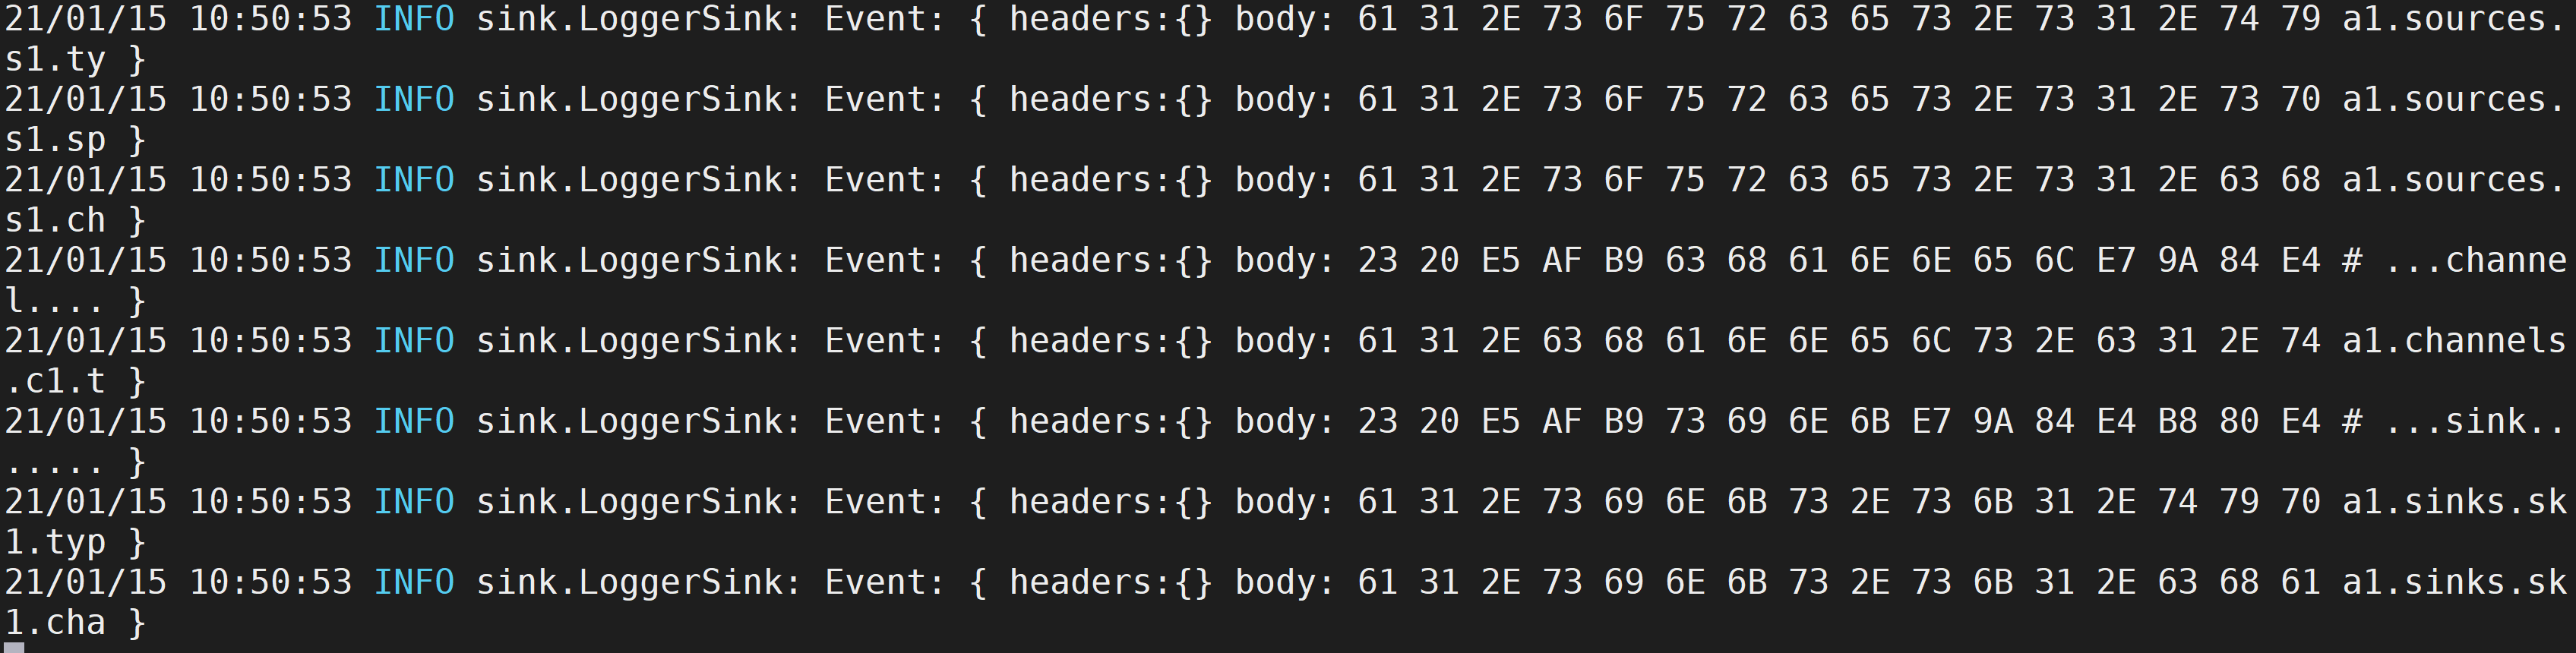
我们在这个文件当中添加一些数据, 验证Flume是否检测到并采集

3、spooldir source
3.1 编写Flume的配置文件
vi source_spooldir.conf
--------------------------------
# 定义 source, channel, 和sink的名字
a1.sources = s1
a1.channels = c1
a1.sinks = sk1
# 对source的一些设置
# 设置source的类型为spooldir, 代表监控一个文件夹里边是否有新文件产生, 所以需要给定一个文件夹
a1.sources.s1.type = spooldir
a1.sources.s1.spoolDir = /root/test
a1.sources.s1.channels = c1
# 对channel的一些设置
a1.channels.c1.type = memory
# 对sink的一些设置
a1.sinks.sk1.type = logger
a1.sinks.sk1.channel = c1
--------------------------------
# 创建文件夹
mkdir /root/test
3.2 启动Flume, 直接启动Flume
flume-ng agent --name a1 -f source_spooldir.conf -Dflume.root.logger=INFO,console

3.3 向/root/test拷贝文件, 查看Flume的输出
cp flume_conf/*.conf test/
3.4 查看/root/test下的文件名

4、http source
4.1 编写Flume的配置文件
vi source_http.conf
--------------------------------
# 定义 source, channel, 和sink的名字
a1.sources = s1
a1.channels = c1
a1.sinks = sk1
# 对source的一些设置
# 设置source的类型为spooldir, 代表监控一个文件夹里边是否有新文件产生, 所以需要给定一个文件夹
a1.sources.s1.type = http
a1.sources.s1.port = 5678
a1.sources.s1.channels = c1
# 对channel的一些设置
a1.channels.c1.type = memory
# 对sink的一些设置
a1.sinks.sk1.type = logger
a1.sinks.sk1.channel = c1
--------------------------------
4.2 启动Flume, 直接启动Flume
flume-ng agent --name a1 -f source_http.conf -Dflume.root.logger=INFO,console

4.3 发送post请求, 查看Flume输出
curl -XPOST localhost:5678 -d'[{"headers":{"h1":"v1","h2":"v2"},"body":"hello body"}]'

5、avro sink and source
5.1 编写Flume的配置文件
vi sink_avro.conf
--------------------------------
# 定义 source, channel, 和sink的名字
a1.sources = s1
a1.channels = c1
a1.sinks = sk1
# 对source的一些设置
# 设置source的类型为spooldir, 代表监控一个文件夹里边是否有新文件产生, 所以需要给定一个文件夹
a1.sources.s1.type = http
a1.sources.s1.port = 5678
a1.sources.s1.channels = c1
# 对channel的一些设置
a1.channels.c1.type = memory
# 对sink的一些设置, 设置格式为avro, 主机和端口号
a1.sinks.sk1.type = avro
a1.sinks.sk1.hostname = localhost
a1.sinks.sk1.port = 4444
a1.sinks.sk1.channel = c1
--------------------------------

vi source_avro.conf
--------------------------------
# 定义 source, channel, 和sink的名字
a1.sources = s1
a1.channels = c1
a1.sinks = sk1
# 对source的一些设置
# 设置格式为avro, 主机和端口号
a1.sources.s1.type = avro
a1.sources.s1.bind = localhost
a1.sources.s1.port = 4444
a1.sources.s1.channels = c1
# 对channel的一些设置
a1.channels.c1.type = memory
# 对sink的一些设置
a1.sinks.sk1.type = logger
a1.sinks.sk1.channel = c1
--------------------------------
5.2 启动Flume, 直接启动Flume
开两个窗口并行执行
flume-ng agent --name a1 -f source_avro.conf -Dflume.root.logger=INFO,console
flume-ng agent --name a1 -f sink_avro.conf -Dflume.root.logger=INFO,console


5.3 发送post请求, 查看Flume输出
curl -XPOST localhost:5678 -d'[{"headers":{"h1":"v1","h2":"v2"},"body":"hello body"}]'

6、HDFS sink
6.1 编写Flume的配置文件
vi sink_hdfs.conf
--------------------------------
# 定义 source, channel, 和sink的名字
a1.sources = s1
a1.channels = c1
a1.sinks = sk1
# 对source的一些设置
a1.sources.s1.type = netcat
a1.sources.s1.bind = localhost
a1.sources.s1.port = 5678
a1.sources.s1.channels = c1
# 对channel的一些设置
a1.channels.c1.type = memory
# 对sink的一些设置
a1.sinks.sk1.type = hdfs
a1.sinks.sk1.hdfs.path = /data/20210115
a1.sinks.sk1.channel = c1
6.2 启动Flume
flume-ng agent --name a1 -f sink_hdfs.conf -Dflume.root.logger=INFO,console

6.3 启动telnet发送数据
# 启动telnet
telnet localhost 5678
Trying 127.0.0.1...
Connected to localhost.
Escape character is '^]'.
# 发送数据
hello world
OK
hello spark
OK
hello hadoop scala
OK
6.4 查看Flume日志输出

6.5 查看HDFS上的文件
hdfs dfs -text /data/20210115/FlumeData.1610682426351

【扩展】实际开发中常用参数

练习
练习1
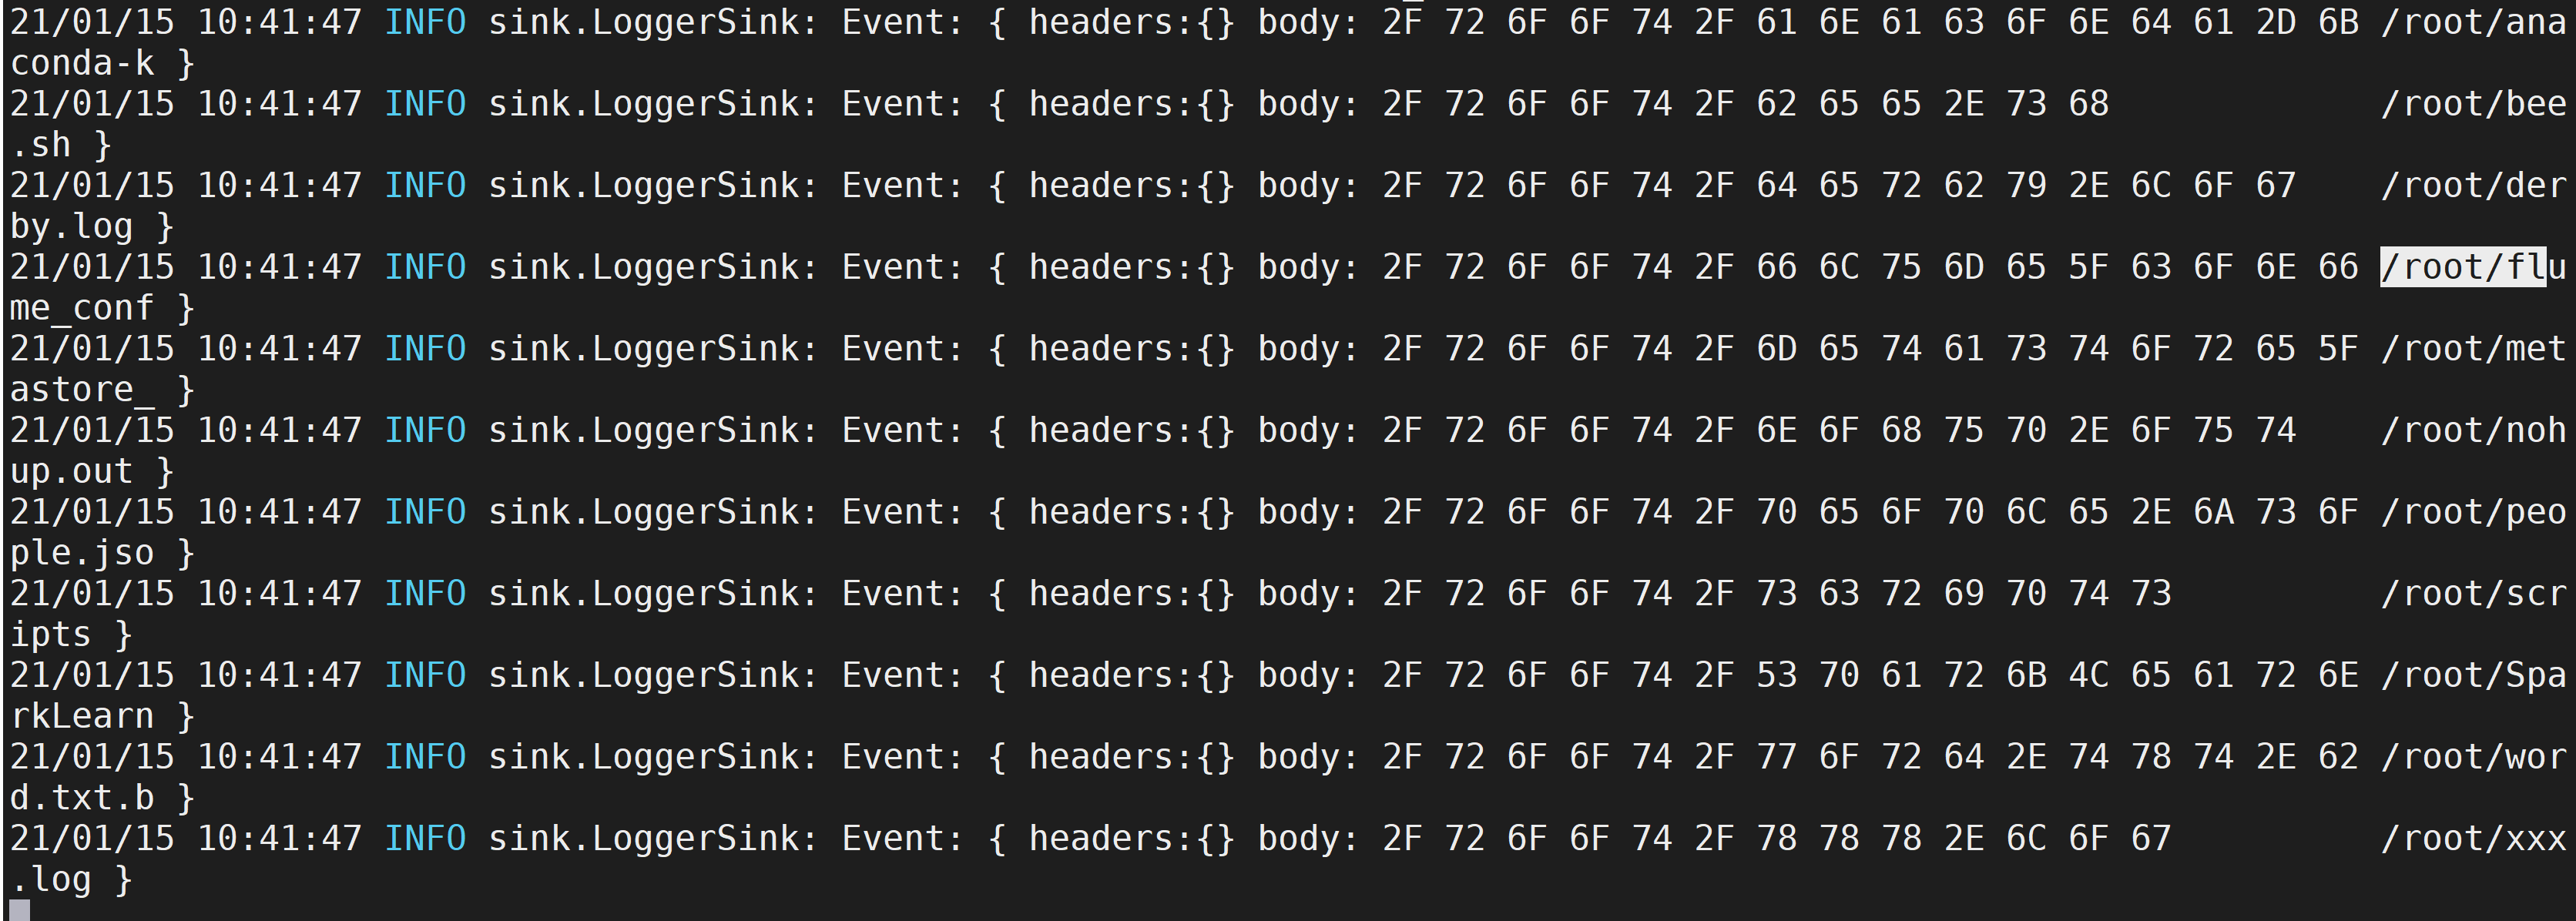
1.编写Flume的配置文件
vi /root/flume_conf/echoPaths.sh
--------------------------------
#!/bin/bash
for i in /root/*
do
  echo $i
done
--------------------------------
vi practise1.conf
--------------------------------
# 定义 source, channel, 和sink的名字
a1.sources = s1
a1.channels = c1
a1.sinks = sk1
# 对source的一些设置
# 设置source的类型为exec, 代表需要执行一条命令, 所以需要给定一个command
a1.sources.s1.type = exec
a1.sources.s1.command = bash /root/flume_conf/echoPaths.sh
a1.sources.s1.channels = c1
# 对channel的一些设置
a1.channels.c1.type = memory
# 对sink的一些设置
a1.sinks.sk1.type = logger
a1.sinks.sk1.channel = c1
2.启动Flume
flume-ng agent --name a1 -f practise1.conf -Dflume.root.logger=INFO,console