1.集合 (Collection)
list接口:储存有序可重复数据。
在使用list储存数据时,如果储存的是对象,那么对象多对应的类要重写equals()方法。
- Arraylist:作为list接口的主要实现类;线程不安全,高效率;可以存储null值。
- Linkedlist:对于频繁的插入、删除操作,使用此类效率比Arraylist 高;底层使用双链表储存; 可以储存null值。
- Vector:作为list古老实现类;线程安全,效率低;底层使用Object[] elementData储存。
set接口:储存无序不可重复数据
在使用hashSet 、LinkedhashSet 储存数据时,如果储存的是对象,那么对象多对应的类要重写equals()方法 和 hashcode()方法。
-
hashSet :作为set主要实现类; 线程不安全;可以储存null值;
底层原理:在添加元素的时候,HashSet会先调用元素的hashcode方法得到元素的哈希值 ,然后通过元素的哈希值经过移位等运算,就可以算出该元素在哈希表中的存储位置 。
1、如果算出的元素存储的位置目前没有任何元素存储,那么该元素可以直接存储在该位置上。
2、如果算出的元素的存储位置目前已经存在有其他的元素了,那么还会调用该元素的equals方法
与该位置的元素再比较一次,如果equals方法返回的是true,那么该位置上的元素视为重复元
素,不允许添加,如果返回的是false,则允许添加。 -
LinkedhashSet:LinkedhashSet 是 hashSet的子类; 对于频繁的遍历操作,linkedhashSet效率高于hashSet。
-
TreeSet:可按照添加对象的指定属性进行排序;不可储存null值;
Collection使用迭代器遍历集合数据
Collection<String> collection = new ArrayList<String>();
    	collection.add("1223");
    	Iterator<String> iterator = collection.iterator();
    	while (iterator.hasNext()) {


			Object object = iterator.next();
			System.out.println(object.toString());
		}
Collection使用 foreach遍历集合数据
Collection<String> collection = new ArrayList<String>();
    	collection.add("1223");
    	for (String string : collection) {


			System.out.println(string);
		}
collection接口常用方法
- 添加、删除、修改操作:
Object add(Object obj):添加数据。
Object remove(Object obj):移除对应数据。
void clear():清空集合中所有数据。 - 元素查询操作
boolean contains(Object obj):判断元素是否存在。
int size():返回集合中元素的个数。
boolean isEmpty():判断当前集合是否为空。
retainAll(Collection c) //保留两个集合的交集
参考:https://blog.csdn.net/iruier_/article/details/80010308
Map:映射关系集合,以key—value形式储存数据;其中的 key 是无序不可重复的
在HashMap中如果key是自定义的类,类中就要重写equals()方法和 hashcode()方法。
hashMap:
- 作为Map的主要实现类,线程不安全,效率高;
- key可以为null,当key为null是会返回0; 源码如下:


hashMap在put时会调用 hash()方法来计算key的hashcode值,可以从hash算法中看出当 key为null时返回的值是0。因此key为null时,hash算法返回值为0,不会调用key的hashcode()方法。
LinkedHashMap:
- 保证在遍历Map元素时,可以按照添加顺序实现遍历。
- 在原有的HashMap底层结构基础上添加了一对指针,指向前一个和后一个元素,对应频繁的遍历操作,执行效率高于HashMap
TreeMap:
保证按照添加的key-value对进行排序,实现排序遍历。
Hashtable:线程安全的,效率低;储存的key不能为null。
Map接口的常用方法
- 添加、删除、修改操作:
Object put(Object key,Object value):添加key - value 类型数据。
void putAll(Map m):将m中所有数据存放到map中。
Object remove(Object key):移除key所对应的value的值。
void clear():清空map中所有数据。 - 元素查询操作
Object get(Object key):获取key所对应的value的值。
boolean containsKey(Object key):判断key是否存在。
boolean containsValue(Object value):判断value值是否存在。
int size():返回map中key—value对 的个数。
boolean isEmpty():判断当前map是否为空。
boolean equals(Object obj):判断当前map和参数对象obj是否相等。
使用Collections工具类是用来操作collection接口
1.void copy(List dest , List src):将src中的类容复制到dest中。 例如:
      List list = new ArrayList();
    	list.add("abc");
    	System.out.println(list);
    	List nlist = Arrays.asList(new Object[list.size()]);
    	//将list中的类容复制到 nlist中
    	Collections.copy(nlist, list);
    	System.out.println(nlist);
2.使用Collections.synchronizedXXX(XXX) 可以解决多线程并发访问时的线程安全问题。例如
//dlist 线程不安全
    	List dList = new ArrayList();
    	//nlist 为线程安全的
    	List nlList = Collections.synchronizedList(dList);
2.异常
捕获异常:使用 try…catch 语句,try中是有可能出现异常的代码,catch中使用 e.printStackTrace()方法打印异常信息;try…catch语句是在方法中使用
声明异常:使用 throws ,跟在方法的后面,可以接多个异常类
自定义异常
- 创建类
- 继承Exception类或者Exception的子类
- 重写构造方法
public class MyServiceException extends RuntimeException {


	private static final long serialVersionUID = 1L;

	private String code;

    private String msg;

    public  MyServiceException(ResponseEnum e){


        super(e.getMsg());
        this.code = e.getCode();
        this.msg = e.getMsg();
    }

    public MyServiceException(String code, String msg) {


        super(msg);
        this.code = code;
        this.msg = msg;
    }
}
手动抛出异常
- 找到一个合适的在这里插入代码片异常类
- 创建这个异常类的对象
- 抛出这个对象
 public void orderTask(){


    	//使用throw手动抛出异常 (MySericeExcption是自定义异常)
    	throw new MyServiceException("11","fff");
    }
参考视频https://www.bilibili.com/video/BV1nC4y1s7EY?from=search&seid=4430483164806649866
3.反射
1、什么是反射
反射:是Java被视为动态语言的关键;反射机制允许程序在运行期间,借助反射API获取任何类的全部信息,并且能够直接操作这些类的属性和方法。
Java的反射(reflection)机制是指在程序的运行状态中,可以构造任意一个类的对象,可以了解任意一个对象所属的类,可以了解任意一个类的成员变量和方法,可以调用任意一个对象的属性和方法。这种动态获取程序信息以及动态调用对象的功能称为Java语言的反射机制。反射被视为动态语言的关键。
2、获取Class类的实例(三种方式)
- 通过类直接获取
Class c3 = Student.class;
- 通过类的一个实例,调用getClass()方法获取
People people = new Student();
Class c1 = people.getClass();
- 通过类的全路径获取(包名+类名)
Class c2 = Class.forName("ThreeClass.Student");
3、Class类的常用方法
| 方法名 | 说明 |
|---|---|
| Objecet newInstance() | 创建Class类型的一个实例 |
| getName() | 获取Class对象所表示的实例名称 |
| Class getSuperClass() | 返回当前Class对象的父类的Class对象 |
| Class[] getinterfaces() | 获取当前Class对象的接口 |
| ClassLoader getClassLoader() | 获取该类的类加载器 |
4、反射获取类的属性、方法和构造器
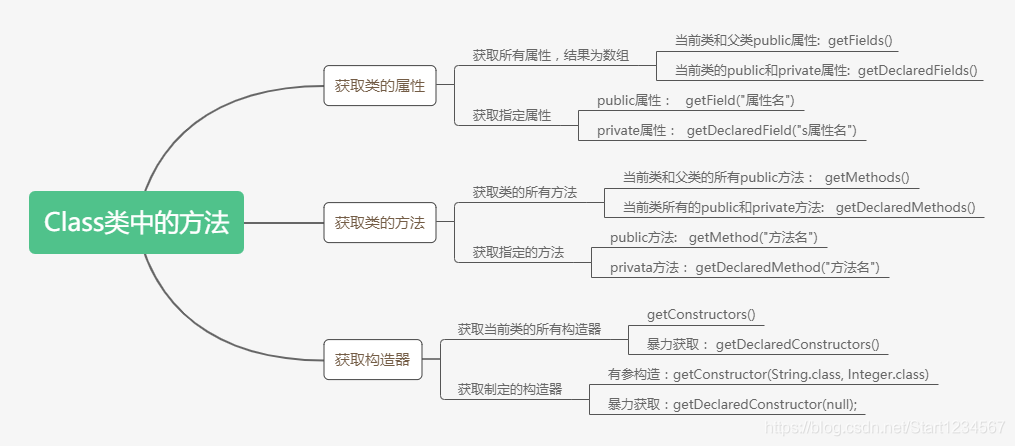
1. 获取类的属性
        Class people = Class.forName("People");
        Class user = Class.forName("user");

        /*
         * 1、获取类的属性
         */
        //获取当前类和父类的所有public属性
        Field[] fields = people.getFields();
        for (Field field : fields) {


            System.out.println(field);
        }
        //获取当前类的所以public和private属性
        Field[] f2 = user.getDeclaredFields();
        for (Field field : f2) {


            System.out.println("Field暴力获取"+field);
        }
        //获取指定属性
        Field name = user.getField("name"); //获取public属性
        System.out.println(name);
        Field age = user.getDeclaredField("age");  //获取私有的属性
        System.out.println(age);
2. 获取类的方法
        /*
         *  2、获取类的方法
         */
        //获取当前类和父类的所有public方法
        Method[] m1 = user.getMethods();
        for (Method method : m1) {


            System.out.println(method);
        }
        //获取当前类所有的public和private方法
        Method[] m2 = user.getDeclaredMethods();
        for (Method method : m2) {


            System.out.println("暴力获取"+method);
        }
        //获取指定的方法
        Method test = user.getMethod("test"); //获取public方法
        System.out.println("获取public方法"+test);
        Method ptest = user.getDeclaredMethod("ptest"); //获取privata方法
        System.out.println("获取private方法"+ptest);
3. 获取类构造器
        /*
         * 3、获取构造器
         */
        //获取当前类public构造器
        Constructor[] c1 = people.getConstructors();
        for (Constructor constructor : c1) {


            System.out.println(constructor);
        }
        //获取当前类public和private构造器
        Constructor<?>[] c2 = people.getDeclaredConstructors();
        for (Constructor<?> constructor : c2) {


            System.out.println("暴力获取"+constructor);
        }
        //获取指定的构造器
        Constructor c3 = user.getConstructor(String.class, Integer.class);
        System.out.println("指定public构造器"+c3);
        Constructor c4 = user.getDeclaredConstructor(null);
        System.out.println("获取指定的private"+c4);
5、反射操作类的属性、方法
1. 反射创建对象
        Class user = Class.forName("user");
        Class people = Class.forName("People");
        /*
         * 1、通过反射创建对象
         */
        //默认调用的无参构造
        user u1 = (user) user.newInstance();
        System.out.println(u1);
        //使用有参构造
        Constructor<?> constructor = user.getDeclaredConstructor(String.class, Integer.class);
        user ul2 = (user) constructor.newInstance("小婉", 17);
        System.out.println(ul2);
2. 反射执行方法
        /*
         *2、通过反射执行方法
         * invoke(实例化的对象,方法中的参数)
         */
        Method m1 = user.getDeclaredMethod("test");
        m1.invoke(u1);
        Method m2 = user.getDeclaredMethod("ptest");
        m2.setAccessible(true); //ptest()方法为private的 ,要关闭安全检查才能执行
        m2.invoke(u1);
3. 反射操作属性
        /*
         * 3、通过放射操作属性
         * set(实例化的对象,属性值)
         */
        Field f1 = people.getDeclaredField("pname");
        People peo = (People) people.newInstance();

        f1.setAccessible(true); //pname方法为private的 ,要关闭安全检查设置值
        f1.set(peo,"小红");
        System.out.println(peo.getPname());
注意点:
操作私有属性和方法时,要关闭安全权限检查,设置setAccessible(true),否则执行不了。
4.io流
1、File类
1.1、file类的三种构造方法
- File(String pathname) 通过将给定的路径名字符串转换为抽象路径名来创建新的 File实例。
File f1 = new File("D:/下载/JavaSE.png");
- File(String parent, String child) 从父路径名字符串和子路径名字符串创建新的 File实例。
File f2 = new File("D:/","下载/JavaSE.png");
- File(File parent, String child) 从父抽象路径名和子路径名字符串创建新的 File实例
 File file = new File("D:/");
 File f3 = new File(file,"下载/JavaSE.png");
1.2、file类的常用方法
获取功能的方法
- public String getAbsolutepath(); 获取绝对路径名字符串
- public String getpath(); 获取相对路径字符串
- public String getName(); 获取文件名或文件夹名
- public long length(); 文件大小的字节长度 ( 文件夹没有大小为 0 )
- public long lastModified(); 获取最后一次的修改时间
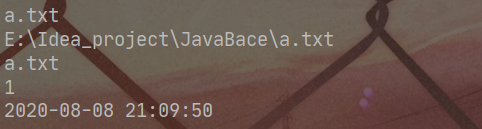
File file = new File("a.txt");
System.out.println(file.getPath());   //获取相对路径
System.out.println(file.getAbsolutePath());   //获取绝对路径
System.out.println(file.getName());  //获取文件名或文件夹名
System.out.println(file.length());  //获取文件大小的字节长度(文件夹没有大小默认是0)
long l1 = file.lastModified();  //获取最后修改的时间
Date date = new Date(l1);
String format1 = new SimpleDateFormat("yyyy-MM-dd HH:mm:ss").format(date);
System.out.println(format1);
运行结果:
判断功能的方法
- public boolean isDirectory(); 判断是否是目录
- public boolean isFile(); 判断是否是文件
- public boolean exists(); 判断是否存在
- public boolean canRead(); 判断是否可读
- public boolean canwrite(); 判断是否可写
- public boolean isHidden(); 判断是否隐藏
创建删除功能的方法
- public boolean createNewFile(); 当且仅当具有该名称的文件尚不存在时,原子地创建一个由该抽象路径名命名的新的空文件。
- public boolean mkdir(); 创建由此抽象路径名命名的目录。
- public boolean mkdirs(); 创建由此抽象路径名命名的目录,包括任何必需但不存在的父目录
- public boolean delete(); 删除由此抽象路径名表示的文件或目录。
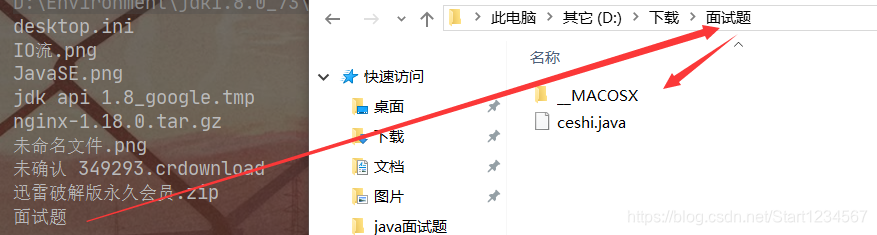
遍历文件夹目录
- String[] list() 返回一个字符串数组,命名由此抽象路径名表示的目录中的文件和目录。
- File[] listFiles() 返回一个抽象路径名数组,表示由该抽象路径名表示的目录中的文件。
//list遍历返回的是字符数组
 File file = new File("D:/下载");
 String[] list = file.list();
 for (String s : list) {


 System.out.println(s);
没有遍历文件夹的文件,遍历不完全
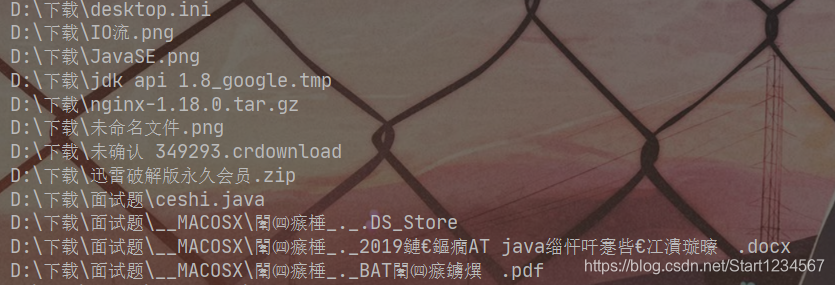
//listfiles遍历返回的是字符数组
public static void getAllfile(String string){


    File file = new File(string);
    File[] files = file.listFiles();
    for (File file1 : files) {


        if (file1.isDirectory()){


            getAllfile(file1.getPath());
        }else {


           System.out.println(file1); //默认调用的是getputh
        }
    }
}
遍历结果:全部遍历了
例题:遍历D:/下载 下的所有.java文件
- 第一种
       File file = new File(string);
        File[] files = file.listFiles();
        for (File file1 : files) {


            if (file1.isDirectory()){


                getAllfile(file1.getPath());
            }else {


                if (file1.getPath().endsWith(".java")){


                    System.out.println(file1);
                }
            }
        }
遍历结果:

- 第二种:实现过滤器
 public static void getAlltofilter(String string){


        File file = new File(string);
        File[] files = file.listFiles(new FileFilter() {


            @Override
            public boolean accept(File pathname) {


                if (pathname.isDirectory()){


                    return true;
                }else if(pathname.getPath().endsWith(".java")){


                    return true;
                }else {


                    return false;
                }
            }
        });
        for (File file1 : files) {


            if (file1.isDirectory()){


                getAlltofilter(file1.getPath());
            }else {


                System.out.println(file1);
            }
        }
    }
遍历结果:

2、IO流
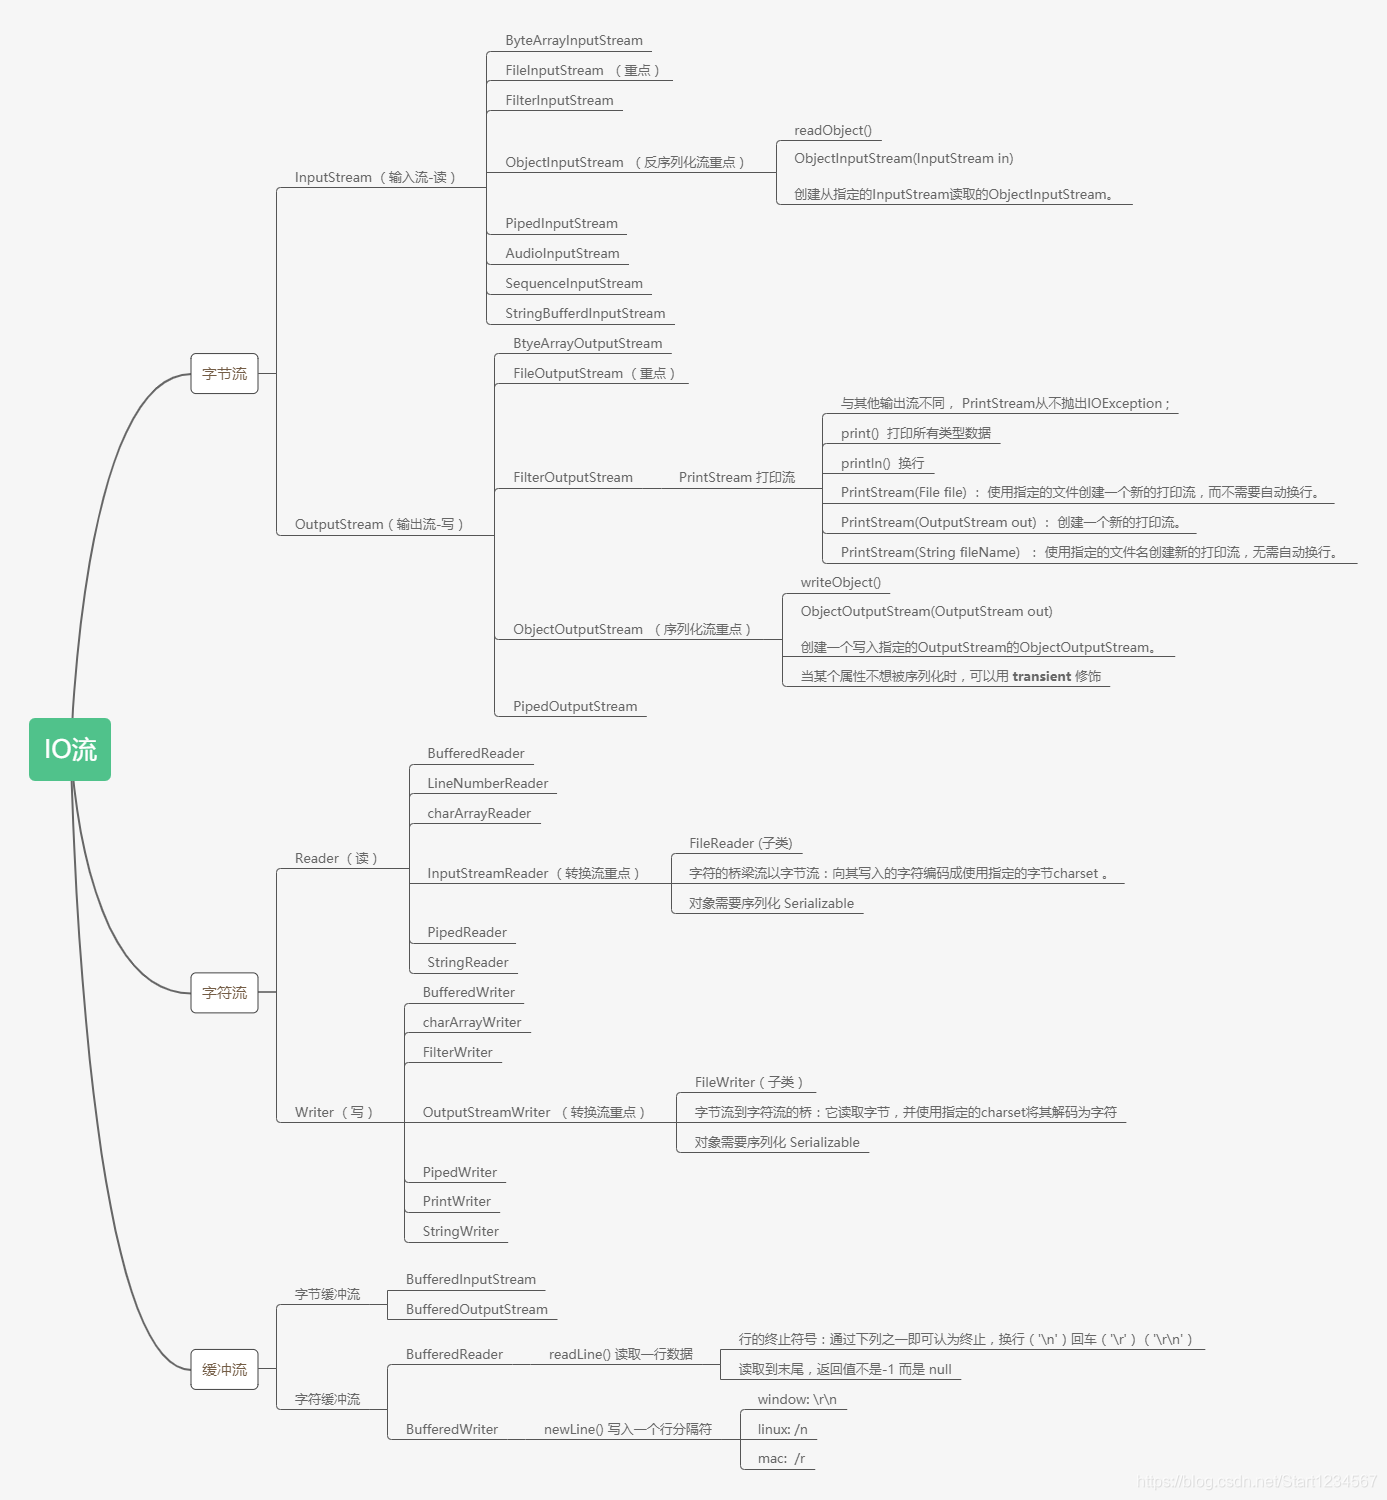
2.1、字节流
一切文件数据(文本、图片、视频等)都是以二进制的形式保存
字节输入流和输出流
OutputStream和InputStream是抽象类,其具体实现要看其子类
InputStream常用方法:
- abstract int read() 从输入流读取数据的下一个字节。
- void close() 关闭此输入流并释放与流相关联的任何系统资源。
- int read(byte[] b) 从输入流读取一些字节数,并将它们存储到缓冲区 b 。
- int read(byte[] b, int off, int len) 从输入流读取最多 len字节的数据到一个字节数组。
OutputStream常用方法:
- void close() 关闭此输出流并释放与此流相关联的任何系统资源。
- void flush() 刷新此输出流并强制任何缓冲的输出字节被写出。
- void write(byte[] b) 将 b.length字节从指定的字节数组写入此输出流。
- void write(byte[] b, int off, int len) 从指定的字节数组写入 len个字节,从偏移 off开始输出到此输出流。
- abstract void write(int b) 将指定的字节写入此输出流。
1、FileInputStream和FileOutputStream 文件操作流
FileInputStream
构造方法:
- FileInputStream(File file) ; 通过打开与实际文件的连接创建一个 FileInputStream ,该文件由文件系统中的 File对象 file命名。
- FileInputStream(String name) ; 通过打开与实际文件的连接来创建一个 FileInputStream ,该文件由文件系统中的路径名 name命名。
FileOutputStream
构造方法:
- FileOutputStream(File file) ; 创建文件输出流以写入由指定的 File对象表示的文件。
- FileOutputStream(String name) ;创建文件输出流以指定的名称写入文件。
- FileOutputStream(File file, boolean append) ;创建文件输出流以写入由指定的 File对象表示的文件,append设置为true 可追加写。
- FileOutputStream(String name, boolean append) ;创建文件输出流以指定的名称写入文件,append设置为true 可追加写。
测试代码:
//1.FileInputStream 读取 a.txt 文件
        FileInputStream f1 = new FileInputStream("a.txt");
        FileOutputStream f2 = new FileOutputStream("b.txt", true);
        byte[] bytes= new byte[1024];
        int len;
        while ((len =(f1.read(bytes)))!= -1){


            System.out.println(new String(bytes,0,len));
            //2.FileOutputStream 向b.txt 中写入数据
            //append :true  表示不会覆盖文件数据,可以继续向文件中写入数据
            f2.write(bytes,0,len);
        }
        //3.关闭流资源
        f1.close();
        f2.close();
2、ObjectInputStream和ObjectOutputStream 序列化流
ObjectOutputStream 序列化
构造方法:
- ObjectOutputStream(OutputStream out)
创建一个写入指定的OutputStream的ObjectOutputStream。
特有方法:
- void writeObject(Object obj) 将指定的对象写入ObjectOutputStream。
ObjectInputStream 反序列化
构造方法:
- ObjecInputStream(InputStream in)
创建一个写入指定的InputStream的ObjectInputStream。
特有方法:
- void readObject(Object obj) 将指定的对象写入ObjectInputStream。
实例代码:
       User user = new User("小王",12);
        //1、将对象序列化储存到 c.txt 文件中
        ObjectOutputStream o1 = new ObjectOutputStream(new FileOutputStream("c.txt"));
        o1.writeObject(user);
        o1.close();

        //2、将 c.txt 文件中存储的对象反序列化,得到对象
        ObjectInputStream o2 = new ObjectInputStream(new FileInputStream("c.txt"));
        User o = (User)o2.readObject();
        System.out.println(o);

注意点:
1、序列化的对象,其实体类要实现 Serializable 接口
2、当某个属性不想被序列化时,可以用 transient 修饰
2.2、字符流
字符输入流和输出流
Reader 和 Writer 是抽象类,其具体实现要看其子类
Reader常用方法:
- abstract void close() 关闭流并释放与之相关联的任何系统资源。
- int read() 读一个字符
- int read(char[] cbuf) ; 将字符读入数组
- read(char[] cbuf, int off, int len) ; 将字符读入数组的一部分。
- read(CharBuffer target) ; 尝试将字符读入指定的字符缓冲区。
Writer常用方法:
- abstract void close() ; 关闭流,先刷新。
- abstract void flush() ; 刷新流。
- void write(char[] cbuf) ; 写入一个字符数组。
- abstract void write(char[] cbuf, int off, int len) ; 写入字符数组的一部分。
- void write(String str) ; 写一个字符串
- void write(String str, int off, int len) ; 写一个字符串的一部分。
1、InputStreamReader和OutputStreamWriter 转换流
InputStreamReader
构造方法:
- InputStreamReader(InputStream in) ;创建一个使用默认字符集的InputStreamReader。
- InputStreamReader(InputStream in, String charsetName) ; 创建一个使用命名字符集的InputStreamReader。
OutputStreamWriter
构造方法:
- OutputStreamWriter(OutputStream out) ; 创建一个使用默认字符编码的OutputStreamWriter。
- OutputStreamWriter(OutputStream out, Charset cs) ; 创建一个使用给定字符集的OutputStreamWriter。
public static void main(String[] args) throws Exception {


        InputStreamReader ir1 = new InputStreamReader(new FileInputStream("b.txt"),"UTF-8");
        //charsetName 设置文件编码格式 append:true 设置可追加写入
        OutputStreamWriter or1 = new OutputStreamWriter(new FileOutputStream("d.txt",true),"GBK");
        //1、InputStreamReader读取b.txt 文件
        int len = 0;
        char[] chars = new char[1024];
        while ((len = (ir1.read(chars))) != -1){


            String s = new String(chars, 0, len);
            System.out.println(s);
            //2、OutputStreamWriter 将读取到的b.txt 文件的内容,写入到d.txt
            or1.write(s);
        }
        //3、关闭资源
        or1.close();
        ir1.close();
    }
控制台输出:

b.txt 文件

d.txt 文件

2.3、缓冲流
1、BufferedInputStream和 BufferedOutputStream 字节缓冲流
BufferedInputStream构造方法:
- BufferedInputStream(InputStream in) ; 创建一个 BufferedInputStream并保存其参数,输入流 in ,供以后使用。
- BufferedInputStream(InputStream in, int size) ; 创建 BufferedInputStream具有指定缓冲区大小,并保存其参数,输入流 in ,供以后使用。
测试代码:
BufferedInputStream b1 = new BufferedInputStream(new FileInputStream("a.txt"));
        int len = 0;
        byte[] bytes = new byte[1024];
        while ((len=(b1.read(bytes))) != -1){


            String s = new String(bytes, 0, len);
            System.out.println(s);
        }
        b1.close();

BufferedOutputStream构造方法:
- BufferedOutputStream(OutputStream out) ; 创建一个新的缓冲输出流,以将数据写入指定的底层输出流。
- BufferedOutputStream(OutputStream out, int size) ; 创建一个新的缓冲输出流,以便以指定的缓冲区大小将数据写入指定的底层输出流。
测试代码:
public static void main(String[] args) throws Exception {


        BufferedOutputStream b1 = new BufferedOutputStream(new FileOutputStream("a.txt", true));
        b1.write("妖精的尾巴".getBytes());
        b1.flush();
        b1.close();
    }

2、BufferedReader和BufferedWriter 字符缓冲流
BufferReader构造方法:
- BufferedReader(Reader in) ;创建使用默认大小的输入缓冲区的缓冲字符输入流。
- BufferedReader(Reader in, int sz) ;创建使用指定大小的输入缓冲区的缓冲字符输入流。
特有方法:
- String readLine() 读一行文字, 读取到末尾,返回值不是-1 而是 null。
测试代码:
        BufferedReader b1 = new BufferedReader(new FileReader("a.txt"));
        String len;
        while ((len = b1.readLine()) != null){


            System.out.println(len);
        }
        b1.close();
结果:

BufferedWriter构造方法:
- BufferedWriter(Writer out) ; 创建使用默认大小的输出缓冲区的缓冲字符输出流。
- BufferedWriter(Writer out, int sz) ; 创建一个新的缓冲字符输出流,使用给定大小的输出缓冲区。
特有方法:
- newLine() 写入一个行分隔符
测试代码:
 BufferedWriter b1 = new BufferedWriter(new FileWriter("a.txt", true));
        b1.newLine(); //换行
        b1.write("风吹云雾见真容");

        b1.flush();
        b1.close();
结果:

学习视频:https://www.bilibili.com/video/BV1Y4411P7Ey
参考视频:https://www.bilibili.com/video/BV1v5411W7ZE
5.多线程
1、创建线程的三种方式
- 继承Thread类
//线程实现方式一
public class ThreadDome01 extends Thread{


    @Override
    public void run() {


        for (int i=0;i<20;i++){


            System.out.println("看小说"+i);
        }
    }
    public static void main(String[] args) {


        //开启ThreadDome01线程
        new ThreadDome01().start();
        for (int i=0;i<2000;i++){


            System.out.println("主线程执行"+i);
        }
    }
}
- 实现Runnable接口
public class RunnableDome01 implements Runnable{


    @Override
    public void run() {


        for(int i = 0;i<20;i++){


            System.out.println("runnable实现线程"+i);
        }
    }

    public static void main(String[] args) {


        //开启实现Runnable接口的线程
        RunnableDome01 dome01 = new RunnableDome01();
        new Thread(dome01).start();
        for (int i = 0;i<200;i++){


            System.out.println("main线程"+i);
        }
    }
}
- 实现Callable接口
例1:
public class CallableDome01 implements Callable<Boolean> {


    @Override
    public Boolean call(){


       for(int i = 0;i<20;i++){


            System.out.println("runnable实现线程"+i);
        }
    }

    public static void main(String[] args) throws ExecutionException, InterruptedException {


        CallableDome01 t1 = new CallableDome01();

        //1、开启服务
        ExecutorService executor = Executors.newFixedThreadPool(3); //3为开启线程个数

        //2、开启线程
        Future<Boolean> f1 = executor.submit(t1);

        //3、获取返回值
        Boolean aBo1 = f1.get();

        //4、关闭服务
        executor.shutdown();
    }
}
例2:
public class CallableDome02 {


    public static void main(String[] args) {


        FutureTask futureTask = new FutureTask(new MyThread());
        new Thread(futureTask).start();
        try {


            Integer integer = (Integer) futureTask.get();
            System.out.println(integer);
        } catch (Exception e) {


            e.printStackTrace();
        }
    }
}
class MyThread implements Callable{


    @Override
    public Integer call() throws Exception {


        return 100;
    }
}
2、线程方法和状态
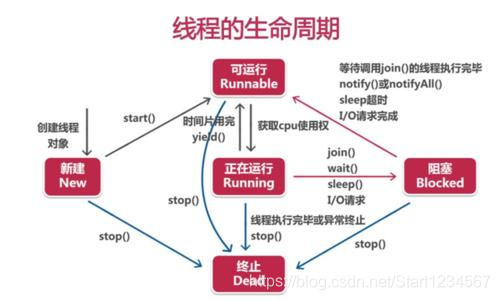
-
sleep() 线程休眠
线程休眠,不会释放锁,会阻塞 -
yield() 礼让方法
对于同一个对象,开启的两个线程,进入cup中的线程调用yield()方法,会改变线程为就绪状态, 下一次两个线程谁先执行看cup心情 -
setpriority() 设置线程的优先级
优先级默认是5,权重大的优先执行 -
join() 线程插队
可以使插队的线程优先主线程执行 -
setDaemon(true) 设置线程为守护线程
Thread thread = new Thread(dome02);
thread.setDaemon(true);
3、线程同步
3.1、线程同步中死锁问题
- 什么是死锁:多个线程持有对方的资源,形成僵持
- 产生死锁的四个条件:
1、互斥条件:一个资源每次只能被一个线程访问
2、请求与保持条件:一个进程因请求资源而阻塞式,对以获得的资源保持不放
3、不剥夺条件:进程获得的资源,在未使用完成之前,不能被强行剥夺
4、循环等待条件 :若干个进程之间形成一种头尾相接的循环等待资源关系
线程死锁代码:
public class DeadLock {


    public static void main(String[] args) {


        new Thread(new TestThread(1)).start();
        new Thread(new TestThread(0)).start();
    }

}
class A{

    }
class B{

    }

class TestThread implements Runnable{


    static A a = new A();
    static B b = new B();
    private int flag;
    public TestThread(int flag){


        this.flag = flag;
    }
    @Override
    public void run() {


        if (flag == 1){


            synchronized (a){

                  System.out.println(Thread.currentThread().getName()+"获取的 a 对象的锁");
                try {


                    Thread.sleep(1000); //模拟延迟,不让1一下拿到两个对象的锁
                } catch (InterruptedException e) {


                    e.printStackTrace();
                }
                //1、死锁
                /*synchronized (b){
                    System.out.println(Thread.currentThread().getName()+"获取的 b 对象的锁");
                }*/
            }
            //2、解决死锁的方法
            synchronized (b){


                System.out.println(Thread.currentThread().getName()+"获取的 b 对象的锁");
            }
        }else if (flag == 0){


            synchronized (b){


                System.out.println(Thread.currentThread().getName()+"获取的 b 对象的锁");
                try {


                    Thread.sleep(1000);
                } catch (InterruptedException e) {


                    e.printStackTrace();
                }
                //1、死锁
                /*synchronized (a){
                    System.out.println(Thread.currentThread().getName()+"获取的 a 对象的锁");
                }*/
            }
            //2、解决死锁
            synchronized (a){


                System.out.println(Thread.currentThread().getName()+"获取的 a 对象的锁");
            }
        }
    }
}
3.2、实现线程同步
- synchronized 同步代码块
synchronized 锁的是对象,一般是公共资源,可用于方法。
//使用同步代码块来解决Arraylist线程不安全问题
public class ListTest {


    public static void main(String[] args) {


        //arraylist是线程不安全的
        List<String> list = new ArrayList<>();

        synchronized (list){


            for (int i = 0; i < 1000; i++) {


                new Thread(()->{


                    list.add(Thread.currentThread().getName());
                }).start();
            }
        }
        try {


            Thread.sleep(8000);
            System.out.println(Thread.currentThread().getName());
        }catch (Exception e){


            e.printStackTrace();
        }
        System.out.println(list.size());
    }
}
- lock锁
Reentrantlock 可重入所
public class LockDome {


    public static void main(String[] args) {


        Test01 test01 = new Test01();
        new Thread(test01).start();
        new Thread(test01).start();
        new Thread(test01).start();
    }
}

class Test01 implements Runnable{


    private int i = 10;
    private final ReentrantLock lock = new ReentrantLock();

    @Override
    public void run() {


        while (true){


            try {


                lock.lock();
                if (i>0){


                    try {


                        Thread.sleep(1000);
                    } catch (InterruptedException e) {


                        e.printStackTrace();
                    }                 System.out.println(Thread.currentThread().getName()+"拿到了第"+i--+"票");
                }else {


                    break;
                }
            }finally {


                lock.unlock();
            }
        }
    }
}
4、线程通信
- 通过缓冲区(管程法)
/**
 * 测试生产者和消费者模型—> 利用缓冲区解决:管程法
 * 生产者、消费者、产品、缓存区
 */
public class TestPC {


    public static void main(String[] args) {


        SynContainer container = new SynContainer();
        new Thread(new Productor(container)).start();
        new Thread(new Consumer(container)).start();
    }
}

//生产者
class Productor implements Runnable{


    SynContainer container;
    Productor(SynContainer container){


        this.container = container;
    }
    @Override
    public void run() {


        for (int i = 0; i < 100; i++) {


            container.push(new Chicken(i));
            System.out.println("生产了第"+i+"只鸡");
        }
    }
}

//消费者
class Consumer implements Runnable{


    SynContainer container;
    Consumer(SynContainer container){


        this.container = container;
    }
    @Override
    public void run() {


        for (int i = 0; i < 100; i++) {


            container.pop(new Chicken(i));
            System.out.println("消费了第"+i+"只鸡");
        }
    }
}

//产品
class Chicken{


    private int id; //编号
    Chicken(int id){


        this.id = id;
    }
}

//缓存区
class SynContainer{


    //设置容器大小
    Chicken[] chickens = new Chicken[10];
    //容器计数器
    int conut = 0;

    //生产者生产放入产品
    public synchronized void push(Chicken chicken){


        if (conut == chickens.length){


            //通知消费者消费
            try {


                this.wait();
            } catch (InterruptedException e) {


                e.printStackTrace();
            }
        }
        chickens[conut] = chicken;
        conut++;
        //通知消费者消费
        this.notifyAll();
    }

    //消费者消费取出产品
    public synchronized Chicken pop(Chicken chicken){


        if (conut == 0){


            //通知生产者生产
            try {


                this.wait();
            } catch (InterruptedException e) {


                e.printStackTrace();
            }
        }
        conut--;
        Chicken chicken1= chickens[conut];

        //吃完通知生产者生产
        this.notifyAll();
        return chicken1;
    }
}
5、线程池
public class ThreadPool {


    public static void main(String[] args) throws ExecutionException, InterruptedException {


        //1、创建线程池  newFixedThreadPool 参数为池子大小
        ExecutorService service = Executors.newFixedThreadPool(5);

        //2、执行线程
        service.submit(new MyThread01());
        service.submit(new MyThread01());
        service.execute(new MyThread01());
        Future submit = service.submit(new MyThread02());
        Integer number = (Integer) submit.get();
        System.out.println(number);

        //3、关闭线程池
        service.shutdown();

    }
}

class MyThread01 implements Runnable{


    @Override
    public void run() {


        System.out.println(Thread.currentThread().getName()+"MyThread01");
    }
}

class MyThread02 implements Callable {


    @Override
    public Integer call() throws Exception {


        System.out.println(Thread.currentThread().getName()+"MyThread02");
        return 11;
    }
}
注意点:
- 线程池submit()方法 既可以执行Runnable接口 线程,也可执行 Callable 接口线程;
- 线程池execute()方法只能执行 Runnable接口 线程