介绍
ElasticSearch 是一个基于 Lucene 的搜索服务器。它提供了一个分布式多用户能力的全文搜索引擎,基于 RESTful web 接口。Elasticsearch 是用 Java 开发的,并作为 Apache 许可条款下的开放源码发布,是当前流行的企业级搜索引擎。设计用于云计算中,能够达到实时搜索,稳定,可靠,快速,安装使用方便。基百科、Stack Overflow、Github 都采用它。
本文从零开始,讲解如何使用 Elasticsearch 搭建自己的全文搜索引擎。每一步都有详细的说明,大家跟着做就能学会。
安装 ElasticSearch
下载地址: https://www.elastic.co/downloads/elasticsearch
wget https://artifacts.elastic.co/downloads/elasticsearch/elasticsearch-5.5.2.tar.gz
cd /usr/local
tar -zxvf   elasticsearch-5.5.2.tar.gz
su tzs 切换到 tzs 用户下 ( 默认不支持 root 用户)
sh /usr/local/elasticsearch/bin/elasticsearch -d 其中 -d 表示后台启动
在 vmware 上测试是否成功:curl http://localhost:9200/
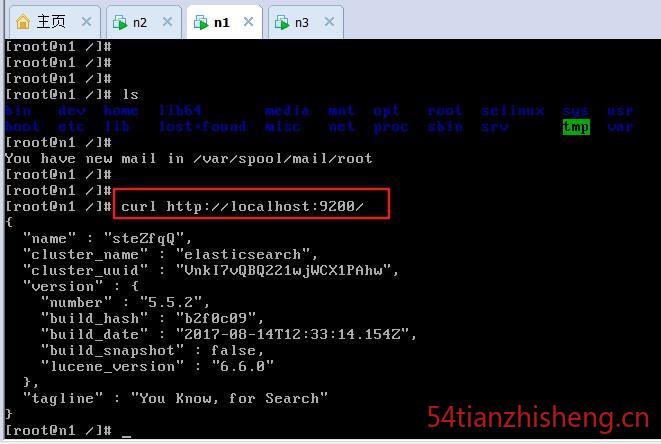
出现如上图这样的效果,就代表已经装好了。
elasticsearch 默认 restful-api 的端口是 9200 不支持 IP 地址,也就是说无法从主机访问虚拟机中的服务,只能在本机用 http://localhost:9200 来访问。如果需要改变,需要修改配置文件 /usr/local/elasticsearch/config/elasticsearch.yml 文件,加入以下两行:
network.bind_host: 0.0.0.0
network.publish_host: _nonloopback:ipv4
或去除 network.host 和 http.port 之前的注释,并将 network.host 的 IP 地址修改为本机外网 IP。然后重启,Elasticsearch
关闭方法(输入命令:ps -ef | grep elasticsearch ,找到进程,然后 kill 掉就行了。
如果外网还是不能访问,则有可能是防火墙设置导致的 ( 关闭防火墙:service iptables stop )
修改配置文件:vim config/elasticsearch.yml
cluster.name : my-app (集群的名字,名字相同的就是一个集群)
node.name : es1 (节点的名字, 和前面配置的 hosts 中的 name 要一致)
path.data: /data/elasticsearch/data (数据的路径。没有要创建(mkdir -p /data/elasticsearch/{data,logs}),并且给执行用户权限 chown tzs /data/elasticsearch/{data,logs} -R )
path.logs: /data/elasticsearch/logs (数据 log 信息的路径,同上)
network.host: 0.0.0.0 //允许外网访问,也可以是自己的ip地址
http.port: 9200 //访问的端口
discovery.zen.ping.unicast.hosts: [“192.168.153.133”, “192.168.153.134”, “192.168.153.132”] //各个节点的ip地址
记得需要添加上:(这个是安装 head 插件要用的, 目前不需要)
http.cors.enabled: true
http.cors.allow-origin: “*”
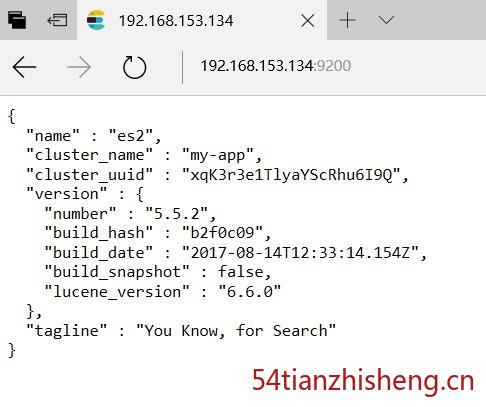
最后在外部浏览器的效果如下图:
安装 IK 中文分词
可以自己下载源码使用 maven 编译,当然如果怕麻烦可以直接下载编译好的
https://github.com/medcl/elasticsearch-analysis-ik/releases/tag/v5.5.2
注意下载对应的版本放在 plugins 目录下
解压
unzip elasticsearch-analysis-ik-5.5.2.zip
在 es 的 plugins 下新建 ik 目录
mkdir ik
将刚才解压的复制到ik目录下
cp -r elasticsearch/* ik
删除刚才解压后的
rm -rf elasticsearch
rm -rf elasticsearch-analysis-ik-5.5.2.zip
IK 带有两个分词器
ik_max_word :会将文本做最细粒度的拆分;尽可能多的拆分出词语
ik_smart:会做最粗粒度的拆分;已被分出的词语将不会再次被其它词语占有
安装完 IK 中文分词器后(当然不止这种中文分词器,还有其他的,可以参考我的文章 Elasticsearch 默认分词器和中分分词器之间的比较及使用方法),测试区别如下:
ik_max_word
curl -XGET ‘http://192.168.153.134:9200/_analyze?pretty&analyzer=ik_max_word‘ -d ‘联想是全球最大的笔记本厂商’
{
  "tokens" : [
    {
      "token" : "联想",
      "start_offset" : 0,
      "end_offset" : 2,
      "type" : "CN_WORD",
      "position" : 0
    },
    {
      "token" : "是",
      "start_offset" : 2,
      "end_offset" : 3,
      "type" : "CN_CHAR",
      "position" : 1
    },
    {
      "token" : "全球",
      "start_offset" : 3,
      "end_offset" : 5,
      "type" : "CN_WORD",
      "position" : 2
    },
    {
      "token" : "最大",
      "start_offset" : 5,
      "end_offset" : 7,
      "type" : "CN_WORD",
      "position" : 3
    },
    {
      "token" : "的",
      "start_offset" : 7,
      "end_offset" : 8,
      "type" : "CN_CHAR",
      "position" : 4
    },
    {
      "token" : "笔记本",
      "start_offset" : 8,
      "end_offset" : 11,
      "type" : "CN_WORD",
      "position" : 5
    },
    {
      "token" : "笔记",
      "start_offset" : 8,
      "end_offset" : 10,
      "type" : "CN_WORD",
      "position" : 6
    },
    {
      "token" : "本厂",
      "start_offset" : 10,
      "end_offset" : 12,
      "type" : "CN_WORD",
      "position" : 7
    },
    {
      "token" : "厂商",
      "start_offset" : 11,
      "end_offset" : 13,
      "type" : "CN_WORD",
      "position" : 8
    }
  ]
}
ik_smart
curl -XGET ‘http://localhost:9200/_analyze?pretty&analyzer=ik_smart‘ -d ‘联想是全球最大的笔记本厂商’
{
  "tokens" : [
    {
      "token" : "联想",
      "start_offset" : 0,
      "end_offset" : 2,
      "type" : "CN_WORD",
      "position" : 0
    },
    {
      "token" : "是",
      "start_offset" : 2,
      "end_offset" : 3,
      "type" : "CN_CHAR",
      "position" : 1
    },
    {
      "token" : "全球",
      "start_offset" : 3,
      "end_offset" : 5,
      "type" : "CN_WORD",
      "position" : 2
    },
    {
      "token" : "最大",
      "start_offset" : 5,
      "end_offset" : 7,
      "type" : "CN_WORD",
      "position" : 3
    },
    {
      "token" : "的",
      "start_offset" : 7,
      "end_offset" : 8,
      "type" : "CN_CHAR",
      "position" : 4
    },
    {
      "token" : "笔记本",
      "start_offset" : 8,
      "end_offset" : 11,
      "type" : "CN_WORD",
      "position" : 5
    },
    {
      "token" : "厂商",
      "start_offset" : 11,
      "end_offset" : 13,
      "type" : "CN_WORD",
      "position" : 6
    }
  ]
}
安装 head 插件
elasticsearch-head 是一个 elasticsearch 的集群管理工具,它是完全由 html5 编写的独立网页程序,你可以通过插件把它集成到 es。
安装 git
yum remove git
yum install git
git clone git://github.com/mobz/elasticsearch-head.git   拉取 head 插件到本地,或者直接在 GitHub 下载 压缩包下来
安装nodejs
先去官网下载 node-v8.4.0-linux-x64.tar.xz
tar -Jxv -f  node-v8.4.0-linux-x64.tar.xz
mv node-v8.4.0-linux-x64  node
环境变量设置:
vim /etc/profile
新增:
export NODE_HOME=/opt/node
export PATH=$PATH:$NODE_HOME/bin
export NODE_PATH=$NODE_HOME/lib/node_modules
使配置文件生效(这步很重要,自己要多注意这步)
source /etc/profile
测试是否全局可用了:
node -v
然后
mv elasticsearch-head head
cd head/
npm install -g grunt-cli
npm install
grunt server
再 es 的配置文件中加:
http.cors.enabled: true
http.cors.allow-origin: "*"
在浏览器打开 http://192.168.153.133:9100/ 就可以看到效果了,
遇到问题
把坑都走了一遍,防止以后再次入坑,特此记录下来
1、ERROR Could not register mbeans java.security.AccessControlException: access denied (“javax.management.MBeanTrustPermission” “register”)
改变 elasticsearch 文件夹所有者到当前用户
sudo chown -R noroot:noroot elasticsearch
这是因为 elasticsearch 需要读写配置文件,我们需要给予 config 文件夹权限,上面新建了 elsearch 用户,elsearch 用户不具备读写权限,因此还是会报错,解决方法是切换到管理员账户,赋予权限即可:
sudo -i
chmod -R 775 config
2、[WARN ][o.e.b.ElasticsearchUncaughtExceptionHandler] [] uncaught exception in thread [main]
org.elasticsearch.bootstrap.StartupException: java.lang.RuntimeException: can not run elasticsearch as root
原因是elasticsearch默认是不支持用root用户来启动的。
解决方案一:Des.insecure.allow.root=true
修改/usr/local/elasticsearch-2.4.0/bin/elasticsearch,
添加 ES_JAVA_OPTS=”-Des.insecure.allow.root=true”
或执行时添加: sh /usr/local/elasticsearch-2.4.0/bin/elasticsearch -d -Des.insecure.allow.root=true
注意:正式环境用root运行可能会有安全风险,不建议用root来跑。
解决方案二:添加专门的用户
useradd elastic
chown -R elastic:elastic  elasticsearch-2.4.0
su elastic
sh /usr/local/elasticsearch-2.4.0/bin/elasticsearch -d
3、UnsupportedOperationException: seccomp unavailable: requires kernel 3.5+ with CONFIG_SECCOMP and CONFIG_SECCOMP_FILTER compiled in
只是警告,使用新的linux版本,就不会出现此类问题了。
4、ERROR: [4] bootstrap checks failed
[1]: max file descriptors [4096] for elasticsearch process is too low, increase to at least [65536]
原因:无法创建本地文件问题,用户最大可创建文件数太小
解决方案:切换到 root 用户,编辑 limits.conf 配置文件, 添加类似如下内容:
vim /etc/security/limits.conf
添加如下内容:
*  soft nofile 65536
* hard nofile 131072
* soft nproc 2048
* hard nproc 4096
[2]: max number of threads [1024] for user [tzs] is too low, increase to at least [2048]
原因:无法创建本地线程问题,用户最大可创建线程数太小
解决方案:切换到root用户,进入limits.d目录下,修改90-nproc.conf 配置文件。
vim /etc/security/limits.d/90-nproc.conf
找到如下内容:
- soft nproc 1024
修改为
- soft nproc 2048
[3]: max virtual memory areas vm.max_map_count [65530] is too low, increase to at least [262144]
原因:最大虚拟内存太小
root用户执行命令:
sysctl -w vm.max_map_count=262144
或者修改 /etc/sysctl.conf 文件,添加 “vm.max_map_count”设置
设置后,可以使用
$ sysctl -p
[4]: system call filters failed to install; check the logs and fix your configuration or disable system call filters at your own risk
原因:Centos6不支持SecComp,而ES5.4.1默认bootstrap.system_call_filter为true进行检测,所以导致检测失败,失败后直接导致ES不能启动。
详见 :https://github.com/elastic/elasticsearch/issues/22899
解决方法:在elasticsearch.yml中新增配置bootstrap.system_call_filter,设为false,注意要在Memory下面:
bootstrap.memory_lock: false
bootstrap.system_call_filter: false
5、 java.lang.IllegalArgumentException: property [elasticsearch.version] is missing for plugin [head]
再 es 的配置文件中加:
http.cors.enabled: true
http.cors.allow-origin: "*"