https://www.it610.com/article/1304931662924124160.htm
Android Q 开机启动流程
- 开机启动概述:
- step 1: 上电开机
- 长按power键后引导芯片开始从固化在ROM的预设代码处执行,加载引导程序(BootLoader)到RAM.
- step 2: BootLoader启动
- 跳转到BootLoader的入口函数,开始执行BootLoader的代码.
- 硬件初始化工作(硬件时钟、手机的主板等)
- 完成初始化uart端口的操作
- arch_init
- target_init
- apps_init
- aboot_init
- 跳转到内核入口函数start_kernel,启动内核.
- step 3: kernel 启动
- 输出Linux版本信息(printk(linux_banner))
- 设置与体系结构相关的环境(setup_arch())
- 页表结构初始化(paging_init())
- 使用"arch/alpha/kernel/entry.S"中的入口点设置系统自陷入口(trap_init())
- 使用alpha_mv结构和entry.S入口初始化系统IRQ(init_IRQ())
- 核心进程调度器初始化(包括初始化几个缺省的Bottom-half,sched_init())
- 时间、定时器初始化(包括读取CMOS时钟、估测主频、初始化定时器中断等,time_init())
- 提取并分析核心启动参数(从环境变量中读取参数,设置相应标志位等待处理,(parse_options())
- 控制台初始化(为输出信息而先于PCI初始化,console_init())
- 剖析器数据结构初始化(prof_buffer和prof_len变量)
- 核心Cache初始化(描述Cache信息的Cache,kmem_cache_init())
- 延迟校准(获得时钟jiffies与CPU主频ticks的延迟,calibrate_delay())
- 内存初始化(设置内存上下界和页表项初始值,mem_init())
- 创建和设置内部及通用cache(“slab_cache”,kmem_cache_sizes_init())
- 创建uid taskcount SLAB cache(“uid_cache”,uidcache_init())
- 创建文件cache(“files_cache”,filescache_init())
- 创建目录cache(“dentry_cache”,dcache_init())
- 创建与虚存相关的cache(“vm_area_struct”,“mm_struct”,vma_init())
- 块设备读写缓冲区初始化(同时创建"buffer_head"cache用户加速访问,buffer_init())
- 创建页cache(内存页hash表初始化,page_cache_init())
- 创建信号队列cache(“signal_queue”,signals_init())
- 初始化内存inode表(inode_init())
- 创建内存文件描述符表(“filp_cache”,file_table_init())
- 检查体系结构漏洞(对于alpha,此函数为空,check_bugs())
- SMP机器其余CPU(除当前引导CPU)初始化(对于没有配置SMP的内核,此函数为空,smp_init())
- 启动init过程(创建第一个核心线程,调用init()函数,原执行序列调用cpu_idle() 等待调度,init())
- step4: init 启动
- 创建文件系统目录并挂载相关的文件系统
- 初始化log系统
- 初始化/设置/启动属性相关的资源
- 完成SELinux相关工作
- 装载子进程信号处理器
- 解析init.rc
- atcion/service管理
- 执行action和启动service,包括启动zygote
- step5: zygote进程启动
- app_process64 启动
- AndroidRuntime 启动
- art 启动和初始化
- zygote init 启动
- 启动system_server
- step 6: system_server启动
- 初始化和启动framework service
- 启动常驻进程
- 启动Home Activity
文章目录
- 1.bootloader 和kernel 启动概述
- 2.init 概述
-
- 2.1 init进程的创建
- 2.2 init main
-
- 2.2.1 FirstStageMain
- 2.2.2 SetupSelinux
- 2.2.3 SecondStageMain
- 2.4 文件系统挂载
-
- 2.4.1 FirstStageMount
- 2.4.2 do_mount_all
- 2.5 init log系统
-
- 2.5.1 Init log输出流程
- 2.5.2 Init log等级
- 2.6 Selinux Init
- 2.7 Start Property Service
-
- 2.7.1 Property初始化
- 2.7.2 启动property service
- 2.8 Rc文件语法与解析
-
- 2.8.1 Action
- 2.8.2 Sevice
- 2.8.3 Exce Command
1.bootloader 和kernel 启动概述
后续补充
2.init 概述
Init作为第一个user space的进程,它是所有Android系统native service的祖先,它的进程号是1。
不过我们会发现还有另外两个init进程号大于1的,这个在Android P以后专门为启动vendor分区的service
而搞出来的vendor init,不过目前高通平台没有使用它去fork vendor 分区进程。
vendor init
Init从最根本上讲,是为了引导/启动用户空间的各项service,而为了确保各个service能正常运行,又会创
建文件系统,设置权限,初始化属性等工作。比较细致的来划分的话,可以分为下面几项:
- 创建文件系统目录并挂载相关的文件系统
- 初始化log系统
- 初始化/设置/启动属性相关的资源
- 完成SELinux相关工作
- 装载子进程信号处理器
- 解析init.rc
- atcion/service管理
首先看看init是如何启动的。
2.1 init进程的创建
内核在启动初期,会调用跟平台架构相关的汇编代码,在构架相关的汇编代码运行完之后,程序跳入了构架无关的内核C语言代码:
init/main.c中的start_kernel函数,在这个函数中Linux内核开始真正进入初始化阶段。以arm64为例:
kernel/arch/arm64/kernel/head.S b start_kernel
这句汇编代码意思就是跳转到start_kernel函数。这个函数很长,这里截取跟init关系比较大的部分:
kernel/msm-4.19/init/main.c
531asmlinkage __visible void __init start_kernel(void)
532{
    ……
    //init_task即手动创建的一个PCB(进程控制块)
536	set_task_stack_end_magic(&init_task);
    ……
737	/* Do the rest non-__init'ed, we're now alive */
738	rest_init();//剩余的初始化
}
这里列举的第一个函数,手动创建了kernel的第一个进程——idle进程。所谓手动,意思是没有调用fork
等系统调用,直接对一个task_struct(进程描述符)进行赋值,指定进程的PID号
继续来看rest_init,init进程的创建也是从这里开始的
397static noinline void __ref rest_init(void)
398{
399	struct task_struct *tsk;
400	int pid;
    ……
403	/*
404	 * We need to spawn init first so that it obtains pid 1, however
405	 * the init task will end up wanting to create kthreads, which, if
406	 * we schedule it before we create kthreadd, will OOPS.
407	 */
    //通过kernel_thread创建一个内核进程,进程跑函数是kernel_init;
408	pid = kernel_thread(kernel_init, NULL, CLONE_FS);
    ……
}
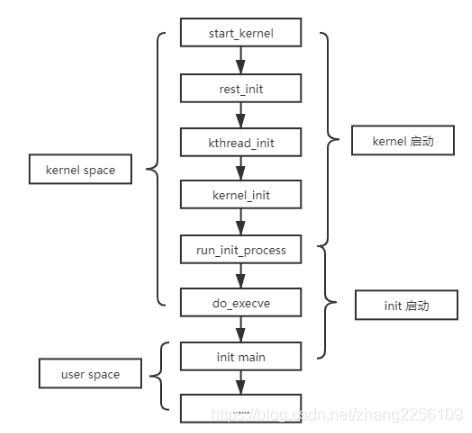
通过调用kernel_thread,1号进程被创建出来,但此时,它运行的还不是init,只有经过如下步骤,init才会
正式启动。中间调用的函数也比较多,还涉及到空间的切换,这里用一个图来表示:
2.2 init main
讲了init进程的创建过程,接下来看下init进程在做些什么。Init进程的入口是main函数,查看init的功能实现,
就从这个函数开始,这里首先来关注下文件系统挂载。
init main函数开头会根据启动参数的差别,根据入参不同分别执行不同的内容。
51int main(int argc, char** argv) {
56    if (!strcmp(basename(argv[0]), "ueventd")) {
57        return ueventd_main(argc, argv);
58    }
59
60    if (argc > 1) {
61        if (!strcmp(argv[1], "subcontext")) {
62            android::base::InitLogging(argv, &android::base::KernelLogger);
63            const BuiltinFunctionMap function_map;
64
65            return SubcontextMain(argc, argv, &function_map);
66        }
67
68        if (!strcmp(argv[1], "selinux_setup")) {
69            return SetupSelinux(argv);
70        }
71
72        if (!strcmp(argv[1], "second_stage")) {
73            return SecondStageMain(argc, argv);
74        }
75    }
76
77    return FirstStageMain(argc, argv);
78}
-
No argv -> FirstStageMain
没有参数的情况下是第一次进入init,在内核态执行init初始化
-
selinux_setup -> SetupSelinux
在FirstStageMain 执行结束后,会重新调用execv("/system/bin/init", “selinux_setup”),第二次进入init main 函数,执行SetupSelinux
-
second_stage -> SecondStageMain
执行完SetupSelinux会重新调用execv("/system/bin/init", “second_stage”)
-
Ueventd --> ueventd_main
ueventd.c与init.c被编译成了同一个可执行文件“/init”,并创建了软链接“/system/bin/ueventd”指向“/system/init”,
所以start uevent的时候会其他init bin文件传入参数ueventd
-
Subcontext --> SubcontextMain
启动vendor_init的时候传入参数Subcontext
2.2.1 FirstStageMain
第一阶段主要是挂载分区和创建设备节点,关键目录,我们顺序介绍一些函数的作用,本文暂时先不做深入分析,后续再进行补充。
介绍一些概念
- mknod
- mount
- mkdir
- proc info
- linux sys
- sys介绍
- dup2
int FirstStageMain(int argc, char** argv) {
//清空文件权限
umask(0);

设置环境变量,_PATH_DEFPATH在bionic/libc/include/paths.h中有定义,主要是shell 启动bin文件的查找路径集合

setenv("PATH", _PATH_DEFPATH, 1)

接下来开始创建一些必要目录和进行挂载。
//使用tmpfs文件系统挂载dev目录
mount("tmpfs", "/dev", "tmpfs", MS_NOSUID, "mode=0755")
// 创建dev/pts目录 :是远程登陆(telnet,ssh等)后创建的控制台设备文件所在的目录
mkdir("/dev/pts", 0755)
//创建dev/socket目录,init会为一些native进程创建socket,会在该目录下生产对应的socket节点
mkdir("/dev/socket", 0755)
//挂载dev/pts
mount("devpts", "/dev/pts", "devpts", 0, NULL)
//挂载proc/目录
mount("proc", "/proc", "proc", 0, "hidepid=2,gid=" MAKE_STR(AID_READPROC))
chmod("/proc/cmdline", 0440)
//挂载sysfs文件系统在sys目录,用来访问内核信息
mount("sysfs", "/sys", "sysfs", 0, NULL)//
//挂载文件系统selinuxfs到目录/sys/fs/selinux ,下面放的都是selinux相关的目录和节点
mount("selinuxfs", "/sys/fs/selinux", "selinuxfs", 0, NULL)
//创建/dev/kmsg文件节点, 存到kenel log
mknod("/dev/kmsg", S_IFCHR | 0600, makedev(1, 11))
//节点/dev/random和/dev/urandom是Linux系统中提供的随机伪设备,这两个设备的任务,是提供永
//不为空的随机字节数据流。很多解密程序与安全应用程序(如SSH Keys,SSL Keys等)需要它们提供的随机数据流。
mknod("/dev/random", S_IFCHR | 0666, makedev(1, 8))
mknod("/dev/urandom", S_IFCHR | 0666, makedev(1, 9))
mknod("/dev/ptmx", S_IFCHR | 0666, makedev(5, 2))
mknod("/dev/null", S_IFCHR | 0666, makedev(1, 3))
//挂载tmpfs文件系统到mnt目录,这个目录正常是挂载光驱,usb设备的
mount("tmpfs", "/mnt", "tmpfs", MS_NOEXEC | MS_NOSUID | MS_NODEV, "mode=0755,uid=0,gid=1000")
mkdir("/mnt/vendor", 0755)
mkdir("/mnt/product", 0755)
mount("tmpfs", "/debug_ramdisk", "tmpfs", MS_NOEXEC | MS_NOSUID | MS_NODEV, "mode=0755,uid=0,gid=0")

//把标准输出,标准输入,标准错误输出重定向到dev/null
SetStdioToDevNull(argv);
//初始化init log并输出定向到dev/kmsg
InitKernelLogging(argv);
// Log 系统初始化结束后,开始输出Log
LOG(INFO) << "init first stage started!";

auto old_root_dir = std::unique_ptr{opendir("/"), closedir};
struct stat old_root_info;
stat("/", &old_root_info)

//根据配置决定是否打开串口
Modprobe m({"/lib/modules"});
//ALLOW_FIRST_STAGE_CONSOLE 在bp配置, 并且cmdline存在androidboot.first_stage_console=1
auto want_console = ALLOW_FIRST_STAGE_CONSOLE && FirstStageConsole(cmdline);
m.LoadListedModules(!want_console)
if (want_console) {
    StartConsole();
}

//对于将恢复用作 ramdisk 的设备,第一阶段 init 位于恢复 ramdisk 中的 /init。这些设备首先将根切换到
//first_stage_ramdisk,以便从环境中移除恢复组件,然后执行与具有 boot-ramdisk 的设备一样的操作
//(即,将 system.img 作为 /system 进行装载,切换根以将该装载移动到 /,然后在装载完成后释放 ramdisk 内容)。
//如果内核命令行中存在 androidboot.force_normal_boot=1,则设备会正常启动(启动到 Android)而不是启动到恢复模式。
//介绍:https://source.android.google.cn/devices/bootloader/system-as-root?hl=zh-cn#ramdisk
if (ForceNormalBoot(cmdline)) {
	mkdir("/first_stage_ramdisk", 0755);
	// SwitchRoot() must be called with a mount point as the target, so we bind mount the
	// target directory to itself here.
	if (mount("/first_stage_ramdisk", "/first_stage_ramdisk", nullptr, MS_BIND, nullptr) != 0) {
		LOG(FATAL) << "Could not bind mount /first_stage_ramdisk to itself";
	}
	SwitchRoot("/first_stage_ramdisk");
}


// If force_debuggable file is present, the second-stage init will use a userdebug sepolicy
// and load adb_debug.prop to allow adb root, if the device is unlocked.
if (access("/force_debuggable", F_OK) == 0) {
	std::error_code ec;  // to invoke the overloaded copy_file() that won't throw.
	if (!fs::copy_file("/adb_debug.prop", kDebugRamdiskProp, ec) ||
		!fs::copy_file("/userdebug_plat_sepolicy.cil", kDebugRamdiskSEPolicy, ec)) {
		LOG(ERROR) << "Failed to setup debug ramdisk";
	} else {
		// setenv for second-stage init to read above kDebugRamdisk* files.
		setenv("INIT_FORCE_DEBUGGABLE", "true", 1);
	}
}

//第一阶段(即初始化 SElinux 之前)装载 /system、/vendor 或 /odm,这个主要是因为打开了Treble的设备上,为了确保
//init能及时导入SELinux的配置文件(contexts/*.te),需要尽快的将system/vendor等分区挂载上。
//这句话要对比AndroidN来理解:在AndroidN上,selinux的配置文件存放在boot.img中,在内核初始化过程中,boot.img中的文
//件已经挂载到rootfs了,相应的,配置文件也就可以从rootfs读取了。而AndroidO开始,selinux配置文件放到了vendor/system分区,
//如果仍然按照do_mount_all阶段来挂载这两个分区,selinux来不及做初始化。
DoFirstStageMount()
struct stat new_root_info;
stat("/", &new_root_info) != 0

//根目录发生变化,则释放ramdisk
if (old_root_dir && old_root_info.st_dev != new_root_info.st_dev) {
	FreeRamdisk(old_root_dir.get(), old_root_info.st_dev);
}

//Avb即Android Verfied boot,功能包括Secure Boot, verfying boot 和 dm-verity,
//原理都是对二进制文件进行签名,在系统启动时进行认证,确保系统运行的是合法的二进制镜像文件。
//其中认证的范围涵盖:bootloader,boot.img,system.img
//此处是在recovery模式下初始化avb的版本,不是recovery模式直接跳过
SetInitAvbVersionInRecovery();

//设置环境变量FIRST_STAGE_STARTED_AT 当前时间
setenv(kEnvFirstStageStartedAt, std::to_string(start_time.time_since_epoch().count()).c_str(),1);
//通过execv 重新给该进程装载/system/bin/init,并携带参数selinux_setup 进入第二阶段
const char* path = "/system/bin/init";
const char* args[] = {path, "selinux_setup", nullptr};
auto fd = open("/dev/kmsg", O_WRONLY | O_CLOEXEC);
dup2(fd, STDOUT_FILENO);
dup2(fd, STDERR_FILENO);
close(fd);
execv(path, const_cast(args));
}
在第一阶段 init 完成后,它会使用 selinux_setup 参数执行 /system/bin/init,以便编译 SELinux 并将其加载到系统中。
最后,init 会使用 second_stage 参数再次执行 /system/bin/init。此时,init 的主要阶段将会运行,并使用 init.rc 脚本继续执行启动过程。
2.2.2 SetupSelinux
主要是初始化selinux,加载selinux规则配置文件,并设置selinux日志
int SetupSelinux(char** argv) {
	//因为execv会将新的bin文件替换之前进程的内存空间,所以下面操作需要重新做
    SetStdioToDevNull(argv);
    InitKernelLogging(argv);

    if (REBOOT_BOOTLOADER_ON_PANIC) {
        InstallRebootSignalHandlers();
    }

    boot_clock::time_point start_time = boot_clock::now();

    // Set up SELinux, loading the SELinux policy.
    //注册回调,用来设置需要写入kmsg的selinux日志
    SelinuxSetupKernelLogging();
    //加载SELinux规则配置文件
    SelinuxInitialize();

    // We're in the kernel domain and want to transition to the init domain.  File systems that
    // store SELabels in their xattrs, such as ext4 do not need an explicit restorecon here,
    // but other file systems do.  In particular, this is needed for ramdisks such as the
    // recovery image for A/B devices.
	//在做完selinux的初始化后,需要切换init进程到用户态。
    if (selinux_android_restorecon("/system/bin/init", 0) == -1) {
        PLOG(FATAL) << "restorecon failed of /system/bin/init failed";
    }
	//设置环境变量FIRST_STAGE_STARTED_AT 当前时间
    setenv(kEnvSelinuxStartedAt, std::to_string(start_time.time_since_epoch().count()).c_str(), 1);
	//通过execv 重新给该进程装载/system/bin/init,并携带参数second_stage 进入第三阶段
    const char* path = "/system/bin/init";
    const char* args[] = {path, "second_stage", nullptr};
    execv(path, const_cast(args));

    // execv() only returns if an error happened, in which case we
    // panic and never return from this function.
    PLOG(FATAL) << "execv(\"" << path << "\") failed";

    return 1;
}
2.2.3 SecondStageMain
这个阶段主要就是注册子进程信号处理器,初始化Property系统,解析rc文件,执行action和启动service操作
int SecondStageMain(int argc, char** argv) {
    if (REBOOT_BOOTLOADER_ON_PANIC) {
        InstallRebootSignalHandlers();
    }

    boot_clock::time_point start_time = boot_clock::now();

    trigger_shutdown = TriggerShutdown;

    SetStdioToDevNull(argv);
    InitKernelLogging(argv);
    LOG(INFO) << "init second stage started!";

    // Will handle EPIPE at the time of write by checking the errno
	//SIG_IGN作用是忽略对应信号的处理,这里是为了忽略SIGPIPE信号异常
    signal(SIGPIPE, SIG_IGN);

    // Set init and its forked children's oom_adj.
	//设置init 进程自己的oomadj值-1000
    if (auto result =
                WriteFile("/proc/1/oom_score_adj", StringPrintf("%d", DEFAULT_OOM_SCORE_ADJUST));
        !result.ok()) {
        LOG(ERROR) << "Unable to write " << DEFAULT_OOM_SCORE_ADJUST
                   << " to /proc/1/oom_score_adj: " << result.error();
    }

    // Set up a session keyring that all processes will have access to. It
    // will hold things like FBE encryption keys. No process should override
    // its session keyring.
	//初始化进程会话密钥
    keyctl_get_keyring_ID(KEY_SPEC_SESSION_KEYRING, 1);

    // Indicate that booting is in progress to background fw loaders, etc.
	//创建 /dev/.booting 文件,就是个标记,表示booting进行中
    close(open("/dev/.booting", O_WRONLY | O_CREAT | O_CLOEXEC, 0000));

    // See if need to load debug props to allow adb root, when the device is unlocked.
	//读取INIT_FORCE_DEBUGGABLE,这个是在第一阶段设置的,也就是debug ramdisk setup成功。
    const char* force_debuggable_env = getenv("INIT_FORCE_DEBUGGABLE");
    bool load_debug_prop = false;
    if (force_debuggable_env && AvbHandle::IsDeviceUnlocked()) {
        load_debug_prop = "true"s == force_debuggable_env;
    }
    unsetenv("INIT_FORCE_DEBUGGABLE");

    // Umount the debug ramdisk so property service doesn't read .prop files from there, when it
    // is not meant to.
	//如果force_debuggable没有开启,需要先ummount ramdisk,避免property初始话的时候读取.prop文件
    if (!load_debug_prop) {
        UmountDebugRamdisk();
    }
	//Property子系统初始化,这个管理存储和获取Property 属性
    PropertyInit();

    // Umount the debug ramdisk after property service has read the .prop files when it means to.
	//再ummount ramdisk
    if (load_debug_prop) {
        UmountDebugRamdisk();
    }

    // Mount extra filesystems required during second stage init
	//这里面主要挂载apex和linkerconfig
    MountExtraFilesystems();

    // Now set up SELinux for second stage.
	//注册回调,用来设置需要写入kmsg的selinux日志
    SelinuxSetupKernelLogging();
	设置sehandle为selinux_android_set_sehandle
    SelabelInitialize();
	//进行SELinux第二阶段并恢复一些文件安全上下文
    //恢复相关文件的安全上下文,因为这些文件是在SELinux安全机制初始化前创建的,
    //所以需要重新恢复上下文
    SelinuxRestoreContext();

	//创建epoll实例,并返回epoll的文件描述符,实现init的一些事件监控
    Epoll epoll;
    if (auto result = epoll.Open(); !result.ok()) {
        PLOG(FATAL) << result.error();
    }

	//监控子进程的SIGCHLD和SIGTERM信号,并在收到信号后通过HandleSignalFd函数处理
    InstallSignalFdHandler(&epoll);

    //主要创建property_set_fd socket并通过pool监控它,当来设置property的请求后,通过handle_property_set_fd去处理。
    StartPropertyService(&property_fd);
    if (auto result = epoll.RegisterHandler(property_fd, HandlePropertyFd); !result.ok()) {
        LOG(FATAL) << "Could not register epoll handler for property fd: " << result.error();
    }

    // Make the time that init stages started available for bootstat to log.
    RecordStageBoottimes(start_time);

    // Set libavb version for Framework-only OTA match in Treble build.
	// INIT_AVB_VERSION 设置给ro.boot.avb_version
    if (const char* avb_version = getenv("INIT_AVB_VERSION"); avb_version != nullptr) {
        SetProperty("ro.boot.avb_version", avb_version);
    }
    unsetenv("INIT_AVB_VERSION");
	// 主要是根据ro.vndk.version 版本号,将/system/vendor_overlay/"和/product/vendor_overlay/挂载在vendor上
    fs_mgr_vendor_overlay_mount_all();
	//ro.oem_unlock_supported 属性应在编译时根据设备是否支持刷写解锁来设置。 如果设备不支持刷写解锁,应将 ro.oem_unlock_supported 设置为“0”;如果支持刷写解锁,应将其设置为“1”。
    //如果设备支持刷写解锁(即 ro.oem_unlock_supported = 1),则引导加载程序应通过将内核命令行变量 androidboot.flash.locked(或 /firmware/android/flash.locked DT 属性)设置为“1”(如果已锁定)或“0”(如果已解锁)来指示锁定状态。
    export_oem_lock_status();
	//监控/proc/mounts 节点,发生变化也就是有新分区mount的时候执行MountHandlerFunction函数
    MountHandler mount_handler(&epoll);
	//读取/sys/class/udc目录的文件也就是USB设备控制器的节点,设置给属性sys.usb.controller,从而使得USB主机端可以正常枚举到该USB设备
    set_usb_controller();
	//获取函数的BuiltinFunctionMap表,BuiltinFunctionMap 对象是一个KeywordMap数据结构
    //在BuiltinFunctionMap初始化的时候,创建一个pair表,存储字符串和对应的MapValue数据结果,MapValue 里面存储函数最大参数,最小参数,
    //以及BuiltinFunctionMapValue 数据结果,这样我们通过传入字符串,然后调用function_map的Find函数返回BuiltinFunctionMapValue
    //BuiltinFunctionMapValue 则保存了对应的函数 function对象,以便调用该函数。总结下:就是可以根据函数的字符串简称,找到对应函数入口,去调用该函数
    const BuiltinFunctionMap& function_map = GetBuiltinFunctionMap();
	初始化Action的function_map_ 为刚才的函数表,以便于后续执行Aciton 调用对应函数
    Action::set_function_map(&function_map);

	//这个主要设置./ apex 这些分区的挂载信息权限的。这块可以参考资料:https://cizixs.com/2017/08/29/linux-namespace/
    if (!SetupMountNamespaces()) {
        PLOG(FATAL) << "SetupMountNamespaces failed";
    }
	//android P版本以上,给vendor oem增加u:r:vendor_init:s0权限
    subcontext = InitializeSubcontext();

	//下面主要是解析RC文件操作了,LoadBootScripts中主要依靠ActionManager和ServiceList 解析RC文件的Action和Service,这个后边单独章节去讲
    ActionManager& am = ActionManager::GetInstance();//构造解析action对象
    ServiceList& sm = ServiceList::GetInstance();//构造管理服务对象

    LoadBootScripts(am, sm);

    // Turning this on and letting the INFO logging be discarded adds 0.2s to
    // Nexus 9 boot time, so it's disabled by default.
	//把解析并维护起来的Action service dump出来用去debug
    if (false) DumpState();

    // Make the GSI status available before scripts start running.
	//GSI 是google 原生代码的镜像,一般用于VTS测试
    if (android::gsi::IsGsiRunning()) {
        SetProperty("ro.gsid.image_running", "1");
    } else {
        SetProperty("ro.gsid.image_running", "0");
    }

	//在ActionManager的队列中依次加入Action和Trigger
    am.QueueBuiltinAction(SetupCgroupsAction, "SetupCgroups");
    am.QueueBuiltinAction(SetKptrRestrictAction, "SetKptrRestrict");
    am.QueueBuiltinAction(TestPerfEventSelinuxAction, "TestPerfEventSelinux");
    am.QueueEventTrigger("early-init");

    // Queue an action that waits for coldboot done so we know ueventd has set up all of /dev...
    am.QueueBuiltinAction(wait_for_coldboot_done_action, "wait_for_coldboot_done");
    // ... so that we can start queuing up actions that require stuff from /dev.
    am.QueueBuiltinAction(MixHwrngIntoLinuxRngAction, "MixHwrngIntoLinuxRng");
    am.QueueBuiltinAction(SetMmapRndBitsAction, "SetMmapRndBits");
    Keychords keychords;
    am.QueueBuiltinAction(
            [&epoll, &keychords](const BuiltinArguments& args) -> Result {
                for (const auto& svc : ServiceList::GetInstance()) {
                    keychords.Register(svc->keycodes());
                }
                keychords.Start(&epoll, HandleKeychord);
                return {};
            },
            "KeychordInit");

    // Trigger all the boot actions to get us started.
    am.QueueEventTrigger("init");

    // Repeat mix_hwrng_into_linux_rng in case /dev/hw_random or /dev/random
    // wasn't ready immediately after wait_for_coldboot_done
    am.QueueBuiltinAction(MixHwrngIntoLinuxRngAction, "MixHwrngIntoLinuxRng");

    // Don't mount filesystems or start core system services in charger mode.
    std::string bootmode = GetProperty("ro.bootmode", "");
    if (bootmode == "charger") {
        am.QueueEventTrigger("charger");
    } else {
        am.QueueEventTrigger("late-init");
    }

    // Run all property triggers based on current state of the properties.
    am.QueueBuiltinAction(queue_property_triggers_action, "queue_property_triggers");

    while (true) {
        // By default, sleep until something happens.
        auto epoll_timeout = std::optional{};
		//发起重启,sys.powerctl 发生变化会do_shutdown置为true
        if (do_shutdown && !IsShuttingDown()) {
            do_shutdown = false;
            HandlePowerctlMessage(shutdown_command);
        }

        //当前没有事件需要处理时
        if (!(waiting_for_prop || Service::is_exec_service_running())) {
			//am 队列中依次执行每个action中携带command对应的执行函数
            am.ExecuteOneCommand();
        }
        if (!IsShuttingDown()) {
			//重启死掉的子进程
            auto next_process_action_time = HandleProcessActions();

            // If there's a process that needs restarting, wake up in time for that.
            if (next_process_action_time) {
                //决定timeout的时间,将影响while循环的间隔
                epoll_timeout = std::chrono::ceil(
                        *next_process_action_time - boot_clock::now());
                if (*epoll_timeout < 0ms) epoll_timeout = 0ms;
            }
        }

        if (!(waiting_for_prop || Service::is_exec_service_running())) {
            // If there's more work to do, wake up again immediately.
			//有command等着处理的话,不等待
            if (am.HasMoreCommands()) epoll_timeout = 0ms;
        }
		//没有事件到来的话,最多阻塞epoll_timeout_ms时间
        auto pending_functions = epoll.Wait(epoll_timeout);
        if (!pending_functions.ok()) {
            LOG(ERROR) << pending_functions.error();
        } else if (!pending_functions->empty()) {
            // We always reap children before responding to the other pending functions. This is to
            // prevent a race where other daemons see that a service has exited and ask init to
            // start it again via ctl.start before init has reaped it.
			//1.  //有事件到来,执行对应处理函数
            //根据上文知道,epoll句柄(即epoll_fd)主要监听子进程结束,及其它进程设置系统属性的请求。
            ReapAnyOutstandingChildren();
            for (const auto& function : *pending_functions) {
                (*function)();
            }
        }
    }

    return 0;
}
2.4 文件系统挂载
2.4.1 FirstStageMount
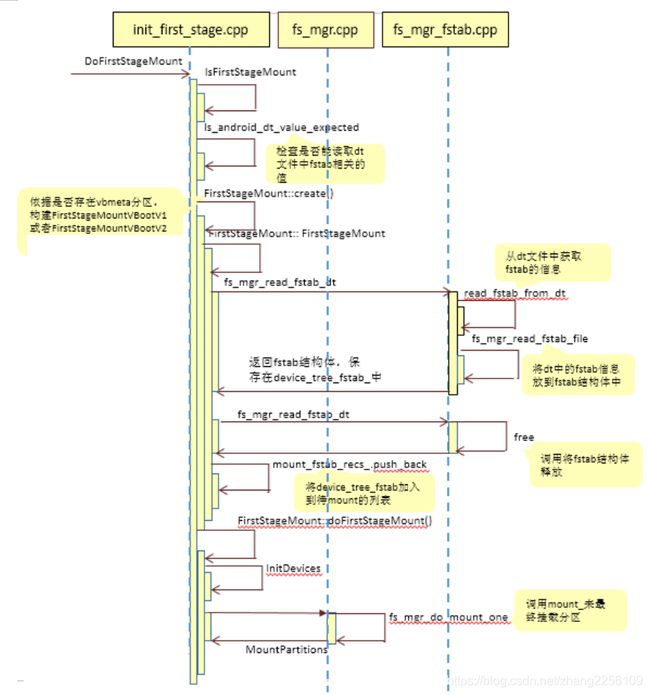
android有很多分区,如"syste",“userdata”,“cache”,AndroidO 之后还新增了vendor/odm等新的分区,它们是何时挂载的?如何挂载的?
在Android8.0以前,挂载是通过触发do_mount_all来做的。从Andriod8.0开始,以前由do_mount_all来做的事情现在分成了两部分,新增了FirstStageMount,将system/vendor/odm分区挂载放在FSM阶段来做;而其它分区的挂载,仍然在do_mount_all阶段。之所以提前挂载system和vendor我们前文也有说明是为了在打开了Treble的设备上,确保init能及时导入SELinux的配置文件(contexts/*.te),需要尽快的将system/vendor等分区挂载上。
主要是对比AndroidN来理解:在AndroidN上,selinux的配置文件存放在boot.img中,在内核初始化过程中,boot.img中的文件已经挂载到rootfs了,相应的,配置文件也就可以从rootfs读取了。而AndroidO开始,selinux配置文件放到了vendor/system分区,如果仍然按照do_mount_all阶段来挂载这两个分区,selinux来不及做初始化。
这块流程暂时没有重新整理,先附上android O的流程,比较相近
2.4.2 do_mount_all
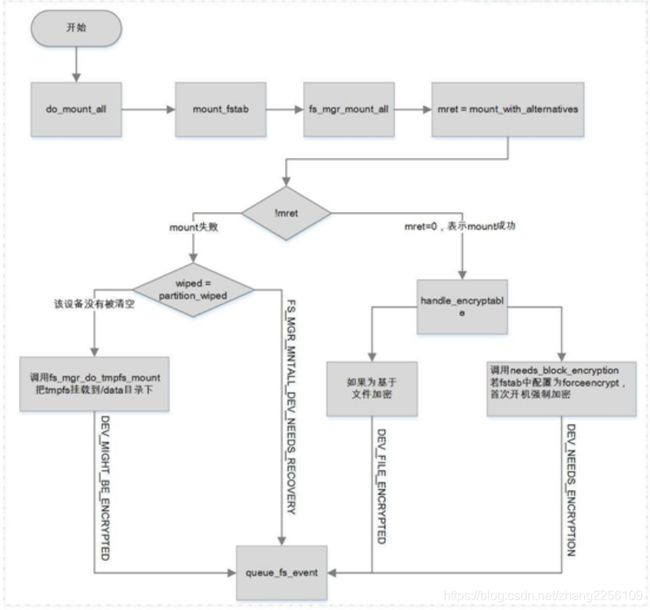
在文件系统挂载的第一阶段,system/vendor分区已经成功挂载,而其它分区的挂载则通过do_mount_all来实现。看下这个流程:
common/rootdir/root/init.common.rc中就有如下规则:
1. on fs
2.     ubiattach 0 ubipac
3.     # exec /sbin/resize2fs -ef /fstab.${ro.hardware}
4.     mount_all /fstab.${ro.hardware}
5.     mount pstore pstore /sys/fs/pstore
mount_all是一条命令,fstab.${ro.hardware}是传入的参数。
接着通过ActionManager来解析“mount_all指令“,找到指令所对应的解析函数。
这个指令解析函数的对应关系,定义在system/core/init/builtins.cpp:
1. static const Map builtin_functions = {
2. .....
3. {
4.     "mount_all",               {1,     kMax, do_mount_all}},
5.     .....
6. }
从上面可以看出,mount_all命令对应的是do_mount_all函数,xxxx是do_mount_all函数的传入参数。
2.5 init log系统
熟悉init模块的话,会知道Android系统中,init的log会出现在kernel log中。
理论上,init是属于user space的,为何log出现在kernel log系统中?顺带的还有其他几个问题:
1、 kernel log与init log都有log等级,两者有对应关系吗?
2、 Kernel log可以调整loglevel来控制log输出,init可以吗?
下面带着这些问题,来了解init log系统。
2.5.1 Init log输出流程
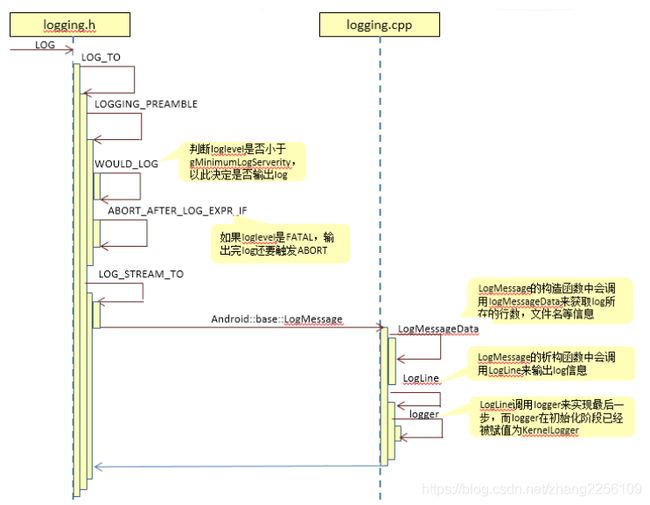
要了解init log,最好的方法莫过于分析log输出的流程。例如下面这句log:
- LOG(INFO) << “init first stage started!”;
最后一步调用logger的中做了说明:LogLine调用logger来实现最后一步,而logger在初始化阶段已经被赋值为KernelLogger。来看下这个函数的一部分:
1. void KernelLogger(android::base::LogId, android::base::LogSeverity severity,
2.      const char* tag, const char*, unsigned int, const char* msg) {
3.     ……
4.     static int klog_fd = TEMP_FAILURE_RETRY(open("/dev/kmsg", O_WRONLY | O_CLOEXEC));//打开kmsg节点
5.     ……
6.     TEMP_FAILURE_RETRY(writev(klog_fd, iov, 1));//将log写入到kmsg中
7. }
看到这里,前面提到问题就可以解答了:通过将init log写入到kmsg,实现了init log从kernel log输出。
2.5.2 Init log等级
WOULD_LOG会判断loglevel是否小于gMinimumLogServerity,以此决定是否输出log。gMinimumLogServerity就是init默认的loglevel,它的设定很简单,只需修改它的赋值即可:
system/core/base/logging.cpp:

static LogSeverity gMinimumLogSeverity = INFO;
至于gMinimumLogServerity可以被设定的值,依然可以从KernelLogger找到答案。
164void KernelLogger(android::base::LogId, android::base::LogSeverity severity,
165                  const char* tag, const char*, unsigned int, const char* msg) {
166  // clang-format off
167  static constexpr int kLogSeverityToKernelLogLevel[] = {
168      [android::base::VERBOSE] = 7,              // KERN_DEBUG (there is no verbose kernel log
169                                                 //             level)
170      [android::base::DEBUG] = 7,                // KERN_DEBUG
171      [android::base::INFO] = 6,                 // KERN_INFO
172      [android::base::WARNING] = 4,              // KERN_WARNING
173      [android::base::ERROR] = 3,                // KERN_ERROR
174      [android::base::FATAL_WITHOUT_ABORT] = 2,  // KERN_CRIT
175      [android::base::FATAL] = 2,                // KERN_CRIT
176  };
从后面的注释来看,这些级别跟kernel中log level是一一对应的。init的loglevel最小为2,这也是为何kernel loglevel设定为1的时候,init的log就不会再输出了。
通过init loglevel与kernel log对应关系的介绍以及init loglevel的设定,可以得出一个结论:
如果想要确保添加在init中的log输出到kernel log中,需要保证两条
-
1、 kernel loglevel >= gMinimumLogServerity;
-
2、 LOG(loglevel) <= gMinimumLogServerity
到这里2.3章节开头提出的两个问题就有答案了。了解init log系统,有利于手机开发过程中debug,某些时候可能默认的loglevel太低, log出不来,这个时候就可以根据
上面提到的方法,来修改kernel loglevel和gMinimumLogServerity,从而获取更多的log信息。在BringUP阶段和项目初始阶段,建议调整log等级调为DEBUG,即 gMinimumLogServerity= DEBUG。
2.6 Selinux Init
Selinux是从Android4.4开始导入,Android5.0开始全面启用的安全相关模块,它同样是在init中开始初始化的。Selinux初始化入口是system\core\init\selinux.cpp main 函数:
void SelinuxInitialize() {
    LOG(INFO) << "Loading SELinux policy";
    if (!LoadPolicy()) {//加载sepolicy文件
        LOG(FATAL) << "Unable to load SELinux policy";
    }


    bool kernel_enforcing = (security_getenforce() == 1);
    bool is_enforcing = IsEnforcing();//获取selinux模式
    if (kernel_enforcing != is_enforcing) {
        if (security_setenforce(is_enforcing)) {
            PLOG(FATAL) << "security_setenforce(" << (is_enforcing ? "true" : "false")
                        << ") failed";
        }
    }

    if (auto result = WriteFile("/sys/fs/selinux/checkreqprot", "0"); !result.ok()) {
        LOG(FATAL) << "Unable to write to /sys/fs/selinux/checkreqprot: " << result.error();
    }
}
Load SeLinux Policy 文件:从AndroidO开始,sepolicy相关的文件已经拆分到system和vendor分区了,所以这里加载policy文件的过程会不一样。
最终是通过LoadSplitPolicy来分别导入system/etc/selinux和vendor/etc/selinux下的policy文件。
然后在第三阶段调用通过调用SelabelInitialize 设置handler 并且调用SelinuxRestoreContext来装载文件和属性的安全上下文 。
还有一个值得注意的点是调用selinux_is_enforcing设置Selinux 模式。首先检测kernel cmdline 是否设置了androidboot.selinux = permissive;
当cmdline设置了permissive时会设置Selinux 模式为permissive;否则设置为enforing 模式。所以在调试开机流程时可以通过修改cmdline或者直接修改上面的函数修改Selinux 模式。
在手机开机的情况下还可以通过setenforce的方式改变Selinux模式,但这种方式重启后就不再起效。
Selinux 模式有两种:
-
enforcing:强制模式,SELinux 运作中,且已经正确的开始限制domain/type
-
permissive:宽容模式,SELinux 运作中,不过仅会有警告讯息并不会实际限制 domain/type 的存取
selinux是一个很复杂的系统,而AndroidO通过Treble架构,将selinux做了split,使得它的规则更加繁琐。在这里就不再做更多的介绍了,只需了解selinux是在哪个阶段启动、如何修改selinux的模式即可。
2.7 Start Property Service
在第三阶段我们调用PropertyInit 进行初始化/修改/加载property。调用StartPropertyService 初始化property的socket,等待其他进程调用设置获取属性
Android property系统其实可以理解为键值对:属性名字和属性值。
大部分property是记录在某些文件中的, init进程启动的时候,会加载这些文件,完成property系统初始化。
2.7.1 Property初始化
上面提到PropertyInit进行的初始化,大概流程如下: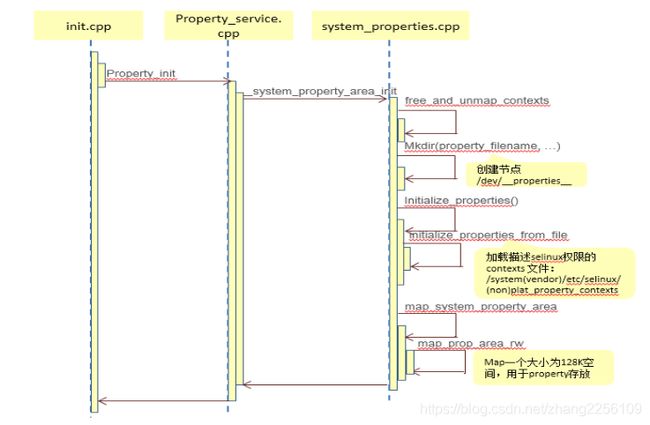
在Property初始化的最后阶段,会通过mmap一个128K的内存,property以链表的形式存放于其中。
而这个内存的首地址会保存在__system_property_area__中。
2.7.2 启动property service
这个实在StartPropertyService 函数实现的
void StartPropertyService(int* epoll_socket) {
    InitPropertySet("ro.property_service.version", "2");


    int sockets[2];
    if (socketpair(AF_UNIX, SOCK_SEQPACKET | SOCK_CLOEXEC, 0, sockets) != 0) {
        PLOG(FATAL) << "Failed to socketpair() between property_service and init";
    }
    *epoll_socket = sockets[0];
    init_socket = sockets[1];
    accept_messages = true;

    if (auto result = CreateSocket(PROP_SERVICE_NAME, SOCK_STREAM | SOCK_CLOEXEC | SOCK_NONBLOCK,
                                   false, 0666, 0, 0, {});
        result.ok()) {
        property_set_fd = *result;
    } else {
        LOG(FATAL) << "start_property_service socket creation failed: " << result.error();
    }

    listen(property_set_fd, 8);

    std::thread{PropertyServiceThread}.detach();
}
创建property_service socket用于监听进程修改property请求,通过handle_property_set_fd来处理请求,set property msg分为两类处理,
msg name以“ctl.”为起始的msg 通过handle_control_message处理,主要是启动、停止、重启服务。修改其它prop时会调用property_get,
然后通过bionic的__system_property_set函数来实现,而这个函数会通过socket与init的property service取得联系。
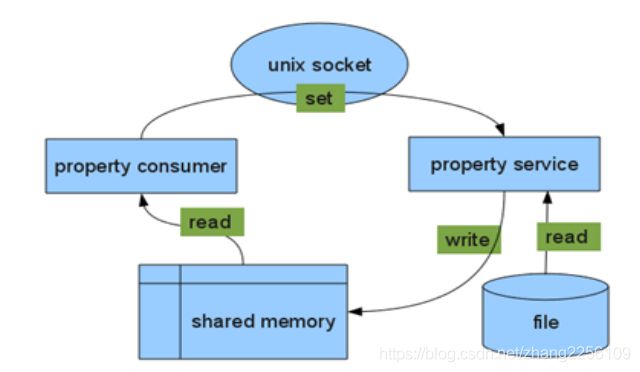
整个property访问的过程可以用下图来表述:
2.8 Rc文件语法与解析
rc文件主要包含Action、Service、Command、Options 、Import等5类声明:
-
1)Action
-
2)Command
-
3)Service
-
4)Option
-
5)Import
Action和Service是以Section的形式出现的,其中每个Action Section可以含有若干Command,而每个ServiceSection可以含有若干Option。Section只有起始标记,
却没有明确的结束标记,也就是说,是用“后一个Section”的起始来结束“前一个Section”。Service不能出现重名, Action可以重复,但最后会合并到一起。
而import则是导入其它init.*.rc用的,如import /init.${ro.hardware}.rc。从init main函数的代码可以看出来,根路径中只解析了init.rc,
其它的init.*.rc就是通过import导入进来的。
Action需要有一个触发器(trigger)来触发它,一旦满足了触发条件,这个Action就会被加到执行队列的末尾。Action的结构如下:
- on
Service表示一个服务程序,会通过start command执行。并根据option参数判断服务在退出时是否需要自动重启。Service的结构如下:
service [] *
看下init.rc解析的代码:
    //下面主要是解析RC文件操作了,LoadBootScripts中主要依靠ActionManager和ServiceList 解析RC文件的Action和Service,这个后边单独章节去讲
    ActionManager& am = ActionManager::GetInstance();//构造解析action对象
    ServiceList& sm = ServiceList::GetInstance();//构造管理服务对象

    LoadBootScripts(am, sm);
static void LoadBootScripts(ActionManager& action_manager, ServiceList& service_list) {
    Parser parser = CreateParser(action_manager, service_list);//构造解析文件用的parser对象


    std::string bootscript = GetProperty("ro.boot.init_rc", "");
	//依次解析 如下目录的rc文件
    // /system/etc/init/hw/init.rc
    // /system/etc/init
    // /system_ext/etc/ini
    // /product/etc/init
    // /odm/etc/init
    // /vendor/etc/init
    if (bootscript.empty()) {
        parser.ParseConfig("/system/etc/init/hw/init.rc");
        if (!parser.ParseConfig("/system/etc/init")) {
            late_import_paths.emplace_back("/system/etc/init");
        }
        // late_import is available only in Q and earlier release. As we don't
        // have system_ext in those versions, skip late_import for system_ext.
        parser.ParseConfig("/system_ext/etc/init");
        if (!parser.ParseConfig("/product/etc/init")) {
            late_import_paths.emplace_back("/product/etc/init");
        }
        if (!parser.ParseConfig("/odm/etc/init")) {
            late_import_paths.emplace_back("/odm/etc/init");
        }
        if (!parser.ParseConfig("/vendor/etc/init")) {
            late_import_paths.emplace_back("/vendor/etc/init");
        }
    } else {
        parser.ParseConfig(bootscript);
    }
}
解析init.rc文件时使用了Parser类(在init目录下的init_parser.h中定义), 并初始化ServiceParser用来解析init.rc中的“service”块,
ActionParser用来解析init.rc中的"on"块,ImportParser用来解析init.rc中的“import”块。首先来看下parser解析init.rc的过程:
函数定义于system/core/init/parser.cpp中。
bool Parser::ParseConfig(const std::string& path) {
    if (is_dir(path.c_str())) {\\判断传入参数是否为目录地址
        return ParseConfigDir(path);\\递归目录,最终还是靠ParseConfigFile来解析实际的文件
    }
    return ParseConfigFile(path);\\传入传输为文件地址
}

bool Parser::ParseConfigFile(const std::string& path) {
    LOG(INFO) << "Parsing file " << path << "...";
    android::base::Timer t;
    auto config_contents = ReadFile(path);//读取路径指定文件中的内容
    if (!config_contents.ok()) {
        LOG(INFO) << "Unable to read config file '" << path << "': " << config_contents.error();
        return false;
    }


    ParseData(path, &config_contents.value());// 解析获取的字符串

    LOG(VERBOSE) << "(Parsing " << path << " took " << t << ".)";
    return true;
}
ParseData比较长,它的作用是将构造出的对象加入到对应的service_、actions_、imports_中,这里的“service_/action_/improts_”其实是vector(也就是动态数组),
它们负责存放从init.rc中解析出来的service或者action(imports_有点特殊,只记录文件名和行数)。
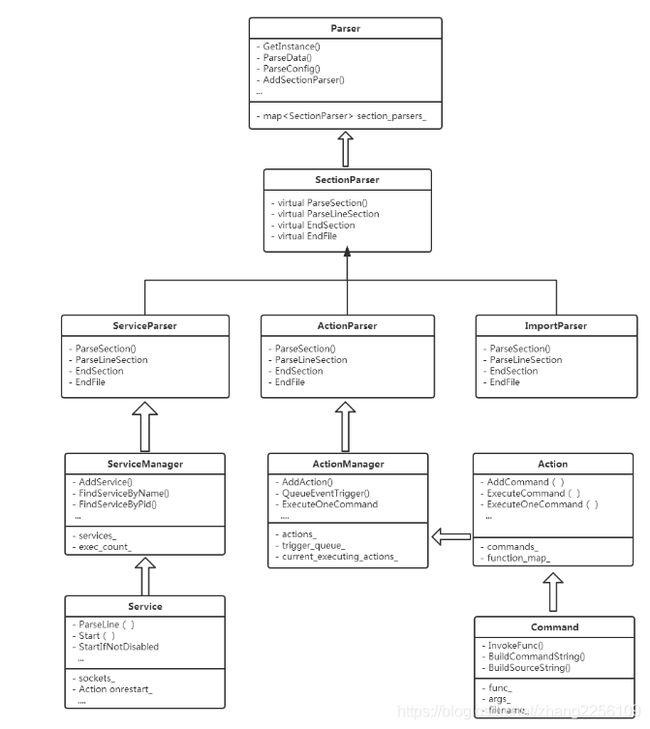
经过上面这一步,init.rc文件就彻底被解析为一个个的section,而每个section又会调用对应的SectionParser来进一步处理:
service就会被ServiceParser解析,而action则会被ActionParser解析,improt会被ImportParser解析。
整个过程可以用类图来表示:
[外链图片转存失败,源站可能有防盗链机制,建议将图片保存下来直接上传(img-gg2IrXqq-1587557245588)(http://q90i1nb0e.bkt.clouddn.com/Parser.png?e=1587554869&token=3MlMKkn-A4Uh5WwacM29RnvfqAOa4LZOLUth31kb:jgIAJuv34C9-5TYXkrWVgWQaohU=&attname=)]
2.8.1 Action
ActionParser定义于system/core/init/action.cpp中。
不同启动模式下触发的Action是不一样的,下面是之前8.0的charge 和normal启动模式下Trigger的Action和执行顺序,最新的待后续完成补上。
    static const BuiltinFunctionMap builtin_functions = {
        {"bootchart",               {1,     1,    {false,  do_bootchart}}},
        {"chmod",                   {2,     2,    {true,   do_chmod}}},
        {"chown",                   {2,     3,    {true,   do_chown}}},
        {"class_reset",             {1,     1,    {false,  do_class_reset}}},
        {"class_reset_post_data",   {1,     1,    {false,  do_class_reset_post_data}}},
        {"class_restart",           {1,     1,    {false,  do_class_restart}}},
        {"class_start",             {1,     1,    {false,  do_class_start}}},
        {"class_start_post_data",   {1,     1,    {false,  do_class_start_post_data}}},
        {"class_stop",              {1,     1,    {false,  do_class_stop}}},
        {"copy",                    {2,     2,    {true,   do_copy}}},
        {"domainname",              {1,     1,    {true,   do_domainname}}},
        {"enable",                  {1,     1,    {false,  do_enable}}},
        {"exec",                    {1,     kMax, {false,  do_exec}}},
        {"exec_background",         {1,     kMax, {false,  do_exec_background}}},
        {"exec_start",              {1,     1,    {false,  do_exec_start}}},
        {"export",                  {2,     2,    {false,  do_export}}},
        {"hostname",                {1,     1,    {true,   do_hostname}}},
        {"ifup",                    {1,     1,    {true,   do_ifup}}},
        {"init_user0",              {0,     0,    {false,  do_init_user0}}},
        {"insmod",                  {1,     kMax, {true,   do_insmod}}},
        {"installkey",              {1,     1,    {false,  do_installkey}}},
        {"interface_restart",       {1,     1,    {false,  do_interface_restart}}},
        {"interface_start",         {1,     1,    {false,  do_interface_start}}},
        {"interface_stop",          {1,     1,    {false,  do_interface_stop}}},
        {"load_persist_props",      {0,     0,    {false,  do_load_persist_props}}},
        {"load_system_props",       {0,     0,    {false,  do_load_system_props}}},
        {"loglevel",                {1,     1,    {false,  do_loglevel}}},
        {"mark_post_data",          {0,     0,    {false,  do_mark_post_data}}},
        {"mkdir",                   {1,     6,    {true,   do_mkdir}}},
        // TODO: Do mount operations in vendor_init.
        // mount_all is currently too complex to run in vendor_init as it queues action triggers,
        // imports rc scripts, etc.  It should be simplified and run in vendor_init context.
        // mount and umount are run in the same context as mount_all for symmetry.
        {"mount_all",               {1,     kMax, {false,  do_mount_all}}},
        {"mount",                   {3,     kMax, {false,  do_mount}}},
        {"perform_apex_config",     {0,     0,    {false,  do_perform_apex_config}}},
        {"umount",                  {1,     1,    {false,  do_umount}}},
        {"umount_all",              {1,     1,    {false,  do_umount_all}}},
        {"update_linker_config",    {0,     0,    {false,  do_update_linker_config}}},
        {"readahead",               {1,     2,    {true,   do_readahead}}},
        {"remount_userdata",        {0,     0,    {false,  do_remount_userdata}}},
        {"restart",                 {1,     1,    {false,  do_restart}}},
        {"restorecon",              {1,     kMax, {true,   do_restorecon}}},
        {"restorecon_recursive",    {1,     kMax, {true,   do_restorecon_recursive}}},
        {"rm",                      {1,     1,    {true,   do_rm}}},
        {"rmdir",                   {1,     1,    {true,   do_rmdir}}},
        {"setprop",                 {2,     2,    {true,   do_setprop}}},
        {"setrlimit",               {3,     3,    {false,  do_setrlimit}}},
        {"start",                   {1,     1,    {false,  do_start}}},
        {"stop",                    {1,     1,    {false,  do_stop}}},
        {"swapon_all",              {1,     1,    {false,  do_swapon_all}}},
        {"enter_default_mount_ns",  {0,     0,    {false,  do_enter_default_mount_ns}}},
        {"symlink",                 {2,     2,    {true,   do_symlink}}},
        {"sysclktz",                {1,     1,    {false,  do_sysclktz}}},
        {"trigger",                 {1,     1,    {false,  do_trigger}}},
        {"verity_update_state",     {0,     0,    {false,  do_verity_update_state}}},
        {"wait",                    {1,     2,    {true,   do_wait}}},
        {"wait_for_prop",           {2,     2,    {false,  do_wait_for_prop}}},
        {"write",                   {2,     2,    {true,   do_write}}},
    };
由于Action对应的Command太多无法一一说明,下面会简单的概括每个action完成的任务:
-
Early-Init :设置init 进程 score adj值,重置安全上下文,启动uevent服务。
-
Wait-for-coldboot-done:wait uevent_main – device_init完成coldboot_done目录创建,Timeout 1s
-
mix_hwrng_into_linux_rng:读取512 bytes 硬件随机数,写入linux RNG,不支持HWrandom 直接返回,不影响init启动。
-
keychord_init:keychord是组合按键,keychord为每个服务配置组合键,在服务解析时为指定服务设置相应的键码值。
-
console-init:如果ro.boot.console指定了控制台终端,那么优先使用这个控制台,如果没有指定,那么将使用默认控制台终端/dev/console。
-
late-init: trigger early-fs fs post-fs load_system_props_action post-fs load_persist_props_action firmware_mounts_complete early-boot boot
-
early-fs:设置外部存储环境变量
-
fs:挂载mtd分区,创建adb设备目录,修改adf设备文件权限
-
post-fs:修改productinfo用户群组,改变系统目录访问权限(kmsg、vmallcoinfo、cache等)
-
Load_system_props_action:load property file,"/system/build.prop" “/vendor/build.prop” “/factory/factory.prop”
-
Post-fs-data:创建、改变/data目录以及它的子目录的访问权限,启动vold、debuggerd服务,bootchart_init.
-
Load_presist_props_action:启动logd服务,load property file /data/property,"/data/local.prop"
-
Firmware_mounts_complete:删除dev/.booting目录
-
Early-boot:修改proc、sys/class子目录访问权限
-
Boot:设置usb厂商参数、CPU参数,修改sensorhub、 bluetooth、gnss、thermal目录访问权限,网络参数设置。启动Core class service。
-
Nonencrypted:启动 main、late_start class service.
2.8.2 Sevice
Service的解析,就是对option解析的过程,AndroidO上支持的Option 列表如下:
system/core/init/service_parser.cpp
   static const KeywordMap parser_map = {
        {"capabilities",            {0,     kMax, &ServiceParser::ParseCapabilities}},
        {"class",                   {1,     kMax, &ServiceParser::ParseClass}},//设置service所属的类名,当所属类启动/退出时,服务也启动/停止,默认为default;常见的类名有:main、core、charge
        {"console",                 {0,     1,    &ServiceParser::ParseConsole}},
        {"critical",                {0,     0,    &ServiceParser::ParseCritical}},//设备关键服务,4分钟内重启超过4次会进入recovery模式
        {"disabled",                {0,     0,    &ServiceParser::ParseDisabled}},//不跟随class启动
        {"enter_namespace",         {2,     2,    &ServiceParser::ParseEnterNamespace}},
        {"file",                    {2,     2,    &ServiceParser::ParseFile}},
        {"group",                   {1,     NR_SVC_SUPP_GIDS + 1, &ServiceParser::ParseGroup}},//服务用户组设置
        {"interface",               {2,     2,    &ServiceParser::ParseInterface}},
        {"ioprio",                  {2,     2,    &ServiceParser::ParseIoprio}},//io 操作优先级设置
        {"keycodes",                {1,     kMax, &ServiceParser::ParseKeycodes}},
        {"memcg.limit_in_bytes",    {1,     1,    &ServiceParser::ParseMemcgLimitInBytes}},
        {"memcg.limit_percent",     {1,     1,    &ServiceParser::ParseMemcgLimitPercent}},
        {"memcg.limit_property",    {1,     1,    &ServiceParser::ParseMemcgLimitProperty}},
        {"memcg.soft_limit_in_bytes",
                                    {1,     1,    &ServiceParser::ParseMemcgSoftLimitInBytes}},
        {"memcg.swappiness",        {1,     1,    &ServiceParser::ParseMemcgSwappiness}},
        {"namespace",               {1,     2,    &ServiceParser::ParseNamespace}},
        {"oneshot",                 {0,     0,    &ServiceParser::ParseOneshot}},//sevice退出后不再重启
        {"onrestart",               {1,     kMax, &ServiceParser::ParseOnrestart}},,//当服务重启时执行相关的command
        {"oom_score_adjust",        {1,     1,    &ServiceParser::ParseOomScoreAdjust}},
        {"override",                {0,     0,    &ServiceParser::ParseOverride}},
        {"priority",                {1,     1,    &ServiceParser::ParsePriority}},
        {"reboot_on_failure",       {1,     1,    &ServiceParser::ParseRebootOnFailure}},
        {"restart_period",          {1,     1,    &ServiceParser::ParseRestartPeriod}},
        {"rlimit",                  {3,     3,    &ServiceParser::ParseProcessRlimit}},
        {"seclabel",                {1,     1,    &ServiceParser::ParseSeclabel}},
        {"setenv",                  {2,     2,    &ServiceParser::ParseSetenv}},//设置service环境变量
        {"shutdown",                {1,     1,    &ServiceParser::ParseShutdown}},
        {"sigstop",                 {0,     0,    &ServiceParser::ParseSigstop}},
        {"socket",                  {3,     6,    &ServiceParser::ParseSocket}},创建socket
        {"stdio_to_kmsg",           {0,     0,    &ServiceParser::ParseStdioToKmsg}},
        {"timeout_period",          {1,     1,    &ServiceParser::ParseTimeoutPeriod}},
        {"updatable",               {0,     0,    &ServiceParser::ParseUpdatable}},
        {"user",                    {1,     1,    &ServiceParser::ParseUser}},//设置service的用户
        {"writepid",                {1,     kMax, &ServiceParser::ParseWritepid}},
    };
2.8.3 Exce Command
通过介绍init.rc的解析,将action和service加载到数组中,接下去就是执行action,启动service了。
执行的过程是通过调用QueueBuiltinAction和QueueEventTrigger来实现的。
QueueBuiltinAction的第一个参数作为新建action携带cmd的执行函数;
第二个参数既作为action的trigger name,也作为action携带cmd的参数。
QueueEventTrigger函数就是利用参数构造EventTrigger,然后加入到trigger_queue_中。
后续init进程处理trigger事件时,将会触发相应的操作。
通过上述两步,将需要处理的trigger添加到trigger_queue_中,而trigger_queue_本身就是一个队列,所以先加进去的,先执行,后加入的,后执行。
也就是通过这种方式,init.rc中所列action的执行顺序得到的确认。 从2.2.3 我们知道
当while循环不断调用ExecuteOneCommand函数时,将按照trigger表的顺序,依次取出action链表中与trigger匹配的action。
每次仅仅执行一个action中的一个command对应函数(一个action可能携带多个command)。
当一个action所有的command均执行完毕后,再执行下一个action。
当一个trigger对应的action均执行完毕后,再执行下一个trigger对应action。
