四个实验(两学时):策略模式、装饰者模式、抽象工厂模式、命令模式【没做GUI界面,只满足最简要求】
本文对你有用的话,记得点赞哦!以下是教科书&参考书

策略模式 Strategy Pattern
策略模式定义了算法族,分别封装起来,让他们之间可以互相替换,此模式让算法的变化独立于使用算法的客户。在熟悉策略模式相关理论知识的基础上,使用策略模式实现一个小游戏。
一、基本要求
使用策略模式实现一个小游戏,要求如下:
- 游戏中有三个角色:和尚,侠女,忍者;
- 每个角色都有生命值和魔法值,但各角色不同。
- 各角色外观不同。
- 每个角色具有魔法攻击和物理攻击;
- 物理攻击有三种:用刀、用剑、用手;
- 魔法攻击也有三种:火系魔法、金系魔法、水系魔法;
各角色可以动态更换物理、魔法攻击方式,也可以动态选择攻击方法。
笔者推荐参考https://blog.csdn.net/qq_42685588/article/details/103576562
二、实验内容
1. 设计并绘制该程序的类图;
2. 依照设计的类图使用Java语言编写代码,并实现该程序;
3. 除了核心的模式相关类实现外,提供测试环境,按照难度高低,分别是:
a)控制台程序,Client硬编码初始化模式和测试环境,运行结果文本输出;
b)控制台程序,Client初始化测试环境,并根据用户输入运算,运行结果文本输出;
c)设计并实现用户UI,Client初始化测试环境,并根据用户在UI控件上的输入运算,运行结果文本输出;
三、实验提示
1. 策略模式的结构和组件
- Strategy:定义所有支持算法的公共接口,Context使用该接口调用某ConcreteStrategy定义的算法;
- ConcreteStrategy:以Strategy接口实现某具体算法;
- Context:用一个ConcreteStrategy对象来配置,维护一个对Strategy对象的引用,可定义一个接口来让Strategy访问它的数据;
2. 策略模式代码提示 【出自《Head First设计模式》一书】
SimUDuck范例:将duck的行为理解为 “一组行为”,并使用策略模式的“一族算法”来进行实现。

Duck基类
public abstract class Duck {
	FlyBehavior flyBehavior;
	QuackBehavior quackBehavior;

	public Duck() {
	}

	public void setFlyBehavior (FlyBehavior fb) {
		flyBehavior = fb;
	}

	public void setQuackBehavior(QuackBehavior qb) {
		quackBehavior = qb;
	}

	abstract void display();

	public void performFly() {
		flyBehavior.fly();
	}

	public void performQuack() {
		quackBehavior.quack();
	}

	public void swim() {
		System.out.println("All ducks float, even decoys!");
	}
}
FlyBehavior和QuackBehavior接口
public interface QuackBehavior {
	public void quack();
}

public interface FlyBehavior {
	public void fly();
}
FlyWithWings具体行为
public class FlyWithWings implements FlyBehavior {
	public void fly() {
		System.out.println("I'm flying!!");
	}
}
MiniDuckSimulator测试环境
public class MiniDuckSimulator {

	public static void main(String[] args) {

		MallardDuck	mallard = new MallardDuck();
		RubberDuck rubberDuckie = new RubberDuck();
		DecoyDuck decoy = new DecoyDuck();

		ModelDuck model = new ModelDuck();

		mallard.performQuack();
		rubberDuckie.performQuack();
		decoy.performQuack();

		model.performFly();
		model.setFlyBehavior(new FlyRocketPowered());
		model.performFly();
	}
}
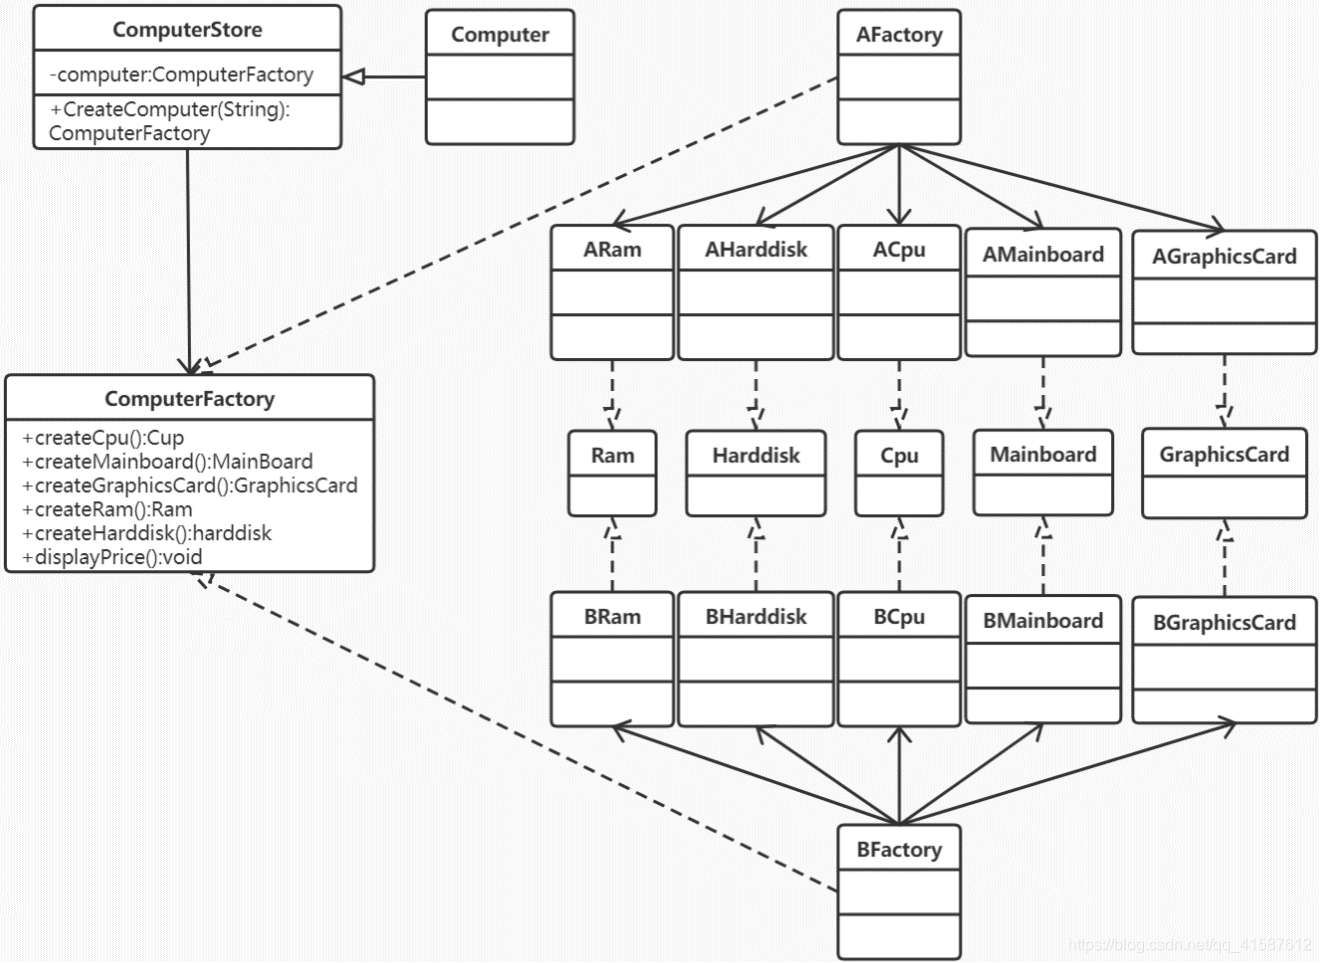
四、实验原理(算法或图)
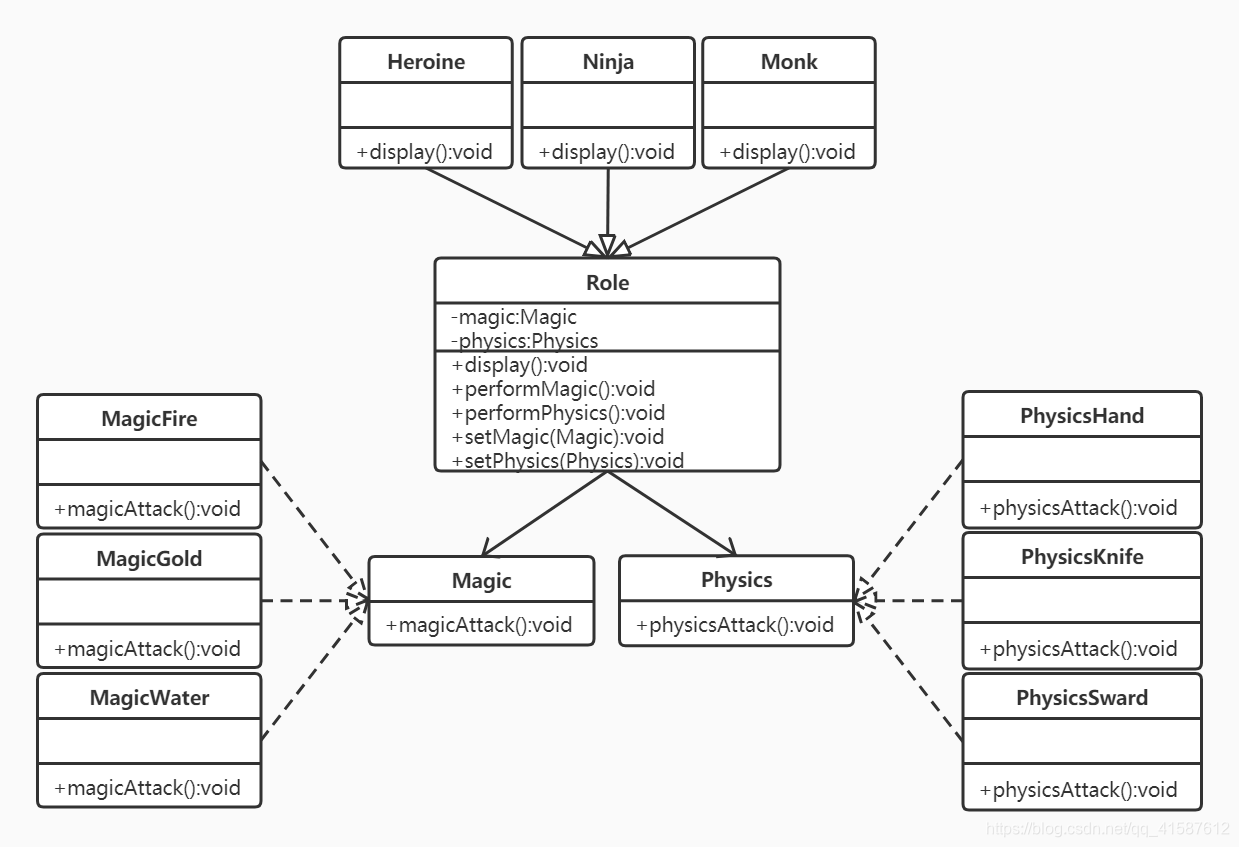
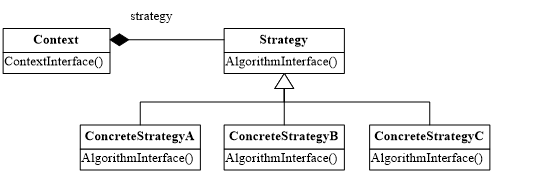
图1 策略模式类图
五、源代码
Role(基类)
public abstract class Role {
	Magic magic;
	Physics physics;

	public Role(Magic magic, Physics physics) {
		setMagic(magic);
		setPhysics(physics);
	};

	public abstract void display();

	public void performMagic() {
		magic.magicAttack();
	}

	public void performPhysics() {
		physics.physicsAttack();
	}

	public void setMagic(Magic magic) {
		this.magic = magic;
	}

	public void setPhysics(Physics physics) {
		this.physics = physics;
	}
}
Monk和尚、Heroine侠女、Ninja忍者(子类)
public class Monk extends Role {
	public Monk(Magic magic, Physics physics) {
		super(magic, physics);
	}

	@Override
	public void display() {
		System.out.println("我外貌像个和尚");
	}
}
public class Heroine extends Role {
	public Heroine(Magic magic, Physics physics) {
		super(magic, physics);
	}

	@Override
	public void display() {
		System.out.println("我外貌像个侠女");
	}
}
public class Ninja extends Role {
	public Ninja(Magic magic, Physics physics) {
		super(magic, physics);
	}

	@Override
	public void display() {
		System.out.println("我外貌像个忍者");
	}
}
Magic接口
public interface Magic {
	public void magicAttack() ;
}
实现Magic的类
public class MagicFire implements Magic {
	@Override
	public void magicAttack() {
		System.out.println("正在使用火系魔法攻击");
	}
}
public class MagicGold implements Magic {
	@Override
	public void magicAttack() {
		System.out.println("正在使用金系魔法攻击");
	}
}
public class MagicWater implements Magic {
	@Override
	public void magicAttack() {
		System.out.println("正在使用水系魔法攻击");
	}
}
Physics接口
public interface Physics {
	public void physicsAttack() ;
}
实现Physics的类
public class PhysicsHand implements Physics {
	@Override
	public void physicsAttack() {
		System.out.println("正在使用手进行物理攻击");
	}
}
public class PhysicsKnife implements Physics {
	@Override
	public void physicsAttack() {
		System.out.println("正在使用刀进行物理攻击");
	}
}
public class PhysicsSword  implements Physics {
	@Override
	public void physicsAttack() {
		System.out.println("正在使用剑进行物理攻击");
	}
}
Test类
public class Test {
	public static void main(String[] args) {
		Monk monk = new Monk(new MagicGold(), new PhysicsHand());
		monk.display();
		monk.performPhysics();
		monk.performMagic();

		Heroine heroine  =new Heroine(new MagicWater(), new PhysicsSword());
		heroine.display();
		heroine.performPhysics();
		heroine.performMagic();

		Ninja ninja = new Ninja(new MagicFire(), new PhysicsSword());
		ninja.display();
		ninja.performPhysics();
		ninja.performMagic();
	}
}
六、运行结果

装饰者模式 Decorator Pattern
装饰者模式动态地将责任附加到对象上,若要扩展功能,装饰者提供了比继承更有弹性的替代方案。在熟悉装饰者模式相关理论知识的基础上,使用装设者模式实现米线店结账小程序。
一、基本要求
使用装饰者模式实现米线店结账程序,要求如下:
- 米线有三种,干浆、酸浆和水米线。
- 配料有三种,豆腐、鸡蛋、牛肉,今后还会更多。
- 客户可疑随心所欲的要各种米线搭配各种配料,配料可以加同一种加多份,或者不同种加多份。
二、实验内容
1. 设计并绘制该程序的类图;
2. 依照设计的类图使用Java语言编写代码,并实现该程序;
3. 除了核心的模式相关类实现外,提供测试环境,按照难度高低,分别是:
a)控制台程序,Client硬编码初始化模式和测试环境,运行结果文本输出;
b)控制台程序,Client初始化测试环境,并根据用户输入运算,运行结果文本输出;
c)设计并实现用户UI,Client初始化测试环境,并根据用户在UI控件上的输入运算,运行结果文本输出;
三、实验提示
1. 装饰者模式的结构和组件

- Component:对象接口,可以给对象动态地添加职责;
- Concrete Component:具体对象;
- Decorator:维持一个指向Component对象的指针,并定义一个与Component接口一致的接口;
- ConcreteDecorator:向组件添加职责;
- Decorator将请求转发给它的Component对象,并有可能在转发请求前后执行一些附加的动作;
2. 装饰者模式代码提示
Starbuzz范例:以饮料为主体,然后在运行时以调料来“装饰”饮料。

Beverage 基类
public abstract class Beverage {
	String description = "Unknown Beverage";

	public String getDescription() {
		return description;
	}

	public abstract double cost();
}
HouseBlend 具体饮料类
public class HouseBlend extends Beverage {
	public HouseBlend() {
		description = "House Blend Coffee";
	}

	public double cost() {
		return .89;
	}
}
CondimentDecorator 调料基类
public abstract class CondimentDecorator extends Beverage {
	public abstract String getDescription();
}
Soy 具体调料类
public class Soy extends CondimentDecorator {
	Beverage beverage;

	public Soy(Beverage beverage) {
		this.beverage = beverage;
	}

	public String getDescription() {
		return beverage.getDescription() + ", Soy";
	}

	public double cost() {
		return .15 + beverage.cost();
	}
}
StarbuzzCoffee 测试环境
public class StarbuzzCoffee {

	public static void main(String args[]) {
		Beverage beverage = new Espresso();
		System.out.println(beverage.getDescription() + " $" + beverage.cost());

		Beverage beverage2 = new DarkRoast();
		beverage2 = new Mocha(beverage2);
		beverage2 = new Mocha(beverage2);
		beverage2 = new Whip(beverage2);
		System.out.println(beverage2.getDescription() + " $" + beverage2.cost());

		Beverage beverage3 = new HouseBlend();
		beverage3 = new Soy(beverage3);
		beverage3 = new Mocha(beverage3);
		beverage3 = new Whip(beverage3);
		System.out.println(beverage3.getDescription() + " $" + beverage3.cost());
	}
}
四、实验原理(算法或图)

五、源码
Noodles基类
public abstract class Noodles {
	private String description = null;

	public String getDescription() {
	 	return description;
	}

	public void setDescription(String description) {
	 	this.description = description;
	}

	public abstract double cost();
}
继承Noodles的类
public class NoodlesAcid extends Noodles {
	public NoodlesAcid() {
    	String description="酸浆米线";
		setDescription(description);
    }

	@Override
	public double cost() {
		return 3;
	}
}
public class NoodlesDry extends Noodles {
	public NoodlesDry() {
		String description="干浆米线";
		setDescription(description);
	}

	@Override
	public double cost() {
		return 2;
	}
}
public class NoodlesWater extends Noodles {
	public NoodlesWater() {
    	String description="水米线";
		setDescription(description);
    }

	@Override
	public double cost() {
		return 2;
	}
}
Ingredients基类
public abstract class Ingredients extends Noodles {
	public abstract String getDescription();

	@Override
	public double cost() {
		return 0;
	}
}
继承Ingredients的类
public class Beef extends Ingredients{
	private Noodles noodles=null;

	public Beef(Noodles noodles){
		this.noodles = noodles;
	}

	@Override
	public String getDescription() {
		String str = noodles.getDescription();

		if(str.indexOf("牛肉") != -1){
			return str;
		}else{
			return "牛肉" + noodles.getDescription();
		}
	}

	public double cost(){
		return 5 + noodles.cost();
	}
}
public class Egg extends Ingredients {
	private Noodles noodles=null;

	public Egg(Noodles noodles){
		this.noodles = noodles;
	}

	@Override
	public String getDescription() {
		String str = noodles.getDescription();

		if(str.indexOf("鸡蛋") != -1){
			return str;
		}else{
			return "鸡蛋" + noodles.getDescription();
		}
	}

	public double cost(){
		return 2 + noodles.cost();
	}
}
public class Tofu extends Ingredients{
	private Noodles noodles=null;

	public Tofu(Noodles noodles){
		this.noodles = noodles;
	}

	@Override
	public String getDescription() {
		String str = noodles.getDescription();

		if(str.indexOf("豆腐") != -1){
			return str;
		}else{
			return "豆腐" + noodles.getDescription();
		}
	}

	public double cost(){
		return 2.5 + noodles.cost();
	}
}
Test类
public class Test {
	public static void main(String[] args) {
	    Noodles noodles1 = new NoodlesDry();
	    noodles1 = new Egg(noodles1);
	    noodles1 = new Beef(noodles1);
	    System.out.println(noodles1.getDescription() + noodles1.cost());

	    Noodles noodles2 = new NoodlesAcid();
	    noodles2 = new Tofu(noodles2);
	    noodles2 = new Beef(noodles2);
	    System.out.println(noodles2.getDescription() + noodles2.cost());
	}
}
六、实验结果

抽象工厂模式 Abstract Factory Pattern
抽象工厂模式提供一个接口,用于创建相关或依赖对象的家族,而不需要明确指定具体类。在熟悉抽象工厂模式相关理论知识的基础上,使用抽象工厂模式实现“电脑配置商店”程序。
一、基本要求
使用抽象工厂模式实现“电脑配置商店”,要求如下:
- 电脑由CPU、主板、显卡、内存、硬盘等配件组合而成。现电脑配置有两种配置方案。
- 根据配置方案可以显示具体配置信息。
- 根据配置方案可以显示价格。
二、实验内容
1. 设计并绘制该程序的类图;
2. 依照设计的类图使用Java语言编写代码,并实现该程序;
3. 除了核心的模式相关类实现外,提供测试环境,按照难度高低,分别是:
a)控制台程序,Client硬编码初始化模式和测试环境,运行结果文本输出;
b)控制台程序,Client初始化测试环境,并根据用户输入运算,运行结果文本输出;
c)设计并实现用户UI,Client初始化测试环境,并根据用户在UI控件上的输入运算,运行结果文本输出;
三、实验提示
1. 抽象工厂模式的结构和组件

- Abstract Factory:声明创建抽象产品对象的操作接口;
- ConcreteFactory:实现创建具体对象的操作;
- Abstract Product:为一类产品对象声明一个接口;
- ConcreteProduct:定义一个被具体工厂创建的产品对象;
2. 抽象工厂模式代码提示
PizzaStore范例:抽象工厂允许客户使用抽象的接口来创建一组相关的产品,而不需要知道实际产出的具体产品是什么,这样一来,客户就从具体的产品中被解耦。
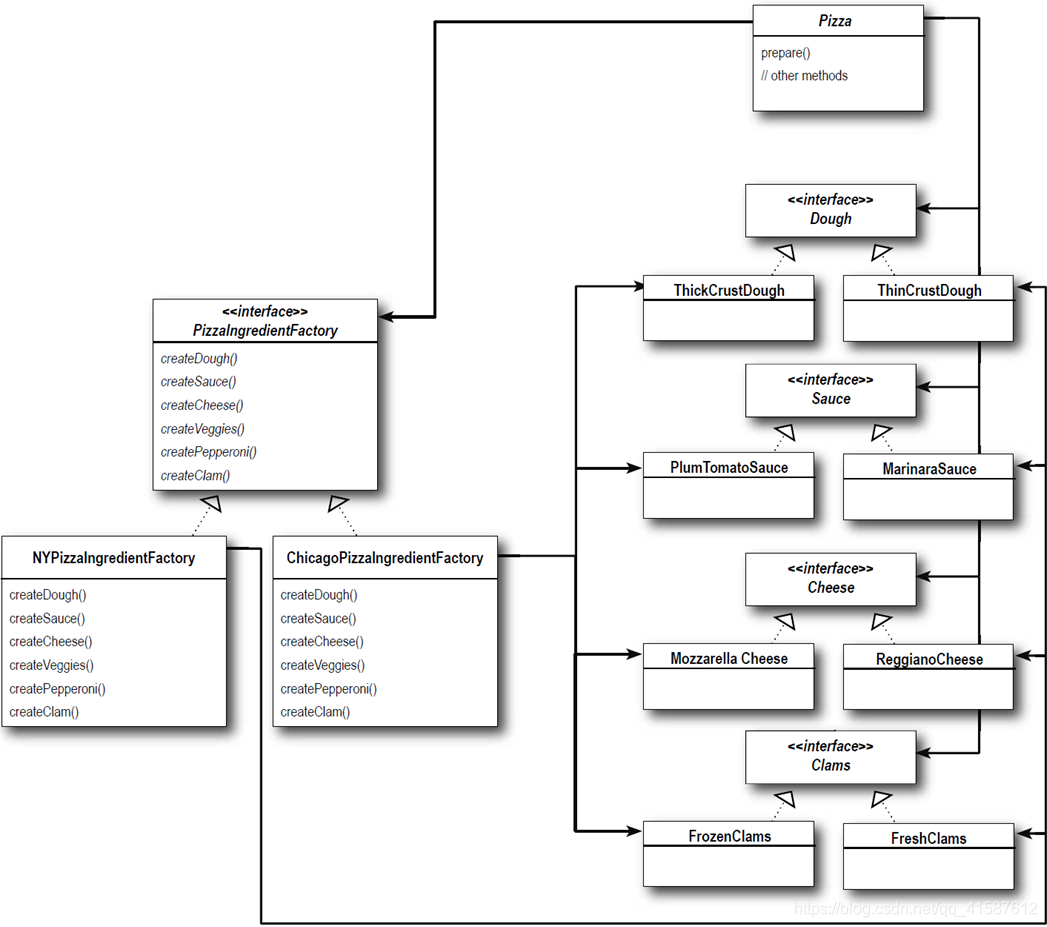
PizzaIngredientFactory 接口
public interface PizzaIngredientFactory {

	public Dough createDough();
	public Sauce createSauce();
	public Cheese createCheese();
	public Veggies[] createVeggies();
	public Pepperoni createPepperoni();
	public Clams createClam();
}
ChicagoPizzaIngredientFactory 具体实现类
public class ChicagoPizzaIngredientFactory
	implements PizzaIngredientFactory
{

	public Dough createDough() {
		return new ThickCrustDough();
	}

	public Sauce createSauce() {
		return new PlumTomatoSauce();
	}

	public Cheese createCheese() {
		return new MozzarellaCheese();
	}

	public Veggies[] createVeggies() {
		Veggies veggies[] = { new BlackOlives(),
		                      new Spinach(),
		                      new Eggplant() };
		return veggies;
	}

	public Pepperoni createPepperoni() {
		return new SlicedPepperoni();
	}

	public Clams createClam() {
		return new FrozenClams();
	}
}
Pizza 基类
public abstract class Pizza {
	String name;

	Dough dough;
	Sauce sauce;
	Veggies veggies[];
	Cheese cheese;
	Pepperoni pepperoni;
	Clams clam;

	abstract void prepare();

	void bake() {
		System.out.println("Bake for 25 minutes at 350");
	}

	void cut() {
		System.out.println("Cutting the pizza into diagonal slices");
	}

	void box() {
		System.out.println("Place pizza in official PizzaStore box");
	}

	void setName(String name) {
		this.name = name;
	}

	String getName() {
		return name;
	}

	public String toString() {
		StringBuffer result = new StringBuffer();
		result.append("---- " + name + " ----\n");
		if (dough != null) {
			result.append(dough);
			result.append("\n");
		}
		if (sauce != null) {
			result.append(sauce);
			result.append("\n");
		}
		if (cheese != null) {
			result.append(cheese);
			result.append("\n");
		}
		if (veggies != null) {
			for (int i = 0; i < veggies.length; i++) {
				result.append(veggies[i]);
				if (i < veggies.length-1) {
					result.append(", ");
				}
			}
			result.append("\n");
		}
		if (clam != null) {
			result.append(clam);
			result.append("\n");
		}
		if (pepperoni != null) {
			result.append(pepperoni);
			result.append("\n");
		}
		return result.toString();
	}
}
Dough 接口及实现
public interface Dough {
	public String toString();
}

public class ThickCrustDough implements Dough {
	public String toString() {
		return "ThickCrust style extra thick crust dough";
	}
}
PizzaTestDrive 测试环境
public class PizzaTestDrive {

	public static void main(String[] args) {
		PizzaStore nyStore = new NYPizzaStore();
		PizzaStore chicagoStore = new ChicagoPizzaStore();

		Pizza pizza = nyStore.orderPizza("cheese");
		System.out.println("Ethan ordered a " + pizza + "\n");

		pizza = chicagoStore.orderPizza("cheese");
		System.out.println("Joel ordered a " + pizza + "\n");

		pizza = nyStore.orderPizza("clam");
		System.out.println("Ethan ordered a " + pizza + "\n");

		pizza = chicagoStore.orderPizza("clam");
		System.out.println("Joel ordered a " + pizza + "\n");

		pizza = nyStore.orderPizza("pepperoni");
		System.out.println("Ethan ordered a " + pizza + "\n");

		pizza = chicagoStore.orderPizza("pepperoni");
		System.out.println("Joel ordered a " + pizza + "\n");

		pizza = nyStore.orderPizza("veggie");
		System.out.println("Ethan ordered a " + pizza + "\n");

		pizza = chicagoStore.orderPizza("veggie");
		System.out.println("Joel ordered a " + pizza + "\n");
	}
}
四、实验原理
五、源码
ComputerStore类
public abstract class ComputerStore {
	ComputerFactory computer;
	public abstract ComputerFactory createComputer(String type) ;
}
继承ComputerStore的类
public class Computer extends ComputerStore{
	public  ComputerFactory createComputer(String type){
		ComputerFactory computer=null;
		if(type.equals("A")){
			computer=new AFactory();
		}
		else if(type.equals("B")){
			computer=new BFactory();
		}

		computer.createCpu();
		computer.createGraphicsCard();
		computer.createHarddisk();
		computer.createMainboard();
		computer.createRam();
		computer.displayPrice();
		return computer;
	}
}
ComputerFactory接口
public interface ComputerFactory {
	public Cpu createCpu();
	public Mainboard createMainboard();
	public GraphicsCard createGraphicsCard();
	public Ram createRam();
	public Harddisk createHarddisk();
	public void displayPrice();
}
实现ComputerFactory的类
public class AFactory implements ComputerFactory{
	public AFactory(){
		System.out.println("\n方案A:");
	}

	public Cpu createCpu() {
		return new ACpu();
	}

	public Mainboard createMainboard() {
		return new AMainboard();
	}

	public GraphicsCard createGraphicsCard() {
		return new AGraphicsCard();
	}

	public Ram createRam() {
		return new ARam();
	}

	public Harddisk createHarddisk() {
		return new AHarddisk();
	}

	public void displayPrice() {
		System.out.println("RMB:4000");
	}
}
public class BFactory implements ComputerFactory{
	public BFactory(){
		System.out.println("\n方案B:");
	}
	public Cpu createCpu() {
		return new BCpu();
	}
	public Mainboard createMainboard() {
		return new BMainboard();
	}
	public GraphicsCard createGraphicsCard() {
		return new BGraphicsCard();
	}
	public Ram createRam() {
		return new BRam();
	}
	public Harddisk createHarddisk() {
		return new BHarddisk();
	}
	public void displayPrice() {
		System.out.println("RMB:8000");
	}
}
Cpu接口
public interface Cpu {
	String Cpu=new String();
}
实现Cpu的类
public class ACpu implements Cpu {
	String Cpu = new String();

	public ACpu(){
		Cpu="Intel i5";
		System.out.println("Cpu:" + Cpu);
	}
}
public class BCpu implements Cpu {
	String Cpu = new String();

	public BCpu(){
		Cpu="Intel i7";
		System.out.println("Cpu:" + Cpu);
	}
}
GraphicsCard接口
public interface GraphicsCard {
	String GraphicsCard=new String();
}
实现GraphicsCard的类
public class AGraphicsCard implements GraphicsCard{
	String GraphicsCard=new String();

	public AGraphicsCard(){
		GraphicsCard="GTX 1050";
		System.out.println("GraphicsCard:"+GraphicsCard);
	}
}
public class BGraphicsCard implements GraphicsCard{
	String GraphicsCard = new String();

	public BGraphicsCard(){
		GraphicsCard="GTX 1050Ti";
		System.out.println("GraphicsCard:"+GraphicsCard);
	}
}
Harddisk接口
public interface Harddisk {
	String Harddisk=new String();
}
实现Harddisk的类
public class AHarddisk implements Harddisk{
	String Harddisk=new String();

	public AHarddisk(){
		Harddisk="HDD 1T";
		System.out.println("Harddisk:"+Harddisk);
	}
}
public class BHarddisk implements Harddisk {
	String Harddisk=new String();

	public BHarddisk(){
		Harddisk="SSD 1T";
		System.out.println("Harddisk:"+Harddisk);
	}
}
Mianboard接口
public interface Mainboard {
	String Mainboard=new String();
}
继承Mianboard的类
public class AMainboard implements Mainboard{
	String Mainboard=new String();

	public AMainboard(){
		Mainboard="ASUS";
		System.out.println("Mainboard:"+Mainboard);
	}
}
public class BGraphicsCard implements GraphicsCard{
	String GraphicsCard = new String();

	public BGraphicsCard(){
		GraphicsCard="GTX 1050Ti";
		System.out.println("GraphicsCard:"+GraphicsCard);
	}
}
Ram接口
public interface Ram {
	String Ram =new String();
}
实现Ram的类
public class ARam implements Ram{
	String Ram=new String();

	public ARam(){
		Ram="4g";
		System.out.println("Ram:"+Ram);
	}
}
public class BRam implements Ram{
	String Ram=new String();

	public BRam(){
		Ram="8g";
		System.out.println("Ram:"+Ram);
	}
}
Test类
import java.util.Scanner;

public class Test {
	public static void main(String[] args) {
		Computer computer=new Computer ();
		Scanner sc = new Scanner(System.in);
		System.out.println("选项选择电脑配置方案 (A or B)");
    	String k = sc.nextLine();
    	sc.close();
    	switch(k){
    	case "A": case "a":
    		computer.createComputer("A");
    		break;
    	case "B": case "b":
    		computer.createComputer("B");
    		break;
    	default:
    		System.out.println("不存在所选择方案");
    		break;
    	}
	}
}
六、实验结果

命令模式 Command Pattern
命令模式将“请求”封装成对象,以便使用不同的请求、队列或者日志来参数化其他对象,命令模式也支持可撤销的操作。在熟悉命令模式相关理论知识的基础上,使用命令模式实现图片处理程序。
一、基本要求
使用命令模式实现图片处理程序,要求如下:
- 图片处理程序要有3张图片。
- 每张图片至少有3种操作。
- 实现类似遥控器的菜单,动态的选择对图片进行的处理。
- 要有“撤消操作”,撤消操作要可以撤销至最后一步。
二、 实验内容
1. 设计并绘制该程序的类图;
2. 依照设计的类图使用Java语言编写代码,并实现该程序;
3. 除了核心的模式相关类实现外,提供测试环境,按照难度高低,分别是:
a)控制台程序,Client硬编码初始化模式和测试环境,运行结果文本输出;
b)控制台程序,Client初始化测试环境,并根据用户输入运算,运行结果文本输出;
c)设计并实现用户UI,Client初始化测试环境,并根据用户在UI控件上的输入运算,运行结果文本输出;
三、实验提示
1. 命令模式的结构和组件
- Command:声明执行操作的接口;
- ConcreteCommand:将一个接收者对象绑定于一个动作,调用接收者相应的操作;
- Client(Application):创建一个具体命令对象并设定其接收者;
- Invoker(MenuItem):要求命令执行请求;
- Receiver(Document,Application):知道如何实施与执行一个请求相关的操作;
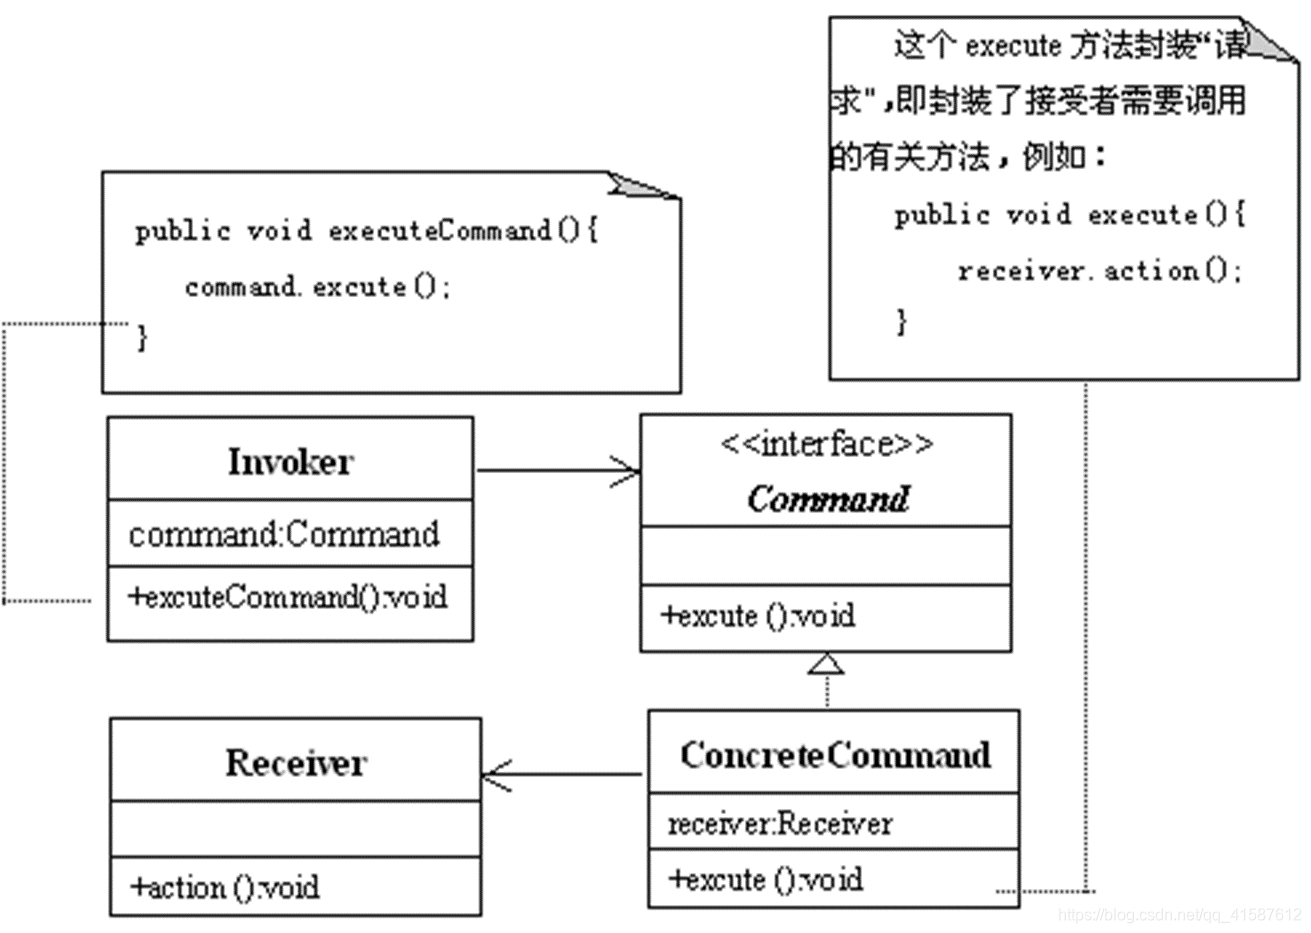
2. 命令模式代码提示
RemoteControl范例:命令对象将动作和接收者包进对象中。这个对象只暴露出一个execute()方法,当此方法调用的时候,接收者就会进行这些动作。
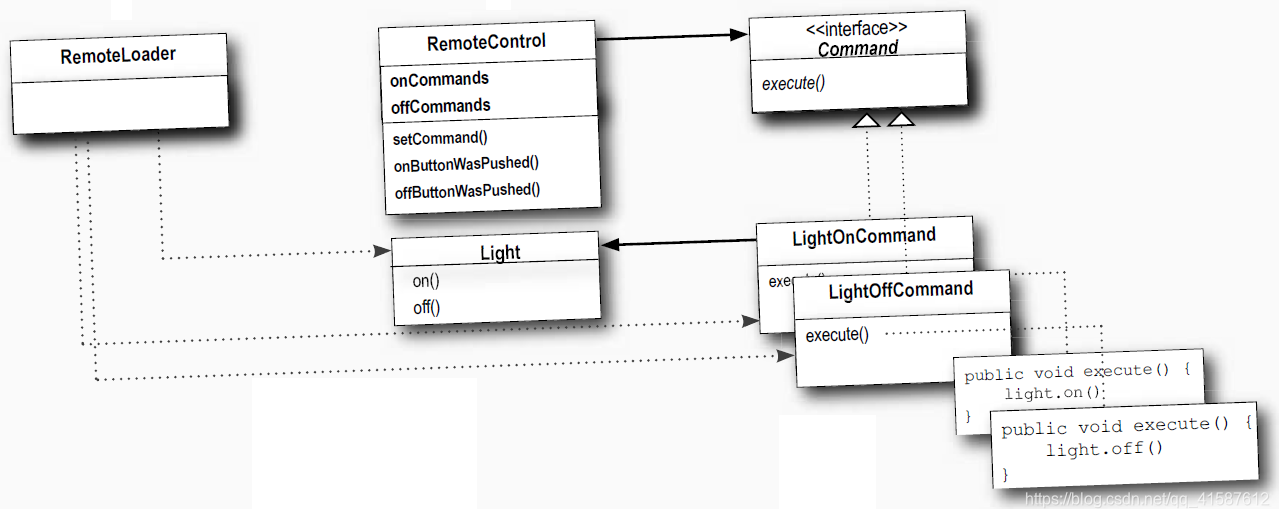
RemoteControl类
public class RemoteControl {
	Command[] onCommands;
	Command[] offCommands;

	public RemoteControl() {
		onCommands = new Command[7];
		offCommands = new Command[7];

		Command noCommand = new NoCommand();
		for (int i = 0; i < 7; i++) {
			onCommands[i] = noCommand;
			offCommands[i] = noCommand;
		}
	}

	public void setCommand(int slot, Command onCommand, Command offCommand) {
		onCommands[slot] = onCommand;
		offCommands[slot] = offCommand;
	}

	public void onButtonWasPushed(int slot) {
		onCommands[slot].execute();
	}

	public void offButtonWasPushed(int slot) {
		offCommands[slot].execute();
	}

	public String toString() {
		StringBuffer stringBuff = new StringBuffer();
		stringBuff.append("\n------ Remote Control -------\n");
		for (int i = 0; i < onCommands.length; i++) {
			stringBuff.append("[slot " + i + "] " + onCommands[i].getClass().getName()
				+ "    " + offCommands[i].getClass().getName() + "\n");
		}
		return stringBuff.toString();
	}
}
Command类
public interface Command {
	public void execute();
}
Light类
public class Light {
	String location = "";

	public Light(String location) {
		this.location = location;
	}

	public void on() {
		System.out.println(location + " light is on");
	}

	public void off() {
		System.out.println(location + " light is off");
	}
}
LightOnCommand类
public class LightOnCommand implements Command {
	Light light;

	public LightOnCommand(Light light) {
		this.light = light;
	}

	public void execute() {
		light.on();
	}
}
测试环境RemoteLoader
public class RemoteLoader {

	public static void main(String[] args) {
		RemoteControl remoteControl = new RemoteControl();

		Light livingRoomLight = new Light("Living Room");
		Light kitchenLight = new Light("Kitchen");
		CeilingFan ceilingFan= new CeilingFan("Living Room");
		GarageDoor garageDoor = new GarageDoor("");
		Stereo stereo = new Stereo("Living Room");

		LightOnCommand livingRoomLightOn =
				new LightOnCommand(livingRoomLight);
		LightOffCommand livingRoomLightOff =
				new LightOffCommand(livingRoomLight);
		LightOnCommand kitchenLightOn =
				new LightOnCommand(kitchenLight);
		LightOffCommand kitchenLightOff =
				new LightOffCommand(kitchenLight);

		CeilingFanOnCommand ceilingFanOn =
				new CeilingFanOnCommand(ceilingFan);
		CeilingFanOffCommand ceilingFanOff =
				new CeilingFanOffCommand(ceilingFan);

		GarageDoorUpCommand garageDoorUp =
				new GarageDoorUpCommand(garageDoor);
		GarageDoorDownCommand garageDoorDown =
				new GarageDoorDownCommand(garageDoor);

		StereoOnWithCDCommand stereoOnWithCD =
				new StereoOnWithCDCommand(stereo);
		StereoOffCommand  stereoOff =
				new StereoOffCommand(stereo);

		remoteControl.setCommand(0, livingRoomLightOn, livingRoomLightOff);
		remoteControl.setCommand(1, kitchenLightOn, kitchenLightOff);
		remoteControl.setCommand(2, ceilingFanOn, ceilingFanOff);
		remoteControl.setCommand(3, stereoOnWithCD, stereoOff);

		System.out.println(remoteControl);

		remoteControl.onButtonWasPushed(0);
		remoteControl.offButtonWasPushed(0);
		remoteControl.onButtonWasPushed(1);
		remoteControl.offButtonWasPushed(1);
		remoteControl.onButtonWasPushed(2);
		remoteControl.offButtonWasPushed(2);
		remoteControl.onButtonWasPushed(3);
		remoteControl.offButtonWasPushed(3);
	}
}
四、实验原理
五、源码
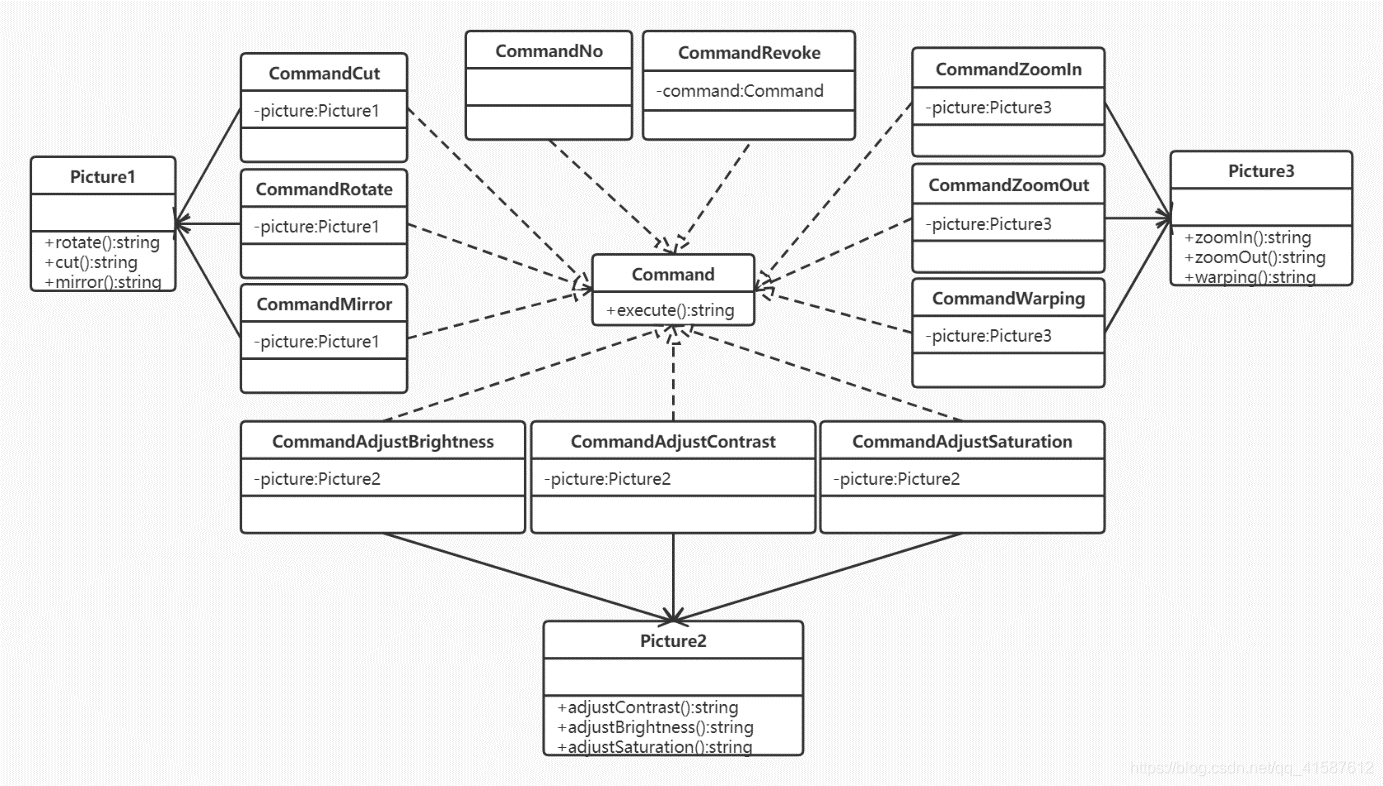
图片类
public class Picture1 {
	public String rotate(){
		 return "Picture1旋转";
	}

	public String cut(){
		return "Picture1剪切";
	}

	public String mirror(){
		return "Picture1镜像";
	}
}
public class Picture2 {
	public String adjustContrast(){
		return "picture2调节对比度";
	}

	public String adjustBrightness(){
		return "picture2调节亮度";
	}

	public String adjustSaturation(){
		return "picture2调节饱和度";
	}
}
public class Picture3 {
	public String zoomIn(){
		return "Picture3放大";
	}

	public String zoomOut(){
		return "Picture3缩小";
	}

	public String warping(){
		return "Picture3扭曲";
	}
}
Command接口
public interface Command {
	public String execute();
}
实现Command的类
public class CommandCut implements Command {
	Picture1 picture = null;

    public CommandCut(Picture1 picture){
    	this.picture = picture;
    }

	@Override
	public String execute() {
		return picture.cut();
	}
}
public class CommandMirror implements Command {
	Picture1 picture = null;

    public CommandMirror(Picture1 picture){
    	this.picture = picture;
    }

	@Override
	public String execute() {
		return picture.mirror();
	}
}
public class CommandRotate implements Command {
	Picture1 picture = null;

    public CommandRotate(Picture1 picture){
    	this.picture = picture;
    }

	@Override
	public String execute() {
		return picture.rotate();
	}
}
public class CommandWarping implements Command {
	Picture3 picture = null;

    public CommandWarping(Picture3 picture){
    	this.picture = picture;
    }

	@Override
	public String execute() {
		return picture.warping();
	}
}
public class CommandZoomIn implements Command {
	Picture3 picture = null;

    public CommandZoomIn(Picture3 picture){
    	this.picture = picture;
    }

	@Override
	public String execute() {
		return picture.zoomIn();
	}
}
public class CommandZoomOut implements Command {
	Picture3 picture = null;

    public CommandZoomOut(Picture3 picture){
    	this.picture = picture;
    }

	@Override
	public String execute() {
		return picture.zoomOut();
	}
}
public class CommandNo implements Command{
	@Override
	public String execute() {
		return null;
	}
}
public class CommandRevoke implements Command {
	Command command = null;

    public CommandRevoke(Command command){
    	this.command = command;
    }

	@Override
	public String execute() {
		return "已撤销上一步:" + command.execute();
	}
}
Test类
public class Test {
	public static void main(String[] args) {
		Scanner sc = new Scanner(System.in);
		Command command = null;
		while(true) {
			System.out.println("选择要处理的图片:\n1)图片1;2)图片2;3)图片3;0)撤销");
	    	String k = sc.nextLine();
	    	switch(k) {
	    	case "1":
	    		Picture1 picture1 = new Picture1();
	    		System.out.println("选择处理方式:\n1)旋转;2)剪切;3)镜像");
	    		String key1 = sc.nextLine();
	    		switch(key1) {
	    		case "1": command = new CommandRotate(picture1); break;
	    		case "2": command = new CommandCut(picture1); break;
	    		case "3": command = new CommandMirror(picture1); break;
	    		default: command = new CommandNo(); break;
	    		}
	    		break;
	    	case "2":
	    		Picture2 picture2 = new Picture2();
	    		System.out.println("选择处理方式:\n1)调节对比度;2)调节亮度;3)调节饱和度");
	    		String key2 = sc.nextLine();
	    		switch(key2) {
	    		case "1": command = new CommandAdjustContrast(picture2); break;
	    		case "2": command = new CommandAdjustBrightness(picture2); break;
	    		case "3": command = new CommandAdjustSaturation(picture2); break;
	    		default: command = new CommandNo(); break;
	    		}
	    		break;
	    	case "3":
	    		Picture3 picture3 = new Picture3();
	    		System.out.println("选择处理方式:\n1)放大;2)缩小;3)扭曲");
	    		String key3 = sc.nextLine();
	    		switch(key3) {
	    		case "1": command = new CommandZoomIn(picture3); break;
	    		case "2": command = new CommandZoomOut(picture3); break;
	    		case "3": command = new CommandWarping(picture3); break;
	    		default: command = new CommandNo(); break;
	    		}
	    		break;
	    	case "0":
	    		command = new CommandRevoke(command);
	    		break;
	    	}
	    	System.out.println(command.execute());
		}
	}
}
六、实验结果
