SpringIOC+JDBC+Tomcat+SpringMVC+Servlet
- 模块化开发 不加Tomcat和Servlet 和mvc
将开发流程分成三个模块 service+controller+dao
首先,打开idea新建一个project(最外层的项目)

然后 项目创建好后,选中项目 右键 依次新建两个Module 如同上方 名字为dao和service
接着,再创建一个Module,名字为controller 选择的是webapp,和上方不同 因为这个模块需要和前端交互了。

创建好后目录结构如下:
![]](https://img-blog.csdnimg.cn/20210318012819951.png?x-oss-process=image/watermark,type_ZmFuZ3poZW5naGVpdGk,shadow_10,text_aHR0cHM6Ly9ibG9nLmNzZG4ubmV0L0c3NTgx,size_16,color_FFFFFF,t_70)
在最外层的pom中应当存在如下:
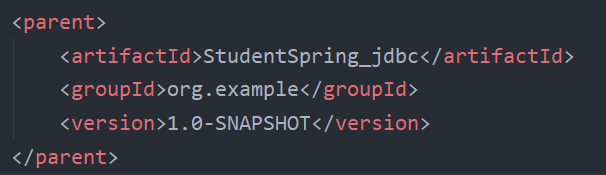
而在三个Module的pom文件中应当都存在如下:
引入依赖 在最外层的pom文件中引入需要的依赖:
<?xml version="1.0" encoding="UTF-8"?>
<project xmlns="http://maven.apache.org/POM/4.0.0" xmlns:xsi="http://www.w3.org/2001/XMLSchema-instance"
xsi:schemaLocation="http://maven.apache.org/POM/4.0.0 http://maven.apache.org/xsd/maven-4.0.0.xsd">
<modelVersion>4.0.0</modelVersion>
<groupId>org.example</groupId>
<artifactId>StudentSpring_jdbc</artifactId>
<packaging>pom</packaging>
<version>1.0-SNAPSHOT</version>
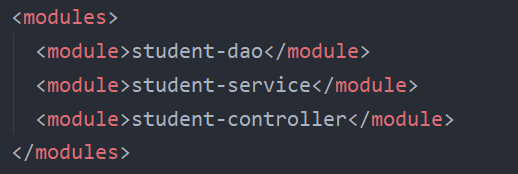
<!--此处是代表自己的三个子模块-->
<modules>
<module>student-dao</module>
<module>student-service</module>
<module>student-controller</module>
</modules>
<name>StudentSpring_jdbc</name>
<!-- FIXME change it to the project's website -->
<url>http://www.example.com</url>
<properties>
<project.build.sourceEncoding>UTF-8</project.build.sourceEncoding>
<maven.compiler.source>1.7</maven.compiler.source>
<maven.compiler.target>1.7</maven.compiler.target>
</properties>
<dependencies>
<!--引入junit的依赖-->
<dependency>
<groupId>junit</groupId>
<artifactId>junit</artifactId>
<version>4.11</version>
<scope>test</scope>
</dependency>
<!--需要导的包
spring-context
jdbc 需要使用jdbc
conmmons-dbcp
mysql-connector-java
-->
<!--
此依赖 中包含了JdbcTemplate的依赖 是spring封装的jdbc
-->
<dependency>
<groupId>org.springframework</groupId>
<artifactId>spring-jdbc</artifactId>
<version>5.3.4</version>
</dependency>
<!--
引入lombok的依赖
此插件先在file-settting的plugin中下载下来
此插件的作用是可以帮助我们自动生成getter和setter等方法
-->
<dependency>
<groupId>org.projectlombok</groupId>
<artifactId>lombok</artifactId>
<version>1.18.18</version>
</dependency>
<!--
把context改成webmvc 就是开启了springmvc 需要用到mvc的注解 来拦截前端发送的请求
webmvc包含context
-->
<dependency>
<groupId>org.springframework</groupId>
<artifactId>spring-webmvc</artifactId>
<version>5.3.4</version>
</dependency>
<!--
需要用到数据源 datasource
-->
<dependency>
<groupId>commons-dbcp</groupId>
<artifactId>commons-dbcp</artifactId>
<version>1.4</version>
</dependency>
<dependency>
<groupId>mysql</groupId>
<artifactId>mysql-connector-java</artifactId>
<version>5.1.40</version>
</dependency>
<!--
Spring用来处理json的包
相当于ali的fastjson
-->
<dependency>
<groupId>com.fasterxml.jackson.core</groupId>
<artifactId>jackson-databind</artifactId>
<version>2.12.1</version>
</dependency>
<!--servlet的依赖 因为要使用servlet-->
<dependency>
<groupId>javax.servlet</groupId>
<artifactId>javax.servlet-api</artifactId>
<version>3.1.0</version>
</dependency>
</dependencies>
<build>
<pluginManagement><!-- lock down plugins versions to avoid using Maven defaults (may be moved to parent pom) -->
<plugins>
<!-- clean lifecycle, see https://maven.apache.org/ref/current/maven-core/lifecycles.html#clean_Lifecycle -->
<plugin>
<artifactId>maven-clean-plugin</artifactId>
<version>3.1.0</version>
</plugin>
<!-- default lifecycle, jar packaging: see https://maven.apache.org/ref/current/maven-core/default-bindings.html#Plugin_bindings_for_jar_packaging -->
<plugin>
<artifactId>maven-resources-plugin</artifactId>
<version>3.0.2</version>
</plugin>
<plugin>
<artifactId>maven-compiler-plugin</artifactId>
<version>3.8.0</version>
</plugin>
<plugin>
<artifactId>maven-surefire-plugin</artifactId>
<version>2.22.1</version>
</plugin>
<plugin>
<artifactId>maven-jar-plugin</artifactId>
<version>3.0.2</version>
</plugin>
<plugin>
<artifactId>maven-install-plugin</artifactId>
<version>2.5.2</version>
</plugin>
<plugin>
<artifactId>maven-deploy-plugin</artifactId>
<version>2.8.2</version>
</plugin>
<!-- site lifecycle, see https://maven.apache.org/ref/current/maven-core/lifecycles.html#site_Lifecycle -->
<plugin>
<artifactId>maven-site-plugin</artifactId>
<version>3.7.1</version>
</plugin>
<plugin>
<artifactId>maven-project-info-reports-plugin</artifactId>
<version>3.0.0</version>
</plugin>
</plugins>
</pluginManagement>
</build>
</project>
根据controller 调用service service调用dao 使用 IOC注解 + xml的方式 来实现创建对象和赋值操作
@Controller用在控制层
@Service用在service层
@Repository 用在dao层上

给属性赋值:

    @Autowied 默认按照类型
    @Resouce 默认按照属性名字

需要在controller层中的resources文件夹下 配置application.xml 开启包扫描
    并且引入 JdbcTemplate 和数据源 并配置相关信息

     <context:property-placeholder location="classpath:db.properties"></context:property-placeholder>
    <!--


    -->
    <context:component-scan base-package="com.etoak.student"></context:component-scan>

    <!--此处是配置JdbcTemplate 和数据源-->
    <bean class="org.springframework.jdbc.core.JdbcTemplate">
        <property name="dataSource" ref="ds"></property>
    </bean>
    <bean id="ds" class="org.apache.commons.dbcp.BasicDataSource">
        <property name="driverClassName" value="${m.driver}"></property>
        <property name="url" value="${m.url}"></property>
        <property name="username" value="${m.user}"></property>
        <property name="password" value="${m.pwd}"></property>
        <property name="maxWait" value="${m.maxWait}"></property>
        <property name="maxActive" value="${m.maxActive}"></property>
    </bean>
随后dao层中书写实体类
@Data  // 此注解就来自于lombok插件 表示自动生成getter setter hashcode。。。等方法
@NoArgsConstructor //表示自动生成无参的构造方法
@AllArgsConstructor // 表示自动生成带参的构造方法

public class Course {


    //实体类中只需要提供属性即可
    private int id;
    private String name;
    private String code;
}
==dao层中书写增删改查 == 几个例子
    //查询所有学校
    @Override
    public List<School> queryAllSchool() {


        List<School> data = jt.query("select * from school " , new BeanPropertyRowMapper<School>(School.class));
        return data;
    }


	//分页查询 模糊查询
	 @Override
    public List<School> querySomeSch(String schname, int start, int max) {


        String sql = "select sch.id,sch.name,sch.phone,concat_ws(pro.name,city.name,area.name,sch.info) info from school sch " +
                "  left join locations pro on pro.id = sch.proid " +
                "  left join locations city on city.id = sch.cityid " +
                "  left join locations area on area.id = sch.areaid  where 1=1 ";
        if(ETStringUtils.isNotEmpty(schname)){


            sql+=" and sch.name like '%"+schname+"%'";
        }
        sql+=" limit ?,?";
        List<School> data = jt.query(sql, new BeanPropertyRowMapper<School>(School.class), schname, start, max);
        return data;
    }
	//查询总记录数
	 @Override
    public int countsch(String schname) {


        int count = 0;
        String sql = "select count(*) from school where 1=1";
        if (ETStringUtils.isNotEmpty(schname)){


            sql+="and school.name like '%"+schname+"%'";
        }
        count = jt.queryForObject(sql, int.class);
        return 0;
    }

	//查询指定课程的学生信息
	@Override
    public List<Sc> queryMaxScore(String name) {


        String sql="select s.id as sid,s.name as sname ,s.age,s.birth, s.schid,sc.score," +
                "       sch.id as schoolid,sch.name as schname,sch.phone, concat_ws(pro.name,city.name,area.name,sch.info) info " +
                " from student s left join sc on s.id = sc.sid left join course c on c.id = sc.cid " +
                "    left join school sch on  s.schid = sch.id " +
                "left join locations pro on sch.proid = pro.id left join locations city on city.id = sch.cityid " +
                "left join locations area on sch.areaid  =area.id " +
                "where s.id in (select sid from sc where score =(select max(score) from sc where cid=(select id from course where name=?)) " +
                "and cid=(select id from course where name=? )) and c.name=?";
        List<Sc> data = jt.query(sql, new RowMapper<Sc>() {


            @Override
            public Sc mapRow(ResultSet d, int i) throws SQLException {


                Sc sc = new Sc();
                Student stu = new Student();
                sc.setScore(d.getInt("score"));
                stu.setId(d.getInt("sid"));
                stu.setName(d.getString("sname"));
                stu.setAge(d.getInt("age"));
                stu.setBirth(ETDateUtils.string2Date(d.getDate("birth") + ""));
                stu.setSchid(d.getInt("schid"));
                if (d.getInt("schoolid") != 0) {


                    School sch = new School();
                    sch.setId(d.getInt("schoolid"));
                    sch.setName(d.getString("schname"));
                    sch.setPhone(d.getString("phone"));
                    sch.setInfo(d.getString("info"));
                    //把sch给student
                    stu.setSch(sch);
                }
                //把stu给Sc
                sc.setStu(stu);
                //把sc给result
                return sc;
            }
        }, name, name, name);

        return data.size()>0?data:null;
    }
service层中调用dao层 controller调用service层
- 使用Tomcat + servlet +mvc 来处理前端请求
首先
需要在controller层中的web.xml中进行配置
<?xml version="1.0" encoding="UTF-8"?>
<web-app xmlns="http://xmlns.jcp.org/xml/ns/javaee"
         xmlns:xsi="http://www.w3.org/2001/XMLSchema-instance"
         xsi:schemaLocation="http://xmlns.jcp.org/xml/ns/javaee http://xmlns.jcp.org/xml/ns/javaee/web-app_4_0.xsd"
         version="4.0">
  <!--
    用maven自动生成的web.xml比较老 所以用这个比较新的
  -->
  <!--
    servlet接收到请求后 先把请求给DispatcherServlet进行处理 需要spring-mvc依赖
    由它根据请求分发下来

    servlet-name随便叫
  -->
  <servlet>
    <servlet-name>mvc</servlet-name>
    <servlet-class>org.springframework.web.servlet.DispatcherServlet</servlet-class>
    <!--
      servlet初始化用到的上下文
      告诉servlet初始化的context在哪
      初始化的参数 就是初始化serlvlet 去加载IOC的文件
    -->
    <init-param>
      <param-name>contextConfigLocation</param-name>
      <param-value>classpath:applicationContext.xml</param-value>
    </init-param>
    <!--
      servlet默认是请求来的时候构造对象
      下方标签设置成1 是把Servlet对象在tomcat开启的时候构造

      url-patten 中的/ 代表所有请求  除了静态的那些
    -->
    <load-on-startup>1</load-on-startup>
  </servlet>

  <servlet-mapping>
    <servlet-name>mvc</servlet-name>
    <url-pattern>/</url-pattern>
  </servlet-mapping>
</web-app>
application.xm文件中
 <!--开启包扫描:扫描 处理请求的注解 @RequestMapping  @ResponseBody
        来自于 xmlns:mvc="http://www.springframework.org/schema/mvc"
    -->
    <mvc:annotation-driven></mvc:annotation-driven>
配置Tomcat

如此 就可以了