0 入门文档
https://www.yuque.com/atguigu/springboot
1 系统要求
- java 8
- maven 3.3+
2 HelloWorld
2.1 maven依赖
<parent>
    <groupId>org.springframework.boot</groupId>
    <artifactId>spring-boot-starter-parent</artifactId>
    <version>2.3.4.RELEASE</version>
</parent>

<dependencies>
    <dependency>
        <groupId>org.springframework.boot</groupId>
        <artifactId>spring-boot-starter-web</artifactId>
    </dependency>

</dependencies>
2.2 主程序
package App;

import org.springframework.boot.SpringApplication;
import org.springframework.boot.autoconfigure.SpringBootApplication;

@SpringBootApplication
public class MainApp {


	public static void main(String[] args) {


		SpringApplication.run(MainApp.class,args);
	}
}
2.3 Controller业务程序
package App.Controller;

import org.springframework.web.bind.annotation.RequestMapping;
import org.springframework.web.bind.annotation.RestController;

@RestController
public class HelloController {


	@RequestMapping("/hello")
	public String handle01(){


		return "Hello Wolrd !!!";
	}
}
2.4 测试
直接运行主程序的main方法

浏览器访问:

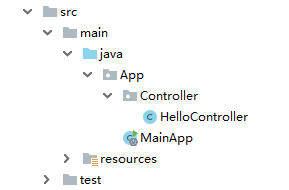
注意:项目结构如下(Controller目录要和主程序同级)
2.5 配置
简化配置:resources目录下新建application.properties,输入以下配置
server.port=9999
配置后运行访问的端口即为9999

2.6 部署
简化部署:maven添加以下build配置
<build>
    <plugins>
        <plugin>
            <groupId>org.springframework.boot</groupId>
            <artifactId>spring-boot-maven-plugin</artifactId>
        </plugin>
    </plugins>
</build>
使用maven的package打包,打包后的文件如下:

使用cmd直接运行jar包:
java -jar SpringBootStu-1.0.jar

浏览器访问:
