Redis多线程
很多人一问Redis为什么运行那么快,就是因为完全基于内存、单线程、多路复用。
但是真的是这样嘛,我们这里主要讨论一下线程的问题。
在Redis6.0之前,Redis的工作方式确实是单线程,具体如下:

缺点:
1.没法利用多CPU(虽然当时性能瓶颈并不在这里)
2.单线程某个操作出现问题会导致阻塞
优点:
1.避免线程间CPU的切换
2.不存在锁的问题
到了Redis6.0后,工作流程就变了,具体如下:
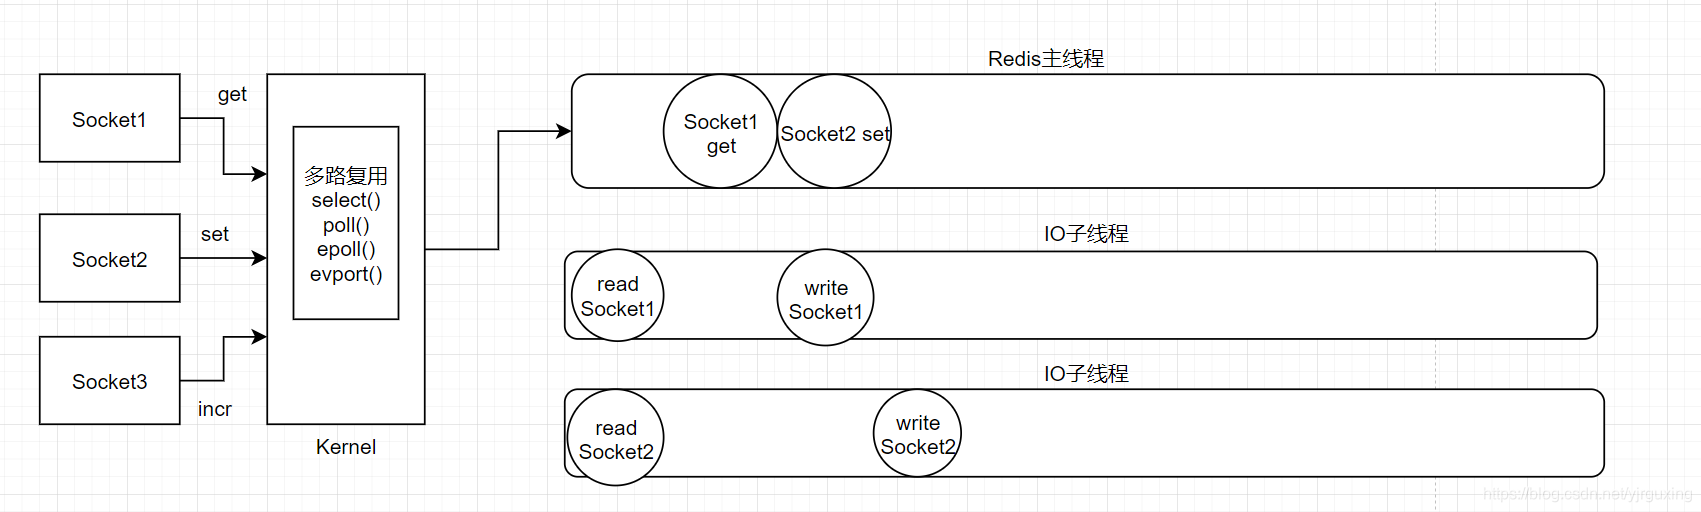
这么做的优势就在于再次提高了Redis的响应速度,利用上了多CPU。
Redis对于最开始采用单线程的解释是,Redis是基于内存的操作,大部分情况下性能瓶颈并不在CPU,而是在ram或者网络IO,所以采用了单线程。
Redis持久化
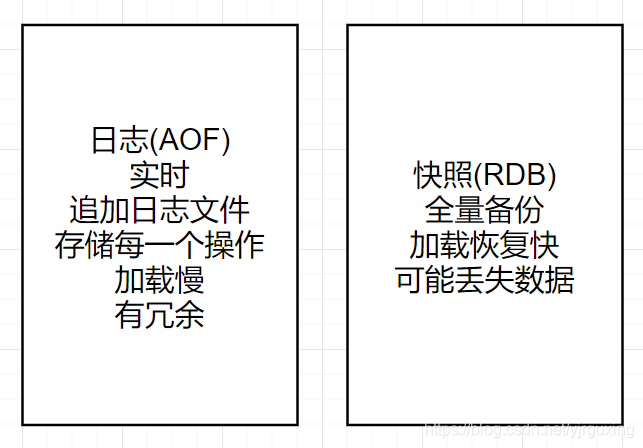
Redis持久化分为2种,日志AOF和快照RDB,2种区别如下
那么竟然有两种,可不可以都用呢?答案是:可以
同时在Redis4.x之前,默认使用的持久化的方式是rdb,当然,你可以手动启用AOF。
在Redis4.x之后,新增了混动模式。
AOF冗余
然后简单提一下AOF的冗余问题,什么叫有冗余呢?举例:
set name zhangsan
set name lisi
set name wangwu
很明显因为AOF会存储你的每一次操作,这三条指令都会被保存下来,但是实际上我们所需要的仅仅是
set name wangwu
针对这种问题,Redis也提供了解决方案:重写。
关于Redis重写的原理,大家可以等待下一篇博文,也可以自行百度。
RDB和AOF的优先级
上面有提到两种持久化方式可以同时启用,那么问题来了,都启用的情况下,先恢复哪个呢?
我们查看任意版本的Redis源码,从server.c找到入口函数int main,再寻找到loadDataFromDisk这个方法,可以得到答案。
/* Function called at startup to load RDB or AOF file in memory. */
void loadDataFromDisk(void) {


    long long start = ustime();
    if (server.aof_state == AOF_ON) {


        if (loadAppendOnlyFile(server.aof_filename) == C_OK)
            serverLog(LL_NOTICE,"DB loaded from append only file: %.3f seconds",(float)(ustime()-start)/1000000);
    } else {


        if (rdbLoad(server.rdb_filename) == C_OK) {


            serverLog(LL_NOTICE,"DB loaded from disk: %.3f seconds",
                (float)(ustime()-start)/1000000);
        } else if (errno != ENOENT) {


            serverLog(LL_WARNING,"Fatal error loading the DB: %s. Exiting.",strerror(errno));
            exit(1);
        }
    }
}
以上为Redis-3.2.5源码
我们可以很明显的看出,Redis的做法是先寻找AOF(AppendOnlyFile)文件,再去寻找RDB文件。
混合模式
混合模式是Redis在4.x版本之后新增的一个模式,顾名思义,这个模式将AOF和RDB混合到了一起。
简单提一点,当你使用AOF的方式做持久化时,在redis目录下产生的文件为appendonly.aof,使用RDB时,产生的文件为dump.rdb。
混合模式下,产生的文件为appendonly.aof,不同之处在于,当你在混合模式下对AOF文件进行重写操作时,Redis的做法是,首先将当前的数据库复制一个快照(rdb)出来,然后以2进制的方式存入aof文件,紧接着将重写缓冲区的增量命令以AOF方式写入到文件。
也就是说,混合模式下,AOF文件的前半段是RDB,后半段是AOF。
RedisConf常用配置
linux版默认设置为:redis.conf
windows版默认设置为:redis.windows.conf
设置Redis占用的端口
# Accept connections on the specified port, default is 6379 (IANA #815344).
# If port 0 is specified Redis will not listen on a TCP socket.
port 6379
bind设置用于规定是否只允许某特定IP连接此Redis,其中较特殊的设置有
127.0.0.1:只允许本记连接
0.0.0.0:允许任何连接
# By default, if no "bind" configuration directive is specified, Redis listens
# for connections from all the network interfaces available on the server.
# It is possible to listen to just one or multiple selected interfaces using
# the "bind" configuration directive, followed by one or more IP addresses.
#
# Examples:
#
# bind 192.168.1.100 10.0.0.1
# bind 127.0.0.1 ::1
#
# ~~~ WARNING ~~~ If the computer running Redis is directly exposed to the
# internet, binding to all the interfaces is dangerous and will expose the
# instance to everybody on the internet. So by default we uncomment the
# following bind directive, that will force Redis to listen only into
# the IPv4 lookback interface address (this means Redis will be able to
# accept connections only from clients running into the same computer it
# is running).
#
# IF YOU ARE SURE YOU WANT YOUR INSTANCE TO LISTEN TO ALL THE INTERFACES
# JUST COMMENT THE FOLLOWING LINE.
# ~~~~~~~~~~~~~~~~~~~~~~~~~~~~~~~~~~~~~~~~~~~~~~~~~~~~~~~~~~~~~~~~~~~~~~~~
bind 127.0.0.1
默认protected-mode 值为yes 指开启保护模式 需配置bind 或者设置访问密码
改为no 则不开启保护模式 外部网络可以直接访问
# Protected mode is a layer of security protection, in order to avoid that
# Redis instances left open on the internet are accessed and exploited.
#
# When protected mode is on and if:
#
# 1) The server is not binding explicitly to a set of addresses using the
#    "bind" directive.
# 2) No password is configured.
#
# The server only accepts connections from clients connecting from the
# IPv4 and IPv6 loopback addresses 127.0.0.1 and ::1, and from Unix domain
# sockets.
#
# By default protected mode is enabled. You should disable it only if
# you are sure you want clients from other hosts to connect to Redis
# even if no authentication is configured, nor a specific set of interfaces
# are explicitly listed using the "bind" directive.
protected-mode yes
appendonly为指定是否开启AOF(日志)持久化
# By default Redis asynchronously dumps the dataset on disk. This mode is
# good enough in many applications, but an issue with the Redis process or
# a power outage may result into a few minutes of writes lost (depending on
# the configured save points).
#
# The Append Only File is an alternative persistence mode that provides
# much better durability. For instance using the default data fsync policy
# (see later in the config file) Redis can lose just one second of writes in a
# dramatic event like a server power outage, or a single write if something
# wrong with the Redis process itself happens, but the operating system is
# still running correctly.
#
# AOF and RDB persistence can be enabled at the same time without problems.
# If the AOF is enabled on startup Redis will load the AOF, that is the file
# with the better durability guarantees.
#
# Please check http://redis.io/topics/persistence for more information.

appendonly no
appendfilename指为AOF文件设置文件名,默认为appendonly.aof
# The name of the append only file (default: "appendonly.aof")
appendfilename "appendonly.aof"
appendfsync用来设置AOF持久化的级别,everysec指每一秒为磁盘中的aof文件写入缓冲区数据,
always指每次write后就写入,no则是不主动写入。
需要注意的是,此设置较为影响redis的性能,因为redis主线程是串行并不是并行,而fsync操作并不是由IO子线程执行而是由redis主线程执行,所以每次执行fsync主线程都要停下操作。
由此可得:3种设置性能好坏 always最差<everyfsync<no最好
设置为no 对redis无性能影响
# The fsync() call tells the Operating System to actually write data on disk
# instead of waiting for more data in the output buffer. Some OS will really flush
# data on disk, some other OS will just try to do it ASAP.
#
# Redis supports three different modes:
#
# no: don't fsync, just let the OS flush the data when it wants. Faster.
# always: fsync after every write to the append only log. Slow, Safest.
# everysec: fsync only one time every second. Compromise.
#
# The default is "everysec", as that's usually the right compromise between
# speed and data safety. It's up to you to understand if you can relax this to
# "no" that will let the operating system flush the output buffer when
# it wants, for better performances (but if you can live with the idea of
# some data loss consider the default persistence mode that's snapshotting),
# or on the contrary, use "always" that's very slow but a bit safer than
# everysec.
#
# More details please check the following article:
# http://antirez.com/post/redis-persistence-demystified.html
#
# If unsure, use "everysec".

# appendfsync always
appendfsync everysec
# appendfsync no
aof-use-rdb-preamble用来设置是否开启混合模式
4.0版本的redis默认是no 不开启混合模式
5.0版本的redis默认是yes 开启混合模式
# When rewriting the AOF file, Redis is able to use an RDB preamble in the
# AOF file for faster rewrites and recoveries. When this option is turned
# on the rewritten AOF file is composed of two different stanzas:
#
#   [RDB file][AOF tail]
#
# When loading Redis recognizes that the AOF file starts with the "REDIS"
# string and loads the prefixed RDB file, and continues loading the AOF
# tail.
#
# This is currently turned off by default in order to avoid the surprise
# of a format change, but will at some point be used as the default.
aof-use-rdb-preamble no
save参数的意义在于设置当启用rdb方式做持久化时在什么时机拍一次快照。
save 900 1 当900s(15min)内有10个key值发生变化时save
save 300 10 当300s(5min)内有10个key值发生变化时save
save 60 10000 当60s(1min)内有10个key值发生变化时save
################################ SNAPSHOTTING  ################################
#
# Save the DB on disk:
#
#   save <seconds> <changes>
#
#   Will save the DB if both the given number of seconds and the given
#   number of write operations against the DB occurred.
#
#   In the example below the behaviour will be to save:
#   after 900 sec (15 min) if at least 1 key changed
#   after 300 sec (5 min) if at least 10 keys changed
#   after 60 sec if at least 10000 keys changed
#
#   Note: you can disable saving completely by commenting out all "save" lines.
#
#   It is also possible to remove all the previously configured save
#   points by adding a save directive with a single empty string argument
#   like in the following example:
#
#   save ""

save 900 1
save 300 10
save 60 10000
Redis压力测试
Redis自带了一个用来做压力测试的工具,redis-benchmark,下面我们简单来介绍一下这款工具。
先说说这个工具在哪
Windows:
如果你的Redis是WIndows版本,那么你的redis-benchmark就在Redis的安装目录里,如下
 Linux:
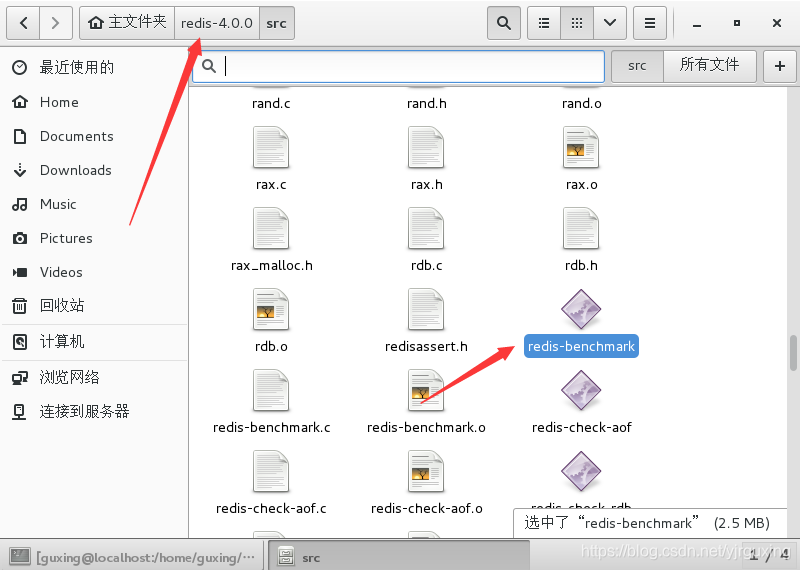
如果你的Redis是Linux版本,那么你的redis-benchmark就在redis安装目录>src>redis-benchmark,如下
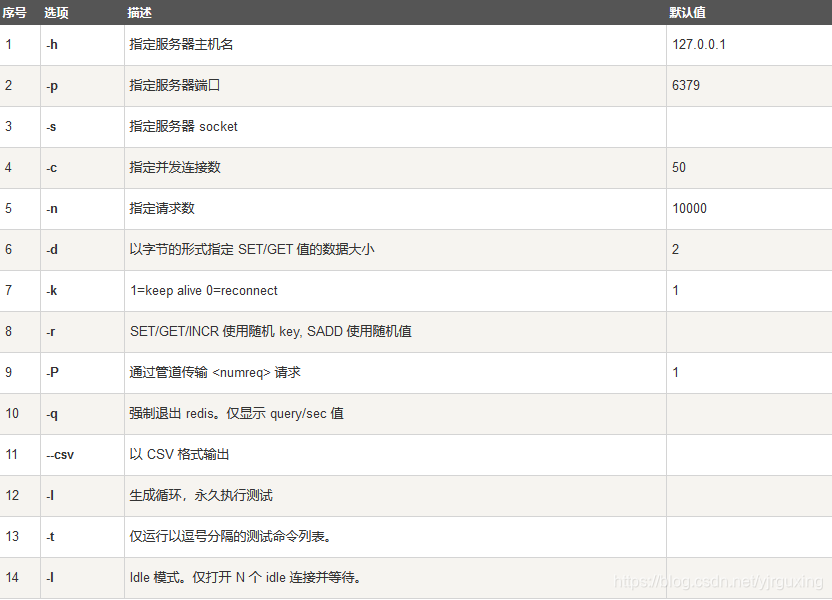
 找到工具在哪里之后,如何使用呢?我们先看一下这份表格
 假设我们现在想要测试Redis的get/set性能,并且只显示结果,同时并发1000,总共10w个请求,如下

 此时我们调整并发数量为2000,如下

 由此可得 ,redis的性能并不是像官方所说的那样:读的速度是110000次/秒,写的速度是81000次/秒。
而是会因为并发数的不同让redis的性能发生变化(不仅仅因此),那么我们下面来讨论一下怎样在可能的情况下优化redis的性能。
tip:benchmark虽然去掉了网络IO的时间,不过其本身也会在cpu中创造需要线程,所以该软件本身的运行也会影响redis性能。
可能的问题
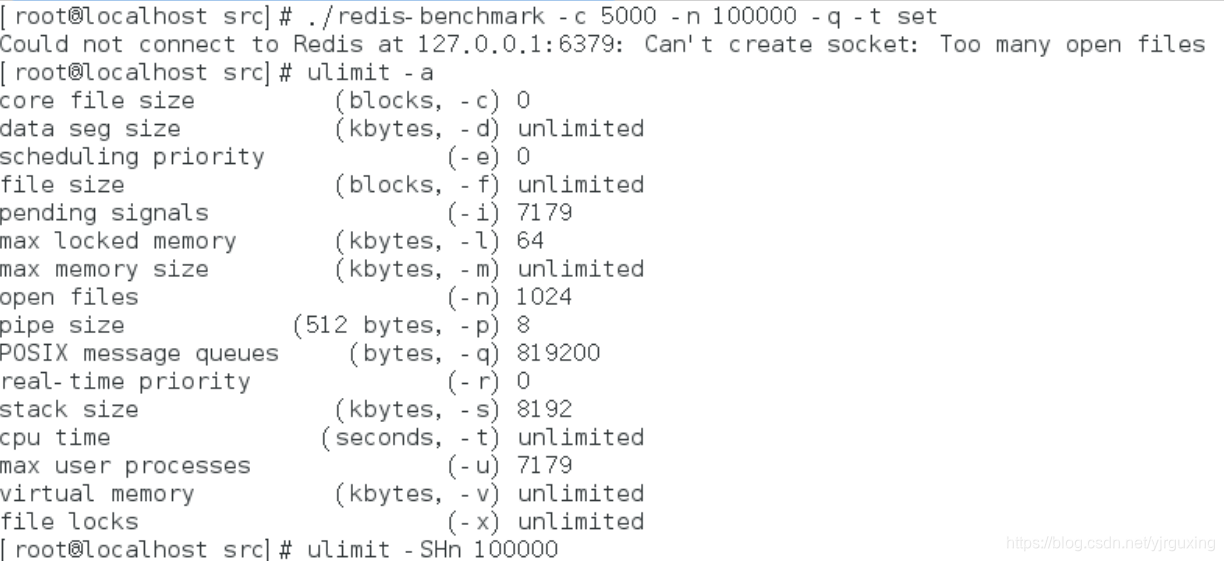 第一种可能会遇到的问题是Too many open files,此问题需要在root权限下临时设置可打开文件数大于你测试时的并发数。
比如在例子中,并发是1000/2000,那么只要设置open files的值大于1000/2000就可以了。
最后更新于2021年1月5日早上5点
原创不易,如果该文章对你有所帮助,望左上角点击关注~如有任何技术相关问题,可通过评论联系我讨论,我会在力所能及之内进行相应回复以及开单章解决该问题.
该文章如有任何错误请在评论中指出,感激不尽,转载请附出处!
个人博客首页:https://blog.csdn.net/yjrguxing ——您的每个关注和评论都对我意义重大