入口
入口很简单,就是我们的main程序,可能如下:
@SpringBootApplication
public class HelloWorldMainApplication {


    public static void main(String[] args) throws URISyntaxException, IOException {


        SpringApplication.run(HelloWorldMainApplication.class, args);
    }
}
好的,那么就让我们从这里开始吧!
1:SpringApplication#run
具体位置是org.springframework.boot.SpringApplication#run(java.lang.Class<?>, java.lang.String...),源码如下:
public static ConfigurableApplicationContext run(Class<?> primarySource, String... args) {


	return run(new Class<?>[] {

     primarySource }, args);
其中第一个参数primarySource就是我们的启动类。接着调用到如下方法:
org.springframework.boot.SpringApplication#run(java.lang.Class<?>[], java.lang.String[])
public static ConfigurableApplicationContext run(Class<?>[] primarySources, String[] args) {


	return new SpringApplication(primarySources).run(args);
}
做了两件事,第一个是通过构造函数创建SpringApplication对象,第二个是调用其run方法。我们先来看通过构造函数创建SpringApplication对象。
2:new SpringApplication(primarySources)
位置org.springframework.boot.SpringApplication#SpringApplication(java.lang.Class<?>...),源码:
public SpringApplication(Class<?>... primarySources) {


	this(null, primarySources);
}
继续:
org.springframework.boot.SpringApplication#SpringApplication(org.springframework.core.io.ResourceLoader, java.lang.Class<?>...)
public SpringApplication(ResourceLoader resourceLoader, Class<?>... primarySources) {


	// <1>
	this.resourceLoader = resourceLoader;
	Assert.notNull(primarySources, "PrimarySources must not be null");
	// <2>
	this.primarySources = new LinkedHashSet<>(Arrays.asList(primarySources));
	// <3>
	this.webApplicationType = WebApplicationType.deduceFromClasspath();
	// <4>
	setInitializers((Collection) getSpringFactoriesInstances(ApplicationContextInitializer.class));
	// <5>
	setListeners((Collection)getSpringFactoriesInstances(ApplicationListener.class));
   // <6>
	this.mainApplicationClass = deduceMainApplicationClass();
}
<1>处设置资源加载器,这里为null,可以忽略。<2>处代码设置启动类集合,设置后如下图:

<3>处代码是获取web应用的类型,对应的是枚举类org.springframework.boot.WebApplicationType,我们都是servlet的web应用,方法deduceFromClasspath源码如下:
static WebApplicationType deduceFromClasspath() {


	// 判断是否为webflux,可以忽略,目前不会是
	if (ClassUtils.isPresent(WEBFLUX_INDICATOR_CLASS, null) && !ClassUtils.isPresent(WEBMVC_INDICATOR_CLASS, null)
			&& !ClassUtils.isPresent(JERSEY_INDICATOR_CLASS, null)) {


		return WebApplicationType.REACTIVE;
	}
	// SERVLET_INDICATOR_CLASSES:
	// private static final String[] SERVLET_INDICATOR_CLASSES = { "javax.servlet.Servlet","org.springframework.web.context.ConfigurableWebApplicationContext" };
	// servlet 的相关的标记指示类,如果是当前类不在指示类中,则说明
	// 为WebApplicationType.NONE,如果是有一个指示类不在classpath
	// 中,则认为是WebApplicationType.NONE类型,即要求所有的指示类都存在
	for (String className : SERVLET_INDICATOR_CLASSES) {


		if (!ClassUtils.isPresent(className, null)) {


			return WebApplicationType.NONE;
		}
	}
	// 到这里说明是servlet的web应用程序
	return WebApplicationType.SERVLET;
}
不同的web应用类型会对应到不同的spring容器。<4>处代码用于初始化ApplicationContextInitializer,这是spring提供的一个扩展点,用于在调用ConfigurableApplicationContext之前进行一些设置,接口定义如下:
org.springframework.context.ApplicationContextInitializer
public interface ApplicationContextInitializer<C extends ConfigurableApplicationContext> {


	void initialize(C applicationContext);
}
接下来我们继续看ApplicationContextInitializer集合是如何获取的,首先调用方法:
org.springframework.boot.SpringApplication#getSpringFactoriesInstances(java.lang.Class<T>)
private <T> Collection<T> getSpringFactoriesInstances(Class<T> type) {


	return getSpringFactoriesInstances(type, new Class<?>[] {

    });
}
然后调用方法:
private <T> Collection<T> getSpringFactoriesInstances(Class<T> type, Class<?>[] parameterTypes, Object... args) {


	// 获取类加载器
	ClassLoader classLoader = getClassLoader();
	// 从META-INF/spring.factories文件中获取key为type的值的集合
	// 这里就是获取key为org.springframework.context.ApplicationContextInitializer
	// 的数组,方法SpringFactoriesLoader.loadFactoryNames
	// 其中有部分代码如下,可以证明加载的文件是META-INF/spring.factories
	/*
	org.springframework.core.io.support.SpringFactoriesLoader#loadSpringFactories
    private static Map<String, List<String>> loadSpringFactories(@Nullable ClassLoader classLoader) {
    	...
        Enumeration<URL> urls = classLoader != null ? classLoader.getResources("META-INF/spring.factories") : ClassLoader.getSystemResources("META-INF/spring.factories");
	    ...
	*/
	Set<String> names = new LinkedHashSet<>(SpringFactoriesLoader.loadFactoryNames(type, classLoader));
	// 创建集合实例
	List<T> instances = createSpringFactoriesInstances(type, parameterTypes, classLoader, args, names);
	// 排序实例,比如依赖于@Order注解
	AnnotationAwareOrderComparator.sort(instances);
	return instances;
}
其中获取的ApplicationContextInilizer配置和最终获取的结果如下图:
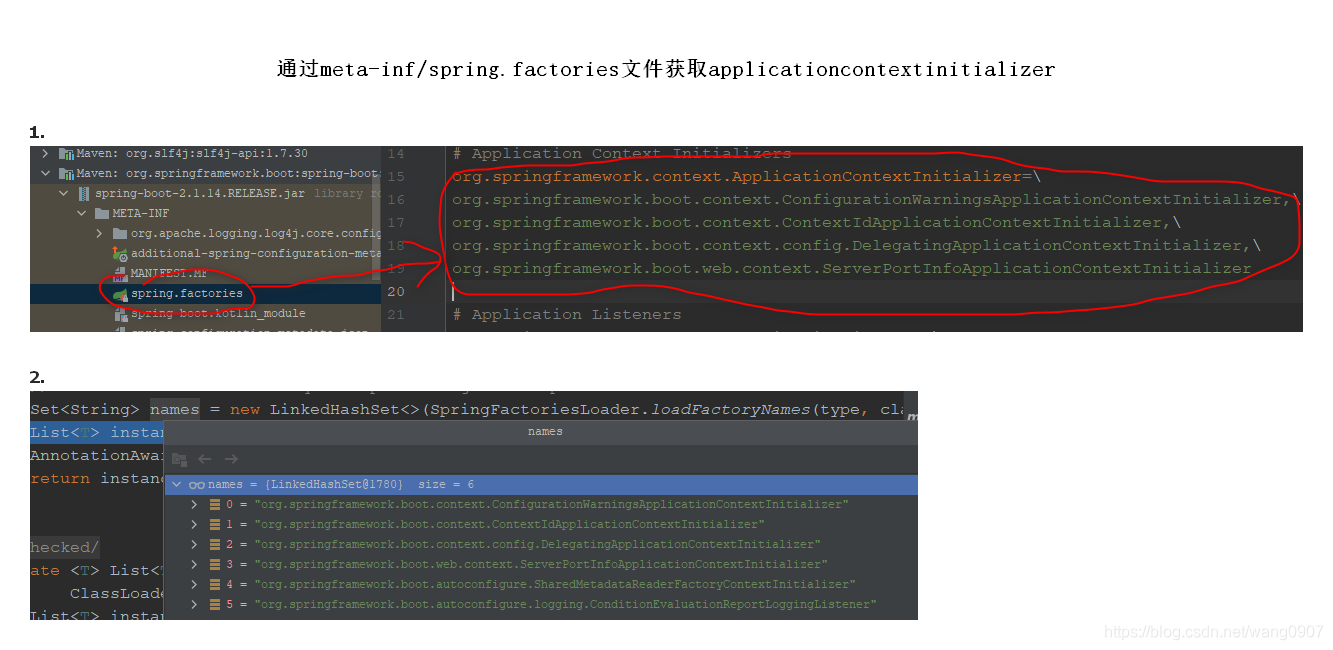
这里配置的是4个,但是最终获取到的是6个,多出的2个目前不知道是哪里来的,暂时不深究,如果需要的话,再看。其中对这些获取的ApplicationContextInilizer进行初始化的方法代码比较简单,贴在这里,不再注释:
private <T> List<T> createSpringFactoriesInstances(Class<T> type, Class<?>[] parameterTypes,
		ClassLoader classLoader, Object[] args, Set<String> names) {


	List<T> instances = new ArrayList<>(names.size());
	for (String name : names) {


		try {


			Class<?> instanceClass = ClassUtils.forName(name, classLoader);
			Assert.isAssignable(type, instanceClass);
			Constructor<?> constructor = instanceClass.getDeclaredConstructor(parameterTypes);
			T instance = (T) BeanUtils.instantiateClass(constructor, args);
			instances.add(instance);
		}
		catch (Throwable ex) {


			throw new IllegalArgumentException("Cannot instantiate " + type + " : " + name, ex);
		}
	}
	return instances;
}
最终生成的实例集合如下图:
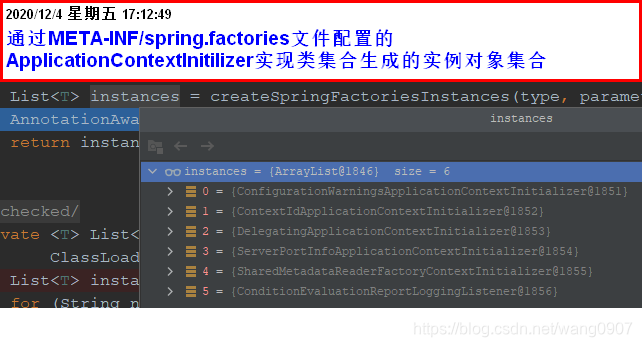
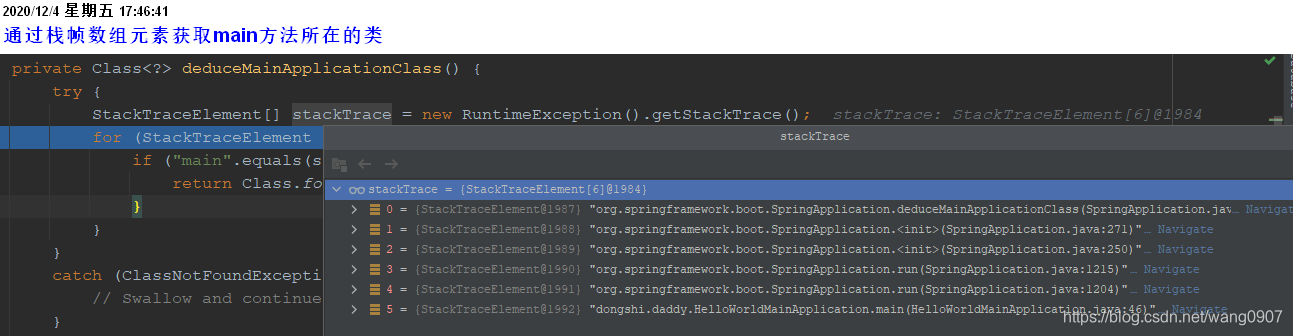
<5>处获取Listener方法和获取ApplicationContextInitizlizer类似,只不过获取的类型不一样。<6>是获取调用的main方法所在的类,源码如下:
private Class<?> deduceMainApplicationClass() {


	try {


		// 获取调用栈帧元素数组
		StackTraceElement[] stackTrace = new RuntimeException().getStackTrace();
		// 遍历栈帧元素数组,方法名称是main所在的类就是目标类
		for (StackTraceElement stackTraceElement : stackTrace) {


			// 如果是方法名称是main,则通过类全限定名创建Class对象
			if ("main".equals(stackTraceElement.getMethodName())) {


				return Class.forName(stackTraceElement.getClassName());
			}
		}
	}
	catch (ClassNotFoundException ex) {


		// Swallow and continue
	}
	return null;
}
如下图栈帧数组:
到这里SpringApplication实例对象就创建完毕了,接下来开始看启动。
3:run
位置org.springframework.boot.SpringApplication#run(java.lang.String...)源码如下:
org.springframework.boot.SpringApplication#run(java.lang.String...)
public ConfigurableApplicationContext run(String... args) {
// 用于统计启动时长,不影响流程,可忽略
StopWatch stopWatch = new StopWatch();
stopWatch.start();
ConfigurableApplicationContext context = null;
Collection<SpringBootExceptionReporter> exceptionReporters = new ArrayList<>();
// 忽略
configureHeadlessProperty();
// <1> 获取SpringApplicationRunListeners,这是springboot自己定义的Listener,具体配置在META-INF/spring.factories文件中
// 后续详细分析该处代码
SpringApplicationRunListeners listeners = getRunListeners(args);
listeners.starting();
try {
// 直接通过构造函数创建ApplicationArguments,会在prepareEnvironment方法中
// 进行使用,具体该对象都有哪些内容,在prepareEnvironment方法中使用到了什么看
ApplicationArguments applicationArguments = new DefaultApplicationArguments(args);
// <2>该方法加载属性配置信息,其中,application.properties/application.yml
// 文件中的信息就是在这个文件中配置的,具体后续详细分析
ConfigurableEnvironment environment = prepareEnvironment(listeners, applicationArguments);
configureIgnoreBeanInfo(environment);
// 打印启动前的Spring Banner,后续简单看下
Banner printedBanner = printBanner(environment);
// <3>创建spring容器,后续详细分析
context = createApplicationContext();
// 创建springboot启动过程中各种异常的异常报告器,具体的类
// 通过SpringFactoriesLoader从META-INF/spring.factories文件中获取
exceptionReporters = getSpringFactoriesInstances(SpringBootExceptionReporter.class,
new Class[] {
ConfigurableApplicationContext.class }, context);
// <4>主要是调用初始化类的initialize方法,后续详细分析
prepareContext(context, environment, listeners, applicationArguments, printedBanner);
// <5>主要是调用refreshContext方法启动/刷新容器,如Root WebApplicationContext
// 的创建就是在这里
refreshContext(context);
// 容器初始化的后置处理,该方法默认实现为空,即没有任何业务逻辑,可以暂时忽略此方法
afterRefresh(context, applicationArguments);
// 停止时长统计
stopWatch.stop();
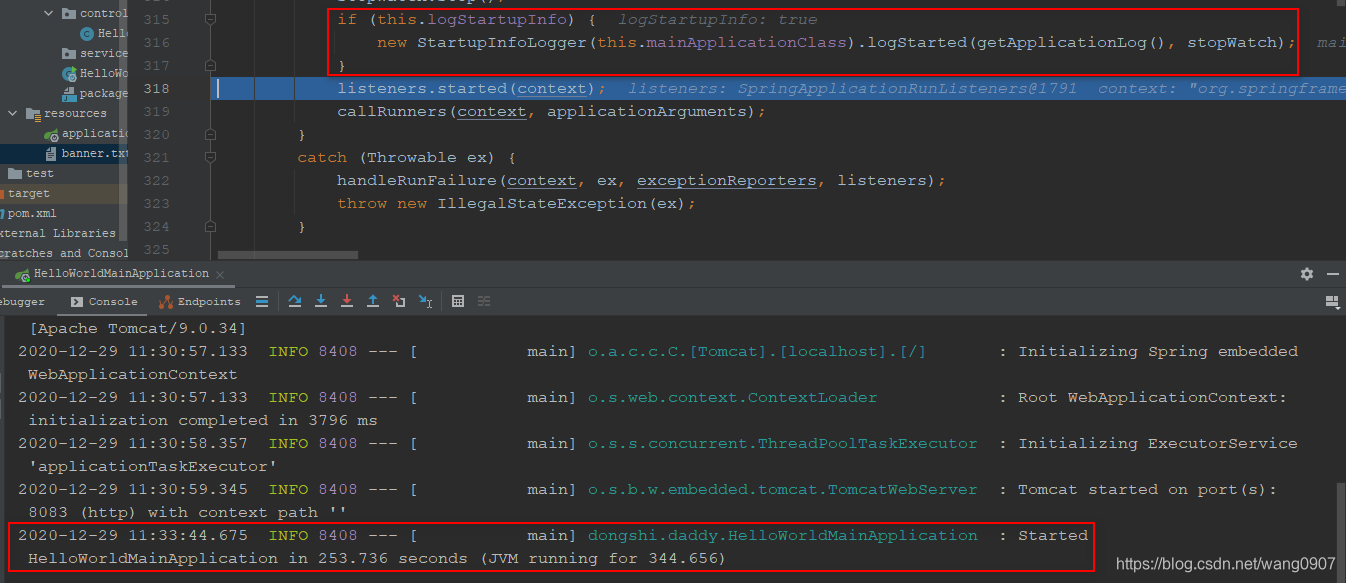
// <6> 打印应用程序启动时长信息,后续分析下这里,如下可能本例程序的输出信息
/*
2020-12-17 13:47:37.401 INFO 28752 --- [ main]
dongshi.daddy.HelloWorldMainApplication : Started
HelloWorldMainApplication in 53.52 seconds (JVM running for 59.738)
*/
if (this.logStartupInfo) {
new StartupInfoLogger(this.mainApplicationClass).logStarted(getApplicationLog(), stopWatch);
}
// 调用SpringApplicationRunListener数组,通知spring容器启动完成
listeners.started(context);
// 暂时忽略,debug发现并不起作用
callRunners(context, applicationArguments);
}
catch (Throwable ex) {
// 处理启动失败的情况,比如要使用的端口已经占用,就会执行到这里
handleRunFailure(context, ex, exceptionReporters, listeners);
throw new IllegalStateException(ex);
}
try {
// 调用SpringApplicationRunListenr数组的run方法,通知其springboot应用程序运行中
listeners.running(context);
}
catch (Throwable ex) {
// 处理异常情况
handleRunFailure(context, ex, exceptionReporters, null);
throw new IllegalStateException(ex);
}
// <8>返回spring容器,后续简单分析下
return context;
}
4:getRunListeners(args)
调用入口是org.springframework.boot.SpringApplication#run(java.lang.String...),调用如下:
org.springframework.boot.SpringApplication#run(java.lang.String...)
public ConfigurableApplicationContext run(String... args) {


	StopWatch stopWatch = new StopWatch();
	stopWatch.start();
	ConfigurableApplicationContext context = null;
	Collection<SpringBootExceptionReporter> exceptionReporters = new ArrayList<>();
	configureHeadlessProperty();
	SpringApplicationRunListeners listeners = getRunListeners(args);
	listeners.starting();
	try {


		ApplicationArguments applicationArguments = new DefaultApplicationArguments(args);
		ConfigurableEnvironment environment = prepareEnvironment(listeners, applicationArguments);
		configureIgnoreBeanInfo(environment);
		Banner printedBanner = printBanner(environment);
		context = createApplicationContext();
		exceptionReporters = getSpringFactoriesInstances(SpringBootExceptionReporter.class,
				new Class[] {

     ConfigurableApplicationContext.class }, context);
		prepareContext(context, environment, listeners, applicationArguments, printedBanner);
		refreshContext(context);
		afterRefresh(context, applicationArguments);
		stopWatch.stop();
		if (this.logStartupInfo) {


			new StartupInfoLogger(this.mainApplicationClass).logStarted(getApplicationLog(), stopWatch);
		}
		listeners.started(context);
		callRunners(context, applicationArguments);
	}
	catch (Throwable ex) {


		handleRunFailure(context, ex, exceptionReporters, listeners);
		throw new IllegalStateException(ex);
	}

	try {


		listeners.running(context);
	}
	catch (Throwable ex) {


		handleRunFailure(context, ex, exceptionReporters, null);
		throw new IllegalStateException(ex);
	}
	return context;
}
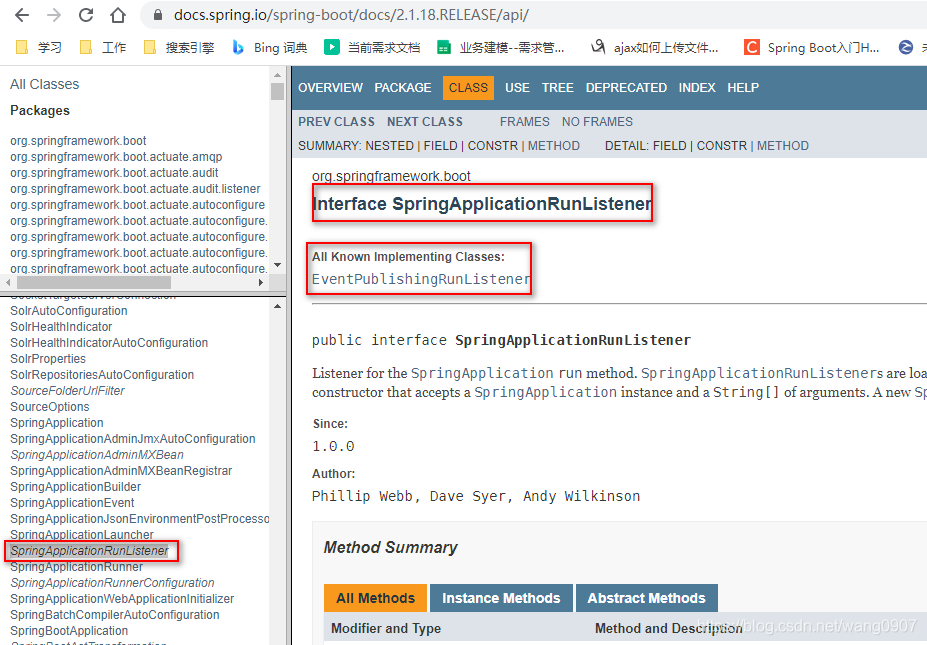
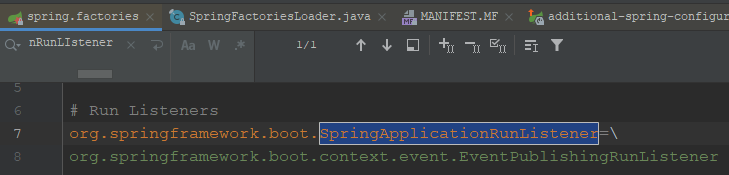
该接口全限定名是org.springframework.boot.SpringApplicationRunListener,只有一个唯一的实现类org.springframework.boot.context.event.EventPublishingRunListener,可以参考这里,也可以看下图:
在方法org.springframework.boot.SpringApplication#run(java.lang.String...)中如下代码SpringApplicationRunListeners listeners = getRunListeners(args);初始化SpringApplicationRunListener数组,如下:
org.springframework.boot.SpringApplication#run(java.lang.String...)
public ConfigurableApplicationContext run(String... args) {


	...
	SpringApplicationRunListeners listeners = getRunListeners(args);
	...
}
方法源码如下:
org.springframework.boot.SpringApplication#getRunListeners
	private SpringApplicationRunListeners getRunListeners(String[] args) {


	Class<?>[] types = new Class<?>[] {

     SpringApplication.class, String[].class };
	return new SpringApplicationRunListeners(logger,
			getSpringFactoriesInstances(SpringApplicationRunListener.class, types, this, args));
}
具体是通过org.springframework.core.io.support.SpringFactoriesLoader从META-INF/spring.factories文件中读取配置的实现类,然后通过反射机制创建对象实例,主要代码如下:
private <T> Collection<T> getSpringFactoriesInstances(Class<T> type, Class<?>[] parameterTypes, Object... args) {


	ClassLoader classLoader = getClassLoader();
	// 通过SpringFactoriesLoader获取指定类型所有子类的类名称
	Set<String> names = new LinkedHashSet<>(SpringFactoriesLoader.loadFactoryNames(type, classLoader));
	List<T> instances = createSpringFactoriesInstances(type, parameterTypes, classLoader, args, names);
	AnnotationAwareOrderComparator.sort(instances);
	return instances;
}
public static List<String> loadFactoryNames(Class<?> factoryClass, @Nullable ClassLoader classLoader) {


	String factoryClassName = factoryClass.getName();
	return loadSpringFactories(classLoader).getOrDefault(factoryClassName, Collections.emptyList());
}
private <T> List<T> createSpringFactoriesInstances(Class<T> type, Class<?>[] parameterTypes,
		ClassLoader classLoader, Object[] args, Set<String> names) {


	List<T> instances = new ArrayList<>(names.size());
	for (String name : names) {


		try {


			Class<?> instanceClass = ClassUtils.forName(name, classLoader);
			// instanceClass必须是type类型的
			Assert.isAssignable(type, instanceClass);
			Constructor<?> constructor = instanceClass.getDeclaredConstructor(parameterTypes);
			T instance = (T) BeanUtils.instantiateClass(constructor, args);
			instances.add(instance);
		}
		catch (Throwable ex) {


			throw new IllegalArgumentException("Cannot instantiate " + type + " : " + name, ex);
		}
	}
	return instances;
}
创建完毕实例集合后通过SpringApplicationRunListeners(注意这里多了个s)构造函数完成创建,源码如下:
org.springframework.boot.SpringApplicationRunListeners#SpringApplicationRunListeners
private final Log log;
private final List<SpringApplicationRunListener> listeners;
SpringApplicationRunListeners(Log log, Collection<? extends SpringApplicationRunListener> listeners) {


	this.log = log;
	this.listeners = new ArrayList<>(listeners);
}
最终的listeners集合,只有EventPublishingRunListener一个,也是SpringApplicationRunListener接口的唯一实现类,debug如下:

在META-INF/spring.factories配置文件中的配置如下图:
5:prepareEnvironment
位置org.springframework.boot.SpringApplication#prepareEnvironment,调用代码如下:
org.springframework.boot.SpringApplication#run(java.lang.String...)
public ConfigurableApplicationContext run(String... args) {


	...
	try {


		...
		ConfigurableEnvironment environment = prepareEnvironment(listeners, applicationArguments);
		configureIgnoreBeanInfo(environment);
		...
	}
	return context;
}
该方法用于获取系统变量信息,环境变量信息,jvm命令行设置的参数信息,profile信息等封装到ConfiguraableEnvironment实例对象中。对于我们经常使用的spring.active.profile=xxx,如果设置如下:
server.port=8083
spring.profiles.active=fordebug
则最终如下图:

详细不用深究,用到的话,再看。
6:printBanner
源码:
org.springframework.boot.SpringApplication#run(java.lang.String...)
public ConfigurableApplicationContext run(String... args) {


	try {


		Banner printedBanner = printBanner(environment);
	}
}
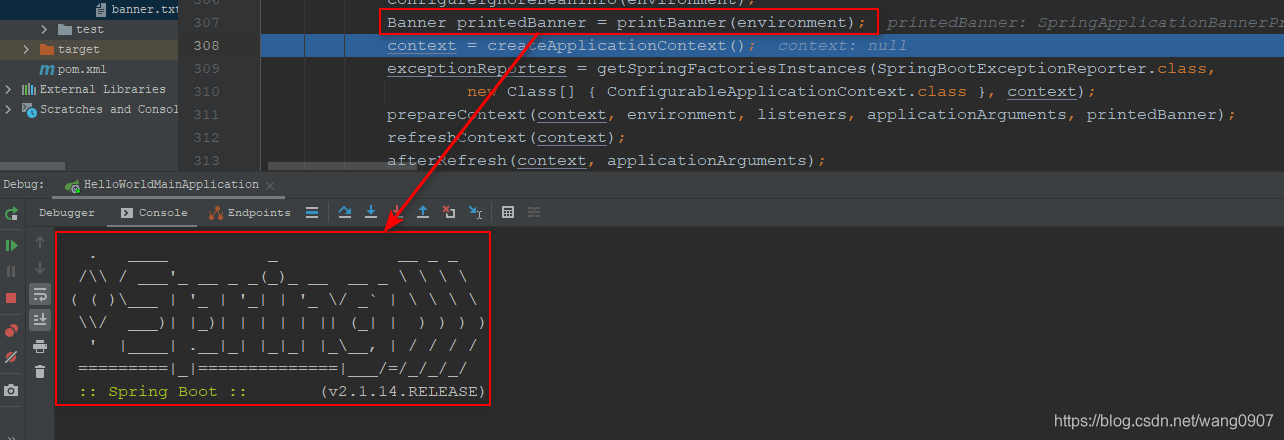
就是启动的时候打印的banner,是可以修改的,下面我们一起来看一下如何做。
6.1:定义main方法
这种是通过修改SpringApplication的属性的方式实现。
SpringApplication springApplication = new SpringApplication(HelloWorldMainApplication.class);
springApplication.setBanner((environment, sourceClass, out) -> System.out.println(" *\n***\n *"));
springApplication.setBannerMode(Banner.Mode.CONSOLE);
springApplication.run(args);
运行如下:
 *
***
 *
2020-12-17 19:10:51.839  INFO 36364 --- [           main] dongshi.daddy.HelloWorldMainApplication  : Starting HelloWorldMainApplication on jhp with PID 36364 (E:\workspace-idea\springboot-helloworld\target\classes started by Administrator in E:\workspace-idea\springboot-helloworld)
...
另外还有一种方式是在src/main/resouces/下定义banner.txt然后在里面录入希望打印的banner就可以了,如果有这种需求的话,这种方式更优。我们可以通过这个网站定制自己的,如下是我的:

运行:
     _                     __ _           _         _        _               _       _     _  _
  __| |    ___    _ _     / _` |   ___   | |_      (_)    __| |   __ _    __| |   __| |   | || |
 / _` |   / _ \  | ' \    \__, |  (_-<   | ' \     | |   / _` |  / _` |  / _` |  / _` |    \_, |
 \__,_|   \___/  |_||_|   |___/   /__/_  |_||_|   _|_|_  \__,_|  \__,_|  \__,_|  \__,_|   _|__/
_|"""""|_|"""""|_|"""""|_|"""""|_|"""""|_|"""""|_|"""""|_|"""""|_|"""""|_|"""""|_|"""""|_| """"|
"`-0-0-'"`-0-0-'"`-0-0-'"`-0-0-'"`-0-0-'"`-0-0-'"`-0-0-'"`-0-0-'"`-0-0-'"`-0-0-'"`-0-0-'"`-0-0-'
2021-02-02 18:15:40.725  INFO 49616 --- [           main] dongshi.daddy.HelloWorldMainApplication  : Starting HelloWorldMainApplication on jhp with PID 49616 (E:\workspace-idea\springboot-helloworld\target\classes started by Administrator in E:\workspace-idea\springboot-helloworld)
7:createApplicationContext
该方法用来创建spring应用程序上下文容器。
源码:
org.springframework.boot.SpringApplication#run(java.lang.String...)
public ConfigurableApplicationContext run(String... args) {


	try {


		context = createApplicationContext();
	}
	catch (Throwable ex) {


	}
	return context;
}
如下源码时针对不同的应用类型,定义的默认的容器类型:
// web容器类型,即servlet,这里我们使用的就是此
public static final String DEFAULT_SERVLET_WEB_CONTEXT_CLASS = "org.springframework.boot."
			+ "web.servlet.context.AnnotationConfigServletWebServerApplicationContext";
// reactive的,用不到
public static final String DEFAULT_REACTIVE_WEB_CONTEXT_CLASS = "org.springframework."
			+ "boot.web.reactive.context.AnnotationConfigReactiveWebServerApplicationContext";
// 此为基于注解方式的容器,也用不到
public static final String DEFAULT_CONTEXT_CLASS = "org.springframework.context."
			+ "annotation.AnnotationConfigApplicationContext";
debug的话,如下:

完整源码如下:
org.springframework.boot.SpringApplication#createApplicationContext
protected ConfigurableApplicationContext createApplicationContext() {


    // 获取容器class类型
	Class<?> contextClass = this.applicationContextClass;
	if (contextClass == null) {


		try {


			switch (this.webApplicationType) {


			case SERVLET:
				contextClass = Class.forName(DEFAULT_SERVLET_WEB_CONTEXT_CLASS);
				break;
			case REACTIVE:
				contextClass = Class.forName(DEFAULT_REACTIVE_WEB_CONTEXT_CLASS);
				break;
			default:
				contextClass = Class.forName(DEFAULT_CONTEXT_CLASS);
			}
		}
		catch (ClassNotFoundException ex) {


			throw new IllegalStateException(
					"Unable create a default ApplicationContext, " + "please specify an ApplicationContextClass",
					ex);
		}
	}
	// 直接反射获取容器实例对象
	return (ConfigurableApplicationContext) BeanUtils.instantiateClass(contextClass);
}
8:prepareContext
调用源码:
org.springframework.boot.SpringApplication#run(java.lang.String...)
public ConfigurableApplicationContext run(String... args) {


	try {


		prepareContext(context, environment, listeners, applicationArguments, printedBanner);
	}
	catch (Throwable ex) {


	}
	return context;
}
完整源码如下:
private void prepareContext(ConfigurableApplicationContext context, ConfigurableEnvironment environment,
SpringApplicationRunListeners listeners, ApplicationArguments applicationArguments, Banner printedBanner) {
// 设置environment属性
context.setEnvironment(environment);
// 设置其他的一些属性,如类加载器等
postProcessApplicationContext(context);
// 循环遍历ApplicationContextInitializer并调用其initialize方法进行初始化
applyInitializers(context);
// 通知SpringBootRunListener,springboot的spring容器准备工作
// 完成
listeners.contextPrepared(context);
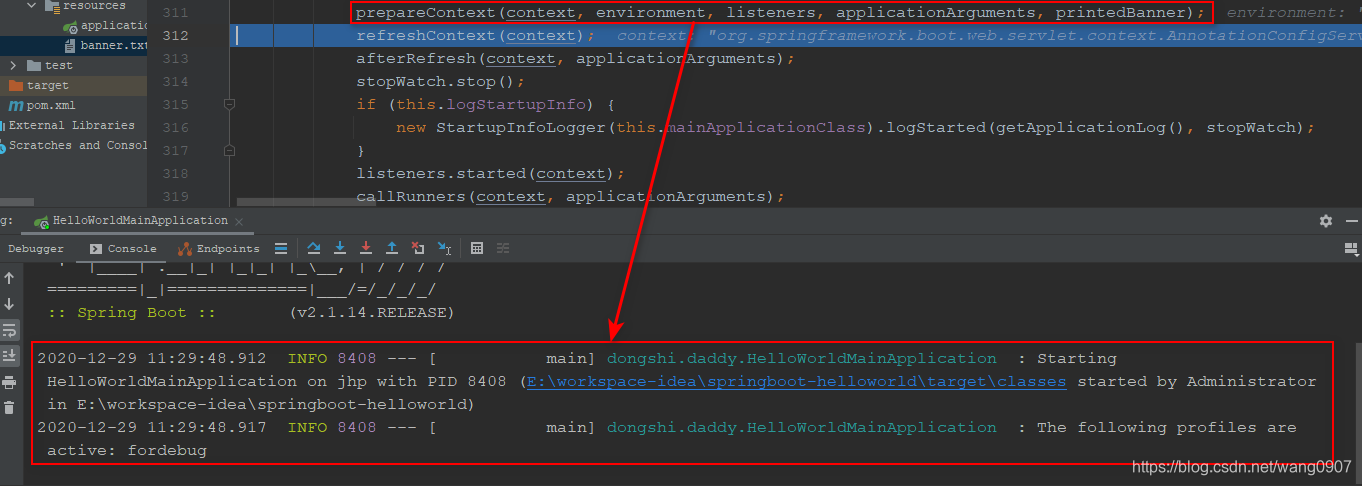
// 打印启动信息,可能如下
/*
2020-12-28 18:40:27.110 INFO 7408 --- [ main] dongshi.daddy.HelloWorldMainApplication : Starting HelloWorldMainApplication on jhp with PID 7408 (E:\workspace-idea\springboot-helloworld\target\classes started by Administrator in E:\workspace-idea\springboot-helloworld)
2020-12-28 18:40:36.302 INFO 7408 --- [ main] dongshi.daddy.HelloWorldMainApplication : The following profiles are active: fordebug
*/
// 以上两行日志分别对应一下的两行代码
if (this.logStartupInfo) {
logStartupInfo(context.getParent() == null);
logStartupProfileInfo(context);
}
// 设置BeanFactory属性
ConfigurableListableBeanFactory beanFactory = context.getBeanFactory();
beanFactory.registerSingleton("springApplicationArguments", applicationArguments);
if (printedBanner != null) {
beanFactory.registerSingleton("springBootBanner", printedBanner);
}
if (beanFactory instanceof DefaultListableBeanFactory) {
((DefaultListableBeanFactory) beanFactory)
.setAllowBeanDefinitionOverriding(this.allowBeanDefinitionOverriding);
}
// 加载并获取BeanDefinition集合,其中在后续的load方法中主要会使用BeanDefinitionRegistry和BeanDefinitionLoader对象,spring的内容,不深究,我测是的获取的source的结果如下:
/*
sources = {Collections$UnmodifiableSet@3482} size = 1
0 = {Class@1336} "class dongshi.daddy.HelloWorldMainApplication"
*/
Set<Object> sources = getAllSources();
Assert.notEmpty(sources, "Sources must not be empty");
load(context, sources.toArray(new Object[0]));
// 通知SpringApplicationRunListener数组,容器加载完成(注意此时Spring的bean还没有初始化,只是加载了BeanDefinition的信息而已)
listeners.contextLoaded(context);
}
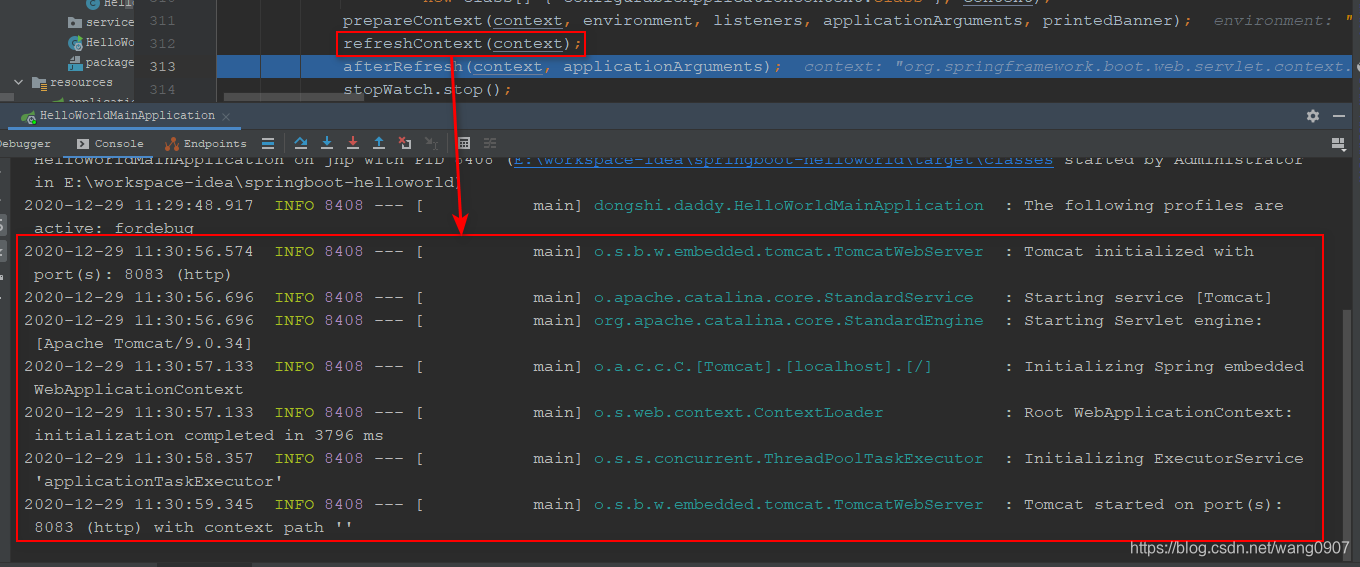
9: refreshContext
代码位置:
org.springframework.boot.SpringApplication#run(java.lang.String...)
public ConfigurableApplicationContext run(String... args) {


	try {


		refreshContext(context);
	}
	catch (Throwable ex) {


	}
	return context;
}
作用就是刷新spring容器初始化spring bean,源码如下:
private void refreshContext(ConfigurableApplicationContext context) {


	// 刷新容器,源码看随后代码
	refresh(context);
	// 如果是有注册关闭钩子,则注册关闭钩子
	// 该钩子用于在容器关闭时销毁spring bean
	if (this.registerShutdownHook) {


		try {


			context.registerShutdownHook();
		}
		catch (AccessControlException ex) {


			// Not allowed in some environments.
		}
	}
}
protected void refresh(ApplicationContext applicationContext) {


	// 判断applicationContext是否是AbstractApplicationContext类型的
	Assert.isInstanceOf(AbstractApplicationContext.class, applicationContext);
	// 通过refresh方法刷新
	((AbstractApplicationContext) applicationContext).refresh();
}
10:run方法和日志相关代码
以下截图,关键代码的执行和输出日志的对应关系:
org.springframework.boot.SpringApplication#run(java.lang.String...)