一句话总结:在context的refresh方法中,需要注册bean definition,实例化bean.在加载bean defintion的时候使用ConfigurationClassParser类来解析我们的主类。然后在解析主类的时候发现了@EnableAutoConfiguratio注解中的@Import注解,就去处理@Import注解中的value值,然后就使用ImportSelector来获取被配置在spring.factories中的类。这些类通常是AutoConfiguration。这些configuration中包含了各种各样的bean
一切的开始源于AppBootstrap.main方法,它调用了SpringApplication.run(AppBootstrap.class)方法。
在SpringApplication.run(AppBootstrap.class)方法中
//SpringApplication.java
public static ConfigurableApplicationContext run(Object[] sources, String[] args) {
        return (new SpringApplication(sources)).run(args);
}
- 1
- 2
- 3
- 4
- 5
所以我们可以看到spring启动流程大概分为两部,new和run。所以本篇文章会从分两个部分说明springboot的启动流程。在诉说启动流程的过程中,会将spring boot 的自动配置有关的东西重点拎出来。因为自动配置,我们可以什么都不做就可以启动一个web服务,不需要在web.xml中配置servlet,也不需要在applicationcontext.xml中配置componentScan。
new SpringApplication(sources)
public SpringApplication(Object... sources) {
        //设置打印模式
        this.bannerMode = Mode.CONSOLE;
        this.logStartupInfo = true;
        this.addCommandLineProperties = true;
        this.headless = true;
        this.registerShutdownHook = true;
        this.additionalProfiles = new HashSet();
        //主要设置listeners,initializer。listeners监听env,context的事件。initializer是在prepareContext中用来初始化context
        this.initialize(sources);
}- 1
- 2
- 3
- 4
- 5
- 6
- 7
- 8
- 9
- 10
- 11
属性设置
headless 刑天模式
Headless模式是在缺少显示屏、键盘或者鼠标时的系统配置。
在java.awt.toolkit和java.awt.graphicsenvironment类中有许多方法,除了对字体、图形和打印的操作外还需要调用显示器、键盘和鼠标的方法。在电脑缺少对应硬件设备的时候会抛出HeadlessException异常。但是有些类,如Canvas也可以在headless下正常使用。
headless
headless
初始化
initialize(sources)
private void initialize(Object[] sources) {
        if (sources != null && sources.length > 0) {
            this.sources.addAll(Arrays.asList(sources));
        }
        /*deduceWebEnvironment方法通过判断
        javax.servlet.Servlet,
        org.springframework.web.context.ConfigurableWebApplicationContext
        这两个Class是否存在判断是否是Web环境*/
        this.webEnvironment = this.deduceWebEnvironment();
        this.setInitializers(this.getSpringFactoriesInstances(ApplicationContextInitializer.class));
        this.setListeners(this.getSpringFactoriesInstances(ApplicationListener.class));
        //设置mainApplicationClass为AppBootstrap
        this.mainApplicationClass = this.deduceMainApplicationClass();
}- 1
- 2
- 3
- 4
- 5
- 6
- 7
- 8
- 9
- 10
- 11
- 12
- 13
- 14
ApplicationContextInitializer
在setInitializer方法中被实例化的initializer有:
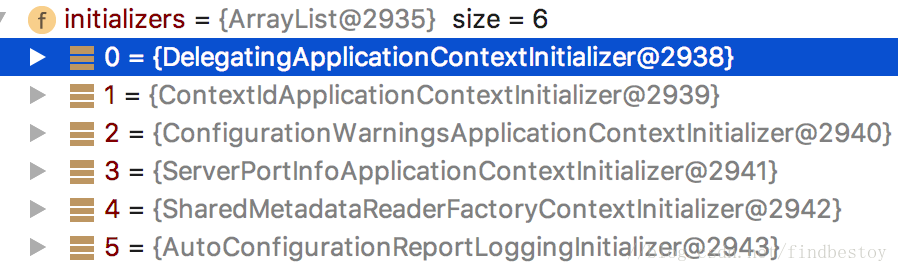
查看这些initializer的类图:

他们都实现了ApplicationContextInitializer。顾名思义,和上下文有关的初始化器。也就是说这些实例将在上下文初始化的时候prepareContext被使用。
public interface ApplicationContextInitializer<C extends ConfigurableApplicationContext> {
    void initialize(C var1);
}- 1
- 2
- 3
ApplicationListener
在setListeners方法中被实例的话listener包含:
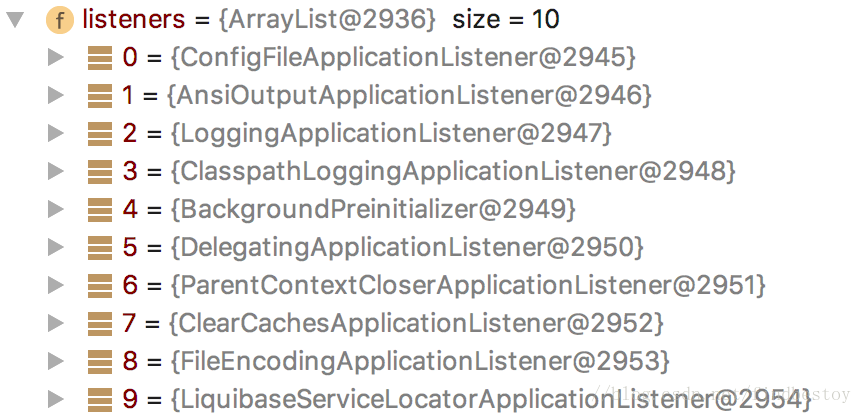
这些listener都实现了ApplicationListener接口。这个接口表示这个接口将监听对应的ApplicationEvent事件
public interface ApplicationListener<E extends ApplicationEvent> extends EventListener {
    void onApplicationEvent(E var1);
}- 1
- 2
- 3
整理几个listener和其监听的事件如下:
| listener | 事件 |
|---|---|
| ConfigFileApplicationListener | ApplicationEnvironmentPreparedEvent,ApplicationPreparedEvent |
| AnsiOutputApplicationListener | ApplicationEnvironmentPreparedEvent |
| LoggingApplicationListener | ApplicationStartingEvent,ApplicationEnvironmentPreparedEvent,ApplicationPreparedEvent,ContextClosedEvent,ApplicationFailedEvent |
| ClasspathLoggingApplicationListener | ApplicationEnvironmentPreparedEvent,ApplicationFailedEvent |
| BackgroundPreinitializer | ApplicationEnvironmentPreparedEvent |
| DelegatingApplicationListener | ApplicationEnvironmentPreparedEvent,** |
| ParentContextCloserApplicationListener | ParentContextAvailableEvent |
| ClearCachesApplicationListener | ContextRefreshedEvent |
| FileEncodingApplicationListener | ApplicationEnvironmentPreparedEvent |
| LiquibaseServiceLocatorApplicationListener | ApplicationStartingEvent |
整理这些对应关系的目的在于,在启动流程中,会出发许多ApplicationEvent。这时会调用对应的listener的onApplicationEvent方法。
这里是一种观察者模式。对于观察者模式,个人的理解为:被观察者持有观察者的引用,在发生某些事情的时候,调用观察者的方法即可
setInitailizers和setListeners方法
在setInitailizers和setListeners方法中都用到了getSpringFactoriesInstances.代码如下
    private <T> Collection<? extends T> getSpringFactoriesInstances(Class<T> type) {
        return this.getSpringFactoriesInstances(type, new Class[0]);
    }

    private <T> Collection<? extends T> getSpringFactoriesInstances(Class<T> type, Class<?>[] parameterTypes, Object... args) {
        ClassLoader classLoader = Thread.currentThread().getContextClassLoader();
        Set<String> names = new LinkedHashSet(SpringFactoriesLoader.loadFactoryNames(type, classLoader));
        List<T> instances = this.createSpringFactoriesInstances(type, parameterTypes, classLoader, args, names);
        AnnotationAwareOrderComparator.sort(instances);
        return instances;
}- 1
- 2
- 3
- 4
- 5
- 6
- 7
- 8
- 9
- 10
- 11
在其中使用SpringFactoriesLoader来根据type,classLoader从几个jar包之类的spring.factories中获取类名,之后实例化对应的类。代码如下:
public static List<String> loadFactoryNames(Class<?> factoryClass, ClassLoader classLoader) {
        String factoryClassName = factoryClass.getName();

        try {
            //会查找几个Spring的jar包中的META-INF/spring.factories文件。
            Enumeration<URL> urls = classLoader != null ? classLoader.getResources("META-INF/spring.factories") : ClassLoader.getSystemResources("META-INF/spring.factories");
            ArrayList result = new ArrayList();

            while(urls.hasMoreElements()) {
                URL url = (URL)urls.nextElement();
                Properties properties = PropertiesLoaderUtils.loadProperties(new UrlResource(url));
                String factoryClassNames = properties.getProperty(factoryClassName);
                result.addAll(Arrays.asList(StringUtils.commaDelimitedListToStringArray(factoryClassNames)));
            }

            return result;
        } catch (IOException var8) {
            throw new IllegalArgumentException("Unable to load [" + factoryClass.getName() + "] factories from location [" + "META-INF/spring.factories" + "]", var8);
        }
}- 1
- 2
- 3
- 4
- 5
- 6
- 7
- 8
- 9
- 10
- 11
- 12
- 13
- 14
- 15
- 16
- 17
- 18
- 19
- 20
SpringFactoriesLoader会查找几个Spring的jar包中的META-INF/spring.factories文件。被查找的factories文件的内容大致如下:
# PropertySource Loaders
org.springframework.boot.env.PropertySourceLoader=\
org.springframework.boot.env.PropertiesPropertySourceLoader,\
org.springframework.boot.env.YamlPropertySourceLoader

# Run Listeners
org.springframework.boot.SpringApplicationRunListener=\
org.springframework.boot.context.event.EventPublishingRunListener

# Application Context Initializers
org.springframework.context.ApplicationContextInitializer=\
org.springframework.boot.context.ConfigurationWarningsApplicationContextInitializer,\
org.springframework.boot.context.ContextIdApplicationContextInitializer,\
org.springframework.boot.context.config.DelegatingApplicationContextInitializer,\
org.springframework.boot.context.embedded.ServerPortInfoApplicationContextInitializer

# Application Listeners
org.springframework.context.ApplicationListener=\
org.springframework.boot.ClearCachesApplicationListener,\
org.springframework.boot.builder.ParentContextCloserApplicationListener,\
org.springframework.boot.context.FileEncodingApplicationListener,\
org.springframework.boot.context.config.AnsiOutputApplicationListener,\
org.springframework.boot.context.config.ConfigFileApplicationListener,\
org.springframework.boot.context.config.DelegatingApplicationListener,\
org.springframework.boot.liquibase.LiquibaseServiceLocatorApplicationListener,\
org.springframework.boot.logging.ClasspathLoggingApplicationListener,\
org.springframework.boot.logging.LoggingApplicationListener

# Environment Post Processors
org.springframework.boot.env.EnvironmentPostProcessor=\
org.springframework.boot.cloud.CloudFoundryVcapEnvironmentPostProcessor,\
org.springframework.boot.env.SpringApplicationJsonEnvironmentPostProcessor

# Failure Analyzers
org.springframework.boot.diagnostics.FailureAnalyzer=\
org.springframework.boot.diagnostics.analyzer.BeanCurrentlyInCreationFailureAnalyzer,\
org.springframework.boot.diagnostics.analyzer.BeanNotOfRequiredTypeFailureAnalyzer,\
org.springframework.boot.diagnostics.analyzer.BindFailureAnalyzer,\
org.springframework.boot.diagnostics.analyzer.ConnectorStartFailureAnalyzer,\
org.springframework.boot.diagnostics.analyzer.NoUniqueBeanDefinitionFailureAnalyzer,\
org.springframework.boot.diagnostics.analyzer.PortInUseFailureAnalyzer,\
org.springframework.boot.diagnostics.analyzer.ValidationExceptionFailureAnalyzer

# FailureAnalysisReporters
org.springframework.boot.diagnostics.FailureAnalysisReporter=\
org.springframework.boot.diagnostics.LoggingFailureAnalysisReporter
- 1
- 2
- 3
- 4
- 5
- 6
- 7
- 8
- 9
- 10
- 11
- 12
- 13
- 14
- 15
- 16
- 17
- 18
- 19
- 20
- 21
- 22
- 23
- 24
- 25
- 26
- 27
- 28
- 29
- 30
- 31
- 32
- 33
- 34
- 35
- 36
- 37
- 38
- 39
- 40
- 41
- 42
- 43
- 44
- 45
- 46
- 47
在本项目中,被查找的有:
- spring-boot
- spring-boot-autoconfigure
- spring-beans
- spring-boot-test
- spring-boot-test-autoconfigure
- spring-test
这些jar包都是被直接或者间接的被项目所依赖.
spring.factories文件的作用也就间接的实现了自动化配置。我们可以在项目下创建自己的spring.factories文件。来向spring boot启动流程中加入我们自己需要的东西。
现在回到SetListener和setInitializer方法。他们使用SpringFactoriesLoader从spring.factories文件中获取对应type的类名。然后实例化这些类。并将这些实例保存在springApplication的对应属性中。 private List<ApplicationContextInitializer<?>> initializers;
或者private List<ApplicationListener<?>> listeners;
由于listener和initializer的构造函数几乎为null。所以不用去关心他们在构造函数中做了什么。
run
public ConfigurableApplicationContext run(String... args) {
        StopWatch stopWatch = new StopWatch();
        stopWatch.start();
        //context,上下文,我们的重点对象
        ConfigurableApplicationContext context = null;
        FailureAnalyzers analyzers = null;
        this.configureHeadlessProperty();
        //new SpringApplicationRunListeners用它来统一管理listeners,在事件发生的时候调用他们
        SpringApplicationRunListeners listeners = this.getRunListeners(args);
        listeners.starting();//如果有监听器监听启动事件,则执行对应的动作

        try {
            //从命令行中读取参数作为propertySource,放入到这里,会加入到env中
            ApplicationArguments applicationArguments = new DefaultApplicationArguments(args);
            //创建env,加载配置文件,系统的属性,profile文件,application.yml, 初始化日志系统
            ConfigurableEnvironment environment = this.prepareEnvironment(listeners, applicationArguments);
            //打印banner
            Banner printedBanner = this.printBanner(environment);
            //创建context
            context = this.createApplicationContext();
            new FailureAnalyzers(context);
            this.prepareContext(context, environment, listeners, applicationArguments, printedBanner);
            this.refreshContext(context);
            this.afterRefresh(context, applicationArguments);
            listeners.finished(context, (Throwable)null);
            stopWatch.stop();
            if (this.logStartupInfo) {
                (new StartupInfoLogger(this.mainApplicationClass)).logStarted(this.getApplicationLog(), stopWatch);
            }

            return context;
        } catch (Throwable var9) {
            this.handleRunFailure(context, listeners, (FailureAnalyzers)analyzers, var9);
            throw new IllegalStateException(var9);
        }
}- 1
- 2
- 3
- 4
- 5
- 6
- 7
- 8
- 9
- 10
- 11
- 12
- 13
- 14
- 15
- 16
- 17
- 18
- 19
- 20
- 21
- 22
- 23
- 24
- 25
- 26
- 27
- 28
- 29
- 30
- 31
- 32
- 33
- 34
- 35
- 36
获取运行时监听器监听运行时发生的事件:getRunListeners
SpringApplicationRunListeners listeners = this.getRunListeners(args);- 1
首先看SpringApplicationRunListeners类。类中包含了一个SpringApplicationRunListener的集合.
class SpringApplicationRunListeners {
    private final Log log;
    private final List<SpringApplicationRunListener> listeners;
}- 1
- 2
- 3
- 4
public interface SpringApplicationRunListener {
    void starting();

    void environmentPrepared(ConfigurableEnvironment var1);

    void contextPrepared(ConfigurableApplicationContext var1);

    void contextLoaded(ConfigurableApplicationContext var1);

    void finished(ConfigurableApplicationContext var1, Throwable var2);
}- 1
- 2
- 3
- 4
- 5
- 6
- 7
- 8
- 9
- 10
- 11
也就是说
在run方法中构造了一个SpringRunApplicationListeners,其中包含多个SpringRunApplicationListener,用来监听应用启动过程中的start,environmentPrepared,contextPrepared,contextLoaded,finished等事件。
SpringRunApplicationLinsteners中到底包含哪些RunListener呢?包含从spring.factories中实例化的。在这里,getSpringFactoroiesIntsances方法返回只包含一个实例的集合,这个实例是EventPublishingRunListener
private SpringApplicationRunListeners getRunListeners(String[] args) {
        Class<?>[] types = new Class[]{SpringApplication.class, String[].class};
        return new SpringApplicationRunListeners(logger, this.getSpringFactoriesInstances(SpringApplicationRunListener.class, types, this, args));
}- 1
- 2
- 3
- 4
下面看EventPublishingRunListener类。
public class EventPublishingRunListener implements SpringApplicationRunListener, Ordered {
    private final SpringApplication application;
    private final String[] args;
    private final SimpleApplicationEventMulticaster initialMulticaster;
    public EventPublishingRunListener(SpringApplication application, String[] args) {
        //在这里,application即SpringApplication
        this.application = application;
        this.args = args;
        this.initialMulticaster = new SimpleApplicationEventMulticaster();
        Iterator var3 = application.getListeners().iterator();

        //在SpringApplication.initailize()方法中初始化的listeners被加入到EventPublishingRunListener里面的initialMulticaster中
        while(var3.hasNext()) {
            ApplicationListener<?> listener = (ApplicationListener)var3.next();
            this.initialMulticaster.addApplicationListener(listener);
        }

    }
}- 1
- 2
- 3
- 4
- 5
- 6
- 7
- 8
- 9
- 10
- 11
- 12
- 13
- 14
- 15
- 16
- 17
- 18
- 19
EventPublishingRunListener通过引用SimpleApplicationEventMulticaster来完成事件的发布和ApplicationListener的管理。
接下来我们仔细看SimpleApplicationEventMulticaster这个类。
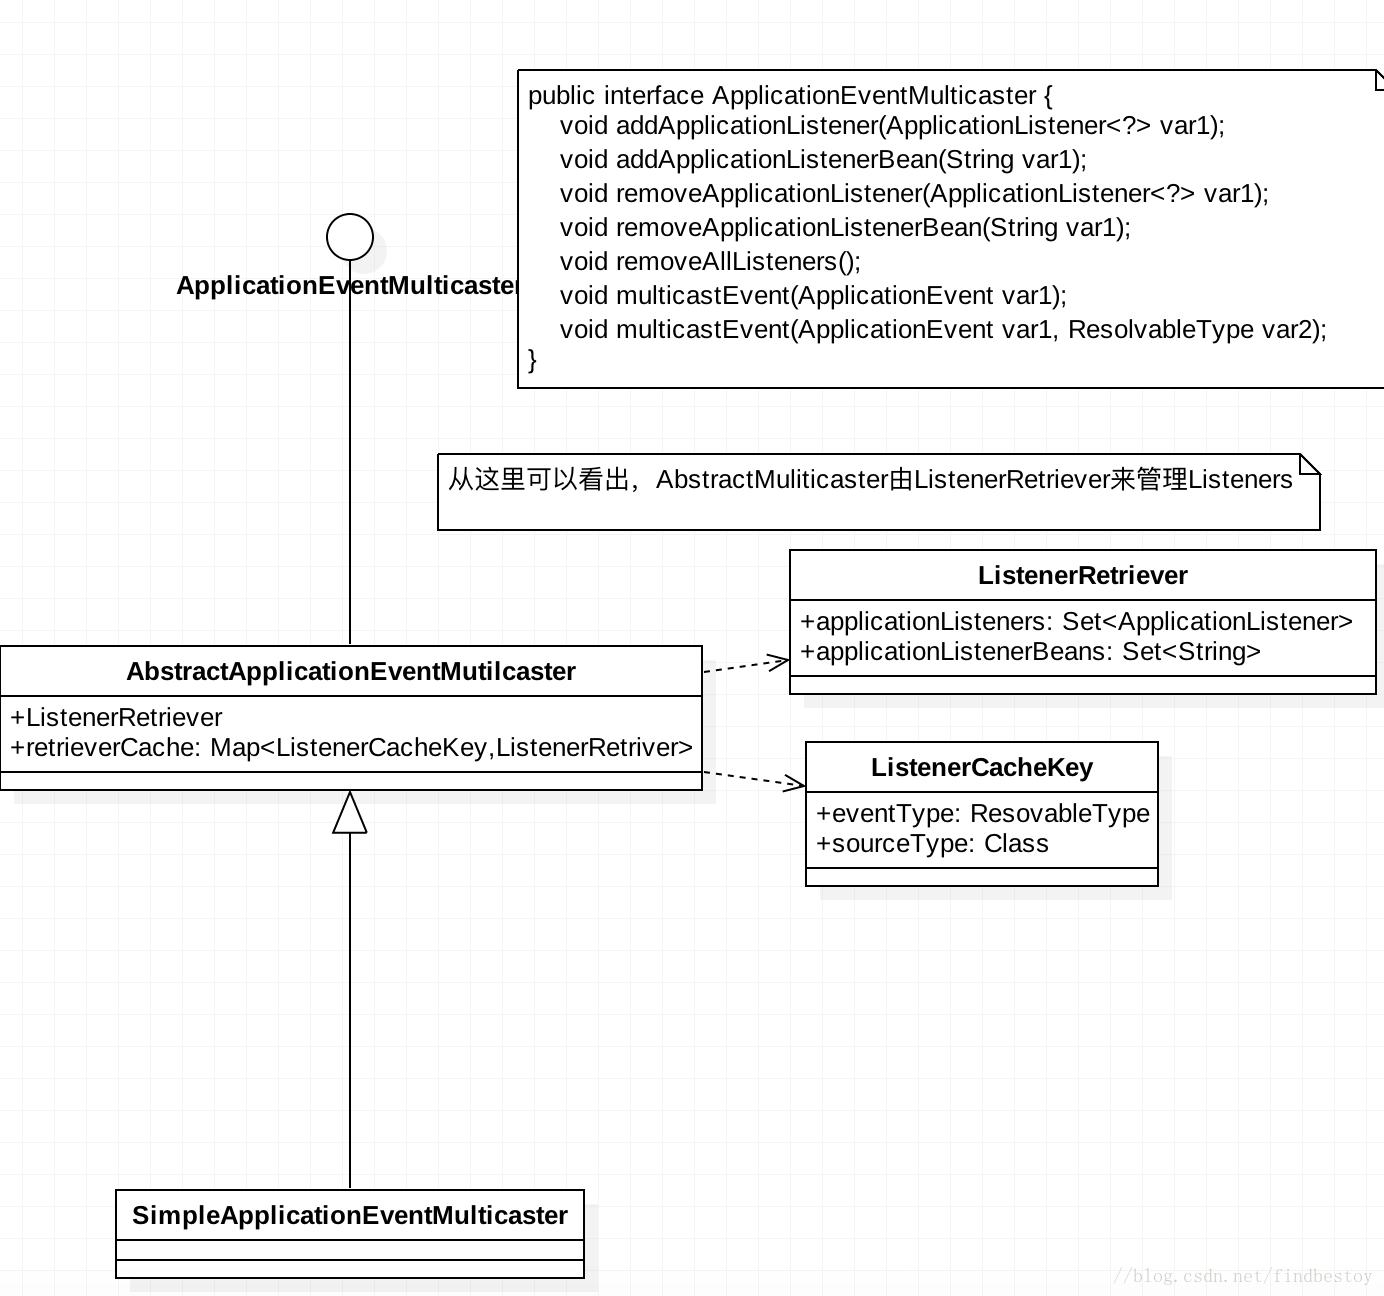
从SimpleApplicationEventMulticaster类的结构中可以看到multicaster使用ListenerRetriever来管理ApplicationListener。使用了retrieverCache:ConcurrentHashMap
广播ApplicationStartedEvent事件:listeners.starting()
在上一步使用SpringRunApplicationListeners将所有的listener管理起来后,开始传播start事件
//EventPublishingRunListener
 public void starting() {
        this.initialMulticaster.multicastEvent(new ApplicationStartedEvent(this.application, this.args));
}- 1
- 2
- 3
- 4
需要注意的是:
public void multicastEvent(final ApplicationEvent event, ResolvableType eventType) {
        ResolvableType type = eventType != null ? eventType : this.resolveDefaultEventType(event);
        //在这一步getApplicationListeners(event,type)中,会从所有的listener中取出支持这个事件类型的listener,一个新的retriever会持有这些listener的引用作为value,另外以(event,source)作为key,存在retrieverCache中。
        Iterator var4 = this.getApplicationListeners(event, type).iterator();

        while(var4.hasNext()) {
            final ApplicationListener<?> listener = (ApplicationListener)var4.next();
            Executor executor = this.getTaskExecutor();
            if (executor != null) {
                executor.execute(new Runnable() {
                    public void run() {
                        SimpleApplicationEventMulticaster.this.invokeListener(listener, event);
                    }
                });
            } else {
                this.invokeListener(listener, event);
            }
        }

}- 1
- 2
- 3
- 4
- 5
- 6
- 7
- 8
- 9
- 10
- 11
- 12
- 13
- 14
- 15
- 16
- 17
- 18
- 19
- 20
在listener.starting()这一部中,几个listener都没有做什么动作。
构造应用参数:new DefaultApplicationArguments(args)
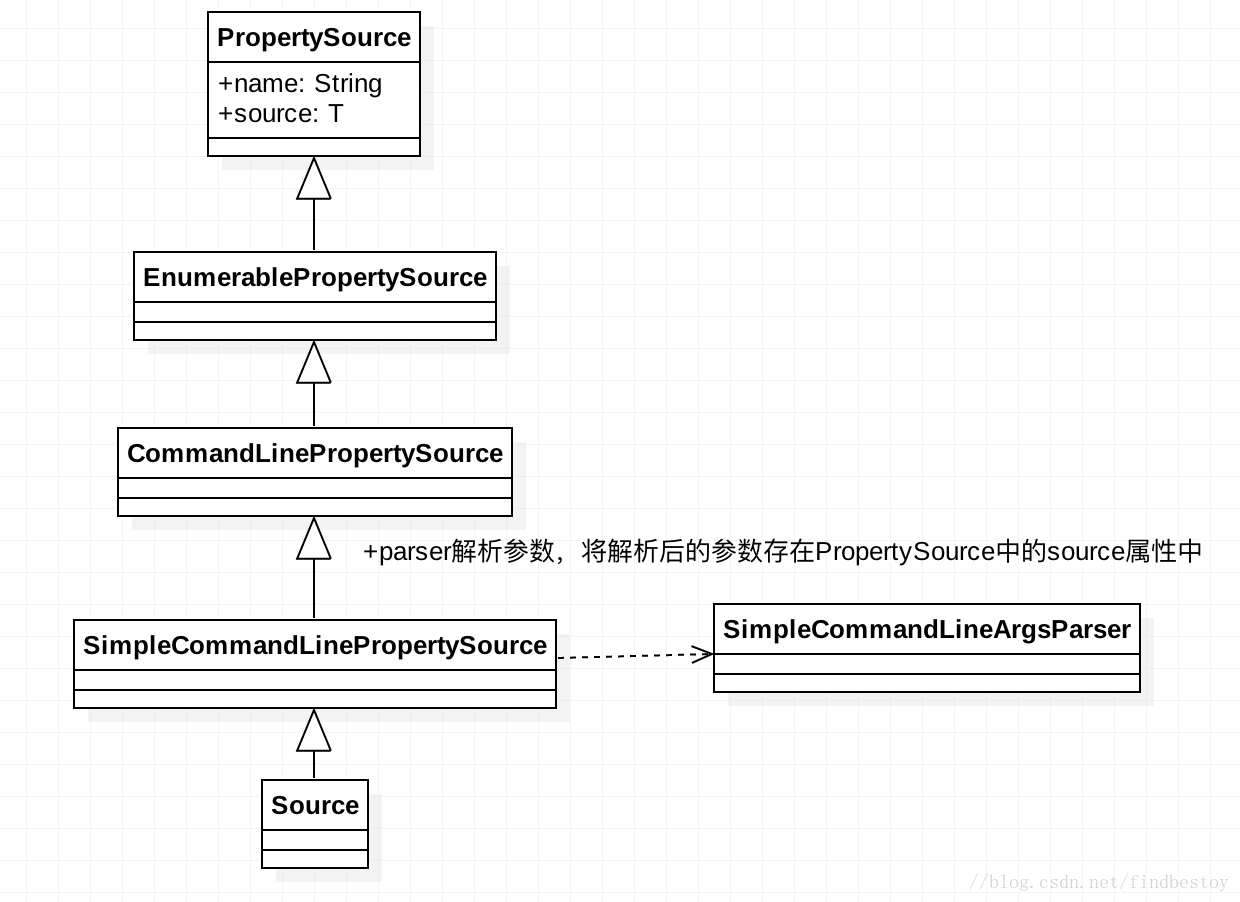
创建DefaultApplicationArguments的作用是将参数存储在DefaultApplicationArguments的内部类Source中。
其中Source的类结构如图:
我们追寻Source的构造函数可以发现,使用SimpleCommandLineArgsParser来解析参数,将解析后的参数存到PropertySource的source属性中。
这里由于没有什么参数,所以略过。
创建和准备环境:environment
ConfigurableEnvironment environment = this.prepareEnvironment(listeners, applicationArguments);- 1
private ConfigurableEnvironment prepareEnvironment(SpringApplicationRunListeners listeners, ApplicationArguments applicationArguments) {
        //创建env,如果是web环境,则创建StandardServletEnvironment,如果不是StandardEnvironment
        ConfigurableEnvironment environment = this.getOrCreateEnvironment();
        //配置env
        this.configureEnvironment((ConfigurableEnvironment)environment, applicationArguments.getSourceArgs());

        //广播environment事件
        listeners.environmentPrepared((ConfigurableEnvironment)environment);
        if (!this.webEnvironment) {
            environment = (new EnvironmentConverter(this.getClassLoader())).convertToStandardEnvironmentIfNecessary((ConfigurableEnvironment)environment);
        }

        return (ConfigurableEnvironment)environment;
}- 1
- 2
- 3
- 4
- 5
- 6
- 7
- 8
- 9
- 10
- 11
- 12
- 13
- 14
这段代码主要分为几个步骤:
1. 创建Env
2. 配置Env
3. 调用监听器广播ApplicationEnvironmentPreparedEvent事件
创建Env
private ConfigurableEnvironment getOrCreateEnvironment() {
        if (this.environment != null) {
            return this.environment;
        } else {
            return (ConfigurableEnvironment)(this.webEnvironment ? new StandardServletEnvironment() : new StandardEnvironment());
        }
}- 1
- 2
- 3
- 4
- 5
- 6
- 7
如果是Web环境,则创建StandardServletEnvironment,否则创建StandardEnvironment.
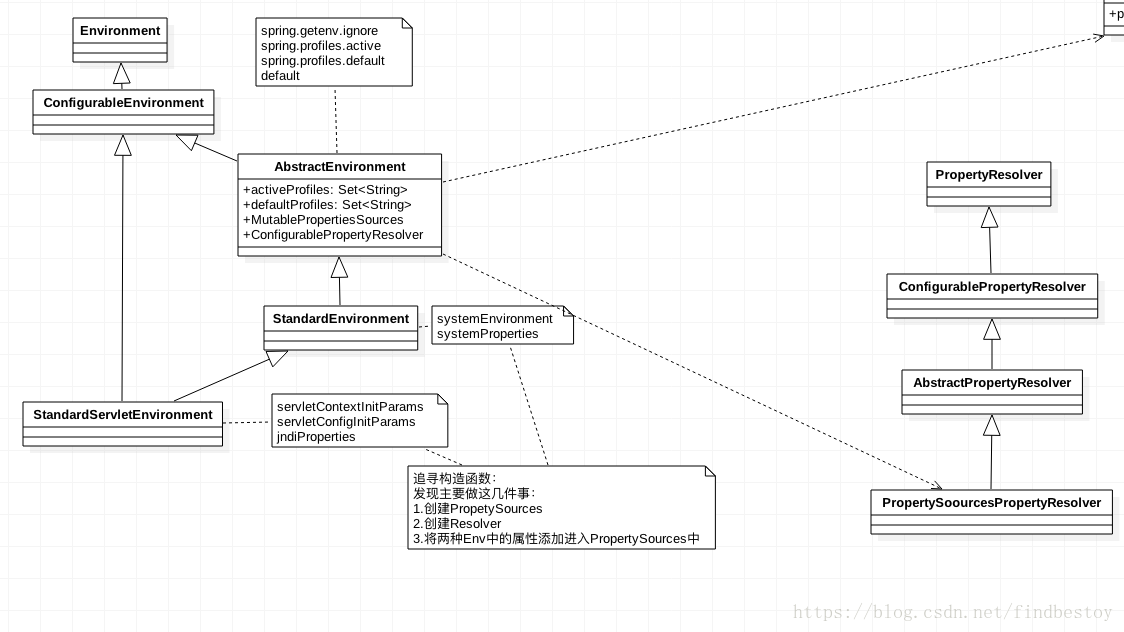
下面的代码是有关Environment和ConfigurableEnvironment接口.
我们可以从接口中看出Environment主要作用为:获取系统的环境和spring的profile文件中的内容,存储到PropertySource中。
public interface Environment extends PropertyResolver {
    String[] getActiveProfiles();

    String[] getDefaultProfiles();

    boolean acceptsProfiles(String... var1);
}
public interface ConfigurableEnvironment extends Environment, ConfigurablePropertyResolver {
    void setActiveProfiles(String... var1);

    void addActiveProfile(String var1);

    void setDefaultProfiles(String... var1);

    MutablePropertySources getPropertySources();

    Map<String, Object> getSystemEnvironment();

    Map<String, Object> getSystemProperties();

    void merge(ConfigurableEnvironment var1);
}- 1
- 2
- 3
- 4
- 5
- 6
- 7
- 8
- 9
- 10
- 11
- 12
- 13
- 14
- 15
- 16
- 17
- 18
- 19
- 20
- 21
- 22
有关Env的类图:
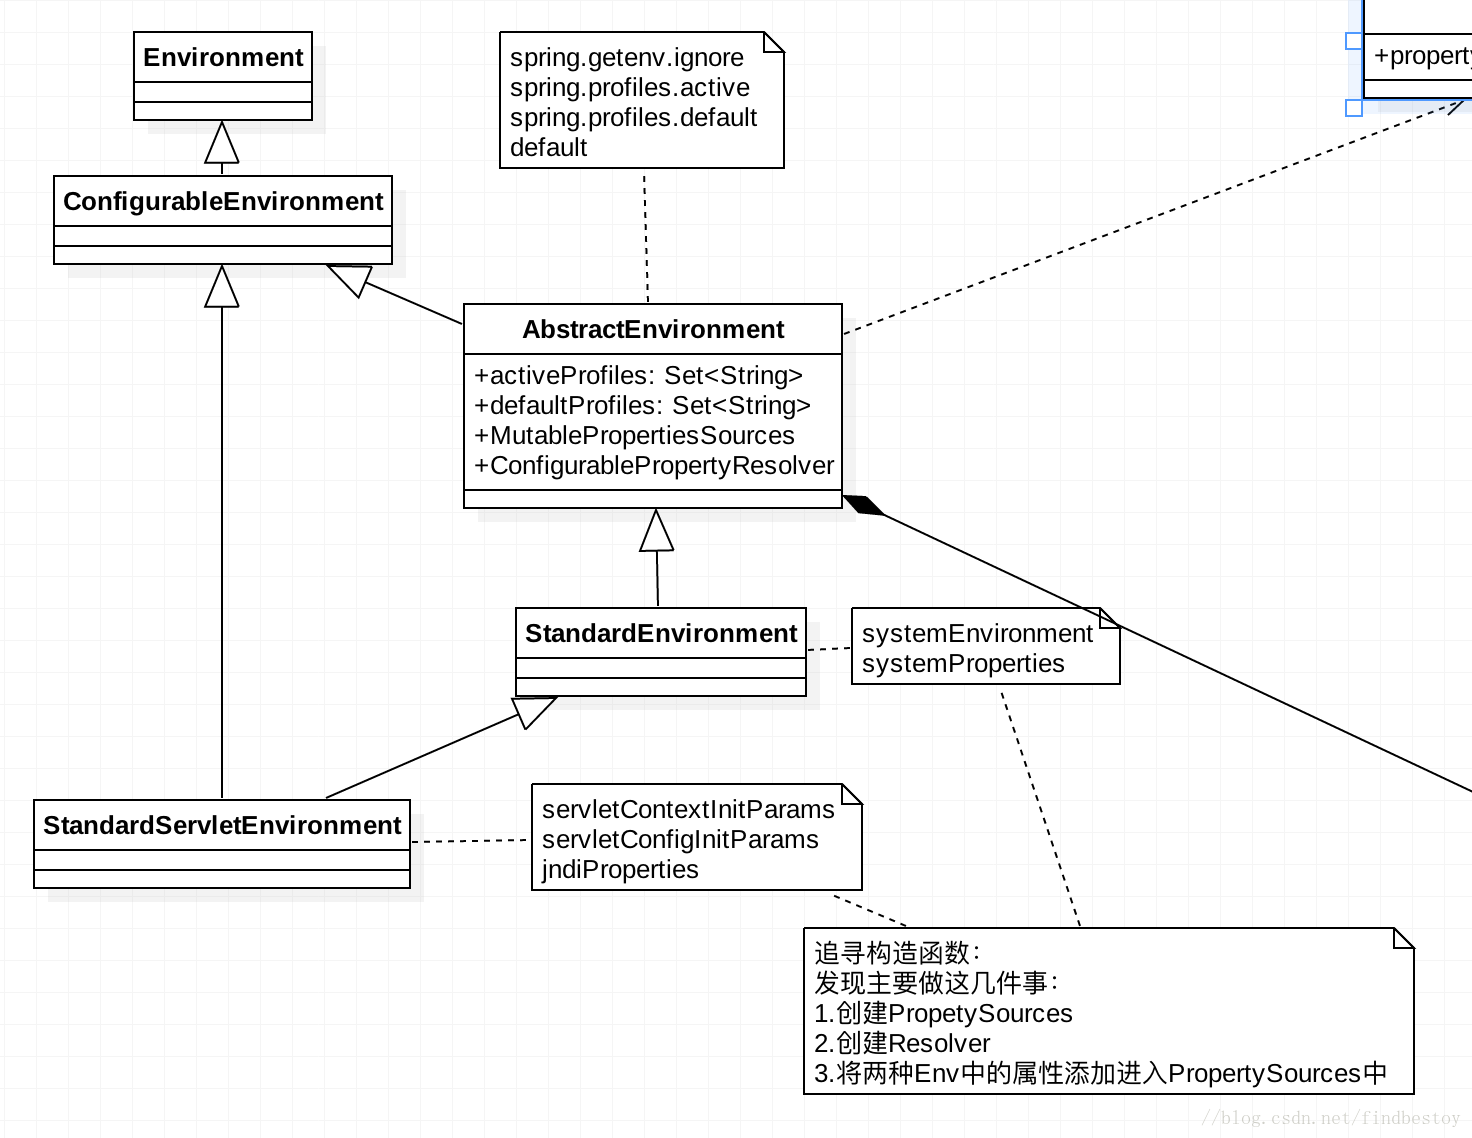
在environment初始化之后,PropertySources中包含的几个PropertySource为4个:
1. servletContextInitParam
2. servletConfigInitParams
3. systemEnv
4. systemProperties
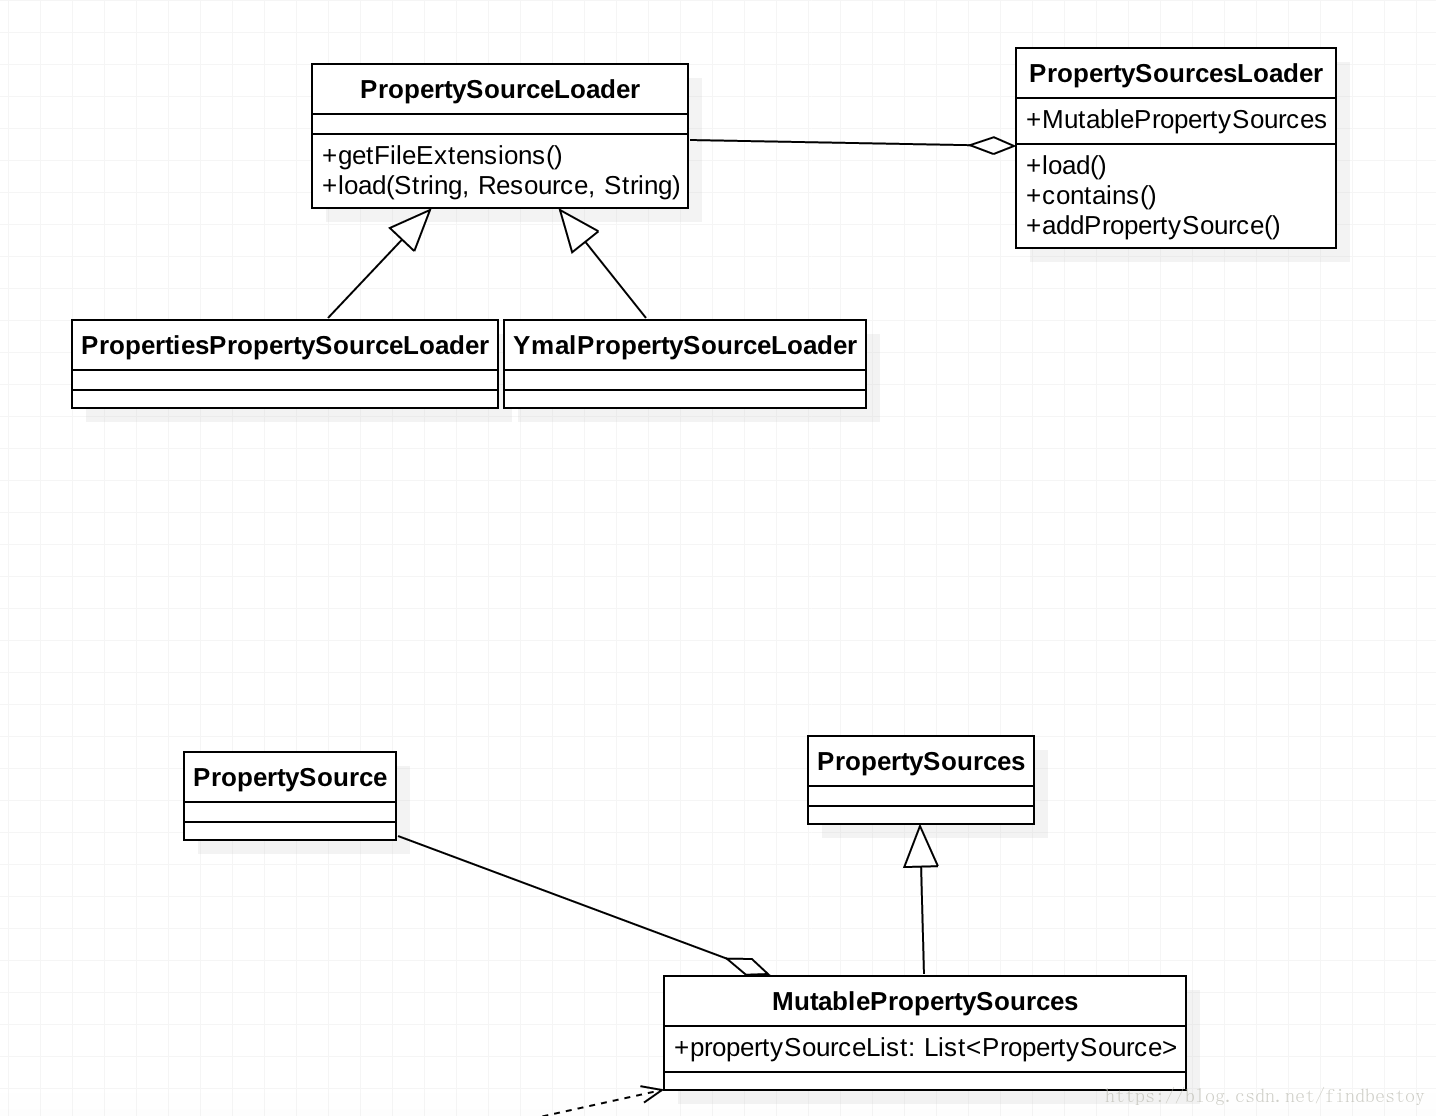
简单说下PropertySource的结构
//代表了name/value属性对的资源。source可以任何一种封装了属性值得类型。可以是Properties,Map,ServletContext,ServletConfig
//一般都很少单独使用PropertySource,而是使用PropertySources
public abstract class PropertySource<T> {
    protected final Log logger;
    protected final String name;
    protected final T source;
}
//PropertySources中聚合了多个PropertySource,包含PropertyResolver的实现可以实现从PropertySource中搜索
public interface PropertySources extends Iterable<PropertySource<?>> {
    boolean contains(String var1);
    PropertySource<?> get(String var1);
}- 1
- 2
- 3
- 4
- 5
- 6
- 7
- 8
- 9
- 10
- 11
- 12
当和@Configuration一起工作时,@PropertySource注解可以方便得为当前环境加入配置文件
和PropertySource相关的类图:

配置env
protected void configureEnvironment(ConfigurableEnvironment environment, String[] args) {
        this.configurePropertySources(environment, args);
        this.configureProfiles(environment, args);
    }
//这两个函数分别用来添加命令行参数的PropertySource和设置activeProfile。由于项目中没有这些则略过- 1
- 2
- 3
- 4
- 5
广播ApplicationEnvironmentPreparedEvent事件
调用RunListener,广播ApplicationEnvironmentPreparedEvent事件。受到影响的listener列在下表
| listener | 事件 |
|---|---|
| ConfigFileApplicationListener | ApplicationEnvironmentPreparedEvent,ApplicationPreparedEvent |
| AnsiOutputApplicationListener | ApplicationEnvironmentPreparedEvent |
| LoggingApplicationListener | ApplicationStartingEvent,ApplicationEnvironmentPreparedEvent,ApplicationPreparedEvent,ContextClosedEvent,ApplicationFailedEvent |
| ClasspathLoggingApplicationListener | ApplicationEnvironmentPreparedEvent,ApplicationFailedEvent |
| BackgroundPreinitializer | ApplicationEnvironmentPreparedEvent |
| DelegatingApplicationListener | ApplicationEnvironmentPreparedEvent,** |
| FileEncodingApplicationListener | ApplicationEnvironmentPreparedEvent |
加载配置文件:ConfigFileApplicationListener。注意application.proporties文件在这一步加载
private void onApplicationEnvironmentPreparedEvent(ApplicationEnvironmentPreparedEvent event) {
        //ConfigFileApplicationListener使用EnvironmentPostProcessor来处理environment
        List<EnvironmentPostProcessor> postProcessors = this.loadPostProcessors();
        postProcessors.add(this);
        AnnotationAwareOrderComparator.sort(postProcessors);
        Iterator var3 = postProcessors.iterator();

        while(var3.hasNext()) {
            EnvironmentPostProcessor postProcessor = (EnvironmentPostProcessor)var3.next();
            postProcessor.postProcessEnvironment(event.getEnvironment(), event.getSpringApplication());
        }

}- 1
- 2
- 3
- 4
- 5
- 6
- 7
- 8
- 9
- 10
- 11
- 12
- 13
EnvironmentPostProcessor会在应用上下文刷新之前定制应用的环境。EnvironmentPostProcessor的实现类需要注册在META-INF/spring.factories文件中,并且用类的全路径名作为key。并且其实现类被鼓励实现Ordered接口或者@Order注解,Ordered接口和@Order的作用在于将容器内的bean排序。
EnvironmentPostProcessor从中所周知的路径中加载属性文件用来配置应用上下文的环境。默认情况是:从classpath:,file:./,classpath:config/,file:./config/:四个位置加载applicatin.properties或者application.yml。
我们可以将EnvironmentPostProcessor作为一个动态管理配置文件的接口。
EnvironmentPostProcessor的扩展
回到ConfigFileApplicationListener的onApplicationEnvironmentPreparedEvent方法,它获取所有的EnvironmentPostProcessor来postProcessEnvironment。
1. SpringApplicationJsonEnvironmentPostProcessor
    从Env中现有的配置解析spring.application.json.如果有值,则向env中添加一个MapPropertySource。spring.applictaion.json的值可以通过命令行参数传递进来
2. CloudFoundryVcapEnvironmentPostProcessor
    从已经存在的env中寻找到VCAP
3. ConfigFileApplicationListener
  从配置路径中加载application.properties/yml/xml
- 1
- 2
- 3
- 4
- 5
- 6
- 7
Spring Boot允许针对不同的环境配置不同的配置参数,可以使用 properties文件、YAML 文件、环境变量或者命令行参数来修改应用的配置。你可以在代码中使用@Value注解来获取配置参数的值
经过这一步加载过后env中包含的ProperytySource有:
- 命令行参数
- 来自SPRING_APPLICATION_JSON的属性
java:comp/env 中的 JNDI 属性- Java系统环境变量
- 操作系统环境变量
- RandomValuePropertySource,随机值,使用 random.* 来定义
- jar包外的 Profile 配置文件,如 application-{profile}.properties 和 YAML 文件
- jar包内的Profile 配置文件,如 application-{profile}.properties 和 YAML 文件
- jar包外的Application 配置,如 application.properties 和 application.yml
- 文件jar 包内的Application 配置,如 application.properties 和application.yml 文件
在标有@Configuration 注解的类标有@PropertySource注解的默认值,使用SpringApplication.setDefaultProperties 设置的
设置输出格式AnsiOutputApplicationListener
AnsiOutputApplicationListener 根据spring.output.ansi.enabled的值来配置AnsiOutput
完成日志系统的集成:LoggingApplicationListener
SpringBoot在这一步完成与日志系统的集成。项目中如果使用了spring boot starter则默认使用logback。我们可以使用自己需要用的日志。只需要将适当的库添加到classpath,便激活各种日志系统。在classpath根目录可以提供一个合适命名的配置文件来定制日志系统。我们不需要在application.properties中做额外的操作。
spring的日志管理,写的很赞的一篇 在ApplicationStartedEvent事件中,LoggingApplicationListener寻找合适的日志系统
在ApplicationEnvironmentPrepared事件中,LoggingApplicationListener寻找到配置文件并且初始化日志系统
加快应用初始化BackgroundPreinitializer
spring boot 为了加速应用的初始化,在后台线程提前初始化一些耗时的任务
public void onApplicationEvent(ApplicationEnvironmentPreparedEvent event) {
        try {
            Thread thread = new Thread(new Runnable() {
                public void run() {
                    this.runSafely(new BackgroundPreinitializer.MessageConverterInitializer(null));
                    this.runSafely(new BackgroundPreinitializer.MBeanFactoryInitializer(null));
                    this.runSafely(new BackgroundPreinitializer.ValidationInitializer(null));
                    this.runSafely(new BackgroundPreinitializer.JacksonInitializer(null));
                    this.runSafely(new BackgroundPreinitializer.ConversionServiceInitializer(null));
                }

                public void runSafely(Runnable runnable) {
                    try {
                        runnable.run();
                    } catch (Throwable var3) {
                        ;
                    }

                }
            }, "background-preinit");
            thread.start();
        } catch (Exception var3) {
            ;
        }

}- 1
- 2
- 3
- 4
- 5
- 6
- 7
- 8
- 9
- 10
- 11
- 12
- 13
- 14
- 15
- 16
- 17
- 18
- 19
- 20
- 21
- 22
- 23
- 24
- 25
- 26
创建和准备环境这一步做的事情总结如下:
1. 加载配置文件
2. 初始化日志系统
3. 提前加载某些后台的进程。在这些进程中创建一些消息转换器等
打印Banner
Banners:持有多个Bannner,循环打印
PrintBanner:持有一个Banner,打印
Banner可以打印在Console,也可以打印到日志文件中。所以有不同的输出路径。print函数应该有一个参数为OutputStream,用来做不同的输出方式
感兴趣的是使用
AnsiOutput.toString(new Object[]{AnsiColor.GREEN, ” :: Spring Boot :: “, AnsiColor.DEFAULT, padding, AnsiStyle.FAINT, version})方法输出有颜色的

创建应用上下文 createApplicationContext
protected ConfigurableApplicationContext createApplicationContext() {
        Class<?> contextClass = this.applicationContextClass;
        if (contextClass == null) {
            try {
                contextClass = Class.forName(this.webEnvironment ? "org.springframework.boot.context.embedded.AnnotationConfigEmbeddedWebApplicationContext" : "org.springframework.context.annotation.AnnotationConfigApplicationContext");
            } catch (ClassNotFoundException var3) {
                throw new IllegalStateException("Unable create a default ApplicationContext, please specify an ApplicationContextClass", var3);
            }
        }

        return (ConfigurableApplicationContext)BeanUtils.instantiate(contextClass);
}- 1
- 2
- 3
- 4
- 5
- 6
- 7
- 8
- 9
- 10
- 11
- 12
如果当前是Web应用,则实例化AnnotationConfigEmbeddedWebApplicationContext,否则实例化AnnotationConfigApplicationContext;
想要了解ApplicationContext的实例化过程中都做了什么,必须了解其类结构。
ApplicationContext有关的类结构
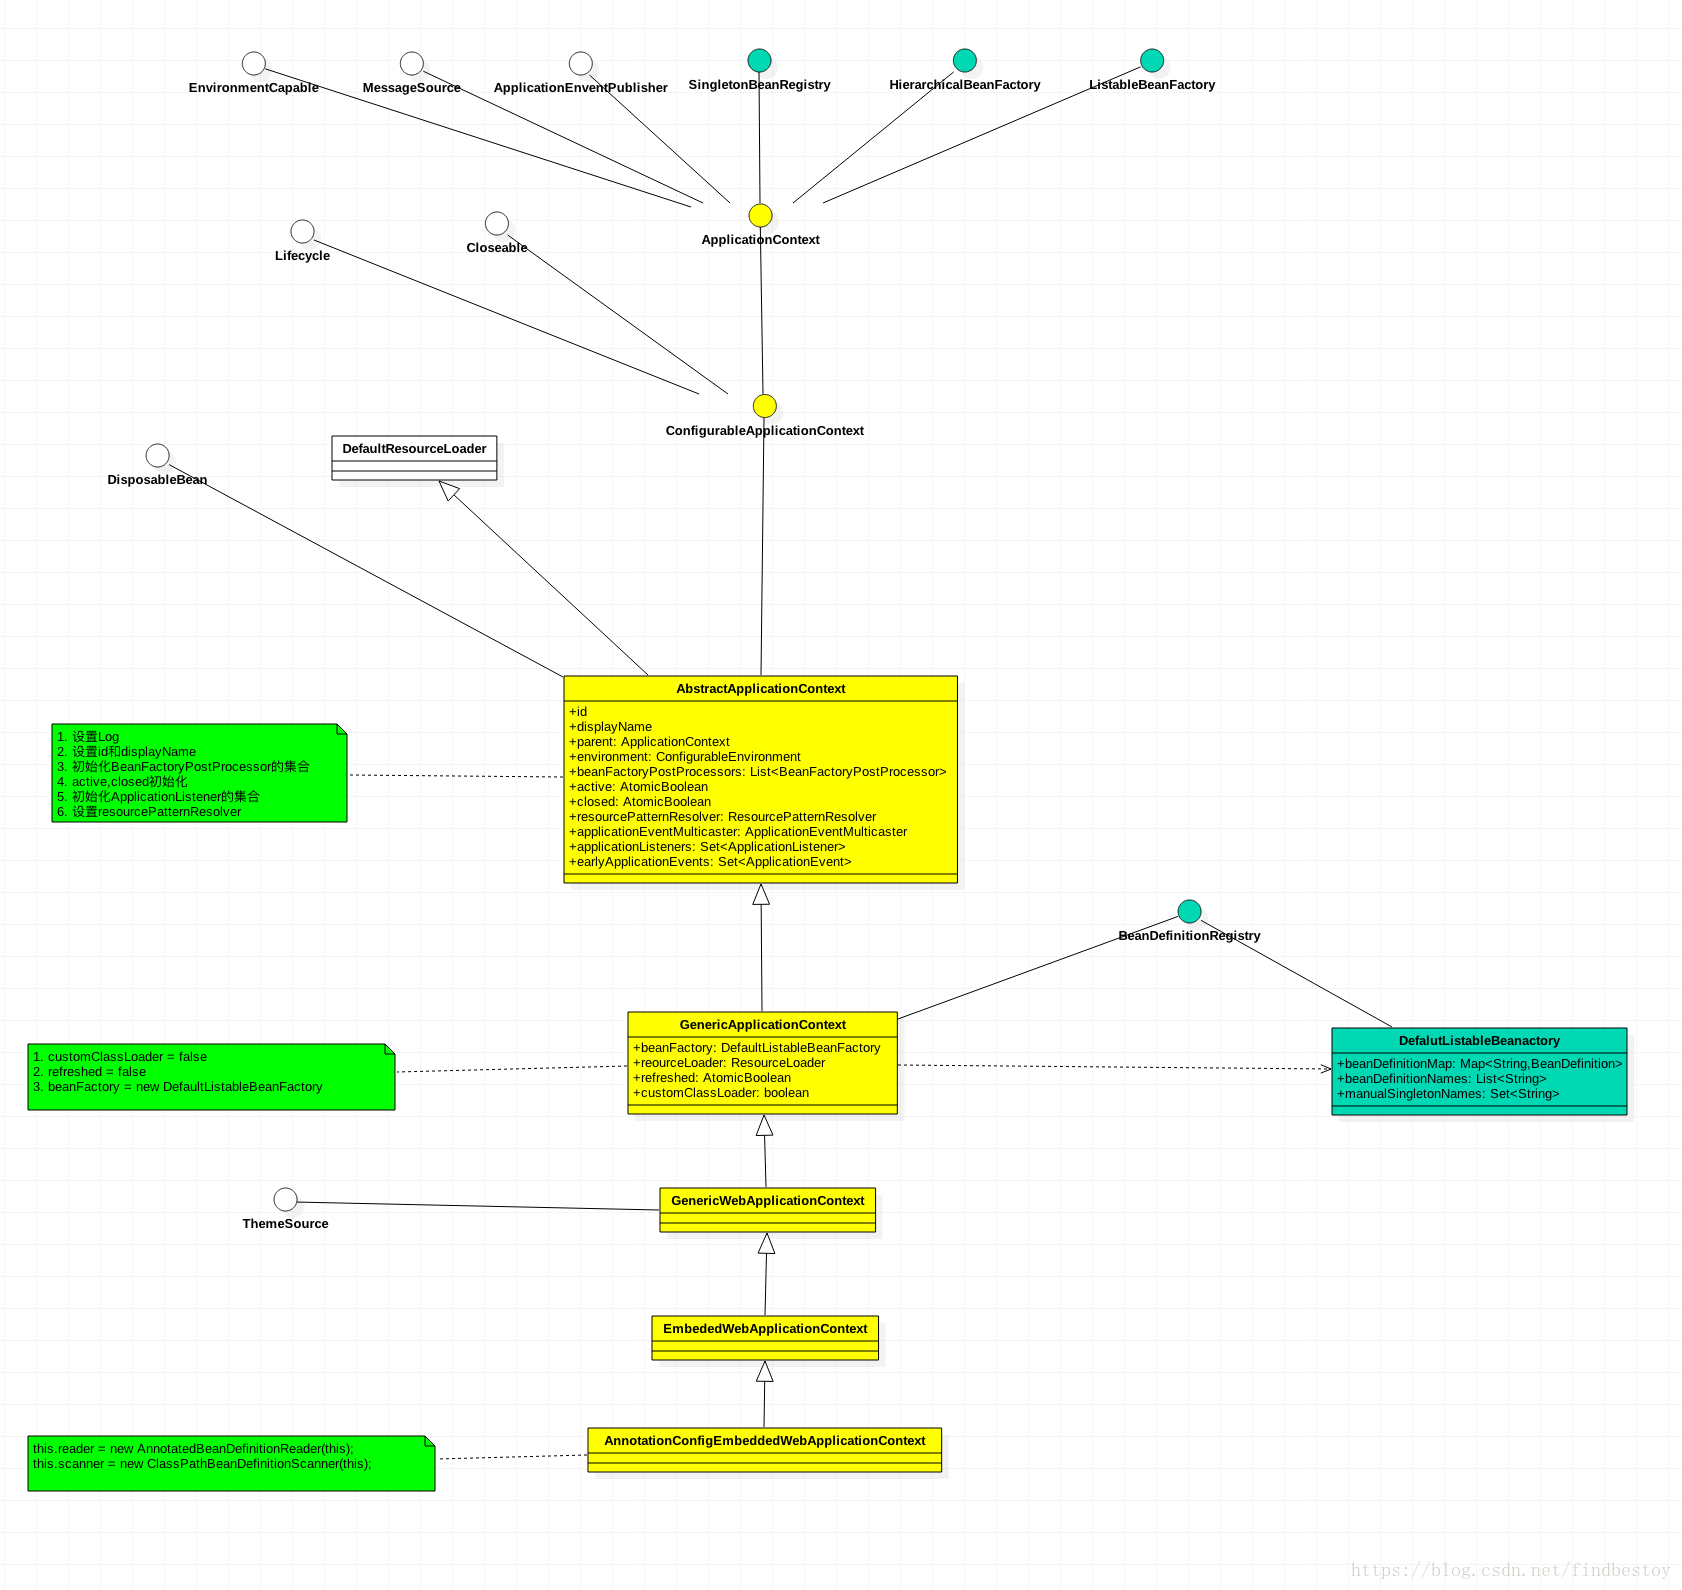
    作为一个Context,ApplicationContext被赋予了很多功能。
    EnvironmentCapable,携带环境的
    ApplicationEventPublisher:发布事件
    SingletonBeanRegistry:注册单例bean
    ListableBeanFactory:bean工厂
    DefaultResourceLoader:加载资源
    BeanDefinitionRegistry:注册bean定义
- 1
- 2
- 3
- 4
- 5
- 6
- 7
- 8
我们追寻其构造方法,发现分别在AbstractApplicationContext和GenericApplicationContext和AnnotationConfigEmbeddedWebApplicationContext三个类中有构造方法。
AbstractApplicationContext
1. 设置Log
2. 设置id和displayName
3. **初始化BeanFactoryPostProcessor的集合**
4. active,closed初始化
5. 初始化ApplicationListener的集合
6. 设置resourcePatternResolver
- 1
- 2
- 3
- 4
- 5
- 6
- 7
2. GenericApplicationContext
1. customClassLoader = false
2. refreshed = false
3. **beanFactory = new DefaultListableBeanFactory**
- 1
- 2
- 3
- 4
3. AnnotationConfigEmbeddedWebApplicationContext
1. **this.reader = new AnnotatedBeanDefinitionReader(this);**
2. **this.scanner = new ClassPathBeanDefinitionScanner(this);**
- 1
- 2
- 3
我们简单介绍context中几个比较重要的类
BeanFactoryPostProcessor,DefaultListableBeanFactory, AnnotatedBeanDefinitionReader,ClassPathBeanDefinitionScanner;
BeanFactoryPostProcessor
可以修改应用上下文的bean definition,以适应上下文底层bean工厂的属性
spring boot会给我们提供一些默认的PostProcessor
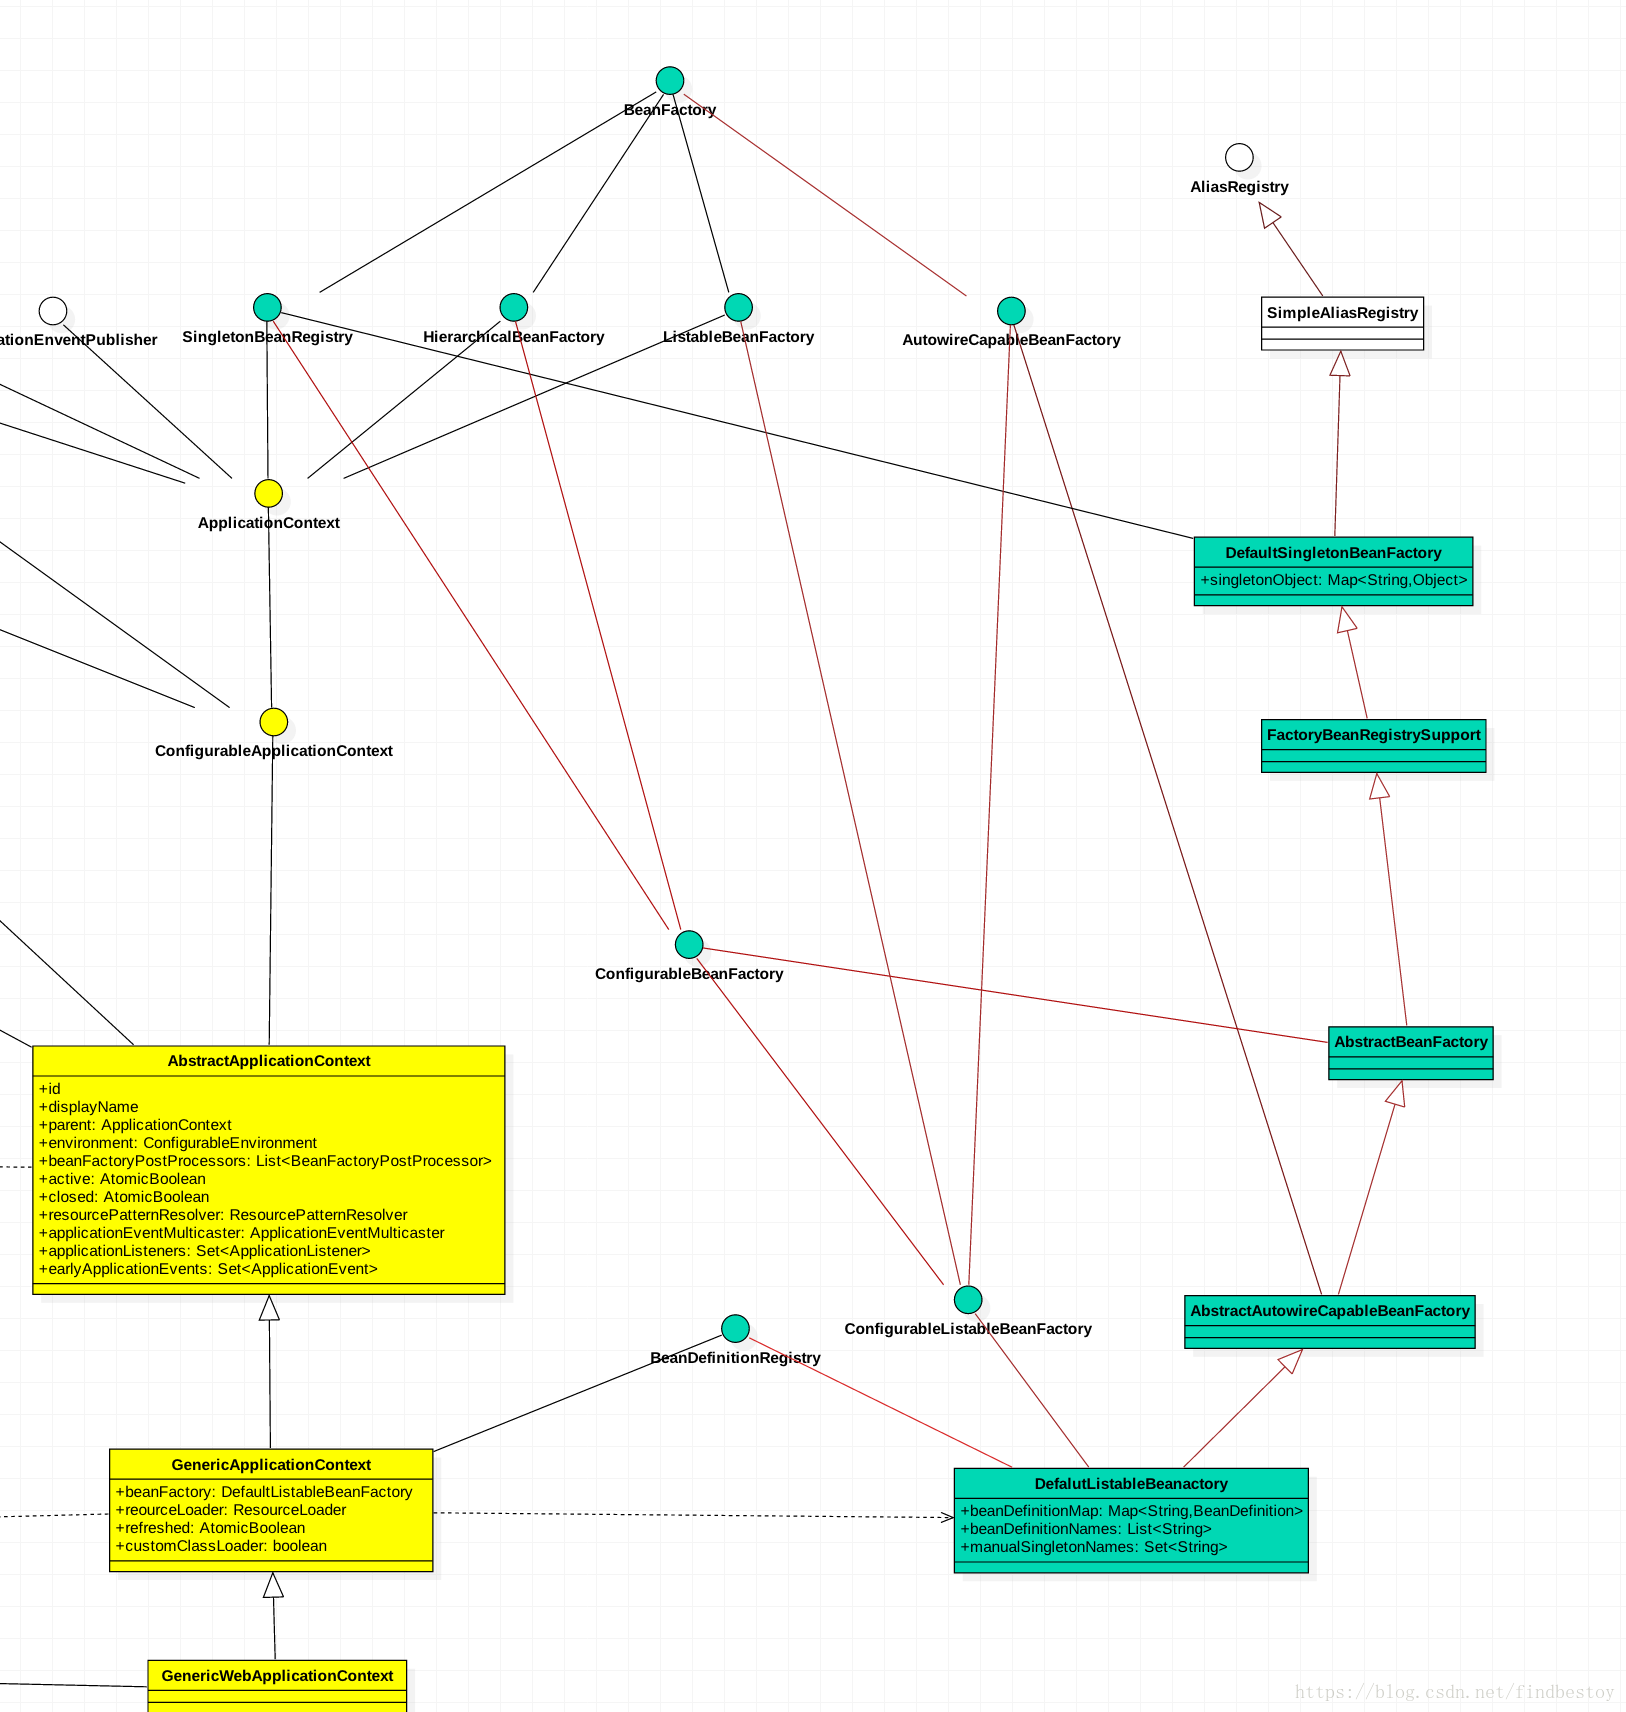
DefaultListableBeanFactory
BeanFactory
Bean容器的根接口。这个接口需要被含有许多bean definition(每一个bean definition有一个唯一的String名字来标识)的对象所实现。根据bean definition,bean容器会返回一个独立的实例或者一个共享的单例。具体返回哪种,需要根据bean 容器的配置。这里说的类型就是Scope
BeanFactory是应用组件的集中注册器。我们在使用中最好使用DI(push推配置)来通过构造器或者settter方法来配置对象。而不是使用任何的pull配置来配置对象,比如通过一个BeanFactory查找。Spring的DI是被BeanFactory及其子类来实现的。
和ListableBeanFactory相反的是,HierarachalBeanFactory会在查找parent factory。如果一个bean没有查找到,会查找parent factory。子层次中的beans可以覆盖父层次中的相同名字的bean.
Bean Factory的实现需要支持标准的bean 的生命周期。下面是全部的初始化方法和他们的排序。
BeanNameAware’s setBeanName
BeanClassLoaderAware’s setBeanClassLoader
BeanFactoryAware’s setBeanFactory
EnvironmentAware’s setEnvironment
EmbeddedValueResolverAware’s setEmbeddedValueResolver
ResourceLoaderAware’s setResourceLoader (only applicable when running in an application context)
ApplicationEventPublisherAware’s setApplicationEventPublisher (only applicable when running in an application context)
MessageSourceAware’s setMessageSource (only applicable when running in an application context)
ApplicationContextAware’s setApplicationContext (only applicable when running in an application context)
ServletContextAware’s setServletContext (only applicable when running in a web application context)
postProcessBeforeInitialization methods of BeanPostProcessors
InitializingBean’s afterPropertiesSet
a custom init-method definition
postProcessAfterInitialization methods of BeanPostProcessors
在一个bean fatcory被关闭的时候,需要执行的生命周期的方法是:
postProcessBeforeDestruction methods of DestructionAwareBeanPostProcessors
DisposableBean’s destroy
a custom destroy-method definitions. BeanDefinitionRegistry
注册bean definition的接口。通常有BeanFactories来实现。Spring 的bean definition Reader需要使用这个接口。众所周知的实现是DefaultListableBeanFactory 和GenericApplicationContext.
DefaultListableBeanFactory
ListableBeanFactory和BeanDefinitionRegistry的实现。基于bean definition的bean factory.典型的用法是在获取bean之前,注册所有的bean definition。因此 bean definition的查找实在本地的集合中通过预先构建的bean definition metedata进行,是一项轻松的操作。
可以被作为一个标准的bean factory,或者是一个自定义工厂的父类。特定类型的bean definition 格式的读取器是独立实现的,而不是作为bean factory的子类。比如 PropertiesBeanDefinitionReader和XmlBeanDefinitionReader
AnnotatedBeanDefinitionReader
顾名思义:读取注解的bean definition的定义。
在GenericWebApplicationContext中构造了它的一个实例。看一下他的构造函数。
public class AnnotatedBeanDefinitionReader {
    private final BeanDefinitionRegistry registry;//context本身
    private BeanNameGenerator beanNameGenerator;
    private ScopeMetadataResolver scopeMetadataResolver;
    private ConditionEvaluator conditionEvaluator;

    public AnnotatedBeanDefinitionReader(BeanDefinitionRegistry registry) {
        this(registry, getOrCreateEnvironment(registry));
    }

    public AnnotatedBeanDefinitionReader(BeanDefinitionRegistry registry, Environment environment) {
        //bean的名字生成器
        this.beanNameGenerator = new AnnotationBeanNameGenerator();
        //用来解析scope元数据
        this.scopeMetadataResolver = new AnnotationScopeMetadataResolver();
        Assert.notNull(registry, "BeanDefinitionRegistry must not be null");
        Assert.notNull(environment, "Environment must not be null");
        this.registry = registry;//bean定义注册器,用来容纳bean definition
        this.conditionEvaluator = new ConditionEvaluator(registry, environment, (ResourceLoader)null);//用来判断是否需要跳过注解

        //我们需要关注这一步。原因是它注册了一个  ConfigurationClassPostProcessor
        AnnotationConfigUtils.registerAnnotationConfigProcessors(this.registry);
    }
}- 1
- 2
- 3
- 4
- 5
- 6
- 7
- 8
- 9
- 10
- 11
- 12
- 13
- 14
- 15
- 16
- 17
- 18
- 19
- 20
- 21
- 22
- 23
- 24
我们可以看到AnnotationConfigUtils.registerAnnotationConfigProcessors(this.registry);这个方法里面做了这几件事情:
1. 设置beanfactory的依赖比较器
2. 设置beanfactory的autowire候选解析器
3. 给beanfatory注册几个postprocessor的bean definition。
这几个PostProcessor中含有一个特别重要的ConfigurationClassPostProcessor。就是这个类使用ConfigurationClassParser完成了basepackage目录下的bean的扫描,并循环处理这些类(处理其中的内部类,methodbean,import,接口,importResource,ProportyResource类)。
//AnnotationConfigUtils.registerAnnotationConfigProcessors(this.registry);
    public static void registerAnnotationConfigProcessors(BeanDefinitionRegistry registry) {
        registerAnnotationConfigProcessors(registry, (Object)null);
    }

    public static Set<BeanDefinitionHolder> registerAnnotationConfigProcessors(BeanDefinitionRegistry registry, Object source) {
        DefaultListableBeanFactory beanFactory = unwrapDefaultListableBeanFactory(registry);
        ...
        Set<BeanDefinitionHolder> beanDefs = new LinkedHashSet(4);
        RootBeanDefinition def;
        if (!registry.containsBeanDefinition("org.springframework.context.annotation.internalConfigurationAnnotationProcessor")) {
            //这里这里这里
            def = new RootBeanDefinition(ConfigurationClassPostProcessor.class);
            def.setSource(source);
            beanDefs.add(registerPostProcessor(registry, def, "org.springframework.context.annotation.internalConfigurationAnnotationProcessor"));
        }
        ....
        return beanDefs;
    }
    private static BeanDefinitionHolder registerPostProcessor(BeanDefinitionRegistry registry, RootBeanDefinition definition, String beanName) {
        definition.setRole(2);
        registry.registerBeanDefinition(beanName, definition);
        return new BeanDefinitionHolder(definition, beanName);
}- 1
- 2
- 3
- 4
- 5
- 6
- 7
- 8
- 9
- 10
- 11
- 12
- 13
- 14
- 15
- 16
- 17
- 18
- 19
- 20
- 21
- 22
- 23
- 24

ClassPathBeanDefinitionScanner
同样,一个好的名字能够让人理解这个类的功能。
ClassPathBeanDefinitionScanner是一个bean definition的扫描器,可以扫描类路径下的候选的bean,并在给定的registry注册bean definition。
需要配置类型过滤器来发现候选bean。默认的filters包含@Component,@Repository,@Service,@Controller注解。同样支持Java EE 6’s的ManagedBean和JSR-330’s Named 的注解
public ClassPathBeanDefinitionScanner(BeanDefinitionRegistry registry) {
        this(registry, true);
    }

    public ClassPathBeanDefinitionScanner(BeanDefinitionRegistry registry, boolean useDefaultFilters) {
        this(registry, useDefaultFilters, getOrCreateEnvironment(registry));
    }

    public ClassPathBeanDefinitionScanner(BeanDefinitionRegistry registry, boolean useDefaultFilters, Environment environment) {
        this(registry, useDefaultFilters, environment, registry instanceof ResourceLoader ? (ResourceLoader)registry : null);
    }

    public ClassPathBeanDefinitionScanner(BeanDefinitionRegistry registry, boolean useDefaultFilters, Environment environment, ResourceLoader resourceLoader) {
        this.beanDefinitionDefaults = new BeanDefinitionDefaults();
        //beanName生成器
        this.beanNameGenerator = new AnnotationBeanNameGenerator();
        //scope元数据解析器
        this.scopeMetadataResolver = new AnnotationScopeMetadataResolver();
        this.includeAnnotationConfig = true;
        Assert.notNull(registry, "BeanDefinitionRegistry must not be null");
        this.registry = registry;
        //是否使用默认的类型过滤器。如果是,则注册默认的类型过滤器。
        if (useDefaultFilters) {
            this.registerDefaultFilters();
        }

        this.setEnvironment(environment);
        this.setResourceLoader(resourceLoader);
    }
    protected void registerDefaultFilters() {
        this.includeFilters.add(new AnnotationTypeFilter(Component.class));
        ClassLoader cl = ClassPathScanningCandidateComponentProvider.class.getClassLoader();

        try {
            this.includeFilters.add(new AnnotationTypeFilter(ClassUtils.forName("javax.annotation.ManagedBean", cl), false));
            this.logger.debug("JSR-250 'javax.annotation.ManagedBean' found and supported for component scanning");
        } catch (ClassNotFoundException var4) {
            ;
        }

        try {
            this.includeFilters.add(new AnnotationTypeFilter(ClassUtils.forName("javax.inject.Named", cl), false));
            this.logger.debug("JSR-330 'javax.inject.Named' annotation found and supported for component scanning");
        } catch (ClassNotFoundException var3) {
            ;
        }

}- 1
- 2
- 3
- 4
- 5
- 6
- 7
- 8
- 9
- 10
- 11
- 12
- 13
- 14
- 15
- 16
- 17
- 18
- 19
- 20
- 21
- 22
- 23
- 24
- 25
- 26
- 27
- 28
- 29
- 30
- 31
- 32
- 33
- 34
- 35
- 36
- 37
- 38
- 39
- 40
- 41
- 42
- 43
- 44
- 45
- 46
- 47
- 48
我们可以在BeanDefinitionDefaults发现一些东西。
public class BeanDefinitionDefaults {
    private boolean lazyInit;
    private int dependencyCheck = 0;
    private int autowireMode = 0;
    private String initMethodName;
    private String destroyMethodName;
}- 1
- 2
- 3
- 4
- 5
- 6
- 7
初始化过程
至此,context的初始化过程完毕。我们回顾一下context在构造函数中做了什么 AbstractApplicationContext
1. 设置Log
2. 设置id和displayName
3. 初始化BeanFactoryPostProcessor的集合
4. active,closed初始化
5. 初始化ApplicationListener的集合
6. 设置resourcePatternResolver GenericApplicationContext
1. customClassLoader = false
2. refreshed = false
3. beanFactory = new DefaultListableBeanFactory AnnotationConfigEmbeddedWebApplicationContext
1. this.reader = new AnnotatedBeanDefinitionReader(this);注册了几个BeanDefinition,最重要的是CongiurationClassPostProcessor的bean definition
2. this.scanner = new ClassPathBeanDefinitionScanner(this);设置了需要识别的注解的类型
失败分析器
准备上下文prepareContext
我们初始化之后的ApplicationContext是最原始的状态。需要配置之前创建好的Environment,SpringApplicationRunListeners,ApplicationArguments,Banner
private void prepareContext(ConfigurableApplicationContext context, ConfigurableEnvironment environment, SpringApplicationRunListeners listeners, ApplicationArguments applicationArguments, Banner printedBanner) {
        context.setEnvironment(environment);//设置env
        this.postProcessApplicationContext(context);//如果SpringApplication类的beanNameGenerator,resourceLoader不为null,则设置到context中去。
        //使用initializer做些初始化的动作
        //1. 调用用户配置的initializer的方法
        //2. 设置context的Id
        //3. context注册 ConfigurationWarningsPostProcessor用于检查错误的配置
        //4. 向env中设置实际的端口
        //5. SharedMetadataReaderFactoryContextInitializer.CachingMetadataReaderFactoryPostProcessor
        //6. 设置ContextRefreshedEvent监听器,打印ConditionEvaluationReport日志
        this.applyInitializers(context);
        listeners.contextPrepared(context);
        if (this.logStartupInfo) {
            this.logStartupInfo(context.getParent() == null);
            this.logStartupProfileInfo(context);
        }

        context.getBeanFactory().registerSingleton("springApplicationArguments", applicationArguments);
        if (printedBanner != null) {
            context.getBeanFactory().registerSingleton("springBootBanner", printedBanner);
        }

        Set<Object> sources = this.getSources();
        Assert.notEmpty(sources, "Sources must not be empty");
        this.load(context, sources.toArray(new Object[sources.size()]));
        listeners.contextLoaded(context);
}- 1
- 2
- 3
- 4
- 5
- 6
- 7
- 8
- 9
- 10
- 11
- 12
- 13
- 14
- 15
- 16
- 17
- 18
- 19
- 20
- 21
- 22
- 23
- 24
- 25
- 26
- 27
使用initializer初始化context
protected void applyInitializers(ConfigurableApplicationContext context) {
        Iterator var2 = this.getInitializers().iterator();

        while(var2.hasNext()) {
            ApplicationContextInitializer initializer = (ApplicationContextInitializer)var2.next();
            //获取initailizer的类型参数的类型
            Class<?> requiredType = GenericTypeResolver.resolveTypeArgument(initializer.getClass(), ApplicationContextInitializer.class);
            Assert.isInstanceOf(requiredType, context, "Unable to call initializer.");
            //使用initializer来初始化context
            initializer.initialize(context);
        }

}- 1
- 2
- 3
- 4
- 5
- 6
- 7
- 8
- 9
- 10
- 11
- 12
- 13
| initializer | 用途 |
|---|---|
| DelegatingApplicationContextInitializer | 从context中获取env,从中获取用户是否配置了context.initializer.classes类。如果配置了这些类,则初始化他们并调用对应的initialize方法 |
| ContextIdApplicationContextInitializer | 从env中解析名字和端口号,最后两者组合,设置为applicationContext的Id.我们在context的构造函数中给context设置的id值是context.toString即org.springframework.boot.context.embedded.AnnotationConfigEmbeddedWebApplicationContext@2b43529a。这一步之后,Id值为application:9188 |
| ConfigurationWarningsApplicationContextInitializer | 这个初始化器的作用在于向context中注册ConfigurationWarningsPostProcessor,用于检查错误的配置和报告错误 |
| ServerPortInfoApplicationContextInitializer | ApplicationContextInitializer向env设置EmbeddedServletContainer服务器实际监听的端口。实现这个功能的方法是:向context添加一个ApplicationListener,监听EmbeddedServletContainerInitializedEvent事件。当事件到达时,设置env中的local.server.port为实际端口值 |
| SharedMetadataReaderFactoryContextInitializer | |
| AutoConfigurationReportLoggingInitializer | 向applicationContext添加ApplicationListener用来监听ContextRefreshedEvent或者ApplicationFailedEvent事件。当事件发生时,打印ConditionEvaluationReport日志到info级别,如果出错,则打印到debug级别 |
总的来说:applyInitializers的所作的事情:
1. 调用用户配置的initializer的方法
2. 设置context的Id
3. context注册 ConfigurationWarningsPostProcessor用于检查错误的配置
4. 向env中设置实际的端口
5. SharedMetadataReaderFactoryContextInitializer.CachingMetadataReaderFactoryPostProcessor
6. 设置ContextRefreshedEvent监听器,打印ConditionEvaluationReport日志
向listeners广播contextPrepared
EventPublishingSpringApplicationRunListener中什么都没有做
打印启动日志
if (this.logStartupInfo) {
            //使用StartupInfoLogger打印启动信息.StartUpInfoLogger可以打印应用的starting,started的信息
            this.logStartupInfo(context.getParent() == null);
            this.logStartupProfileInfo(context);
        }
        protected void logStartupProfileInfo(ConfigurableApplicationContext context) {
        Log log = this.getApplicationLog();
        if (log.isInfoEnabled()) {
            String[] activeProfiles = context.getEnvironment().getActiveProfiles();
            if (ObjectUtils.isEmpty(activeProfiles)) {
                String[] defaultProfiles = context.getEnvironment().getDefaultProfiles();
                log.info("No active profile set, falling back to default profiles: " + StringUtils.arrayToCommaDelimitedString(defaultProfiles));
            } else {
                log.info("The following profiles are active: " + StringUtils.arrayToCommaDelimitedString(activeProfiles));
            }
        }

}- 1
- 2
- 3
- 4
- 5
- 6
- 7
- 8
- 9
- 10
- 11
- 12
- 13
- 14
- 15
- 16
- 17
- 18
打印结果为
INFO [11:57:12.206][main][org.springframework.boot.StartupInfoLogger][48]:Starting AppBootstrap on candydeMacBook-Pro.local with PID 19129 (/Users/maoyanyule/IdeaProjects/movie-pressurer/provider/target/classes started by maoyanyule in /Users/maoyanyule/IdeaProjects/movie-pressurer)
INFO [11:58:25.218][main][org.springframework.boot.SpringApplication][593]:No active profile set, falling back to default profiles: default- 1
- 2
注册两个两个单例bean
context.getBeanFactory().registerSingleton("springApplicationArguments", applicationArguments);
        if (printedBanner != null) {
            context.getBeanFactory().registerSingleton("springBootBanner", printedBanner);
}- 1
- 2
- 3
- 4
此时context.singletonObject中有三个对象:
1. springApplicationArguments
2. springBootBanner
3. autoConfigurationReport
将source加载到context中
protected void load(ApplicationContext context, Object[] sources) {
        if (logger.isDebugEnabled()) {
            logger.debug("Loading source " + StringUtils.arrayToCommaDelimitedString(sources));
        }

        BeanDefinitionLoader loader = this.createBeanDefinitionLoader(this.getBeanDefinitionRegistry(context), sources);
        if (this.beanNameGenerator != null) {
            loader.setBeanNameGenerator(this.beanNameGenerator);
        }

        if (this.resourceLoader != null) {
            loader.setResourceLoader(this.resourceLoader);
        }

        if (this.environment != null) {
            loader.setEnvironment(this.environment);
        }

        loader.load();
}- 1
- 2
- 3
- 4
- 5
- 6
- 7
- 8
- 9
- 10
- 11
- 12
- 13
- 14
- 15
- 16
- 17
- 18
- 19
- 20
创建BeanDefinitionLoader,加载bean definition
创建bean definition Loader
BeanDefinitionLoaderbean 定义加载器。考虑bean definition的几种方式。有注解和Xml类型,同时需要扫描主类所在的目录。所以应该有AnnotatedBeanDefinitionReader,XmlBeanDefinitionReader
BeanDefinitionLoader(BeanDefinitionRegistry registry, Object... sources) {
        Assert.notNull(registry, "Registry must not be null");
        Assert.notEmpty(sources, "Sources must not be empty");
        this.sources = sources;
        this.annotatedReader = new AnnotatedBeanDefinitionReader(registry);
        this.xmlReader = new XmlBeanDefinitionReader(registry);
        if (this.isGroovyPresent()) {
            this.groovyReader = new GroovyBeanDefinitionReader(registry);
        }

        this.scanner = new ClassPathBeanDefinitionScanner(registry);
        this.scanner.addExcludeFilter(new BeanDefinitionLoader.ClassExcludeFilter(sources));
}- 1
- 2
- 3
- 4
- 5
- 6
- 7
- 8
- 9
- 10
- 11
- 12
- 13
AnnotatedBeanDefinitionReader,ClassPathBeanDefinitionScanner在前文已经解释过 XmlBeanDefinitionReader 加载XML文件,并委托BeanDefinitionDocumentReader读取Xml文件,BeanDefinitionDocumentReader会在给定的bean fatcory注册bean definition。
加载bean definition
调用BeanDefinitionLoader.load()方法
//循环加载所有的sources
public int load() {
        int count = 0;
        Object[] var2 = this.sources;//这里的sources只有主类一个
        int var3 = var2.length;

        for(int var4 = 0; var4 < var3; ++var4) {
            Object source = var2[var4];
            count += this.load(source);
        }

        return count;
    }

    //根据不同的source类型使用不同的方法加载
    private int load(Object source) {
        Assert.notNull(source, "Source must not be null");
        if (source instanceof Class) {
            return this.load((Class)source);
        } else if (source instanceof Resource) {
            return this.load((Resource)source);
        } else if (source instanceof Package) {
            return this.load((Package)source);
        } else if (source instanceof CharSequence) {
            return this.load((CharSequence)source);
        } else {
            throw new IllegalArgumentException("Invalid source type " + source.getClass());
        }
    }
    //因为source为主类,所以是这个方法
    private int load(Class<?> source) {
        if (this.isGroovyPresent() && BeanDefinitionLoader.GroovyBeanDefinitionSource.class.isAssignableFrom(source)) {
            BeanDefinitionLoader.GroovyBeanDefinitionSource loader = (BeanDefinitionLoader.GroovyBeanDefinitionSource)BeanUtils.instantiateClass(source, BeanDefinitionLoader.GroovyBeanDefinitionSource.class);
            this.load(loader);
        }
        //如果source被component注解,则使用AnnotatedBeanDefinitionReader来注册source的bean definition
        if (this.isComponent(source)) {
            this.annotatedReader.register(new Class[]{source});
            return 1;
        } else {
            return 0;
        }
}- 1
- 2
- 3
- 4
- 5
- 6
- 7
- 8
- 9
- 10
- 11
- 12
- 13
- 14
- 15
- 16
- 17
- 18
- 19
- 20
- 21
- 22
- 23
- 24
- 25
- 26
- 27
- 28
- 29
- 30
- 31
- 32
- 33
- 34
- 35
- 36
- 37
- 38
- 39
- 40
- 41
- 42
- 43
我们来看AnnotatedBeanDefinitionReader是如何注册一个source 的bean definition的
public void register(Class... annotatedClasses) {
        Class[] var2 = annotatedClasses;
        int var3 = annotatedClasses.length;

        for(int var4 = 0; var4 < var3; ++var4) {
            Class<?> annotatedClass = var2[var4];
            this.registerBean(annotatedClass);
        }

    }

    public void registerBean(Class<?> annotatedClass) {
        this.registerBean(annotatedClass, (String)null, (Class[])null);
    }

    public void registerBean(Class<?> annotatedClass, Class... qualifiers) {
        this.registerBean(annotatedClass, (String)null, qualifiers);
    }
    //主要是在这里
    public void registerBean(Class<?> annotatedClass, String name, Class... qualifiers) {
        //获取一个Class的bean定义,初始获取的bean definition。
        AnnotatedGenericBeanDefinition abd = new AnnotatedGenericBeanDefinition(annotatedClass);
        //判断是否应该跳过这次注册
        if (!this.conditionEvaluator.shouldSkip(abd.getMetadata())) {
            //从source的注解中获取作用域,并设置到bean definition中
            ScopeMetadata scopeMetadata = this.scopeMetadataResolver.resolveScopeMetadata(abd);
            abd.setScope(scopeMetadata.getScopeName());
            //获取bean的名字
            String beanName = name != null ? name : this.beanNameGenerator.generateBeanName(abd, this.registry);
            //处理bean definition中的一些属性
            AnnotationConfigUtils.processCommonDefinitionAnnotations(abd);
            if (qualifiers != null) {
                Class[] var7 = qualifiers;
                int var8 = qualifiers.length;

                for(int var9 = 0; var9 < var8; ++var9) {
                    Class<? extends Annotation> qualifier = var7[var9];
                    if (Primary.class == qualifier) {
                        abd.setPrimary(true);
                    } else if (Lazy.class == qualifier) {
                        abd.setLazyInit(true);
                    } else {
                        abd.addQualifier(new AutowireCandidateQualifier(qualifier));
                    }
                }
            }
            //BeanDefinitionHolder中含有beanName,bean definition
            BeanDefinitionHolder definitionHolder = new BeanDefinitionHolder(abd, beanName);
            //将作用域作用在bean definition 上
            definitionHolder = AnnotationConfigUtils.applyScopedProxyMode(scopeMetadata, definitionHolder, this.registry);
            //在context中注册bean definition
            BeanDefinitionReaderUtils.registerBeanDefinition(definitionHolder, this.registry);
        }
}- 1
- 2
- 3
- 4
- 5
- 6
- 7
- 8
- 9
- 10
- 11
- 12
- 13
- 14
- 15
- 16
- 17
- 18
- 19
- 20
- 21
- 22
- 23
- 24
- 25
- 26
- 27
- 28
- 29
- 30
- 31
- 32
- 33
- 34
- 35
- 36
- 37
- 38
- 39
- 40
- 41
- 42
- 43
- 44
- 45
- 46
- 47
- 48
- 49
- 50
- 51
- 52
- 53
- 54
在这里涉及到了 bean definition 的注册。 BeanDefinition的类图
我们从AbstaractBeanDefinition可以看出一些眼熟的东西:
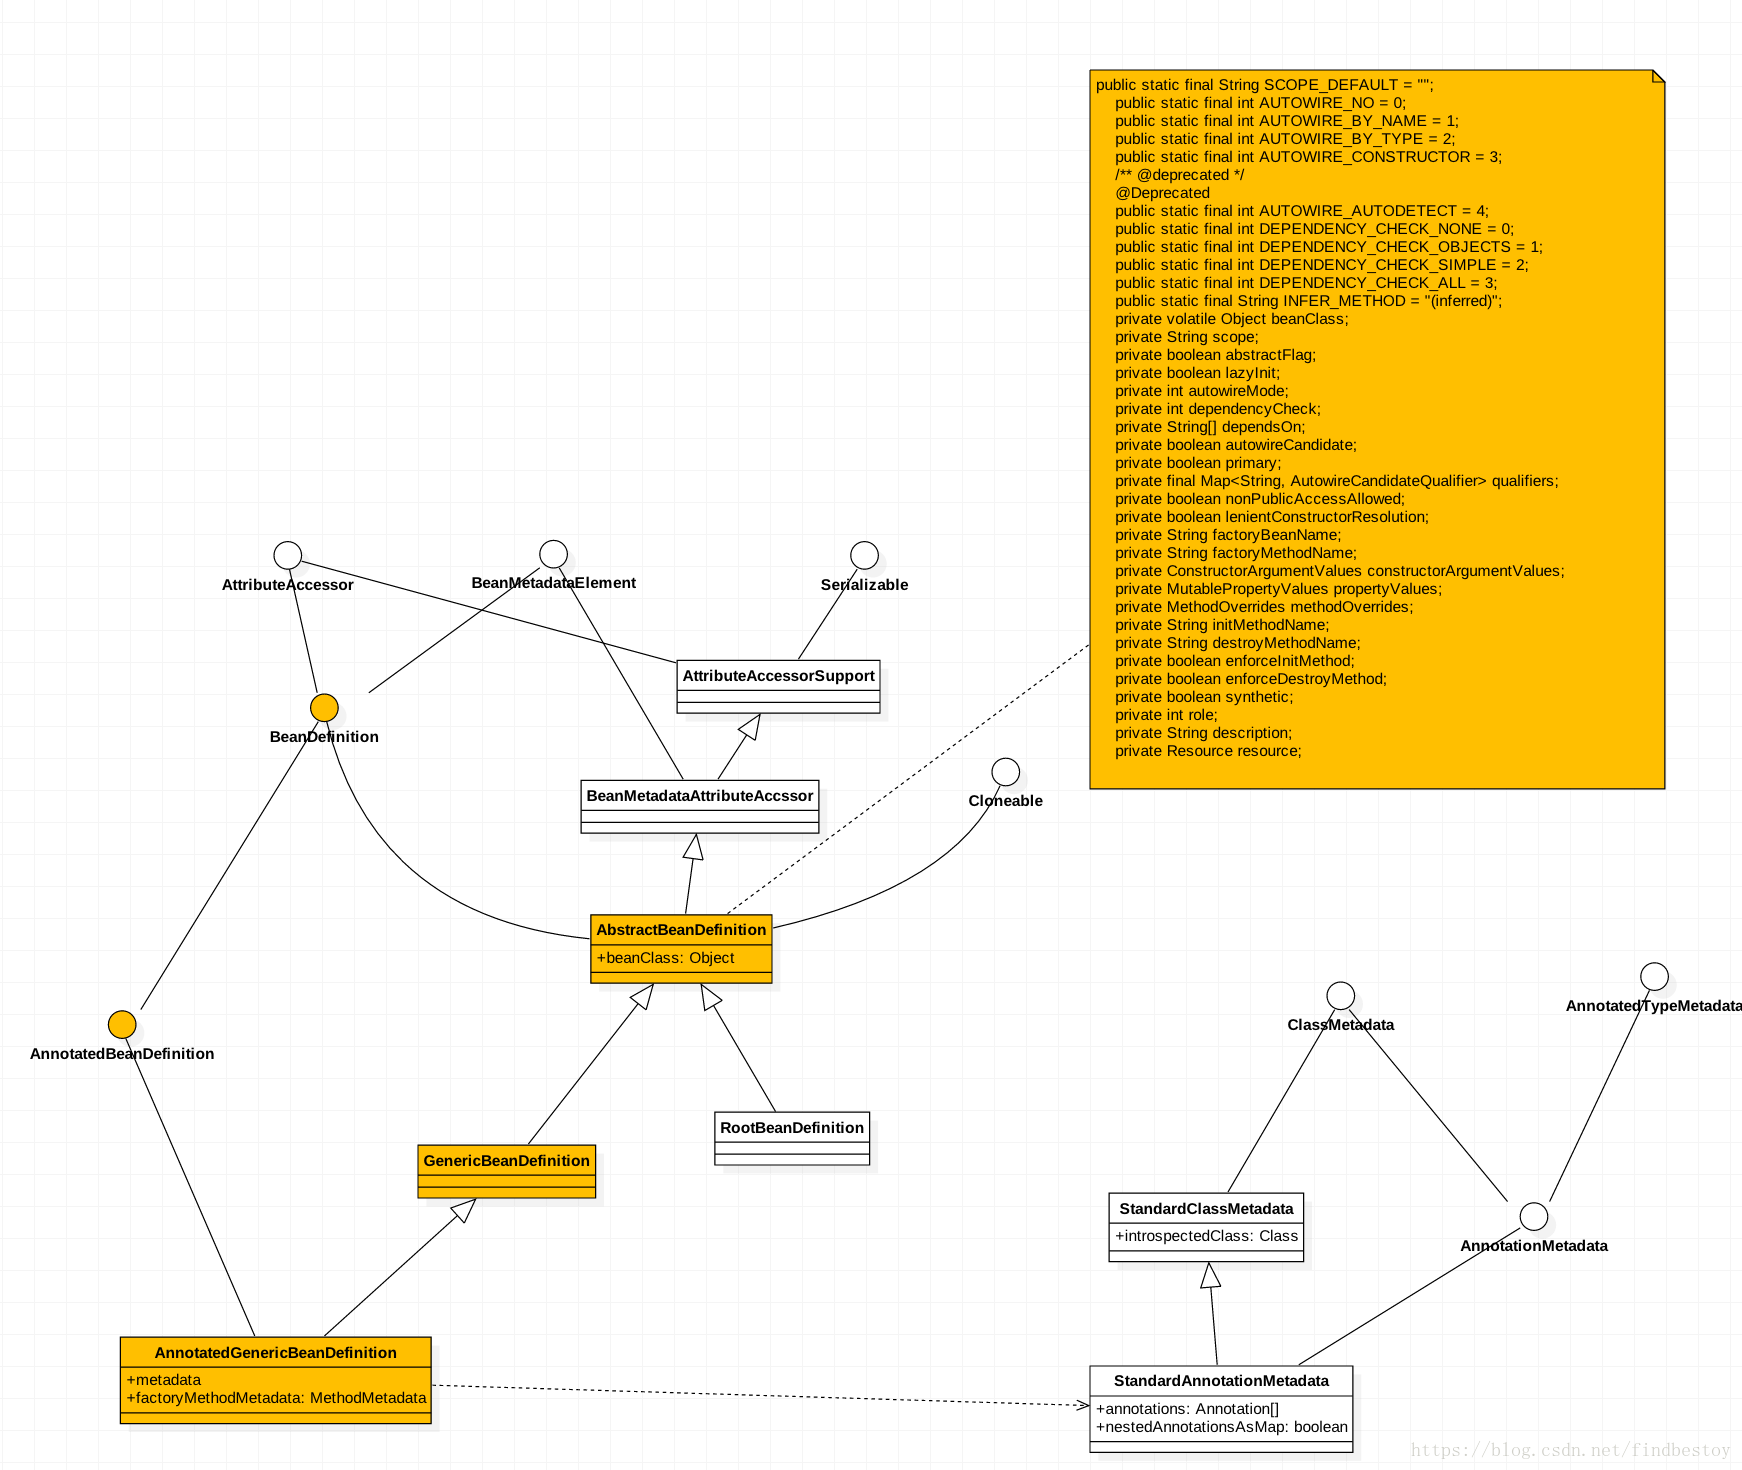
public abstract class AbstractBeanDefinition extends BeanMetadataAttributeAccessor implements BeanDefinition, Cloneable {
    public static final String SCOPE_DEFAULT = "";
    //autowire类型,和AutowireCapableBeanFactory是对应的
    public static final int AUTOWIRE_NO = 0;
    public static final int AUTOWIRE_BY_NAME = 1;
    public static final int AUTOWIRE_BY_TYPE = 2;
    public static final int AUTOWIRE_CONSTRUCTOR = 3;
    /** @deprecated */
    @Deprecated
    public static final int AUTOWIRE_AUTODETECT = 4;
    //dependency_check类型
    public static final int DEPENDENCY_CHECK_NONE = 0;
    public static final int DEPENDENCY_CHECK_OBJECTS = 1;
    public static final int DEPENDENCY_CHECK_SIMPLE = 2;
    public static final int DEPENDENCY_CHECK_ALL = 3;
    public static final String INFER_METHOD = "(inferred)";
    //bean class
    private volatile Object beanClass;
    private String scope;
    private boolean abstractFlag;
    private boolean lazyInit;
    private int autowireMode;
    private int dependencyCheck;
    private String[] dependsOn;
    private boolean autowireCandidate;
    private boolean primary;
    private final Map<String, AutowireCandidateQualifier> qualifiers;
    private boolean nonPublicAccessAllowed;
    private boolean lenientConstructorResolution;
    private String factoryBeanName;
    private String factoryMethodName;
    private ConstructorArgumentValues constructorArgumentValues;
    private MutablePropertyValues propertyValues;
    private MethodOverrides methodOverrides;
    private String initMethodName;
    private String destroyMethodName;
    private boolean enforceInitMethod;
    private boolean enforceDestroyMethod;
    private boolean synthetic;
    private int role;
    private String description;
    private Resource resource;
}- 1
- 2
- 3
- 4
- 5
- 6
- 7
- 8
- 9
- 10
- 11
- 12
- 13
- 14
- 15
- 16
- 17
- 18
- 19
- 20
- 21
- 22
- 23
- 24
- 25
- 26
- 27
- 28
- 29
- 30
- 31
- 32
- 33
- 34
- 35
- 36
- 37
- 38
- 39
- 40
- 41
- 42
- 43
在这一步完成之后,context中包含了一个和主类有关的bean definition.
广播contextLoaded事件
public void contextLoaded(ConfigurableApplicationContext context) {
        ApplicationListener listener;
        //在spring boot initializ()方法中初始化的listeners直到这一步才被添加到context的listener中
        for(Iterator var2 = this.application.getListeners().iterator(); var2.hasNext(); context.addApplicationListener(listener)) {
            listener = (ApplicationListener)var2.next();
            //如果listener中需要context实例,则设置
            if (listener instanceof ApplicationContextAware) {
                ((ApplicationContextAware)listener).setApplicationContext(context);
            }
        }
        //广播ApplicationPreparedEvent事件
        this.initialMulticaster.multicastEvent(new ApplicationPreparedEvent(this.application, this.args, context));
}- 1
- 2
- 3
- 4
- 5
- 6
- 7
- 8
- 9
- 10
- 11
- 12
- 13
| listener | 事件 |
|---|---|
| ConfigFileApplicationListener | ApplicationEnvironmentPreparedEvent,ApplicationPreparedEvent |
| LoggingApplicationListener | ApplicationStartingEvent,ApplicationEnvironmentPreparedEvent,ApplicationPreparedEvent,ContextClosedEvent,ApplicationFailedEvent |
| DelegatingApplicationListener | ApplicationEnvironmentPreparedEvent,** |
我们有三个listener关心ApplicationPreparedEvent事件 ConfigFileApplicationListener
向context中添加ConfigFileApplicationListener.PropertySourceOrderingPostProcessor LoggingApplicationListener
向context中注册单例bean:springBootLoggingSystem DelegatingApplicationListener继续想其他listeners广播事件
prepareContext回顾
- 调用用户配置的initializer的方法
- 设置context的Id
- context注册 ConfigurationWarningsPostProcessor用于检查错误的配置
- 向env中设置实际的端口
- SharedMetadataReaderFactoryContextInitializer.CachingMetadataReaderFactoryPostProcessor
- 设置ContextRefreshedEvent监听器,打印ConditionEvaluationReport日志
- 打印启动日志
- 注册固定的单例bean
- 加载主类的bean definition
- 向context中添加ConfigFileApplicationListener.PropertySourceOrderingPostProcessor
刷新context refreshContext
private void refreshContext(ConfigurableApplicationContext context) {
        this.refresh(context);
        if (this.registerShutdownHook) {
            try {
                context.registerShutdownHook();
            } catch (AccessControlException var3) {
                ;
            }
        }

    }
    protected void refresh(ApplicationContext applicationContext) {
        Assert.isInstanceOf(AbstractApplicationContext.class, applicationContext);
        //最终调用了applicationContext的refresh()函数
        ((AbstractApplicationContext)applicationContext).refresh();
}- 1
- 2
- 3
- 4
- 5
- 6
- 7
- 8
- 9
- 10
- 11
- 12
- 13
- 14
- 15
- 16
而查看applicationContext.refresh()方法时需要注意其继承结构。附上applicationContext的类图

//EmbeddedWebApplicationContext.java
public final void refresh() throws BeansException, IllegalStateException {
        try {
            super.refresh();//调用的是AbstractApplicationContext
        } catch (RuntimeException var2) {
            this.stopAndReleaseEmbeddedServletContainer();
            throw var2;
        }
}- 1
- 2
- 3
- 4
- 5
- 6
- 7
- 8
- 9
//AbstractApplicationContext.java
public void refresh() throws BeansException, IllegalStateException {
        Object var1 = this.startupShutdownMonitor;
        synchronized(this.startupShutdownMonitor) {
            //1. 清空scanner中的resource和metadataReader之间的对应关系
            //2. 设置applicationcontext中的初始状态
            //3. 打印启动日志
            //4. 设置env中的servletContext和serveltConfig
            //5. 验证是否缺失了必须配置的参数
            this.prepareRefresh();//
            ConfigurableListableBeanFactory beanFactory = this.obtainFreshBeanFactory();
            this.prepareBeanFactory(beanFactory);

            try {
                this.postProcessBeanFactory(beanFactory);
                this.invokeBeanFactoryPostProcessors(beanFactory);
                this.registerBeanPostProcessors(beanFactory);
                this.initMessageSource();
                this.initApplicationEventMulticaster();
                this.onRefresh();
                this.registerListeners();
                this.finishBeanFactoryInitialization(beanFactory);
                this.finishRefresh();
            } catch (BeansException var9) {
                if (this.logger.isWarnEnabled()) {
                    this.logger.warn("Exception encountered during context initialization - cancelling refresh attempt: " + var9);
                }

                this.destroyBeans();
                this.cancelRefresh(var9);
                throw var9;
            } finally {
                this.resetCommonCaches();
            }

        }
}- 1
- 2
- 3
- 4
- 5
- 6
- 7
- 8
- 9
- 10
- 11
- 12
- 13
- 14
- 15
- 16
- 17
- 18
- 19
- 20
- 21
- 22
- 23
- 24
- 25
- 26
- 27
- 28
- 29
- 30
- 31
- 32
- 33
- 34
- 35
- 36
- 37
为刷新context做准备: prepareRefresh()
//AnnotationConfigEmbeddedWebApplicationContext
protected void prepareRefresh() {
        this.scanner.clearCache();
        super.prepareRefresh();//调用AbstractApplicationContext中的prepareRefresh();
}- 1
- 2
- 3
- 4
- 5
应该记得在构造函数中创建的ClassPathBeanDefinitionScanner。
在ClassPathBeanDefinitionScanner持有了一个Map:Resource, MetadataReader metadataReaderCache,用来保存resource和metadataReader;
scanner.clearCache()即清空该map的元素

//AbstractApplicationContext.java
protected void prepareRefresh() {
        this.startupDate = System.currentTimeMillis();
        this.closed.set(false);//设置application状态
        this.active.set(true);//设置application状态
        if (this.logger.isInfoEnabled()) {
            this.logger.info("Refreshing " + this);
        }

        this.initPropertySources();//调用的是GenericApplicationContext中的方法
        this.getEnvironment().validateRequiredProperties();//检查是否缺失了必须配置的属性
        this.earlyApplicationEvents = new LinkedHashSet();//初始化
}- 1
- 2
- 3
- 4
- 5
- 6
- 7
- 8
- 9
- 10
- 11
- 12
- 13
- initPropertySources
//GenericApplicationContext.java
protected void initPropertySources() {
        ConfigurableEnvironment env = this.getEnvironment();
        if (env instanceof ConfigurableWebEnvironment) {
            ((ConfigurableWebEnvironment)env).initPropertySources(this.servletContext, (ServletConfig)null);
            //使用这里的servletContext和servletConfig来替换env中的propertySources
        }

}- 1
- 2
- 3
- 4
- 5
- 6
- 7
- 8
- 9
- this.getEnvironment().validateRequiredProperties();
回顾env的类图。查看代码,可发现validateRequiredProperties是调用了AbstractProportyReslover.validateRequiredProperties()方法.作用是检查是否缺失了必须配置的属性
public void validateRequiredProperties() {
       MissingRequiredPropertiesException ex = new MissingRequiredPropertiesException();
       Iterator var2 = this.requiredProperties.iterator();

       while(var2.hasNext()) {
           String key = (String)var2.next();
           if (this.getProperty(key) == null) {
               ex.addMissingRequiredProperty(key);
           }
       }

       if (!ex.getMissingRequiredProperties().isEmpty()) {
           throw ex;
       }
}- 1
- 2
- 3
- 4
- 5
- 6
- 7
- 8
- 9
- 10
- 11
- 12
- 13
- 14
- 15
回顾prepareRefresh()这一步的动作:
1. 清空scanner中的resource和metadataReader之间的对应关系
2. 设置applicationcontext中的初始状态
3. 打印启动日志
4. 设置env中的servletContext和serveltConfig
5. 验证是否缺失了必须配置的参数
获取bean factory
//AbstractApplicationContext
protected ConfigurableListableBeanFactory obtainFreshBeanFactory() {
        this.refreshBeanFactory();//刷新bean factory
        ConfigurableListableBeanFactory beanFactory = this.getBeanFactory();//获取beanFactory
        if (this.logger.isDebugEnabled()) {
            this.logger.debug("Bean factory for " + this.getDisplayName() + ": " + beanFactory);
        }

        return beanFactory;
    }
//GenericApplicationContext.java
protected final void refreshBeanFactory() throws IllegalStateException {
        if (!this.refreshed.compareAndSet(false, true)) {
        //bean factory值可以刷新一次
            throw new IllegalStateException("GenericApplicationContext does not support multiple refresh attempts: just call 'refresh' once");
        } else {
            //设置beanFactory的serializationId和向
            //Map<String, Reference<DefaultListableBeanFactory>> serializableFactories添加serializationId, new WeakReference(this)
            this.beanFactory.setSerializationId(this.getId());
        }
}- 1
- 2
- 3
- 4
- 5
- 6
- 7
- 8
- 9
- 10
- 11
- 12
- 13
- 14
- 15
- 16
- 17
- 18
- 19
- 20
- 21
准备bean factory
protected void prepareBeanFactory(ConfigurableListableBeanFactory beanFactory) {
        //设置类加载器
        beanFactory.setBeanClassLoader(this.getClassLoader());
        //BeanExpressionResolver的标准实现用来解析spring el表达式,可以使用#{bean.xxx}的方式来调用相关属性值
        beanFactory.setBeanExpressionResolver(new StandardBeanExpressionResolver(beanFactory.getBeanClassLoader()));
        //通过资源编辑器 操作一个给定的PropertyEditorRegistry.并在所有bean创建的过程中应用PropertyEditorRegistry.没有用过?
        beanFactory.addPropertyEditorRegistrar(new ResourceEditorRegistrar(this, this.getEnvironment()));
        //ApplicationContextAwareProcessor用于上下文回调,它是BeanPostProcessor的实现类,跟一下这个接口的两个方法postProcessBeforeInitialization和postProcessAfterInitialization
        //如果Bean是EmbeddedValueResolverAware接口的实现类,则调用setEmbeddedValueResolver方法,传入当前BeanFactory
        //如果Bean是ResourceLoaderAware接口的实现类,则调用setResourceLoader方法,传入当前上下文ApplicationContext
        //如果Bean是ApplicationEventPublisherAware的实现类,则调用setApplicationEventPublisher方法,传入当前上下文ApplicationContext
        //如果Bean是MessageSourceAware的实现类,则调用setMessageSource方法,传入当前上下文ApplicationContext
        //如果Bean是ApplicationContextAware的实现类,则调用setApplicationContext方法,传入当前上下文ApplicationContext
        //https://www.cnblogs.com/xrq730/p/6670457.html
        beanFactory.addBeanPostProcessor(new ApplicationContextAwareProcessor(this));
        //定义了在依赖检查和自动绑定时要忽略的依赖接口,是一组类对象,默认情况下,只有beanFactory接口被忽略。
        beanFactory.ignoreDependencyInterface(EnvironmentAware.class);
        beanFactory.ignoreDependencyInterface(EmbeddedValueResolverAware.class);
        beanFactory.ignoreDependencyInterface(ResourceLoaderAware.class);
        beanFactory.ignoreDependencyInterface(ApplicationEventPublisherAware.class);
        beanFactory.ignoreDependencyInterface(MessageSourceAware.class);
        beanFactory.ignoreDependencyInterface(ApplicationContextAware.class);
        //根据第二个参数注册一个特殊的依赖类型,意思是修正依赖,这里是一些自动装配的特殊规则,比如是BeanFactory接口的实现类,则修正为当前BeanFactory
        beanFactory.registerResolvableDependency(BeanFactory.class, beanFactory);
        beanFactory.registerResolvableDependency(ResourceLoader.class, this);
        beanFactory.registerResolvableDependency(ApplicationEventPublisher.class, this);
        beanFactory.registerResolvableDependency(ApplicationContext.class, this);
        beanFactory.addBeanPostProcessor(new ApplicationListenerDetector(this));
        if (beanFactory.containsBean("loadTimeWeaver")) {
            beanFactory.addBeanPostProcessor(new LoadTimeWeaverAwareProcessor(beanFactory));
            beanFactory.setTempClassLoader(new ContextTypeMatchClassLoader(beanFactory.getBeanClassLoader()));
        }
        //注册enviroment单例
        if (!beanFactory.containsLocalBean("environment")) {
            beanFactory.registerSingleton("environment", this.getEnvironment());
        }
        //注册systemProperties单例
        if (!beanFactory.containsLocalBean("systemProperties")) {
            beanFactory.registerSingleton("systemProperties", this.getEnvironment().getSystemProperties());
        }
        //注册systemEnvironment单例
        if (!beanFactory.containsLocalBean("systemEnvironment")) {
            beanFactory.registerSingleton("systemEnvironment", this.getEnvironment().getSystemEnvironment());
        }

}- 1
- 2
- 3
- 4
- 5
- 6
- 7
- 8
- 9
- 10
- 11
- 12
- 13
- 14
- 15
- 16
- 17
- 18
- 19
- 20
- 21
- 22
- 23
- 24
- 25
- 26
- 27
- 28
- 29
- 30
- 31
- 32
- 33
- 34
- 35
- 36
- 37
- 38
- 39
- 40
- 41
- 42
- 43
- 44
- 45
- 46
PostProcessorBeanFactory
//添加beanPostProcessor由于这里的basePackages为null,所以并不扫描
//这一步的作用主要是注册BeanPostProcessors
//AnnotationConfigEmbeddedWebApplicationContext.java
protected void postProcessBeanFactory(ConfigurableListableBeanFactory beanFactory) {
        super.postProcessBeanFactory(beanFactory);
        if (this.basePackages != null && this.basePackages.length > 0) {
            this.scanner.scan(this.basePackages);
        }

        if (this.annotatedClasses != null && this.annotatedClasses.length > 0) {
            this.reader.register(this.annotatedClasses);
        }

    }
//EmbeddedWebApplicationContext.java
protected void postProcessBeanFactory(ConfigurableListableBeanFactory beanFactory) {
        beanFactory.addBeanPostProcessor(new WebApplicationContextServletContextAwareProcessor(this));
        beanFactory.ignoreDependencyInterface(ServletContextAware.class);
}- 1
- 2
- 3
- 4
- 5
- 6
- 7
- 8
- 9
- 10
- 11
- 12
- 13
- 14
- 15
- 16
- 17
- 18
- 19
invokeBeanFactoryPostProcessors
主要是实例化和调用所有已注册的BeanFactoryPostProcessors.需要在所有的bean实例化之前调用。
这个是整个Spring流程中非常重要的一部分,是Spring留给用户的一个非常有用的扩展点,BeanPostProcessor接口针对的是每个Bean初始化前后做的操作而BeanFactoryPostProcessor接口针对的是所有Bean实例化前的操作,
关于如何使用BeanFactoryPostProcessors作为扩展点,可以参考这篇博文容器扩展点BeanFactoryPostProcessors
protected void invokeBeanFactoryPostProcessors(ConfigurableListableBeanFactory beanFactory) {
        PostProcessorRegistrationDelegate.invokeBeanFactoryPostProcessors(beanFactory, this.getBeanFactoryPostProcessors());
        if (beanFactory.getTempClassLoader() == null && beanFactory.containsBean("loadTimeWeaver")) {
            beanFactory.addBeanPostProcessor(new LoadTimeWeaverAwareProcessor(beanFactory));
            beanFactory.setTempClassLoader(new ContextTypeMatchClassLoader(beanFactory.getBeanClassLoader()));
        }

}- 1
- 2
- 3
- 4
- 5
- 6
- 7
- 8
这里委托了PostProcessorRegistrationDelegate工具类来调用BeanFactoryPostProcessor
public static void invokeBeanFactoryPostProcessors(
            ConfigurableListableBeanFactory beanFactory, List<BeanFactoryPostProcessor> beanFactoryPostProcessors) {

        // Invoke BeanDefinitionRegistryPostProcessors first, if any.
        // 如果有BeanDefinitionRegistryPostProcessors 的话,就先调用它们
        // 处理过的Beans
        Set<String> processedBeans = new HashSet<String>();
        // 是否是BeanDefinitionRegistry类型的BeanFactory. BeanDefinitionRegistry的作用是可以用来注册,删除,获取BeanDefinitions
        if (beanFactory instanceof BeanDefinitionRegistry) {
            BeanDefinitionRegistry registry = (BeanDefinitionRegistry) beanFactory;
            // 普通类型的BeanFactoryPostProcessor集合
            List<BeanFactoryPostProcessor> regularPostProcessors = new LinkedList<BeanFactoryPostProcessor>();
            // BeanDefinitionRegistry类型的BeanFactoryPostProcessor集合(BeanDefinitionRegistryPostProcessor继承于BeanFactoryPostProcessor)
            List<BeanDefinitionRegistryPostProcessor> registryPostProcessors =
                    new LinkedList<BeanDefinitionRegistryPostProcessor>();

            // 对集合beanFactoryPostProcessors进行分类,如果是BeanDefinitionRegistry类型的BeanFactoryPostProcessor;则调用方法 - postProcessBeanDefinitionRegistry()。
            //  postProcessBeanDefinitionRegistry(BeanDefinitionRegistry)该方法的作用是在标准的BeanDefinitions初始化完成后可以修改容器上下文内部的beanDefinition。
            for (BeanFactoryPostProcessor postProcessor : beanFactoryPostProcessors) {
                if (postProcessor instanceof BeanDefinitionRegistryPostProcessor) {
                    BeanDefinitionRegistryPostProcessor registryPostProcessor =
                            (BeanDefinitionRegistryPostProcessor) postProcessor;
                    registryPostProcessor.postProcessBeanDefinitionRegistry(registry);
                    registryPostProcessors.add(registryPostProcessor);
                }
                else {
                    regularPostProcessors.add(postProcessor);
                }
            }

            // Do not initialize FactoryBeans here: We need to leave all regular beans
            // uninitialized to let the bean factory post-processors apply to them!
            // Separate between BeanDefinitionRegistryPostProcessors that implement
            // PriorityOrdered, Ordered, and the rest.
            // 这里不要初始化FactoryBeans,
            //我们需要保留这些普通的beans 不在这里初始化,目的是为了让bean factory post-processor去处理他们。
           // 根据BeanDefinitionRegistryPostProcessors 实现的不同接口PriorityOrdered,Ordered,或者不实现两者,拆分开来去调用他们。
            String[] postProcessorNames =
                    beanFactory.getBeanNamesForType(BeanDefinitionRegistryPostProcessor.class, true, false);

            // First, invoke the BeanDefinitionRegistryPostProcessors that implement PriorityOrdered.
            // 首先,调用实现了优先级接口 - PriorityOrdered的BeanDefinitionRegistryPostProcessors
            List<BeanDefinitionRegistryPostProcessor> priorityOrderedPostProcessors = new ArrayList<BeanDefinitionRegistryPostProcessor>();
            for (String ppName : postProcessorNames) {
                if (beanFactory.isTypeMatch(ppName, PriorityOrdered.class)) {
                    priorityOrderedPostProcessors.add(beanFactory.getBean(ppName, BeanDefinitionRegistryPostProcessor.class));
                    processedBeans.add(ppName);
                }
            }
             // 排序
            sortPostProcessors(beanFactory, priorityOrderedPostProcessors);
            // 添加排序好的优先级PostProcessors到registryPostProcessors集合
            registryPostProcessors.addAll(priorityOrderedPostProcessors);
            // 调用排序好的优先级BeanDefinitionRegistryPostProcessors,postProcessBeanDefinitionRegistry方法会被调用,用来修改,获取,删除容器上下文中的bean定义。

            //!!!!!这里是比较重要的一个点。priorityOrderedPostProcessors因为包含ConfigurationClassPostProcessor所以扫描了根目录下的所有类,加载了对应的bean定义
            ////之所以从这个步骤中取到了 ConfigurationClassPostProcessor,是因为当初AnnotatedBeanDefinitionReader只注册了bean definition。
            invokeBeanDefinitionRegistryPostProcessors(priorityOrderedPostProcessors, registry);

            // Next, invoke the BeanDefinitionRegistryPostProcessors that implement Ordered.
            // 调用实现了Ordered接口的BeanDefinitionRegistryPostProcessors ,大致逻辑同上PriorityOrdered的处理
            postProcessorNames = beanFactory.getBeanNamesForType(BeanDefinitionRegistryPostProcessor.class, true, false);
            List<BeanDefinitionRegistryPostProcessor> orderedPostProcessors = new ArrayList<BeanDefinitionRegistryPostProcessor>();
            for (String ppName : postProcessorNames) {
                if (!processedBeans.contains(ppName) && beanFactory.isTypeMatch(ppName, Ordered.class)) {
                    orderedPostProcessors.add(beanFactory.getBean(ppName, BeanDefinitionRegistryPostProcessor.class));
                    processedBeans.add(ppName);
                }
            }
            sortPostProcessors(beanFactory, orderedPostProcessors);
            registryPostProcessors.addAll(orderedPostProcessors);
            invokeBeanDefinitionRegistryPostProcessors(orderedPostProcessors, registry);

            // Finally, invoke all other BeanDefinitionRegistryPostProcessors until no further ones appear.
            // 调用所有其它类型的BeanDefinitionRegistryPostProcessors
            boolean reiterate = true;
            while (reiterate) {
                reiterate = false;
                postProcessorNames = beanFactory.getBeanNamesForType(BeanDefinitionRegistryPostProcessor.class, true, false);
                for (String ppName : postProcessorNames) {
                    if (!processedBeans.contains(ppName)) {
                        BeanDefinitionRegistryPostProcessor pp = beanFactory.getBean(ppName, BeanDefinitionRegistryPostProcessor.class);
                        registryPostProcessors.add(pp);
                        processedBeans.add(ppName);
                        pp.postProcessBeanDefinitionRegistry(registry);
                        reiterate = true;
                    }
                }
            }

            // Now, invoke the postProcessBeanFactory callback of all processors handled so far.
            // 调用所有的BeanDefinitionRegistryPostProcessor的postProcessBeanFactory 方法。
            invokeBeanFactoryPostProcessors(registryPostProcessors, beanFactory);
           // 调用容器中BeanFactoryPostProcessor类型的bean(不包含BeanDefinitionRegistryPostProcessor类型的beans)。
            invokeBeanFactoryPostProcessors(regularPostProcessors, beanFactory);
        }

        else {
            // Invoke factory processors registered with the context instance.
            // 若beanFactory不是BeanDefinitionRegistry类型的,则直接调用容器中所有的BeanFactoryPostProcessor的postProcessBeanFactory 方法。
            invokeBeanFactoryPostProcessors(beanFactoryPostProcessors, beanFactory);
        }


        // Do not initialize FactoryBeans here: We need to leave all regular beans
        // uninitialized to let the bean factory post-processors apply to them!
        String[] postProcessorNames =
                beanFactory.getBeanNamesForType(BeanFactoryPostProcessor.class, true, false);

        // Separate between BeanFactoryPostProcessors that implement PriorityOrdered,
        // Ordered, and the rest.
        //将BeanFactoryPostProcessors分为3类,PriorityOrdered,Ordered,其他
        List<BeanFactoryPostProcessor> priorityOrderedPostProcessors = new ArrayList<BeanFactoryPostProcessor>();
        List<String> orderedPostProcessorNames = new ArrayList<String>();
        List<String> nonOrderedPostProcessorNames = new ArrayList<String>();
        for (String ppName : postProcessorNames) {
            if (processedBeans.contains(ppName)) {
                //如果前面已经处理过过postprocessor,则跳过
                // skip - already processed in first phase above
            }
            else if (beanFactory.isTypeMatch(ppName, PriorityOrdered.class)) {
                priorityOrderedPostProcessors.add(beanFactory.getBean(ppName, BeanFactoryPostProcessor.class));
            }
            else if (beanFactory.isTypeMatch(ppName, Ordered.class)) {
                orderedPostProcessorNames.add(ppName);
            }
            else {
                nonOrderedPostProcessorNames.add(ppName);
            }
        }

        // First, invoke the BeanFactoryPostProcessors that implement PriorityOrdered.
        //首先处理实现了PriorityOrdered接口的postProcessor
        sortPostProcessors(beanFactory, priorityOrderedPostProcessors);
        invokeBeanFactoryPostProcessors(priorityOrderedPostProcessors, beanFactory);

        // Next, invoke the BeanFactoryPostProcessors that implement Ordered.
        //其次处理实现了Ordered接口的postprocessor
        List<BeanFactoryPostProcessor> orderedPostProcessors = new ArrayList<BeanFactoryPostProcessor>();
        for (String postProcessorName : orderedPostProcessorNames) {
            orderedPostProcessors.add(beanFactory.getBean(postProcessorName, BeanFactoryPostProcessor.class));
        }
        sortPostProcessors(beanFactory, orderedPostProcessors);
        invokeBeanFactoryPostProcessors(orderedPostProcessors, beanFactory);

        // Finally, invoke all other BeanFactoryPostProcessors.
        //最终调用其他的postprocessor
        List<BeanFactoryPostProcessor> nonOrderedPostProcessors = new ArrayList<BeanFactoryPostProcessor>();
        for (String postProcessorName : nonOrderedPostProcessorNames) {
            nonOrderedPostProcessors.add(beanFactory.getBean(postProcessorName, BeanFactoryPostProcessor.class));
        }
        invokeBeanFactoryPostProcessors(nonOrderedPostProcessors, beanFactory);

        // Clear cached merged bean definitions since the post-processors might have
        // modified the original metadata, e.g. replacing placeholders in values...
        //postprocessor可能更改了原始数据的bean definition。所以清空缓存
        beanFactory.clearMetadataCache();
    }

链接:https://www.jianshu.com/p/23d4e853b15b
连接:https://blog.csdn.net/andy_zhang2007/article/details/78530137- 1
- 2
- 3
- 4
- 5
- 6
- 7
- 8
- 9
- 10
- 11
- 12
- 13
- 14
- 15
- 16
- 17
- 18
- 19
- 20
- 21
- 22
- 23
- 24
- 25
- 26
- 27
- 28
- 29
- 30
- 31
- 32
- 33
- 34
- 35
- 36
- 37
- 38
- 39
- 40
- 41
- 42
- 43
- 44
- 45
- 46
- 47
- 48
- 49
- 50
- 51
- 52
- 53
- 54
- 55
- 56
- 57
- 58
- 59
- 60
- 61
- 62
- 63
- 64
- 65
- 66
- 67
- 68
- 69
- 70
- 71
- 72
- 73
- 74
- 75
- 76
- 77
- 78
- 79
- 80
- 81
- 82
- 83
- 84
- 85
- 86
- 87
- 88
- 89
- 90
- 91
- 92
- 93
- 94
- 95
- 96
- 97
- 98
- 99
- 100
- 101
- 102
- 103
- 104
- 105
- 106
- 107
- 108
- 109
- 110
- 111
- 112
- 113
- 114
- 115
- 116
- 117
- 118
- 119
- 120
- 121
- 122
- 123
- 124
- 125
- 126
- 127
- 128
- 129
- 130
- 131
- 132
- 133
- 134
- 135
- 136
- 137
- 138
- 139
- 140
- 141
- 142
- 143
- 144
- 145
- 146
- 147
- 148
- 149
- 150
- 151
- 152
- 153
- 154
- 155
- 156
- 157
- 158
- 159
- 160
- 161
priorityOrderedPostProcessors因为包含ConfigurationClassPostProcessor所以扫描了根目录下的所有类,加载了对应的bean定义。而在加载bean definition的时候,将自动配置的bean defintion也加载了进来。 invokeBeanDefinitionRegistryPostProcessors(priorityOrderedPostProcessors, registry);
我们需要了解一下ConfigurationClassPostProcessor类的processConfigBeanDefinitions方法。
public void processConfigBeanDefinitions(BeanDefinitionRegistry registry) {
        //候选的待解析的含有@Configuration注解的类
        List<BeanDefinitionHolder> configCandidates = new ArrayList();
        //从现有的的bean definition中获取待解析类的name
        String[] candidateNames = registry.getBeanDefinitionNames();
        String[] var4 = candidateNames;
        int var5 = candidateNames.length;

        for(int var6 = 0; var6 < var5; ++var6) {
            String beanName = var4[var6];
            BeanDefinition beanDef = registry.getBeanDefinition(beanName);
            //如果当前的beanDef即不是full,也不是lite
            //在没有checkConfigurationClassCandidate之前,beanDef的CONFIGURATION_CLASS_ATTRIBUTE属性是没有设置的
            if (!ConfigurationClassUtils.isFullConfigurationClass(beanDef) && !ConfigurationClassUtils.isLiteConfigurationClass(beanDef)) {
                //如果beanDef有@Configuration注解,则设置CONFIGURATION_CLASS_ATTRIBUTE为full,返回true
                //如果beanDef有Component,ComponentScan,Import,ImportResource注解中的一个,则CONFIGURATION_CLASS_ATTRIBUTE设置为lite,返回true
                //返回true,则加入configCandidates
                if (ConfigurationClassUtils.checkConfigurationClassCandidate(beanDef, this.metadataReaderFactory)) {
                    configCandidates.add(new BeanDefinitionHolder(beanDef, beanName));
                }
            } else if (this.logger.isDebugEnabled()) {
                this.logger.debug("Bean definition has already been processed as a configuration class: " + beanDef);
            }
        }

        if (!configCandidates.isEmpty()) {
            //首先对configCandidates进行排序
            Collections.sort(configCandidates, new Comparator<BeanDefinitionHolder>() {
                public int compare(BeanDefinitionHolder bd1, BeanDefinitionHolder bd2) {
                    int i1 = ConfigurationClassUtils.getOrder(bd1.getBeanDefinition());
                    int i2 = ConfigurationClassUtils.getOrder(bd2.getBeanDefinition());
                    return i1 < i2 ? -1 : (i1 > i2 ? 1 : 0);
                }
            });
            SingletonBeanRegistry sbr = null;
            if (registry instanceof SingletonBeanRegistry) {
                sbr = (SingletonBeanRegistry)registry;
                //如果当前没有设置过beanNameGenerator,则设置
                if (!this.localBeanNameGeneratorSet && sbr.containsSingleton("org.springframework.context.annotation.internalConfigurationBeanNameGenerator")) {
                    BeanNameGenerator generator = (BeanNameGenerator)sbr.getSingleton("org.springframework.context.annotation.internalConfigurationBeanNameGenerator");
                    this.componentScanBeanNameGenerator = generator;
                    this.importBeanNameGenerator = generator;
                }
            }
            //创建ConfigurationClass的解析器
            ConfigurationClassParser parser = new ConfigurationClassParser(this.metadataReaderFactory, this.problemReporter, this.environment, this.resourceLoader, this.componentScanBeanNameGenerator, registry);
            //待解析的configurationClass的bean def
            Set<BeanDefinitionHolder> candidates = new LinkedHashSet(configCandidates);
            //已经解析过的,元素为ConfigurationClass
            HashSet alreadyParsed = new HashSet(configCandidates.size());

            do {
                //解析
                parser.parse(candidates);
                parser.validate();
                //在解析的过程中会遇到很多的需要依赖的bean def
                Set<ConfigurationClass> configClasses = new LinkedHashSet(parser.getConfigurationClasses());
                configClasses.removeAll(alreadyParsed);//去重
                if (this.reader == null) {
                    this.reader = new ConfigurationClassBeanDefinitionReader(registry, this.sourceExtractor, this.resourceLoader, this.environment, this.importBeanNameGenerator, parser.getImportRegistry());
                }
                //加载这些依赖的bean def
                this.reader.loadBeanDefinitions(configClasses);
                alreadyParsed.addAll(configClasses);
                candidates.clear();
                //如果registry中的bean def的数量比candidateNames要多,说明还有一些bean def没有被处理。
                if (registry.getBeanDefinitionCount() > candidateNames.length) {
                    String[] newCandidateNames = registry.getBeanDefinitionNames();
                    Set<String> oldCandidateNames = new HashSet(Arrays.asList(candidateNames));
                    Set<String> alreadyParsedClasses = new HashSet();
                    Iterator var12 = alreadyParsed.iterator();

                    while(var12.hasNext()) {
                        ConfigurationClass configurationClass = (ConfigurationClass)var12.next();
                        alreadyParsedClasses.add(configurationClass.getMetadata().getClassName());
                    }

                    String[] var23 = newCandidateNames;
                    int var24 = newCandidateNames.length;

                    for(int var14 = 0; var14 < var24; ++var14) {
                        String candidateName = var23[var14];
                        //如果之前没有遇到过这个候选的bean name
                        if (!oldCandidateNames.contains(candidateName)) {
                            BeanDefinition bd = registry.getBeanDefinition(candidateName);
                            //如果这个类含有对应的注解,且没有被解析过,则加入到candidates中
                            if (ConfigurationClassUtils.checkConfigurationClassCandidate(bd, this.metadataReaderFactory) && !alreadyParsedClasses.contains(bd.getBeanClassName())) {
                                candidates.add(new BeanDefinitionHolder(bd, candidateName));
                            }
                        }
                    }

                    candidateNames = newCandidateNames;
                }
            } while(!candidates.isEmpty());

            if (sbr != null && !sbr.containsSingleton(IMPORT_REGISTRY_BEAN_NAME)) {
                sbr.registerSingleton(IMPORT_REGISTRY_BEAN_NAME, parser.getImportRegistry());
            }

            if (this.metadataReaderFactory instanceof CachingMetadataReaderFactory) {
                ((CachingMetadataReaderFactory)this.metadataReaderFactory).clearCache();
            }

        }
}- 1
- 2
- 3
- 4
- 5
- 6
- 7
- 8
- 9
- 10
- 11
- 12
- 13
- 14
- 15
- 16
- 17
- 18
- 19
- 20
- 21
- 22
- 23
- 24
- 25
- 26
- 27
- 28
- 29
- 30
- 31
- 32
- 33
- 34
- 35
- 36
- 37
- 38
- 39
- 40
- 41
- 42
- 43
- 44
- 45
- 46
- 47
- 48
- 49
- 50
- 51
- 52
- 53
- 54
- 55
- 56
- 57
- 58
- 59
- 60
- 61
- 62
- 63
- 64
- 65
- 66
- 67
- 68
- 69
- 70
- 71
- 72
- 73
- 74
- 75
- 76
- 77
- 78
- 79
- 80
- 81
- 82
- 83
- 84
- 85
- 86
- 87
- 88
- 89
- 90
- 91
- 92
- 93
- 94
- 95
- 96
- 97
- 98
- 99
- 100
- 101
- 102
- 103
- 104
- 105
- 106
我们需要关注的是其中的两行代码:parser.parse(candidates);用来解析候选类。在解析候选类的过程中会遇到很多以来的bean definition,this.reader.loadBeanDefinitions(configClasses);将注册新发现的bean defintion
 parser.parse(candidates);
 parser.validate();
 //在解析的过程中会遇到很多的需要依赖的bean def
  Set<ConfigurationClass> configClasses = new LinkedHashSet(parser.getConfigurationClasses());
  configClasses.removeAll(alreadyParsed);//去重
  if (this.reader == null) {
      this.reader = new ConfigurationClassBeanDefinitionReader(registry, this.sourceExtractor, this.resourceLoader, this.environment, this.importBeanNameGenerator, parser.getImportRegistry());
  }
  //加载这些依赖的bean def
  this.reader.loadBeanDefinitions(configClasses);
- 1
- 2
- 3
- 4
- 5
- 6
- 7
- 8
- 9
- 10
- 11
ConfigurationClassParser用来解析一个beanDefition。因为在这次的场景中只有AppBootStrap这一个类。我们就从ConfigurationClassParser对这一个类的解析来说。
注册beanPostProcessor
将beanPostProcessor分为4类,实现了PriorityOrdered接口的,实现了Ordered接口的,两者都没有实现的,是MergedBeanDefinitionPostProcessor的。这4类分别排序,被添加进入beanFactory的一个beanPostProcessor的list中,这里并不会调用BeanPostProcessor接口的方法。到时候在bean的初始化前后按顺序调用他们。
这里就根据代码总结一下BeanPostProcessor接口的调用顺序:
- 优先调用PriorityOrdered接口的子接口,调用顺序依照接口方法getOrder的返回值从小到大排序
- 其次调用Ordered接口的子接口,调用顺序依照接口方法getOrder的返回值从小到大排序
- 接着按照BeanPostProcessor实现类在配置文件中定义的顺序进行调用
- 最后调用MergedBeanDefinitionPostProcessor接口的实现Bean,同样按照在配置文件中定义的顺序进行调用
public static void registerBeanPostProcessors(ConfigurableListableBeanFactory beanFactory, AbstractApplicationContext applicationContext) {
        String[] postProcessorNames = beanFactory.getBeanNamesForType(BeanPostProcessor.class, true, false);
        int beanProcessorTargetCount = beanFactory.getBeanPostProcessorCount() + 1 + postProcessorNames.length;
        beanFactory.addBeanPostProcessor(new PostProcessorRegistrationDelegate.BeanPostProcessorChecker(beanFactory, beanProcessorTargetCount));
        List<BeanPostProcessor> priorityOrderedPostProcessors = new ArrayList();
        List<BeanPostProcessor> internalPostProcessors = new ArrayList();
        List<String> orderedPostProcessorNames = new ArrayList();
        List<String> nonOrderedPostProcessorNames = new ArrayList();
        String[] var8 = postProcessorNames;
        int var9 = postProcessorNames.length;

        String ppName;
        BeanPostProcessor pp;
        for(int var10 = 0; var10 < var9; ++var10) {
            ppName = var8[var10];
            if (beanFactory.isTypeMatch(ppName, PriorityOrdered.class)) {
                pp = (BeanPostProcessor)beanFactory.getBean(ppName, BeanPostProcessor.class);
                priorityOrderedPostProcessors.add(pp);
                if (pp instanceof MergedBeanDefinitionPostProcessor) {
                    internalPostProcessors.add(pp);
                }
            } else if (beanFactory.isTypeMatch(ppName, Ordered.class)) {
                orderedPostProcessorNames.add(ppName);
            } else {
                nonOrderedPostProcessorNames.add(ppName);
            }
        }

        sortPostProcessors(beanFactory, priorityOrderedPostProcessors);
        registerBeanPostProcessors(beanFactory, (List)priorityOrderedPostProcessors);
        List<BeanPostProcessor> orderedPostProcessors = new ArrayList();
        Iterator var14 = orderedPostProcessorNames.iterator();

        while(var14.hasNext()) {
            String ppName = (String)var14.next();
            BeanPostProcessor pp = (BeanPostProcessor)beanFactory.getBean(ppName, BeanPostProcessor.class);
            orderedPostProcessors.add(pp);
            if (pp instanceof MergedBeanDefinitionPostProcessor) {
                internalPostProcessors.add(pp);
            }
        }

        sortPostProcessors(beanFactory, orderedPostProcessors);
        registerBeanPostProcessors(beanFactory, (List)orderedPostProcessors);
        List<BeanPostProcessor> nonOrderedPostProcessors = new ArrayList();
        Iterator var17 = nonOrderedPostProcessorNames.iterator();

        while(var17.hasNext()) {
            ppName = (String)var17.next();
            pp = (BeanPostProcessor)beanFactory.getBean(ppName, BeanPostProcessor.class);
            nonOrderedPostProcessors.add(pp);
            if (pp instanceof MergedBeanDefinitionPostProcessor) {
                internalPostProcessors.add(pp);
            }
        }

        registerBeanPostProcessors(beanFactory, (List)nonOrderedPostProcessors);
        sortPostProcessors(beanFactory, internalPostProcessors);
        registerBeanPostProcessors(beanFactory, (List)internalPostProcessors);
        beanFactory.addBeanPostProcessor(new ApplicationListenerDetector(applicationContext));
}- 1
- 2
- 3
- 4
- 5
- 6
- 7
- 8
- 9
- 10
- 11
- 12
- 13
- 14
- 15
- 16
- 17
- 18
- 19
- 20
- 21
- 22
- 23
- 24
- 25
- 26
- 27
- 28
- 29
- 30
- 31
- 32
- 33
- 34
- 35
- 36
- 37
- 38
- 39
- 40
- 41
- 42
- 43
- 44
- 45
- 46
- 47
- 48
- 49
- 50
- 51
- 52
- 53
- 54
- 55
- 56
- 57
- 58
- 59
- 60
- 61
initMessageSource用于创建messageSource
initApplicationEventMulticaster用于创建上下文事件广播器
onRefresh创建Web容器
首先 onfresh():
一个模板方法,重写它的作用是添加特殊上下文刷新的工作,在特殊Bean的初始化时、初始化之前被调用。在Spring中,AbstractRefreshableWebApplicationContext、GenericWebApplicationContext、StaticWebApplicationContext都实现了这个方法。这三个类都是用它来配置themeSource。在EmbeddedWebApplicationContext中则创建和启动了servlet容器。需要在bean实例化之前创建servletcontainer
//EmbeddedWebApplicationContext.java
protected void onRefresh() {
        super.onRefresh();

        try {
            this.createEmbeddedServletContainer();//
        } catch (Throwable var2) {
            throw new ApplicationContextException("Unable to start embedded container", var2);
        }
    }
    private void createEmbeddedServletContainer() {
        EmbeddedServletContainer localContainer = this.embeddedServletContainer;
        ServletContext localServletContext = this.getServletContext();
        if (localContainer == null && localServletContext == null) {
            //如果用户有配置过,则使用用户配置的containerFactory,否则使用默认的。
            EmbeddedServletContainerFactory containerFactory = this.getEmbeddedServletContainerFactory();
            //获取到containerFactory之后就可以使用containerFactory获取servletContainer。
            //而这里在获取servletContainer的时候,直接启动了Jetty中的server
            //另外还需要关注的是我们传递了一个initailizer进去
            this.embeddedServletContainer = containerFactory.getEmbeddedServletContainer(new ServletContextInitializer[]{this.getSelfInitializer()});
        } else if (localServletContext != null) {
            try {
                this.getSelfInitializer().onStartup(localServletContext);
            } catch (ServletException var4) {
                throw new ApplicationContextException("Cannot initialize servlet context", var4);
            }
        }
        //重新设置context中和servlet有关的几个属性
        this.initPropertySources();
    }
    protected EmbeddedServletContainerFactory getEmbeddedServletContainerFactory() {
        //如果配置了JettyConfig,则是我们配置的那个,否在是通过自动配置注入进来的
        //如果没有配置过,且有Jetty,则是jettyEmbeddedServletContainerFactory
        String[] beanNames = this.getBeanFactory().getBeanNamesForType(EmbeddedServletContainerFactory.class);
        if (beanNames.length == 0) {
            throw new ApplicationContextException("Unable to start EmbeddedWebApplicationContext due to missing EmbeddedServletContainerFactory bean.");
        } else if (beanNames.length > 1) {
            throw new ApplicationContextException("Unable to start EmbeddedWebApplicationContext due to multiple EmbeddedServletContainerFactory beans : " + StringUtils.arrayToCommaDelimitedString(beanNames));
        } else {
            return (EmbeddedServletContainerFactory)this.getBeanFactory().getBean(beanNames[0], EmbeddedServletContainerFactory.class);
        }
}- 1
- 2
- 3
- 4
- 5
- 6
- 7
- 8
- 9
- 10
- 11
- 12
- 13
- 14
- 15
- 16
- 17
- 18
- 19
- 20
- 21
- 22
- 23
- 24
- 25
- 26
- 27
- 28
- 29
- 30
- 31
- 32
- 33
- 34
- 35
- 36
- 37
- 38
- 39
- 40
- 41
- 42
//JettyEmbeddedServletContainerFactory.class
public EmbeddedServletContainer getEmbeddedServletContainer(ServletContextInitializer... initializers) {
        JettyEmbeddedWebAppContext context = new JettyEmbeddedWebAppContext();
        int port = this.getPort() >= 0 ? this.getPort() : 0;
        InetSocketAddress address = new InetSocketAddress(this.getAddress(), port);
        Server server = this.createServer(address);
        this.configureWebAppContext(context, initializers);
        server.setHandler(this.addHandlerWrappers(context));
        this.logger.info("Server initialized with port: " + port);
        if (this.getSsl() != null && this.getSsl().isEnabled()) {
            SslContextFactory sslContextFactory = new SslContextFactory();
            this.configureSsl(sslContextFactory, this.getSsl());
            AbstractConnector connector = this.getSslServerConnectorFactory().getConnector(server, sslContextFactory, port);
            server.setConnectors(new Connector[]{connector});
        }

        Iterator var8 = this.getServerCustomizers().iterator();

        while(var8.hasNext()) {
            JettyServerCustomizer customizer = (JettyServerCustomizer)var8.next();
            customizer.customize(server);
        }

        if (this.useForwardHeaders) {
            (new JettyEmbeddedServletContainerFactory.ForwardHeadersCustomizer(null)).customize(server);
        }

        return this.getJettyEmbeddedServletContainer(server);
    }
    protected JettyEmbeddedServletContainer getJettyEmbeddedServletContainer(Server server) {
        return new JettyEmbeddedServletContainer(server, this.getPort() >= 0);
}- 1
- 2
- 3
- 4
- 5
- 6
- 7
- 8
- 9
- 10
- 11
- 12
- 13
- 14
- 15
- 16
- 17
- 18
- 19
- 20
- 21
- 22
- 23
- 24
- 25
- 26
- 27
- 28
- 29
- 30
- 31
- 32
//JettyEmbeddedServletContainer.java
public JettyEmbeddedServletContainer(Server server, boolean autoStart) {
        this.monitor = new Object();
        this.autoStart = autoStart;
        Assert.notNull(server, "Jetty Server must not be null");
        this.server = server;
        this.initialize();
    }

    private void initialize() {
        Object var1 = this.monitor;
        synchronized(this.monitor) {
            try {
                this.connectors = this.server.getConnectors();
                this.server.addBean(new AbstractLifeCycle() {
                    protected void doStart() throws Exception {
                        Connector[] var1 = JettyEmbeddedServletContainer.this.connectors;
                        int var2 = var1.length;

                        for(int var3 = 0; var3 < var2; ++var3) {
                            Connector connector = var1[var3];
                            Assert.state(connector.isStopped(), "Connector " + connector + " has been started prematurely");
                        }

                        JettyEmbeddedServletContainer.this.server.setConnectors((Connector[])null);
                    }
                });
                this.server.start();//这里启动了jetty
                this.server.setStopAtShutdown(false);
            } catch (Exception var4) {
                this.stopSilently();
                throw new EmbeddedServletContainerException("Unable to start embedded Jetty servlet container", var4);
            }

        }
}- 1
- 2
- 3
- 4
- 5
- 6
- 7
- 8
- 9
- 10
- 11
- 12
- 13
- 14
- 15
- 16
- 17
- 18
- 19
- 20
- 21
- 22
- 23
- 24
- 25
- 26
- 27
- 28
- 29
- 30
- 31
- 32
- 33
- 34
- 35
- 36
我们在创建ServletContainer的时候,传递了一个initializer进去。在servlet容器创建后执行一些初始化动作
private void selfInitialize(ServletContext servletContext) throws ServletException {
        //我们需要重点关注这个方法
        this.prepareEmbeddedWebApplicationContext(servletContext);
        ConfigurableListableBeanFactory beanFactory = this.getBeanFactory();
        EmbeddedWebApplicationContext.ExistingWebApplicationScopes existingScopes = new EmbeddedWebApplicationContext.ExistingWebApplicationScopes(beanFactory);
        WebApplicationContextUtils.registerWebApplicationScopes(beanFactory, this.getServletContext());
        existingScopes.restore();
        WebApplicationContextUtils.registerEnvironmentBeans(beanFactory, this.getServletContext());
        Iterator var4 = this.getServletContextInitializerBeans().iterator();

        while(var4.hasNext()) {
            ServletContextInitializer beans = (ServletContextInitializer)var4.next();
            beans.onStartup(servletContext);
        }

    }

//关注这个方法的原因是我们在这个方法中设置了servletContext的ROOT_WEB_APPLICATION_CONTEXT_ATTRIBUTE属性为我们之前applicationContext,也设置了我们applicationContext中的serveltContext属性为在创建servlet容器时创建的servletContext
protected void prepareEmbeddedWebApplicationContext(ServletContext servletContext) {
        Object rootContext = servletContext.getAttribute(WebApplicationContext.ROOT_WEB_APPLICATION_CONTEXT_ATTRIBUTE);
        if (rootContext != null) {
            if (rootContext == this) {
                throw new IllegalStateException("Cannot initialize context because there is already a root application context present - check whether you have multiple ServletContextInitializers!");
            }
        } else {
            Log logger = LogFactory.getLog(ContextLoader.class);
            servletContext.log("Initializing Spring embedded WebApplicationContext");

            try {
                servletContext.setAttribute(WebApplicationContext.ROOT_WEB_APPLICATION_CONTEXT_ATTRIBUTE, this);
                if (logger.isDebugEnabled()) {
                    logger.debug("Published root WebApplicationContext as ServletContext attribute with name [" + WebApplicationContext.ROOT_WEB_APPLICATION_CONTEXT_ATTRIBUTE + "]");
                }

                this.setServletContext(servletContext);
                if (logger.isInfoEnabled()) {
                    long elapsedTime = System.currentTimeMillis() - this.getStartupDate();
                    logger.info("Root WebApplicationContext: initialization completed in " + elapsedTime + " ms");
                }

            } catch (RuntimeException var6) {
                logger.error("Context initialization failed", var6);
                servletContext.setAttribute(WebApplicationContext.ROOT_WEB_APPLICATION_CONTEXT_ATTRIBUTE, var6);
                throw var6;
            } catch (Error var7) {
                logger.error("Context initialization failed", var7);
                servletContext.setAttribute(WebApplicationContext.ROOT_WEB_APPLICATION_CONTEXT_ATTRIBUTE, var7);
                throw var7;
            }
        }
}- 1
- 2
- 3
- 4
- 5
- 6
- 7
- 8
- 9
- 10
- 11
- 12
- 13
- 14
- 15
- 16
- 17
- 18
- 19
- 20
- 21
- 22
- 23
- 24
- 25
- 26
- 27
- 28
- 29
- 30
- 31
- 32
- 33
- 34
- 35
- 36
- 37
- 38
- 39
- 40
- 41
- 42
- 43
- 44
- 45
- 46
- 47
- 48
- 49
- 50
- 51
AfterFresh
spring boot在这一步中完成对Runners的调用
参考CommandLineRunner,ApplicationRunner
protected void afterRefresh(ConfigurableApplicationContext context, ApplicationArguments args) {
        this.callRunners(context, args);
    }

    private void callRunners(ApplicationContext context, ApplicationArguments args) {
        List<Object> runners = new ArrayList();
        runners.addAll(context.getBeansOfType(ApplicationRunner.class).values());
        runners.addAll(context.getBeansOfType(CommandLineRunner.class).values());
        AnnotationAwareOrderComparator.sort(runners);
        Iterator var4 = (new LinkedHashSet(runners)).iterator();

        while(var4.hasNext()) {
            Object runner = var4.next();
            if (runner instanceof ApplicationRunner) {
                this.callRunner((ApplicationRunner)runner, args);
            }

            if (runner instanceof CommandLineRunner) {
                this.callRunner((CommandLineRunner)runner, args);
            }
        }

}- 1
- 2
- 3
- 4
- 5
- 6
- 7
- 8
- 9
- 10
- 11
- 12
- 13
- 14
- 15
- 16
- 17
- 18
- 19
- 20
- 21
- 22
- 23
参考资料
讲bean definition的加载过程的更详细的一篇博文
spring boot源码解析专栏
PostProcessorRegistrationDelegate
详解ImportSelector接口
关于springboot 的启动流程
BeanPostProcessor扩展点
非懒加载bean初始化的过程,特别赞,作者还有关于spring的一系列的文章,建议可以去看
refresh方法
Jetty的工作原理
Spring中的bean工厂后置处理器