在很多情况下,我们的服务将会受到千万级的调用访问,
如果说你的核心业务只做成一个服务,也没法同时兼顾这么多的并发请求量。为此。我们一般采用一个比较经典的解决方案。一个路由服务。多个业务服务,路由服务为每个请求通过一定的计算后分发到后台业务服务上计算结果,并返回结果集。比如说 Nginx+servlet容器。
同样Spring Cloud 也提供了相应的解决方案。那就是Spring Cloud Ribbon
下面我将会用我的demo举例说明
我的服务实例如下:
一台Eureka服务
两台不同端口但是注册名一样的服务分别是:ONE-CLOUD-CLIENT:8080,ONE-CLOUD-CLIENT:8081
一台TWO-CLOUD-CLIENT:9000服务
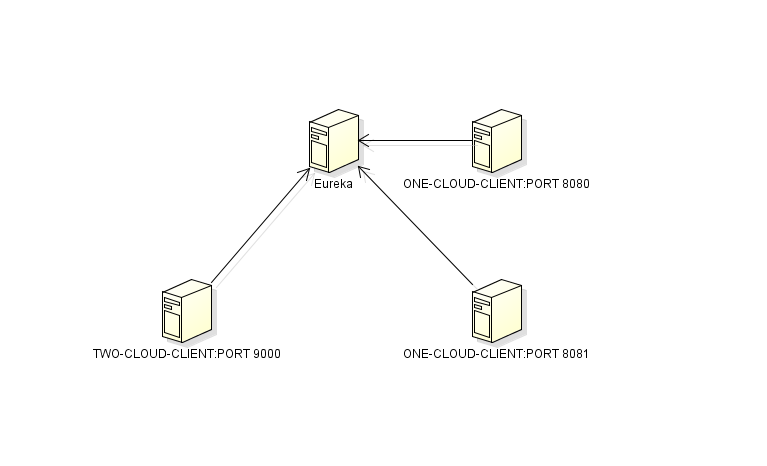
场景是这样的:我TWO服务需要调用ONE服务,但是ONE服务有两台。希望通过一定的规则去请求这两台服务。
我们只需要在TWO-CLOUD-CLIENT里面做一些配置操作即可
TWO-CLIENT的Pom文件如下:
<project xmlns="http://maven.apache.org/POM/4.0.0" xmlns:xsi="http://www.w3.org/2001/XMLSchema-instance" xsi:schemaLocation="http://maven.apache.org/POM/4.0.0 http://maven.apache.org/maven-v4_0_0.xsd">
  <modelVersion>4.0.0</modelVersion>
  <groupId>com.zx</groupId>
  <artifactId>SpringCloudClient2</artifactId>
  <version>0.0.1-SNAPSHOT</version>
  <parent>
    <groupId>org.springframework.boot</groupId>
    <artifactId>spring-boot-starter-parent</artifactId>
    <version>1.3.5.RELEASE</version>
    <relativePath/>
  </parent>

  <properties>
    <project.build.sourceEncoding>UTF-8</project.build.sourceEncoding>
    <java.version>1.7</java.version>
  </properties>

  <dependencyManagement>
    <dependencies>
        <dependency>
            <groupId>org.springframework.cloud</groupId>
            <artifactId>spring-cloud-starter-parent</artifactId>
            <version>Brixton.SR3</version>
            <type>pom</type>
            <scope>import</scope>
        </dependency>
    </dependencies>
  </dependencyManagement>

  <dependencies>
      <!--此处是Eureka客户端-->
      <dependency>
          <groupId>org.springframework.cloud</groupId>
          <artifactId>spring-cloud-starter-eureka</artifactId>
      </dependency>
      <dependency>
          <groupId>org.springframework.boot</groupId>
          <artifactId>spring-boot-starter-test</artifactId>
          <scope>test</scope>
      </dependency>
  </dependencies>

  <build>
    <plugins>
        <plugin>
            <groupId>org.springframework.boot</groupId>
            <artifactId>spring-boot-maven-plugin</artifactId>
        </plugin>
    </plugins>
  </build>
</project>
添加依赖之后我们配置yml文件
server:
  port: 9000
spring:
  application:
    name: Two-cloud-client    #为你的应用起个名字,该名字将注册到eureka注册中心
eureka:
  client:
    serviceUrl:
      defaultZone: http://localhost:8761/eureka/ #申明eureka注册中心地址
TWO-CLOUD-CLIENT:  ##config ribbon
  ribbon:
    eureka:
      enabled: false
    listOfServers: localhost:8081, localhost:8080 ##假设provider有2台instance端口分别是8081 8082
    ServerListRefreshInterval: 15000
然后再控制器这层 我们声明ribbon调用端口

其中注意@LoadBalanced这个标签
这个标签标注的类会被LoadBalancerInterceptor拦截器拦截 然后通过服务实例名去解析url调用对应的方法
package Controller;

import java.util.concurrent.atomic.AtomicLong;

import org.springframework.beans.factory.annotation.Autowired;
import org.springframework.cloud.client.loadbalancer.LoadBalanced;
import org.springframework.cloud.netflix.ribbon.RibbonClient;
import org.springframework.context.annotation.Bean;
import org.springframework.web.bind.annotation.RequestMapping;
import org.springframework.web.bind.annotation.RequestParam;
import org.springframework.web.bind.annotation.RestController;
import org.springframework.web.bind.annotation.SessionAttributes;
import org.springframework.web.client.RestTemplate;

@RestController
@SessionAttributes("userid")
@RibbonClient(name = "ONE-CLOUD-CLIENT", configuration = RibbonConfiguration.class)
public class GreetingController {
	@Bean
	@LoadBalanced
	/**
	 * 当一个被@LoadBalanced注解修饰的RestTemplate对象向外发起HTTP请求时,
	 * 会被LoadBalancerInterceptor类的intercept函数所拦截。
	 * 由于我们在使用RestTemplate时候采用了服务名作为host,
	 * 所以直接从HttpRequest的URI对象中通过getHost()就可以拿到服务名,
	 * 然后调用execute函数去根据服务名来选择实例并发起实际的请求。
	 */
	RestTemplate restTemplate(){
		return new RestTemplate();
	}
	@Autowired
	private RestTemplate restTemplete;

    private static final String template = "Hello, %s!";
    private final AtomicLong counter = new AtomicLong();
    @RequestMapping("/greeting")
    public Greeting greeting(@RequestParam(value="name", defaultValue="World") String name) {
        return new Greeting(counter.incrementAndGet(),"this is Client 9000 send message."+name);
    }
    @RequestMapping("/getinfo")
    public String getinfo() {
    	for (int i = 0; i < 1000; i++) {
    		System.out.println(restTemplete);
//			System.out.println("["+(i+1)+"]"+":"+restTemplete.getForEntity("http://ONE-CLOUD-CLIENT/getinfo", String.class).getBody());
		}
        return restTemplete.getForEntity("http://ONE-CLOUD-CLIENT/getinfo", String.class).getBody();
    }
}
其中我们可以看到restTemplete是同一个对象。但是请求的端口不同,也就是说在发送实际请求的时候就对端口做变换了。
参考:http://blog.csdn.net/message_lx/article/details/56679065
http://blog.csdn.net/liaokailin/article/details/51469834
并且指明ribbon配置文件类
package Controller;

import org.springframework.beans.factory.annotation.Autowired;
import org.springframework.context.annotation.Bean;

import com.netflix.client.config.IClientConfig;
import com.netflix.loadbalancer.AvailabilityFilteringRule;
import com.netflix.loadbalancer.IPing;
import com.netflix.loadbalancer.IRule;
import com.netflix.loadbalancer.PingUrl;
import com.netflix.loadbalancer.RandomRule;
import com.netflix.loadbalancer.RoundRobinRule;
import com.netflix.loadbalancer.WeightedResponseTimeRule;

/**
 *
 * Here, we override the IPing and IRule used by the default load balancer. The
 * default IPing is a NoOpPing (which doesn’t actually ping server instances,
 * instead always reporting that they’re stable), and the default IRule is a
 * ZoneAvoidanceRule (which avoids the Amazon EC2 zone that has the most
 * malfunctioning servers, and might thus be a bit difficult to try out in our
 * local environment).
 *
 */
public class RibbonConfiguration {
    @Autowired
    private IClientConfig ribbonClientConfig;

    /**
     * Our IPing is a PingUrl, which will ping a URL to check the status of each
     * server.provider has, as you’ll recall, a method mapped to the / path;
     * that means that Ribbon will get an HTTP 200 response when it pings a
     * running provider server.
     *
     * server list defined in application.yml :listOfServers: localhost:8000,
     * localhost:8002,localhost:8003
     *
     */
    @Bean
    public IPing ribbonPing(IClientConfig config) {
        // ping url will try to access http://microservice-provider/provider/ to
        // see if reponse code is 200 . check PingUrl.isAlive()
        // param /provider/ is the context-path of provider service
    	System.out.println("load ribbonPing");
        return new PingUrl(false, "/greeting");
    }

    /**
     * The IRule we set up, the AvailabilityFilteringRule, will use Ribbon’s
     * built-in circuit breaker functionality to filter out any servers in an
     * “open-circuit” state: if a ping fails to connect to a given server, or if
     * it gets a read failure for the server, Ribbon will consider that server
     * “dead” until it begins to respond normally.
     *
     * AvailabilityFilteringRule | 过滤掉那些因为一直连接失败的被标记为circuit tripped的后端server,并过滤掉那些高并发的的后端server(active connections 超过配置的阈值) | 使用一个AvailabilityPredicate来包含过滤server的逻辑,其实就就是检查status里记录的各个server的运行状态
     * RandomRule  | 随机选择一个server
     * BestAvailabl eRule | 选择一个最小的并发请求的server | 逐个考察Server,如果Server被tripped了,则忽略,在选择其中
     * RoundRobinRule  |  roundRobin方式轮询选择  |  轮询index,选择index对应位置的server
     * WeightedResponseTimeRule  |  根据响应时间分配一个weight,响应时间越长,weight越小,被选中的可能性越低。  |  一 个后台线程定期的从status里面读取评价响应时间,为每个server计算一个weight。Weight的计算也比较简单responsetime 减去每个server自己平均的responsetime是server的权重。当刚开始运行,没有形成statas时,使用roubine策略选择 server。
     * RetryRule  |  对选定的负载均衡策略机上重试机制。 |  在一个配置时间段内当选择server不成功,则一直尝试使用subRule的方式选择一个可用的server
     * ZoneAvoidanceRule  |  复合判断server所在区域的性能和server的可用性选择server  |  使 用ZoneAvoidancePredicate和AvailabilityPredicate来判断是否选择某个server,前一个判断判定一个 zone的运行性能是否可用,剔除不可用的zone(的所有server),AvailabilityPredicate用于过滤掉连接数过多的 Server。
     * @param config
     * @return
     */
    @Bean
    public IRule ribbonRule(IClientConfig config) {
    	System.out.println("load ribbonrule");
//         return new AvailabilityFilteringRule();
         return new RandomRule();//随机
        // return new BestAvailableRule();
//         return new RoundRobinRule();//轮询
//         return new WeightedResponseTimeRule();
        // return new RetryRule();
        // return new ZoneAvoidanceRule();
    }
}
这样 按顺序启动服务之后,访问two-client的服务 调用/getinfo方法 就能够看到控制台输出一千个请求的结果:
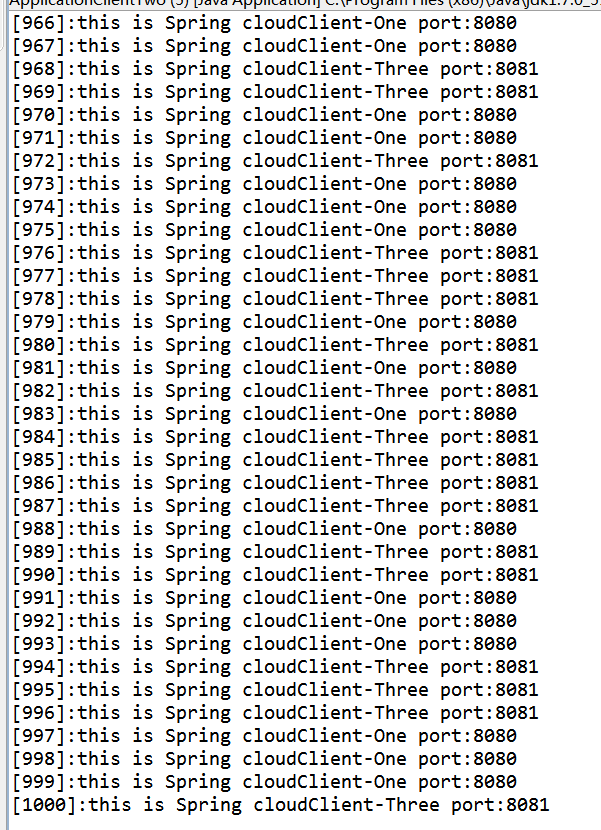
这样负载均衡就做好了。
这里是采用restTemple调用的方法,下一篇将会说说使用Feign调用的使用方法