前言
该篇主要讲下pytorch的入门使用操作,默认已安装好pytorch
pytorch版本:pytorch1.5.0
编程工具:PyCharm
正文
1、张量
1.1 创建张量
创建之前,先简单介绍一下张量,张量是各种数值数据的统称
0阶张量,表示常数
1阶张量,表示向量
2阶张量,表示矩阵
3阶张量,4阶张量。。。
如何看阶数?
答:看张量的shape,如shape为(2,3),表示两行三列的矩阵,shape中数字的个数就是阶数,此处即为2阶,shape为(1,2,3)即为三阶。
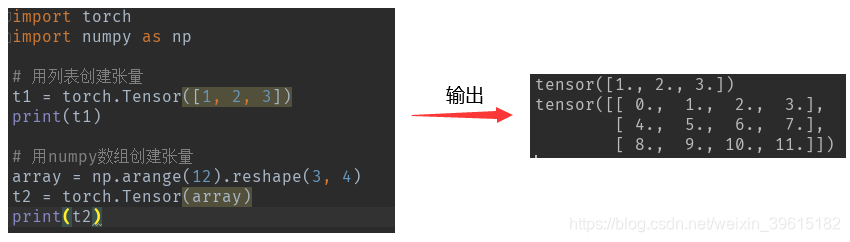
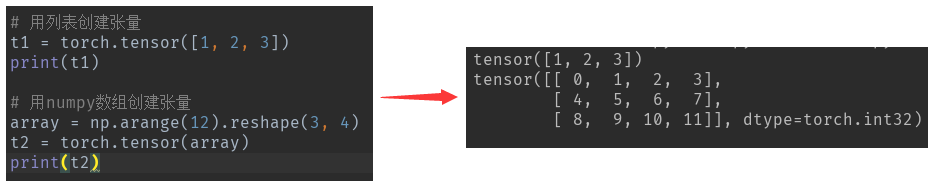
torch.Tensor([1,2]) # 列表创建
torch.Tensor(np.array[1,2]) #numpy数组创建
下面arange表示创建一个0-11的数组[0,1,2,…,11],再reshape成3行4列矩阵,dtype表示数据的类型
注意:torch.Tensor与torch.tensor区别:
1、torch.Tensor是torch.FloatTensor的别称,所以会默认float类型创建
2、tensor.tensor会根据传入的数据进行创建,传入是整型就以整型创建,传入是浮点型就以浮点型创建
1.2 用pytorch中的API创建张量
# torch.empty()创建3行4列空张量,会用无用数据进行填充,通常用[]括起来写shape
t3 = torch.empty([3, 4])
print(t3)
# torch.ones()创建数据全为1的张量
t4 = torch.ones([3, 4])
print(t4)
# torch.zeros()创建全为0的张量
t5 = torch.zeros([3, 4])
print(t5)
# torch.rand()创建[0,1)范围随机数的张量
t6 = torch.rand([3, 4])
print(t6)
# torch.randint()创建[low,high)的整型张量
t7 = torch.randint(low=0, high=10, size=[3, 4])
print(t7)
# torch.randn()创建服从标准正态分布的张量
t8 = torch.randn([3, 4])
print(t8)
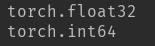
print(t5.dtype) # 获取张量数据类型
print(t7.dtype)
运行效果(用API创建会默认浮点型)

2、张量中的方法与属性
2.1 方法与属性
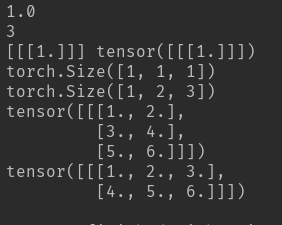
t9 = torch.Tensor([[[1]]])
# torch.item()获取张量中的唯一元素
print(t9.item())
# torch.dim() 获取阶数
print(t9.dim())
# torch.numpy() 转化为array类型,即没有了tensor前缀
print(t9.numpy(), t9)
# torch.size(),相当于获取shape,只是torch中用size获取shape
print(t9.size())
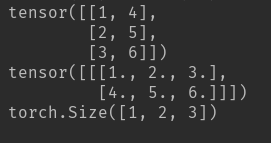
t10 = torch.Tensor([[[1, 2, 3], [4, 5, 6]]]) # size为([1,2,3])
t11 = torch.Tensor([[[1, 2, 3]], [[4, 5 ,6]]]) # size 为([2,1,3])
# torch.view(),相当于reshape操作,只是torch中用view表示reshape
print(t10.size())
print(t10.view([1, 3, 2])) # view的规则就是size中数相乘要相等
print(t11.view([1, 2, 3]))
运行结果
张量的view操作,也就是reshape()操作是个重难点,我们分析一下
[[[1, 2, 3], [4, 5, 6]]] 的size为 ([1,2,3])
为什么是([1,2,3])呢?
首先看第一个中括号[ [ [1, 2, 3], [4, 5, 6] ] ],第一个中括号中只有一对中括号,所以size第一个是1,再看第二个中括号,第二个中括号中有两个中括号,分别是[1,2,3]和[4,5,6],所以size第二个数字为2,最后[1,2,3]和[4,5,6]中都有三个数字,故size第三个数字为3。
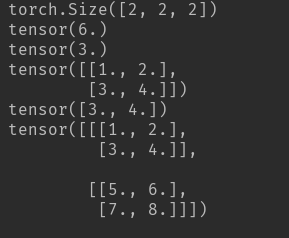
我们也可以理解成,第一个中括号中有一个两行三列的矩阵,如下例子也就可以看成两个两行三列的矩阵,size就为([2,2,3])
[ [ [1, 2, 3], [4, 5, 6] ],
[ [7, 8, 9], [0, 0, 0] ] ]
# t()二维张量的转置
t12 = torch.tensor([[1, 2, 3], [4, 5, 6]]) # size为([2,3])
print(t12.t()) # size为([3,2])

# transpose()三维张量的转置,注意其中参数(0,1)表示size中的位置
# t11的size为([2,1,3]),转置后size为([1,2,3])
print(t11.transpose(0, 1))
print(t11.transpose(0, 1).size())
运行效果
2.2 张量取值与切片
# 取值
t13 = torch.Tensor([[[1, 2], [3, 4]], [[5, 6], [7, 8]]]) # size为([2,2,2])
print(t13.size())
print(t13[1, 0, 1]) # 6.
print(t13[0, 1, 0]) # 3.

# 切片(取一部分)
print(t13[0, :, :]) # [[1., 2.],[3., 4.]]
print(t13[0, 1, :]) # [3,4]
print(t13[:]) # 取全部
运行结果
3、张量的数据类型
# 指定类型创建
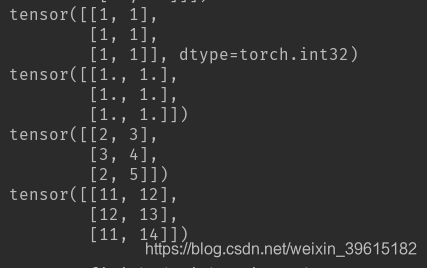
t14 = torch.ones([3, 2], dtype=torch.int32)
print(t14)
# 强制类型转化
print(t14.float())
# 两个张量相加
t15 = torch.tensor([[1, 2], [2, 3], [1, 4]])
print(torch.add(t14, t15))
# 张量与数值相加
print(t15 + 10)
运行效果
4、GPU中创建张量
print(torch.cuda.is_available()) # 看自己电脑是否能调用GPU运行,能返回True,不能返回False

device = torch.device("cuda:0" if torch.cuda.is_available() else "cpu")
device.zeros([2,3], device=device) # 上述两句表示调用GPU创建2行3列值为0的张量

a = torch.zeros([2,3])
a.to(device) # 对已经创建的张量转化成用GPU来调用
以上就是入门使用全部操作