SpringCloud
八、Ribbon负载均衡服务调用
恢复eureka集群环境,以便接下来的练习。
简介

负载均衡
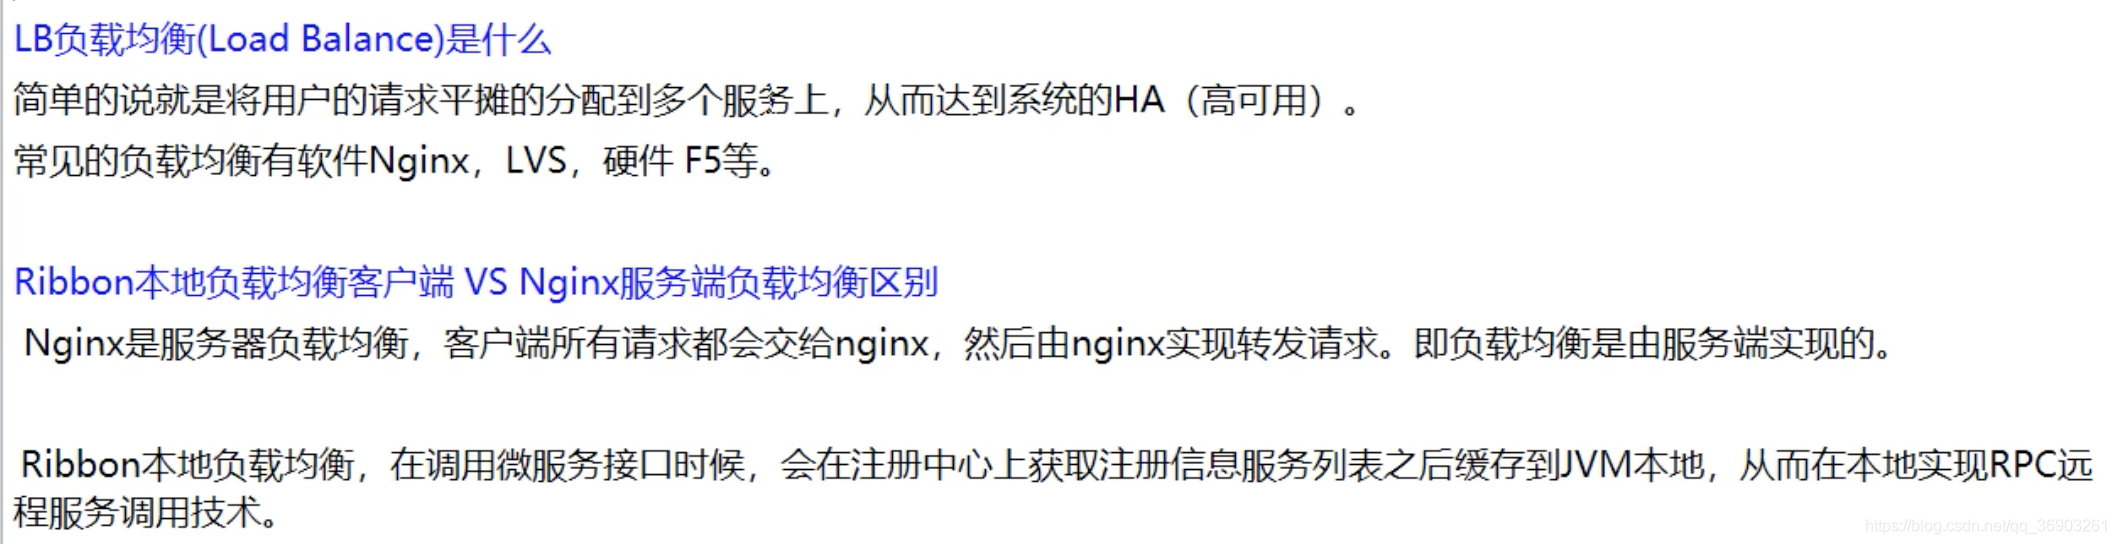
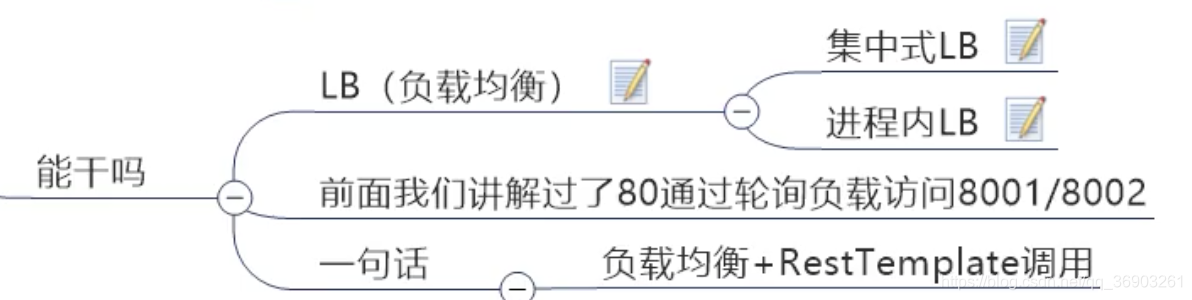


Ribbon(负载均衡+RestTemplate调用)
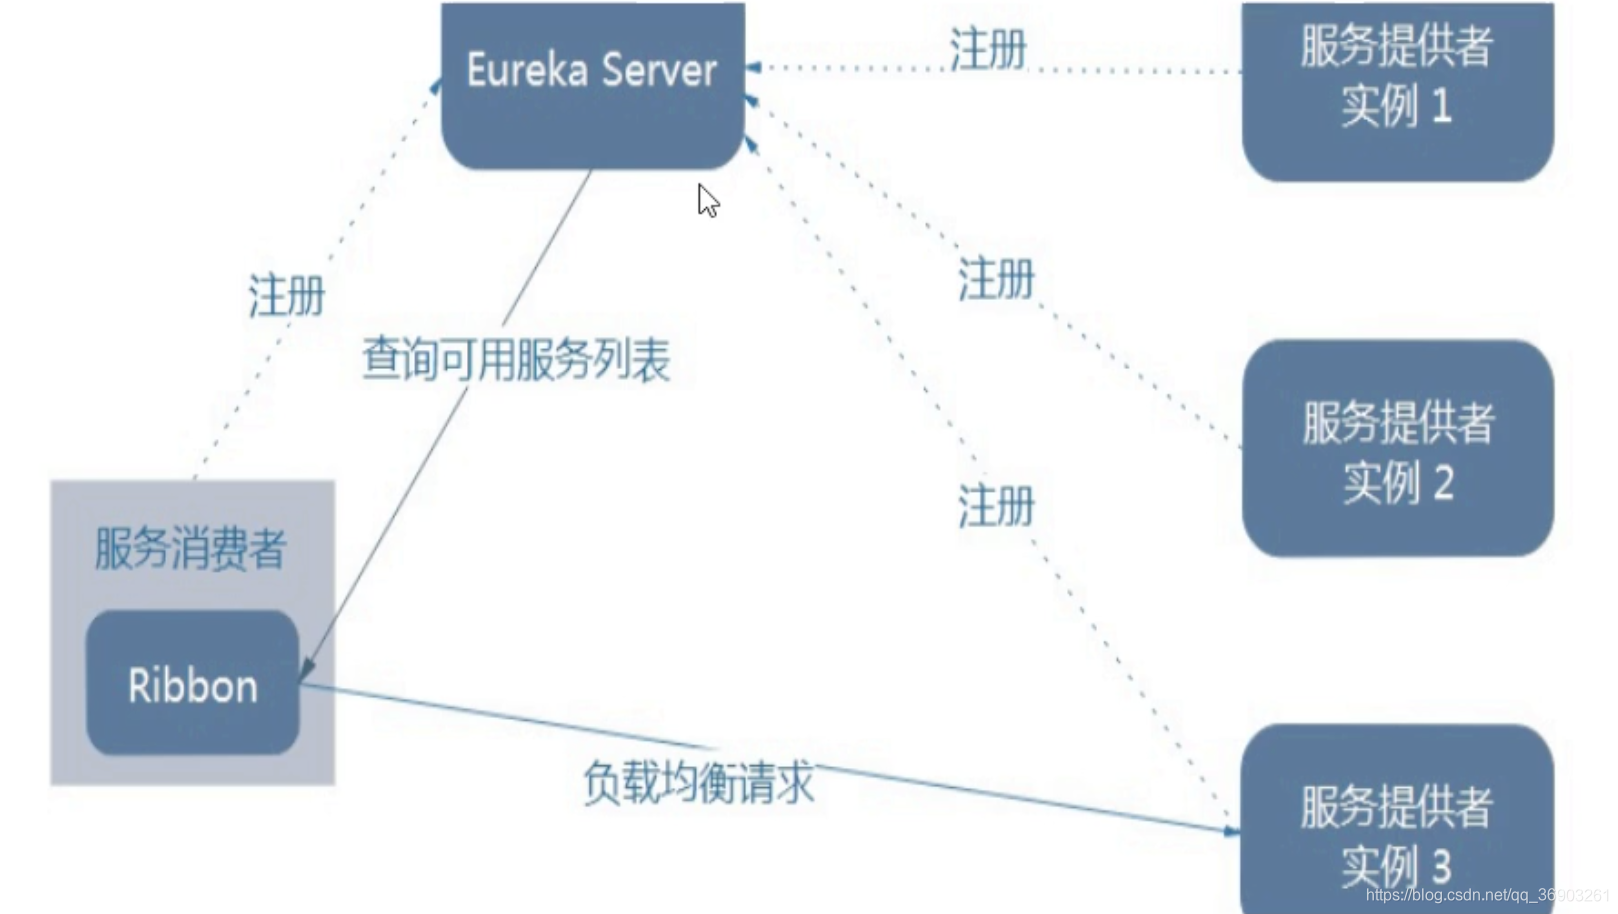
Ribbon是客户端(消费者)负载均衡的工具。


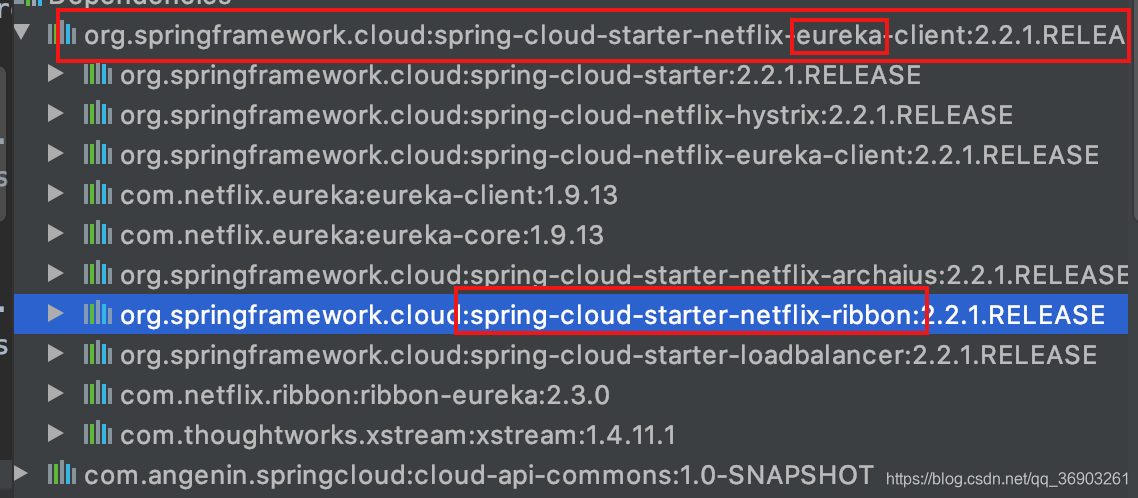
pom
  <!--Ribbon的依赖-->
  <dependency>
      <groupId>org.springframework.cloud</groupId>
      <artifactId>spring-cloud-starter-netflix-ribbon</artifactId>
 </dependency>
新版的eureka依赖以及集成了Ribbon依赖,所以可以不引用。
RestTemplate
@LoadBalanced注解给RestTemplate开启负载均衡的能力。
官方文档:https://docs.spring.io/spring-framework/docs/5.2.2.RELEASE/javadoc-api/org/springframework/web/client/RestTemplate.html
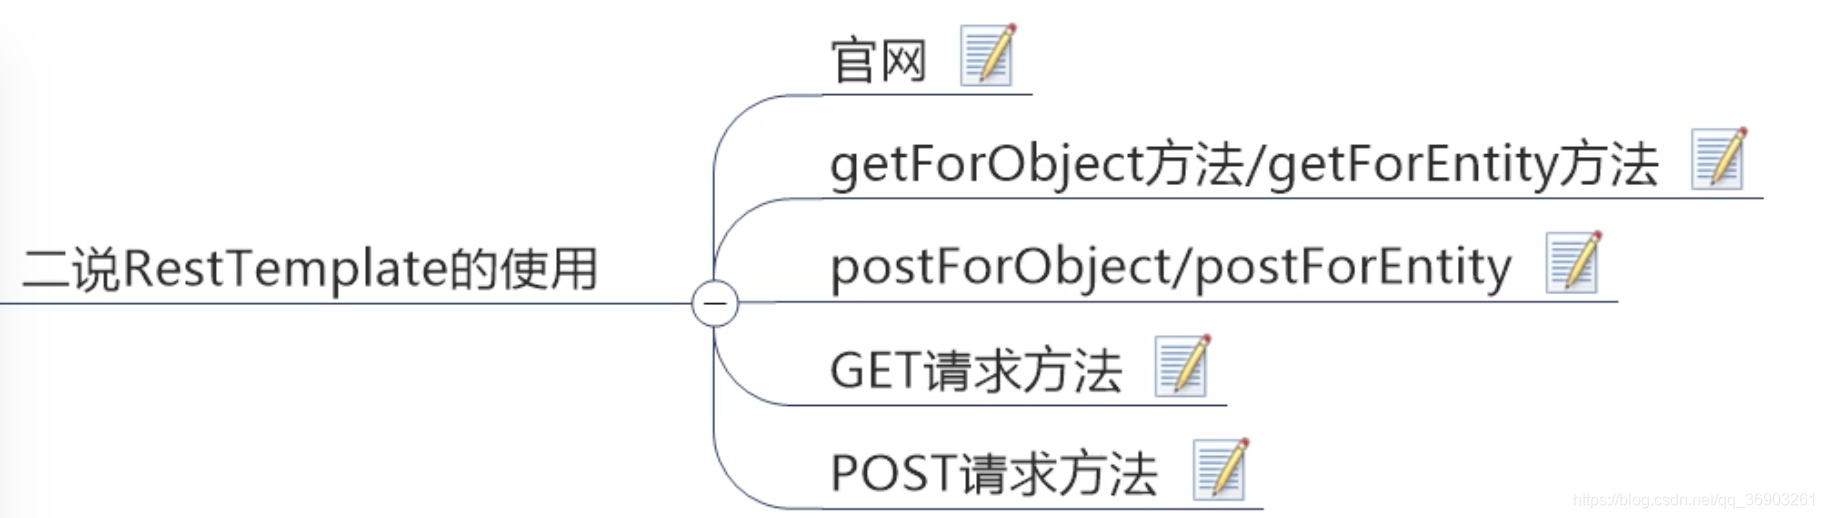
getForObject/getForEntity方法
前置可以理解返回json,后者包含响应一些重要信息:响应头、响应状态码、响应头等。。
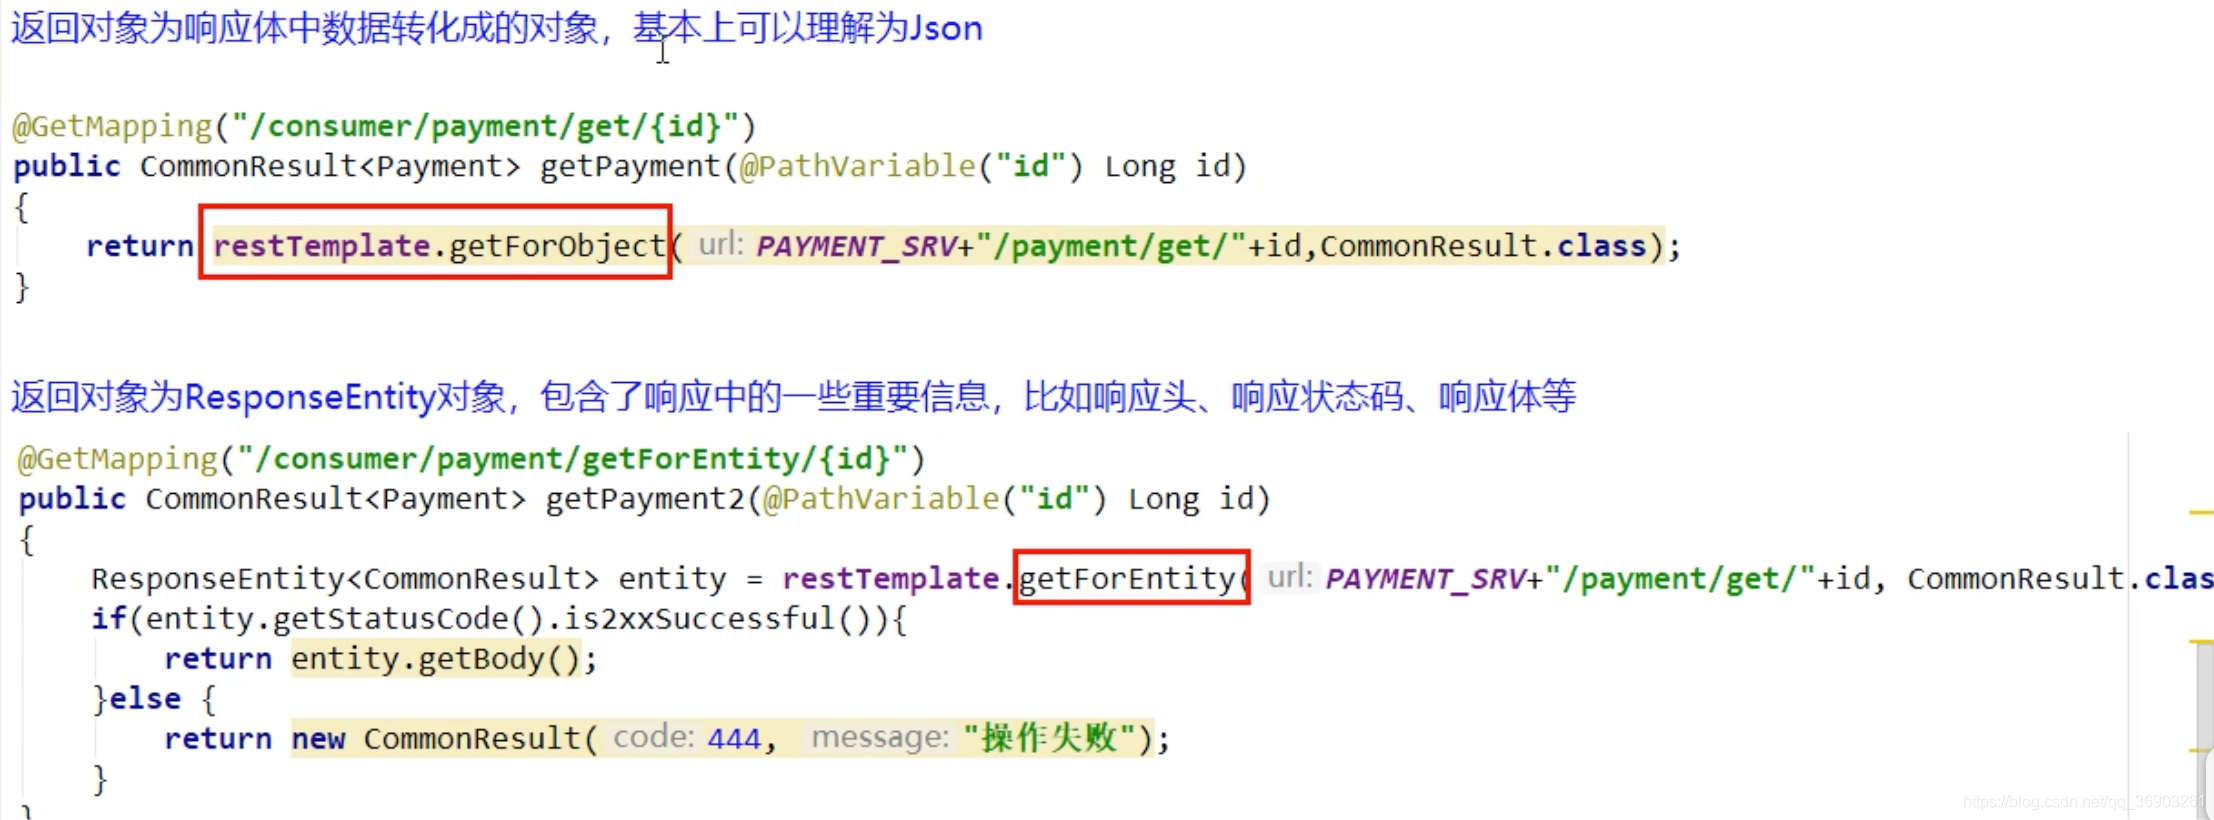
getForObject已经用过了,所以只测试getForEntity方法。
测试getForEntity方法
在消费者cloud-consumer-order80的OrderController方法中添加:
    @GetMapping("/consumer/payment/getForEntity/{id}")
    public CommonResult<Payment> getPayment2(@PathVariable("id")Long id){


        log.info("********查询的id:" + id);
        //getForObject两个参数:请求地址,返回的对象类型
//        return restTemplate.getForObject(PAYMENT_URL + "/payment/get/" + id, CommonResult.class);
        ResponseEntity<CommonResult> entity = restTemplate.getForEntity(PAYMENT_URL+"/payment/get/"+id,CommonResult.class);

        //getStatusCode获取状态码,is2xxSuccessful如果是状态码是2xx
        if (entity.getStatusCode().is2xxSuccessful()){


            return entity.getBody();//返回请求体
        }else {


            return new CommonResult<>(444,"操作失败");
        }

    }
然后启动eureka集群,提供者集群,消费者。(记得把eureka7001和提供者8001的yml文件改为集群环境(这个就这东西搞了我半小时,我就说怎么负载均衡不了了,只使用了8002))
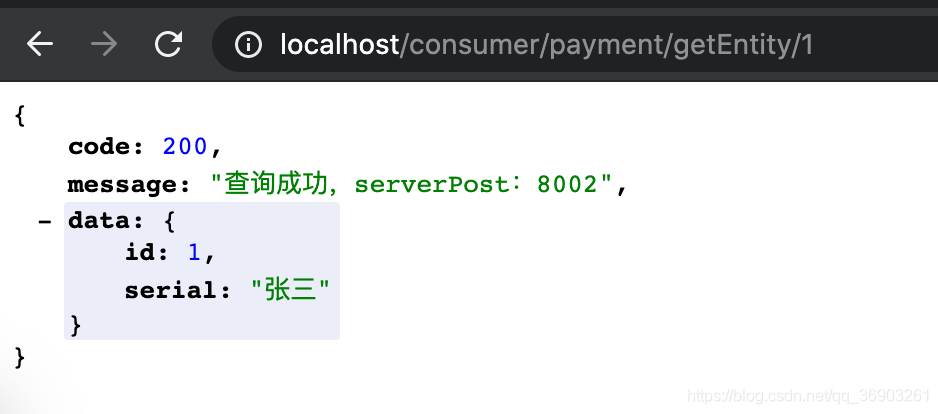
在浏览器输入http://localhost/consumer/payment/getForEntity/1
postForObject/postForEntity方法
    @GetMapping("/consumer/payment/addEntity")
    public CommonResult<Payment> add2(Payment payment){


        log.info("********插入的数据:" + payment);
        //postForObject分别有三个参数:请求地址,请求参数,返回的对象类型
//        return restTemplate.postForObject(PAYMENT_URL + "/payment/add", payment, CommonResult.class);
        ResponseEntity<CommonResult> entity = restTemplate.postForEntity(PAYMENT_URL + "/payment/add", payment, CommonResult.class);
        if(entity.getStatusCode().is2xxSuccessful()){


            return entity.getBody();
        }else{


            return new CommonResult<>(444, "操作失败");
        }
    }
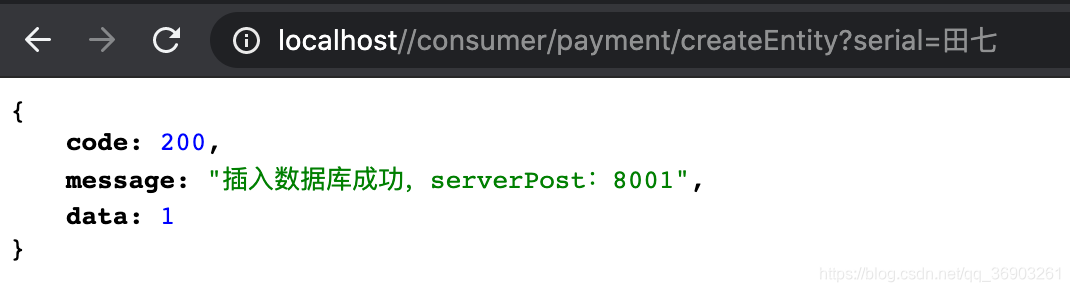
输入http://localhost/consumer/payment/addEntity?serial=田七,插入一条数据。
![[外链图片转存失败,源站可能有防盗链机制,建议将图片保存下来直接上传(img-wJI2wGwd-1612453589907)(C:\Users\PePe\AppData\Roaming\Typora\typora-user-images\image-20210204232051569.png)]](https://img-blog.csdnimg.cn/20210204234750597.png?x-oss-process=image/watermark,type_ZmFuZ3poZW5naGVpdGk,shadow_10,text_aHR0cHM6Ly9ibG9nLmNzZG4ubmV0L3FxXzQzMjg0NDY5,size_16,color_FFFFFF,t_70)
Ribbon核心组件IRUle
IRUle接口的实现类:
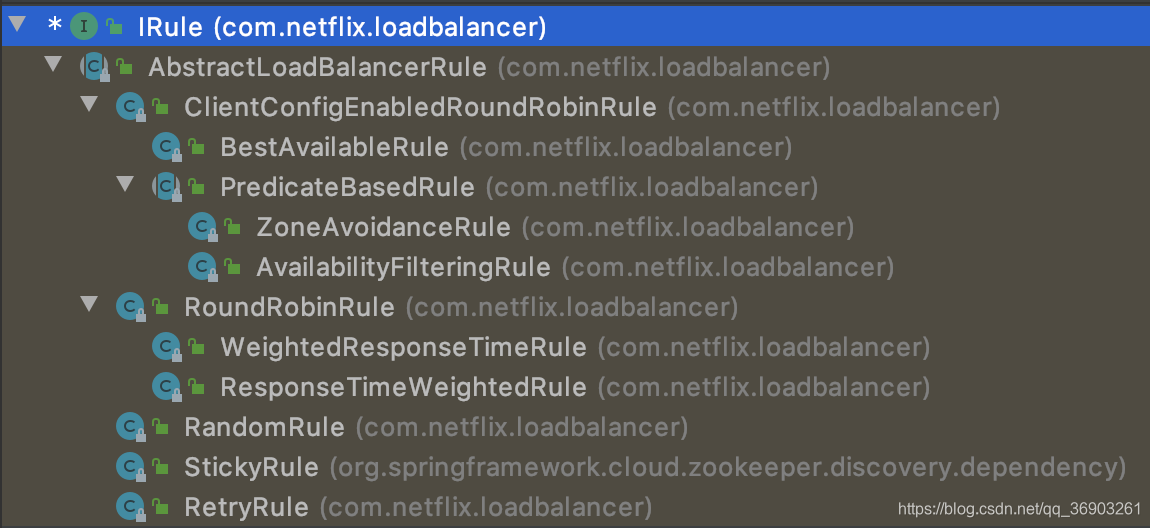
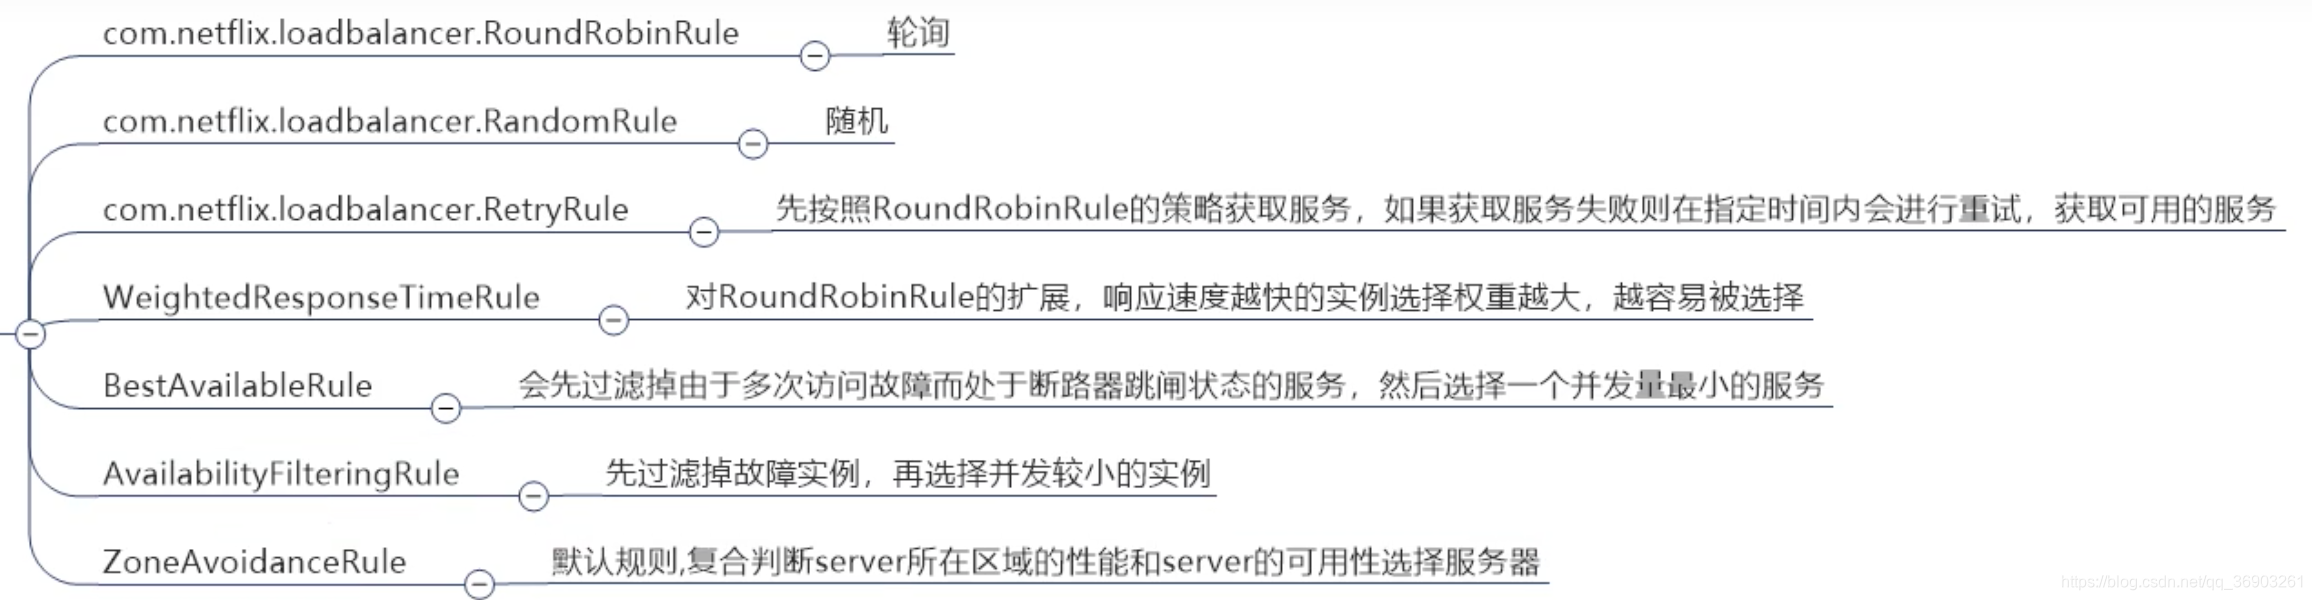
默认为RoundRobinRule轮询。
替换
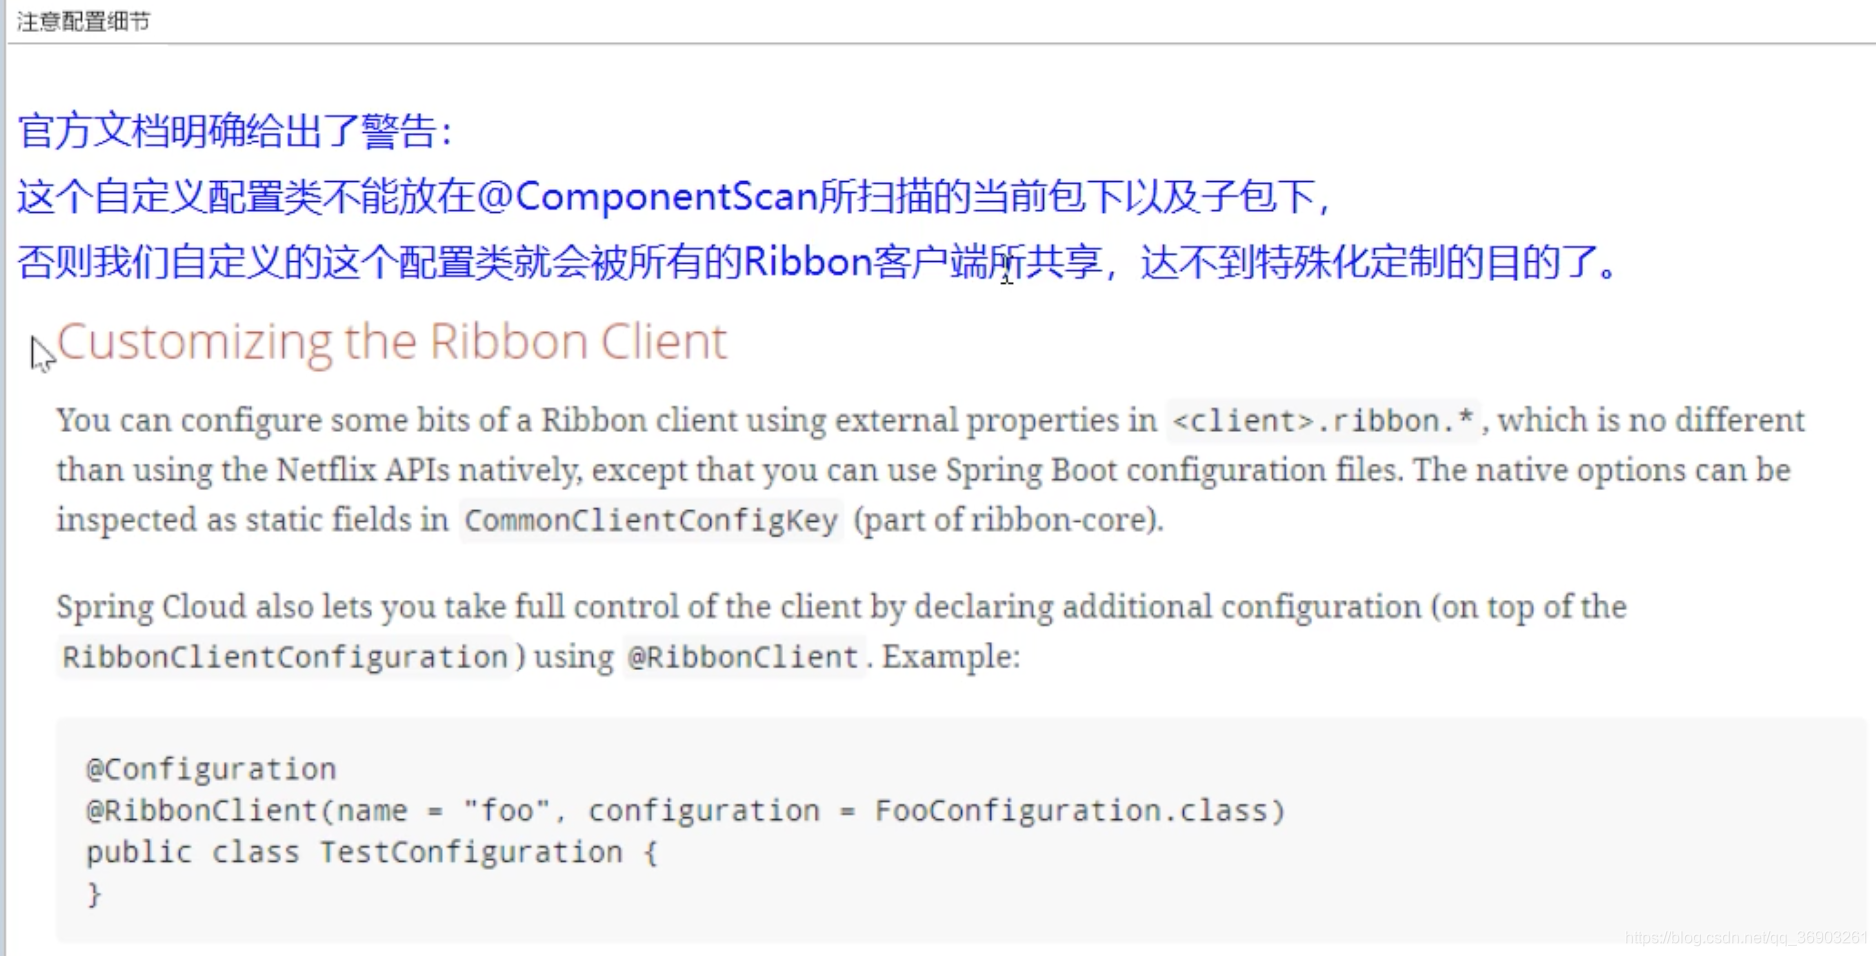
Ribbon的自定义配置类不可以放在@ComponentScan所扫描的当前包下以及子包下,否则这个自定义配置类就会被所有的Ribbon客户端共享,达不到为指定的Ribbon定制配置,而@SpringBootApplication注解里就有@ComponentScan注解,所以不可以放在主启动类所在的包下。(因为Ribbon是客户端(消费者)这边的,所以Ribbon的自定义配置类是在客户端(消费者)添加,不需要在提供者或注册中心添加)
1、所以Ribbon的自定义配置类不能放在springcloud包下,要在angenin包下再新建一个myrule包。
不然会被主启动类上面的@SpringBootApplication中的@ComponentScan所扫描的当前包下以及子包下扫到
![[外链图片转存失败,源站可能有防盗链机制,建议将图片保存下来直接上传(img-XQYgipgB-1612453589911)(C:\Users\PePe\AppData\Roaming\Typora\typora-user-images\image-20210204233016673.png)]](https://img-blog.csdnimg.cn/20210204234801467.png?x-oss-process=image/watermark,type_ZmFuZ3poZW5naGVpdGk,shadow_10,text_aHR0cHM6Ly9ibG9nLmNzZG4ubmV0L3FxXzQzMjg0NDY5,size_16,color_FFFFFF,t_70)
2、在此包下新建MySelfRule自定义配置类
@Configuration
public class MySelfRule {


    @Bean
    public IRule myRule(){


        //根据上面的各种实现类的负载机制,new一个你想要的返回,这里负载均衡机制改为随机
        return new RandomRule();
    }

}
3、在主启动类上添加@RibbonClient(name = "CLOUD-PAYMENT-SERVICE", configuration = MySelfRule.class)name为指定的服务名(服务名必须与注册中心显示的服务名大小写一致)configuration为指定服务使用自定义配置(自定义负载均衡机制)
我的服务是小写的,但我用小写无效,必须要使用大写,才能变成随机机制
@SpringBootApplication
@EnableEurekaClient
@RibbonClient(name = "CLOUD-PAYMENT-SERVICE", configuration = MySelfRule.class)
public class OrderMain80 {


    public static void main(String[] args) {


        SpringApplication.run(OrderMain80.class,args);
    }
}
4、启动eurekaserver集群,提供者集群,消费者。
5、浏览器输入http://localhost/consumer/payment/get/1,多次刷新实现负载均衡为随机。
Ribbon负载均衡——轮询算法
RoundRobinRule原理
取余
RoundRobinRule源码
RoundRobinRule的核心为choose方法:
public class RoundRobinRule extends AbstractLoadBalancerRule {


	//AtomicInteger原子整形类
    private AtomicInteger nextServerCyclicCounter;
	...
    public RoundRobinRule() {


    	//此时nextServerCyclicCounter是一个原子整形类,并且value为0
        nextServerCyclicCounter = new AtomicInteger(0);
    }
	...
	//ILoadBalancer选择的负载均衡机制,这里lb为轮询
    public Server choose(ILoadBalancer lb, Object key) {


    	//如果传入的lb没有负载均衡,为空
        if (lb == null) {


            log.warn("no load balancer");
            return null;
        }

        Server server = null;
        int count = 0;
        //还没选到执行的server,并且选择的次数没超过10次,进行选择server
        while (server == null && count++ < 10) {


        	//lb.getReachableServers获取所有状态是up的服务实例
            List<Server> reachableServers = lb.getReachableServers();
            //lb.getAllServers获取所有服务实例
            List<Server> allServers = lb.getAllServers();
            //状态为up的服务实例的数量
            int upCount = reachableServers.size();
            //所有服务实例的数量
            int serverCount = allServers.size();

			//如果up的服务实例数量为0或者服务实例为0,打印日志log.warn并返回server=null
            if ((upCount == 0) || (serverCount == 0)) {


                log.warn("No up servers available from load balancer: " + lb);
                return null;
            }

			//获取到接下来server的下标
            int nextServerIndex = incrementAndGetModulo(serverCount);
            //获取下一个server
            server = allServers.get(nextServerIndex);

			//如果
            if (server == null) {


                //线程让步,线程会让出CPU执行权,让自己或者其它的线程运行。(让步后,CPU的执行权也有可能又是当前线程)
                Thread.yield();
                //进入下次循环
                continue;
            }

			//获取的server还活着并且还能工作,则返回该server
            if (server.isAlive() && (server.isReadyToServe())) {


                return (server);
            }

            //否则server改为空
            server = null;
        }

		//选择次数超过10次,打印日志log.warn并返回server=null
        if (count >= 10) {


            log.warn("No available alive servers after 10 tries from load balancer: "
                    + lb);
        }
        return server;
    }


    private int incrementAndGetModulo(int modulo) {


    	//CAS加自旋锁
    	//CAS(Conmpare And Swap):是用于实现多线程同步的原子指令。CAS机制当中使用了3个基本操作数:内存地址V,旧的预期值A,要修改的新值B。更新一个变量的时候,只有当变量的预期值A和内存地址V当中的实际值相同时,才会将内存地址V对应的值修改为B。
    	//自旋锁:是指当一个线程在获取锁的时候,如果锁已经被其它线程获取,那么该线程将循环等待,然后不断的判断锁是否能够被成功获取,直到获取到锁才会退出循环。
        for (;;) {


        	//获取value,即0
            int current = nextServerCyclicCounter.get();
            //取余,为1
            int next = (current + 1) % modulo;
            //进行CAS判断,如果此时在value的内存地址中,如果value和current相同,则为true,返回next的值,否则就一直循环,直到结果为true
            if (nextServerCyclicCounter.compareAndSet(current, next))
                return next;
        }
    }
    ...
}
AtomicInteger的compareAndSet方法:
public class AtomicInteger extends Number implements java.io.Serializable {


	...
    public final boolean compareAndSet(int expect, int update) {


        return unsafe.compareAndSwapInt(this, valueOffset, expect, update);
    }
    ...
}
手写一个轮询自定义配置类
8001和8002微服务改造
在8001和8002的PaymentController中加上这个方法,用于测试我们的自定义轮询:
@GetMapping("/payment/lb")
public String getPaymentLB(){


    return serverPort;
}
80订单微服务改造
-
去掉ApplicationContextConfig里restTemplate方法上的@LoadBalanced注解。
-
在springcloud包下新建lb.ILoadBalancer接口(自定义负载均衡机制(面向接口))
public interface ILoadBalancer { //传入具体实例的集合,返回选中的实例 ServiceInstance instances(List<ServiceInstance> serviceInstance); } -
在lb包下新建自定义ILoadBalancer接口的实现类
@Component  //加入容器
public class MyLB implements ILoadBalancer {


    //新建一个原子整形类
    private AtomicInteger atomicInteger = new AtomicInteger(0);

    //
    public final int getAndIncrement(){


        int current;
        int next;
        do{


            current = this.atomicInteger.get();
            //如果current是最大值,重新计算,否则加1(防止越界)
            next = current >=2147483647 ? 0 : current + 1;

        //进行CAS判断,如果不为true,进行自旋
        }while (!this.atomicInteger.compareAndSet(current, next));
        System.out.println("****第几次访问,次数next:" + next);

        return next;
    }

    @Override
    public ServiceInstance instances(List<ServiceInstance> serviceInstance) {


        //非空判断
        if(serviceInstance.size() <= 0){


            return null;
        }
        //进行取余
        int index = getAndIncrement() % serviceInstance.size();
        //返回选中的服务实例
        return serviceInstance.get(index);
    }
}
4、在OrderController添加自己上面写的组件:
    @Resource
    private ILoadBalancer iLoadBalancer;
    @Resource
    private DiscoveryClient discoveryClient;

    @GetMapping("/consumer/payment/lb")
    public String getPaymentLB(){


        List<ServiceInstance> instances = discoveryClient.getInstances("CLOUD-PAYMENT-SERVICE");

        //判断服务有效
        if (instances ==null || instances.size() <=0){


            return null;
        }
        ServiceInstance serviceInstance = loadBalancer.instances(instances);

        URI uri = serviceInstance.getUri();
        System.out.println(uri);

        return restTemplate.getForObject(uri+"/payment/lb",String.class);

    }
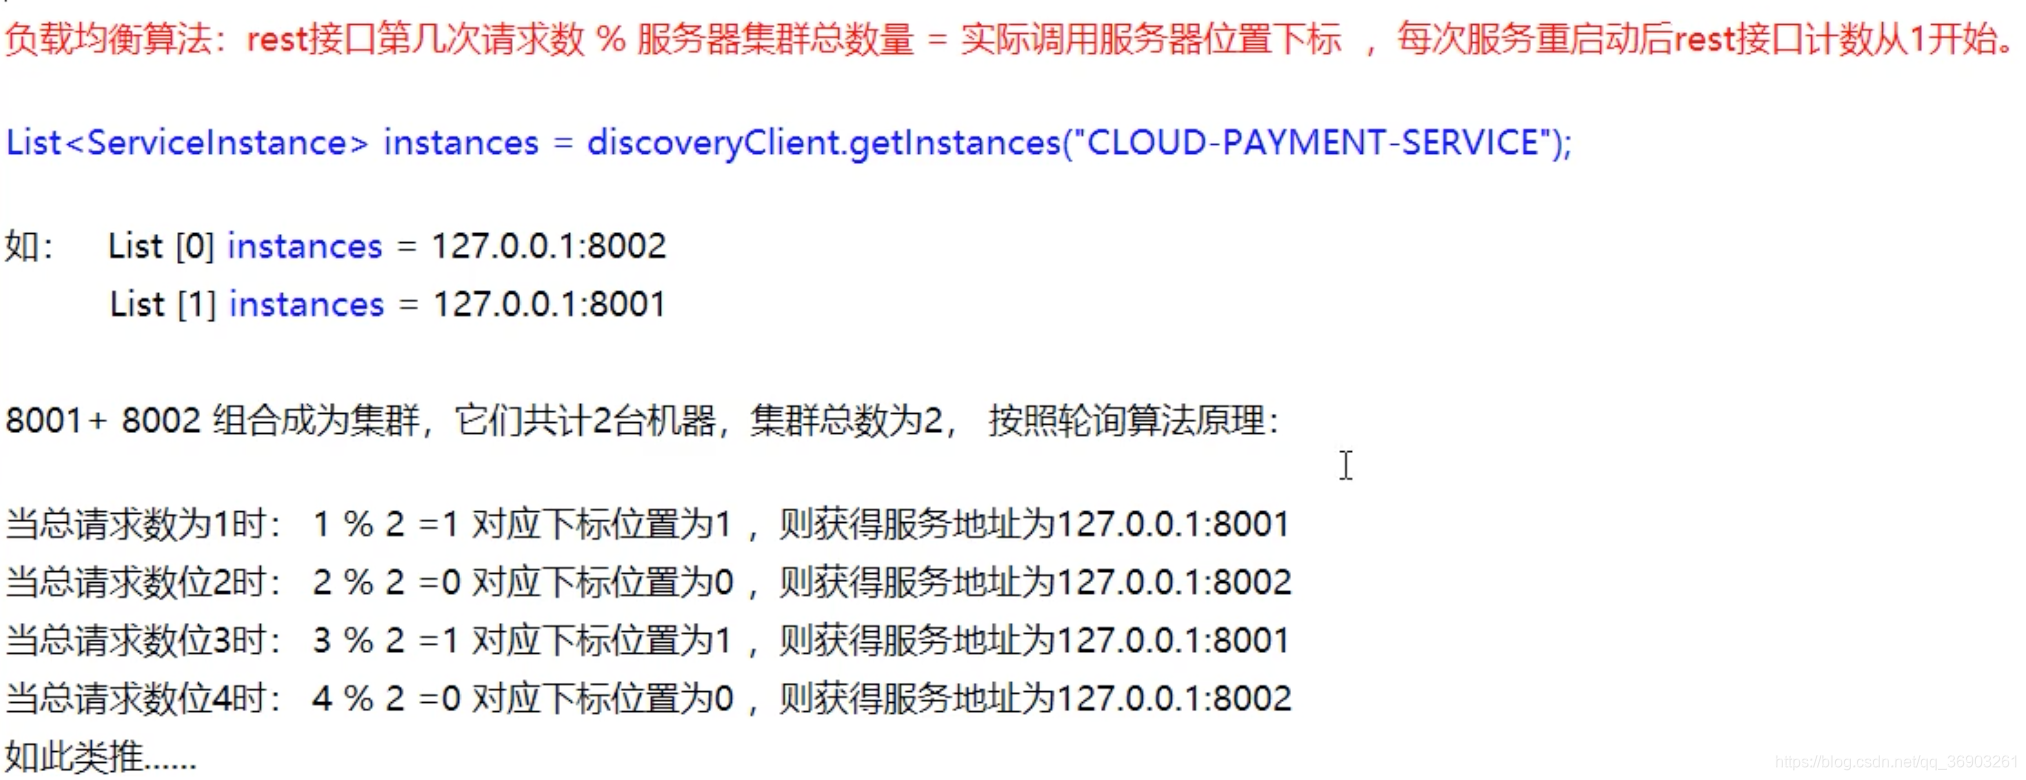
5、启动server集群,提供者集群,80消费者,然后在浏览器中输入http://localhost/consumer/payment/lb,多次刷新,实现自定义轮询。
![[外链图片转存失败,源站可能有防盗链机制,建议将图片保存下来直接上传(img-R8T0SHsV-1612536477676)(C:\Users\PePe\AppData\Roaming\Typora\typora-user-images\image-20210205224651765.png)]](https://img-blog.csdnimg.cn/20210205224822543.png?x-oss-process=image/watermark,type_ZmFuZ3poZW5naGVpdGk,shadow_10,text_aHR0cHM6Ly9ibG9nLmNzZG4ubmV0L3FxXzQzMjg0NDY5,size_16,color_FFFFFF,t_70)
九、OpenFeign服务接口调用
简介
官网文档:https://cloud.spring.io/spring-cloud-static/Hoxton.SR1/reference/htmlsingle/#spring-cloud-openfeign
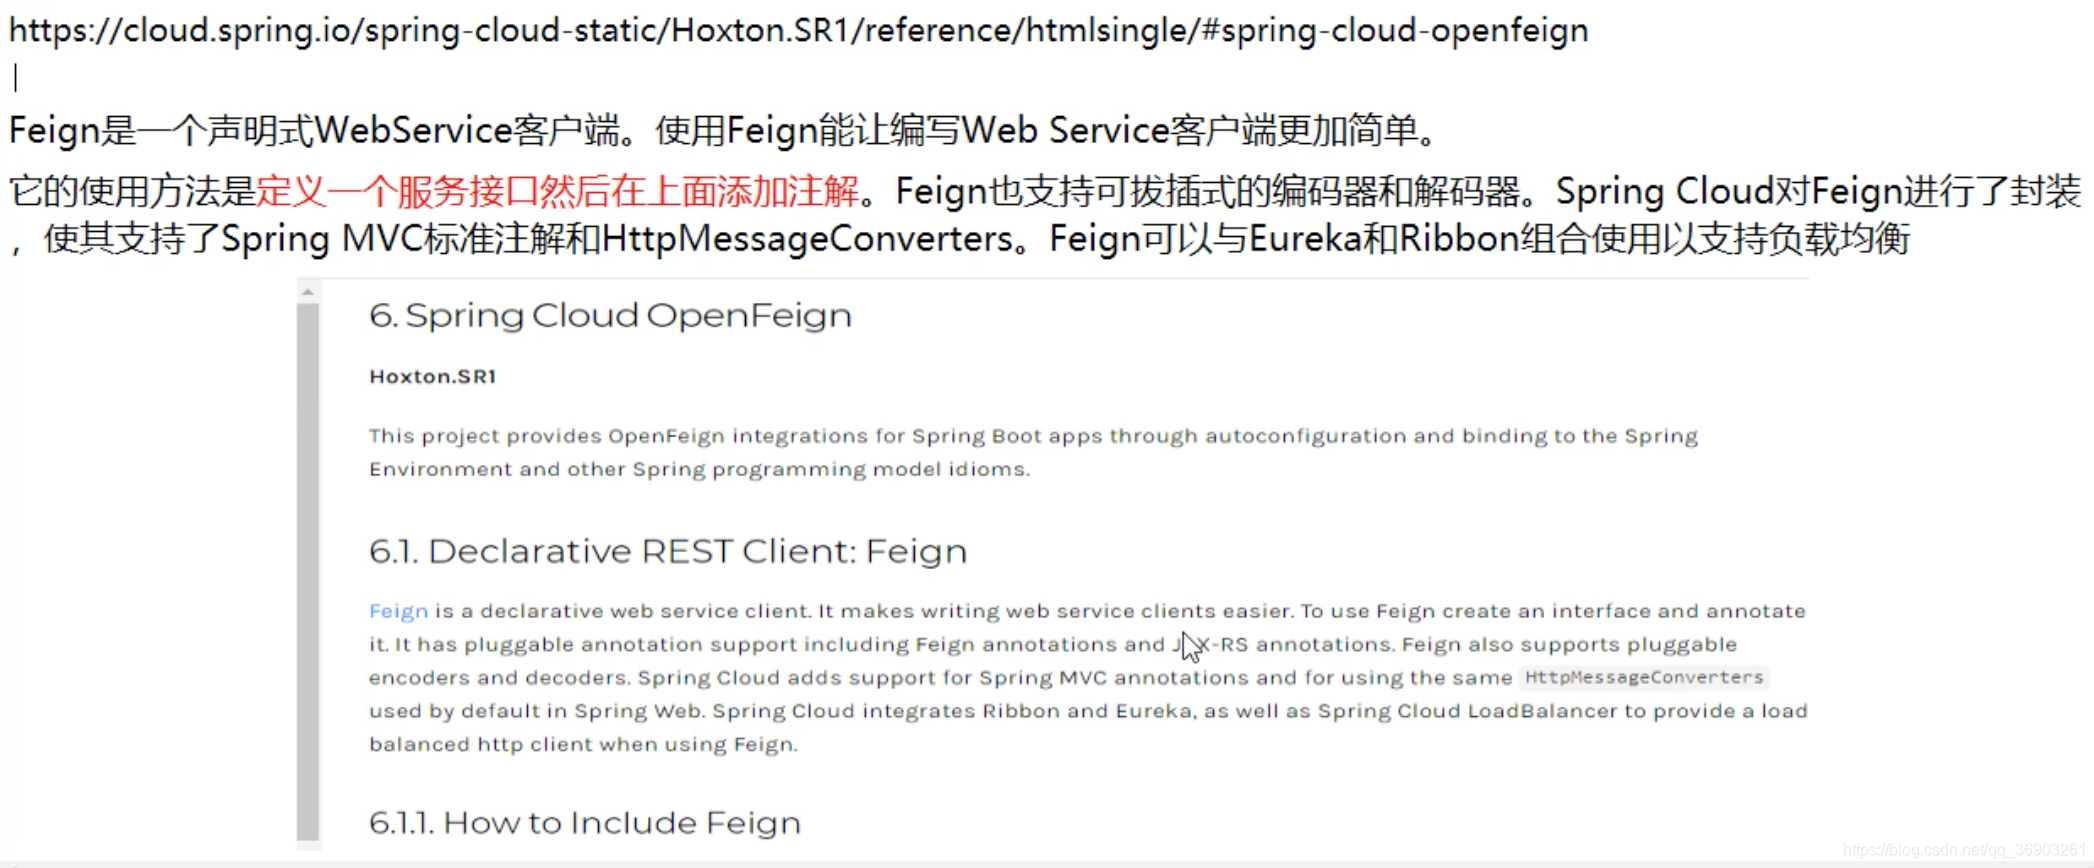
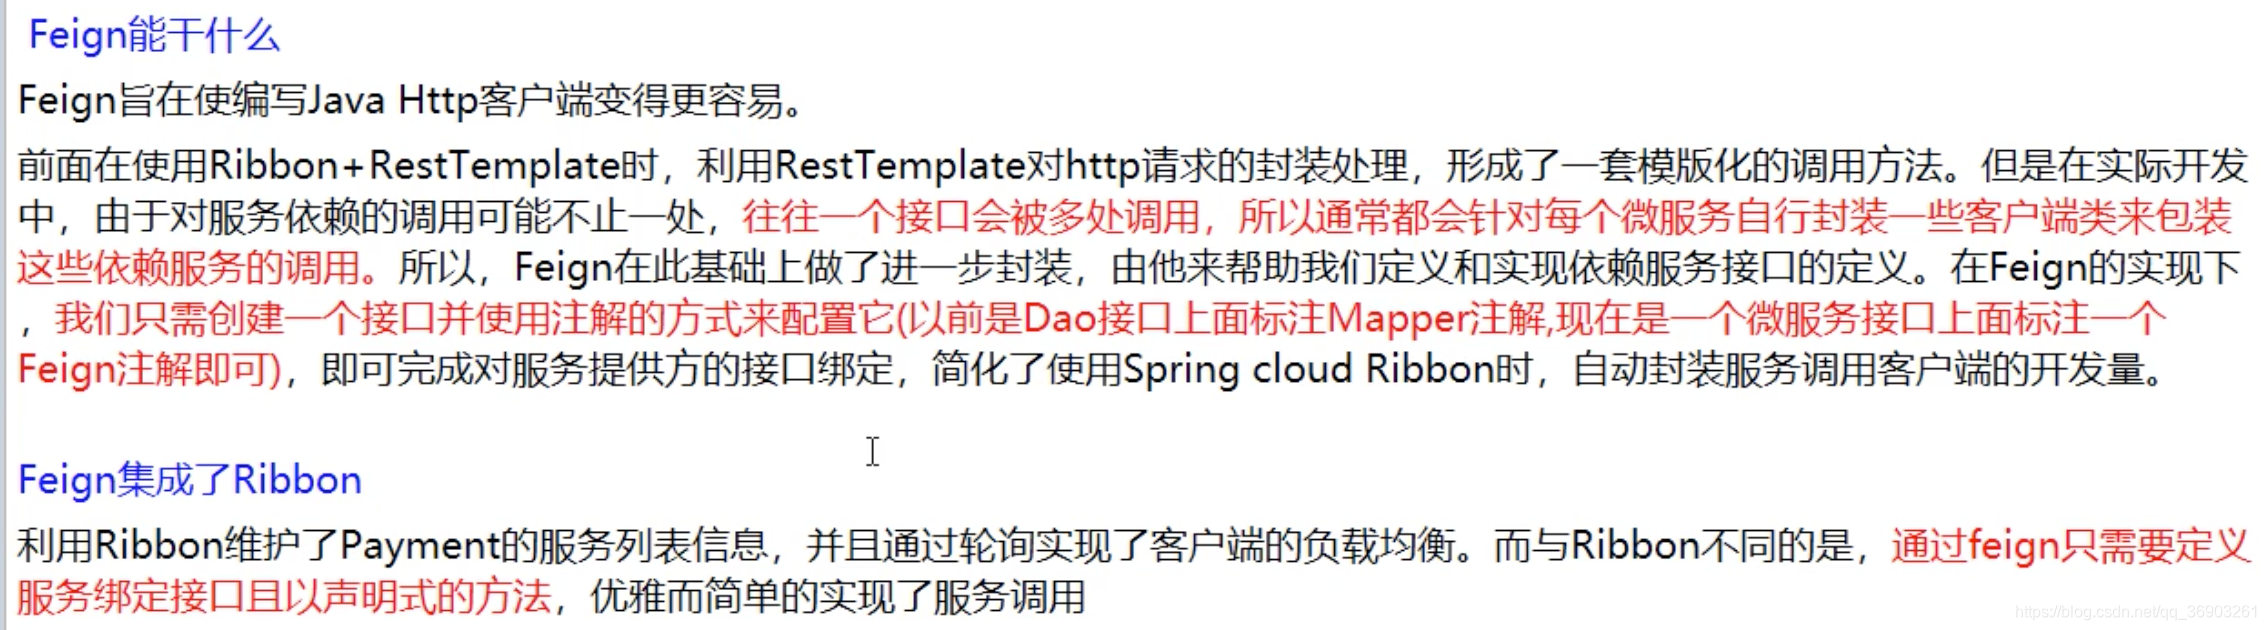
Feign是一个声明式的web服务客户端,让编写web服务客户端变得非常容易,只需创建一个接口并在接口上添加注解即可。
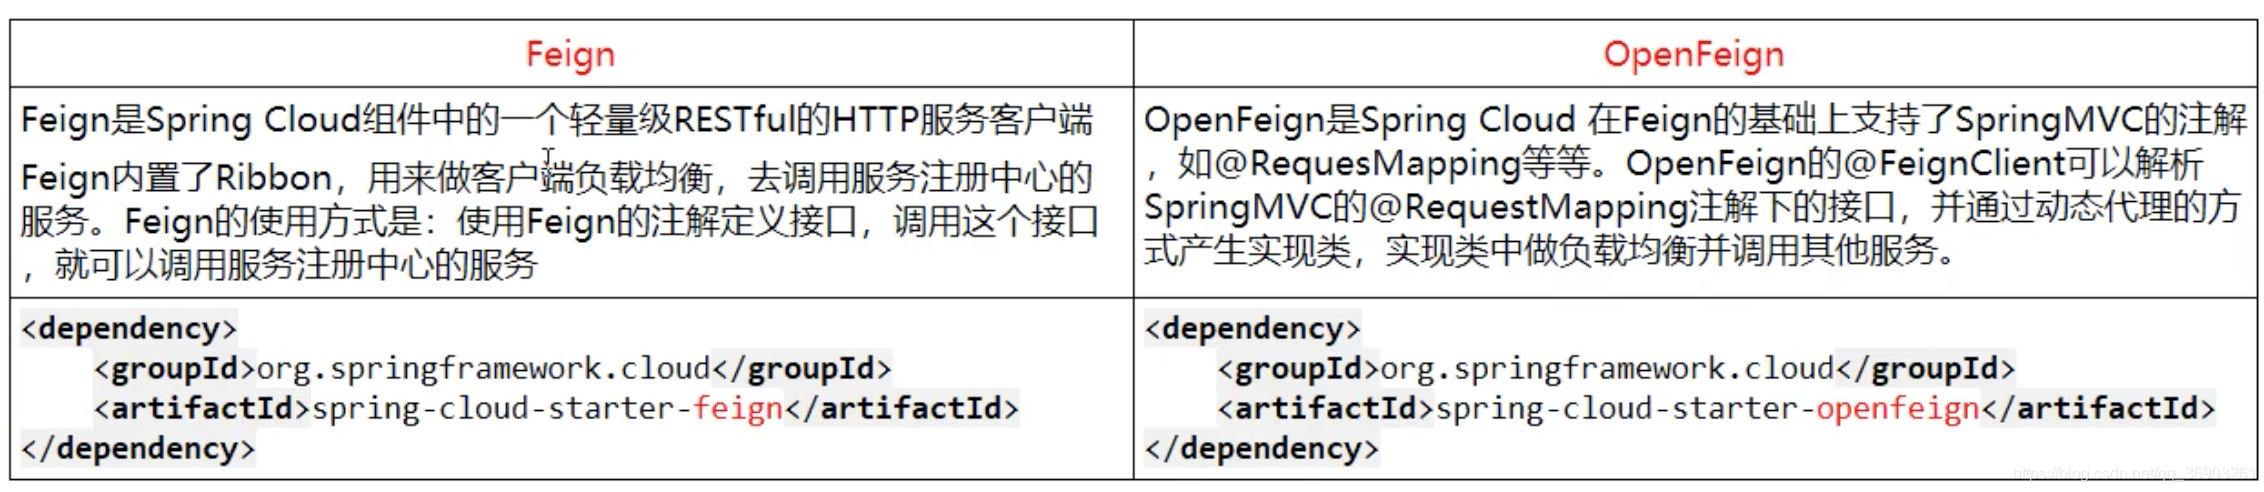
Feign与OpenFeign的区别
OpenFeign的使用(也是在消费者端)
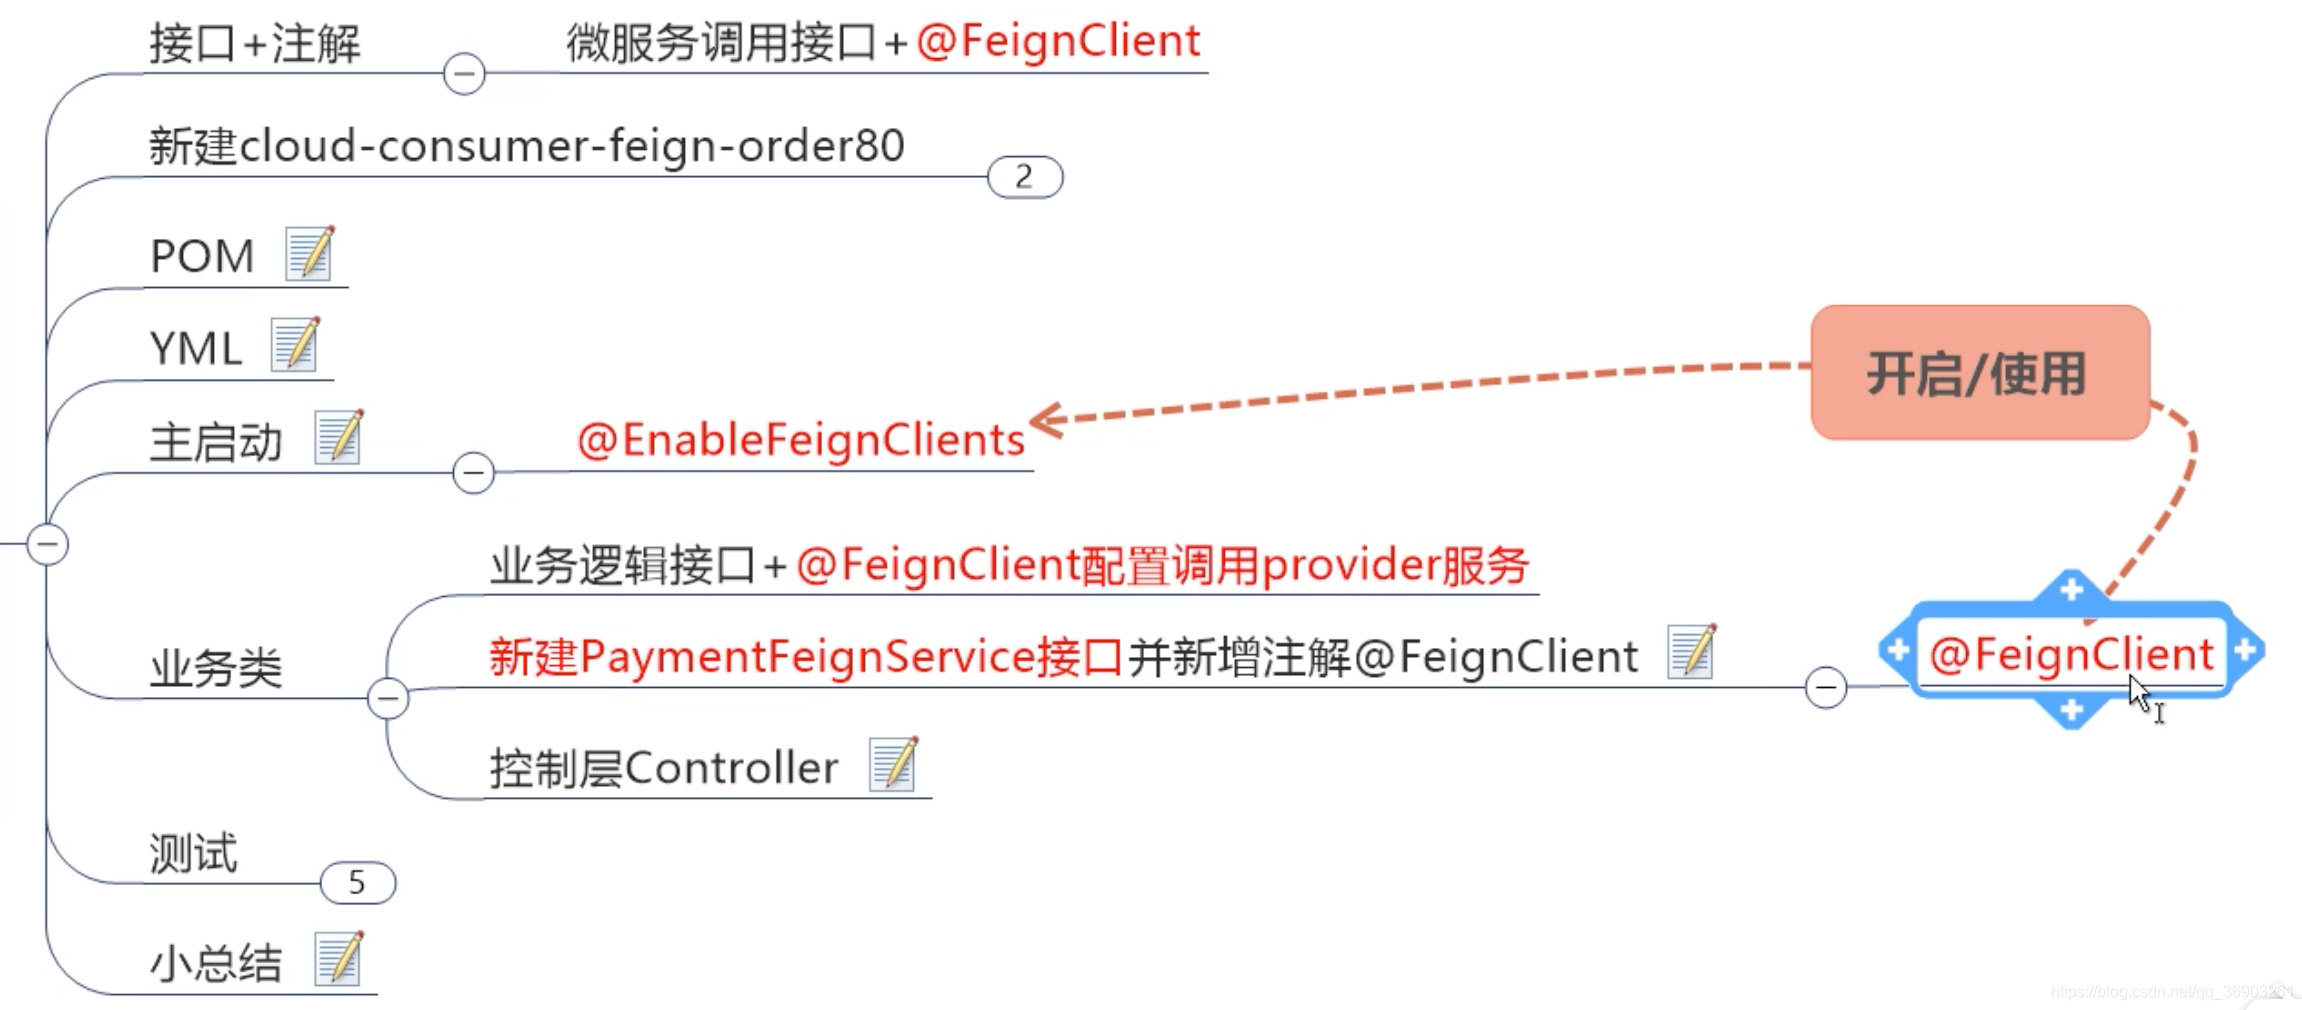
-
新建模块cloud-consumer-feign-order80
-
pom
<dependencies> <!-- openfeign --> <dependency> <groupId>org.springframework.cloud</groupId> <artifactId>spring-cloud-starter-openfeign</artifactId> </dependency> <!-- eureka-client --> <dependency> <groupId>org.springframework.cloud</groupId> <artifactId>spring-cloud-starter-netflix-eureka-client</artifactId> </dependency> <!-- 引用自己定义的api通用包,可以使用Payment支付Entity --> <dependency> <groupId>com.angenin.springcloud</groupId> <artifactId>cloud-api-commons</artifactId> <version>${project.version}</version> </dependency> <dependency> <groupId>org.springframework.boot</groupId> <artifactId>spring-boot-starter-web</artifactId> </dependency> <dependency> <groupId>org.springframework.boot</groupId> <artifactId>spring-boot-starter-actuator</artifactId> </dependency> <!--热部署--> <dependency> <groupId>org.springframework.boot</groupId> <artifactId>spring-boot-devtools</artifactId> <scope>runtime</scope> <optional>true</optional> </dependency> <dependency> <groupId>org.projectlombok</groupId> <artifactId>lombok</artifactId> <optional>true</optional> </dependency> <dependency> <groupId>org.springframework.boot</groupId> <artifactId>spring-boot-starter-test</artifactId> <scope>test</scope> </dependency> </dependencies> -
yml
server: port: 80 eureka: client: register-with-eureka: true service-url: #defaultZone: http://eureka7001.com:7001/eureka defaultZone: http://eureka7001.com:7001/eureka,http://eureka7002.com:7002/eureka,http://eureka7003.com:7003/eureka -
主启动类
@EnableFeignClients //激活并开启Feign @SpringBootApplication public class OrderFeignMain80 { public static void main(String[] args) { SpringApplication.run(OrderFeignMain80.class,args); } } -
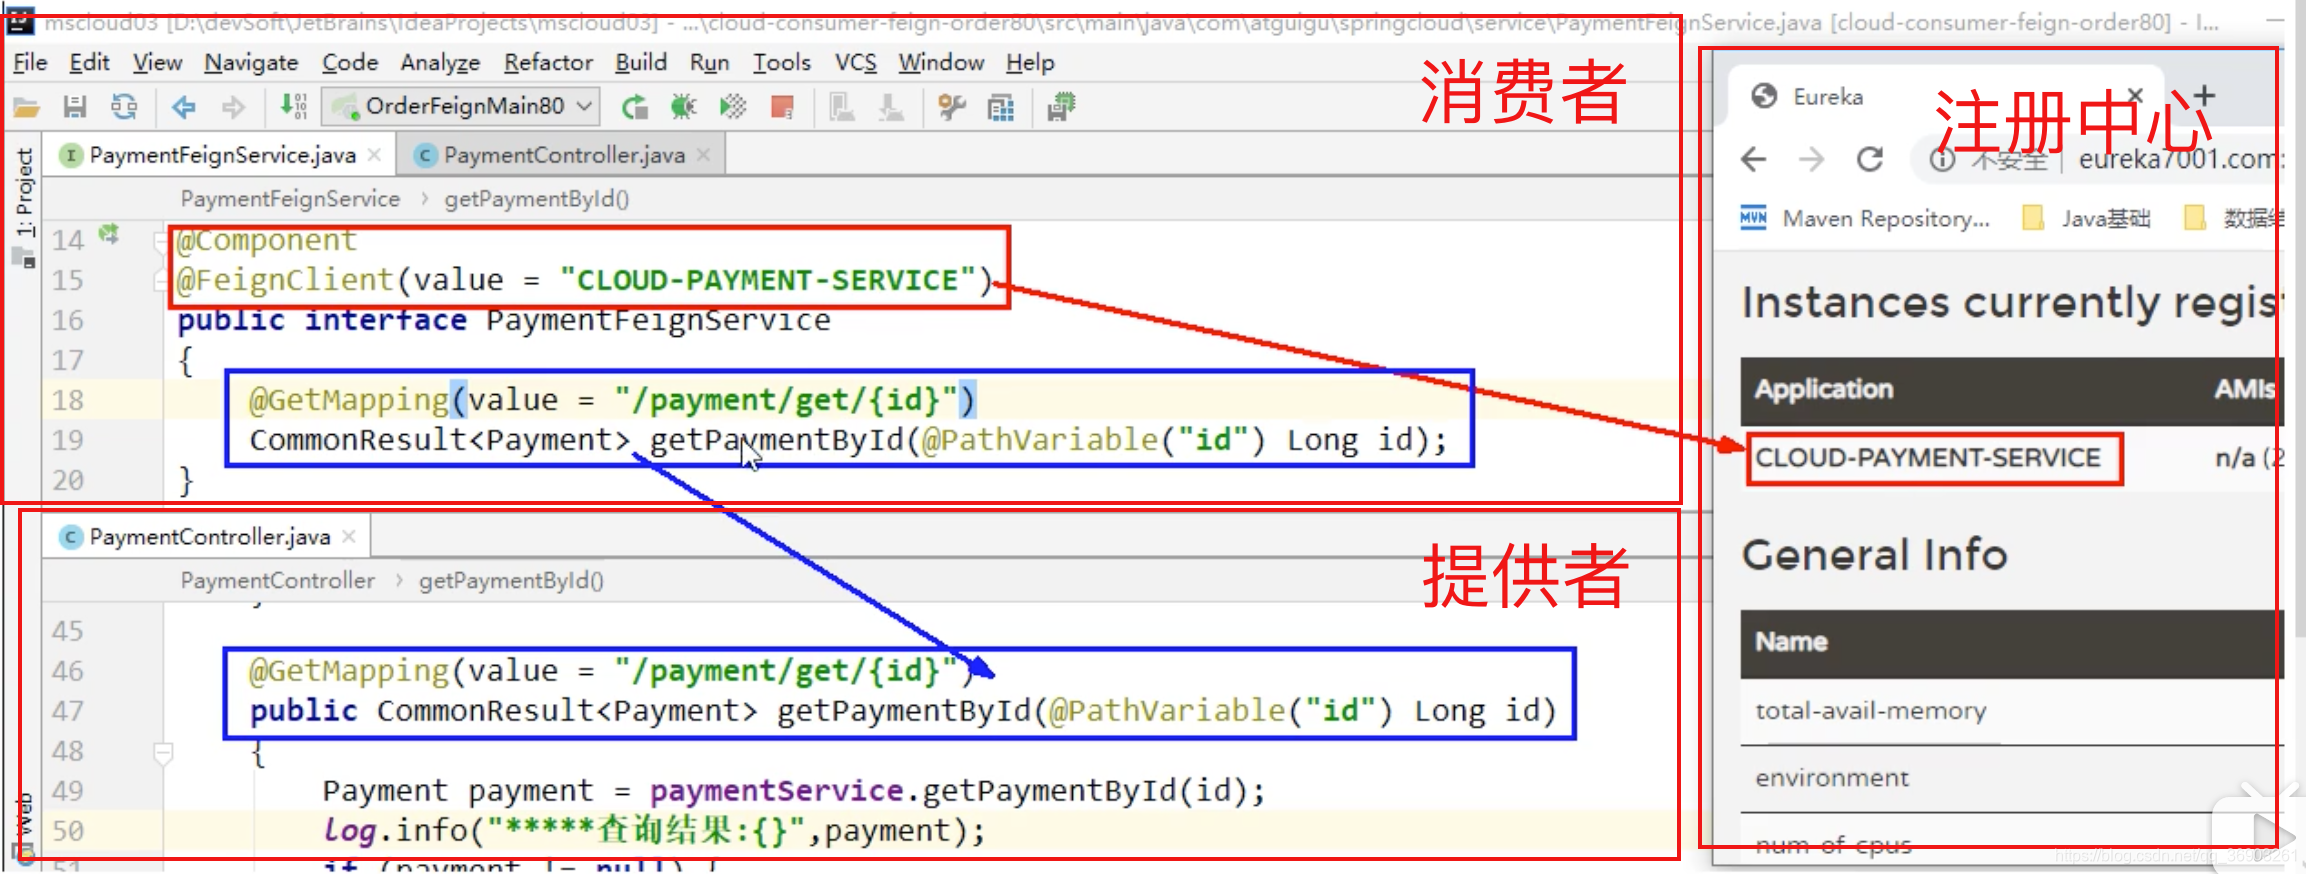
在springcloud包下新建service.PaymentFeignService接口
(业务逻辑接口+@FeignClient配置调用provider服务。)新建PaymentFeignService接口并新增注解@FeignClient
//Feign封装了Ribbon和RestTemplate,实现负载均衡和发送请求 @FeignClient(value = "cloud-payment-service") //告知Feign去eureka上找cloud-payment-service名字的微服务 @Service public interface PaymentFeignService { @GetMapping(value = "/payment/get/{id}")// value值为调用地址 public CommonResult getPaymentById(@PathVariable("id")Long id); } -
在springcloud包下新建controller.OrderFeignController
@RestController @Slf4j //日志 public class PaymentFeignController { @Resource private PaymentFeignService paymentFeignService; @GetMapping("/consumer/payment/get/{id}") public CommonResult<Payment> getPayment(@PathVariable("id")Long id){ log.info("********查询的id:" + id); return paymentFeignService.getPaymentById(id); } } -
按照顺序启动项目(server集群,提供者集群,消费者),然后在浏览器输入
http://localhost/consumer/payment/get/1,成功查询到数据,并且有负载均衡(轮询)。
总结:
controller调用feign的接口服务,然后feign接口服务上用@FeignClient(value=“”)指定是调用哪个微服务提供者,下面的@GetMapping等指定具体的哪个服务地址,他就会自动具有负载均衡,且在注册中心去寻找指定的提供者的服务。
消费者和提供者的@getmapping地址要求一致,不然无法调用
OpenFeign超时控制
提供者在处理服务时用了3秒,提供者认为花3秒是正常,而消费者只愿意等1秒,1秒后,提供者会没返回数据,消费者就会造成超时调用报错。
所以需要双方约定好时间,不使用默认的。
模拟超时出错的情况
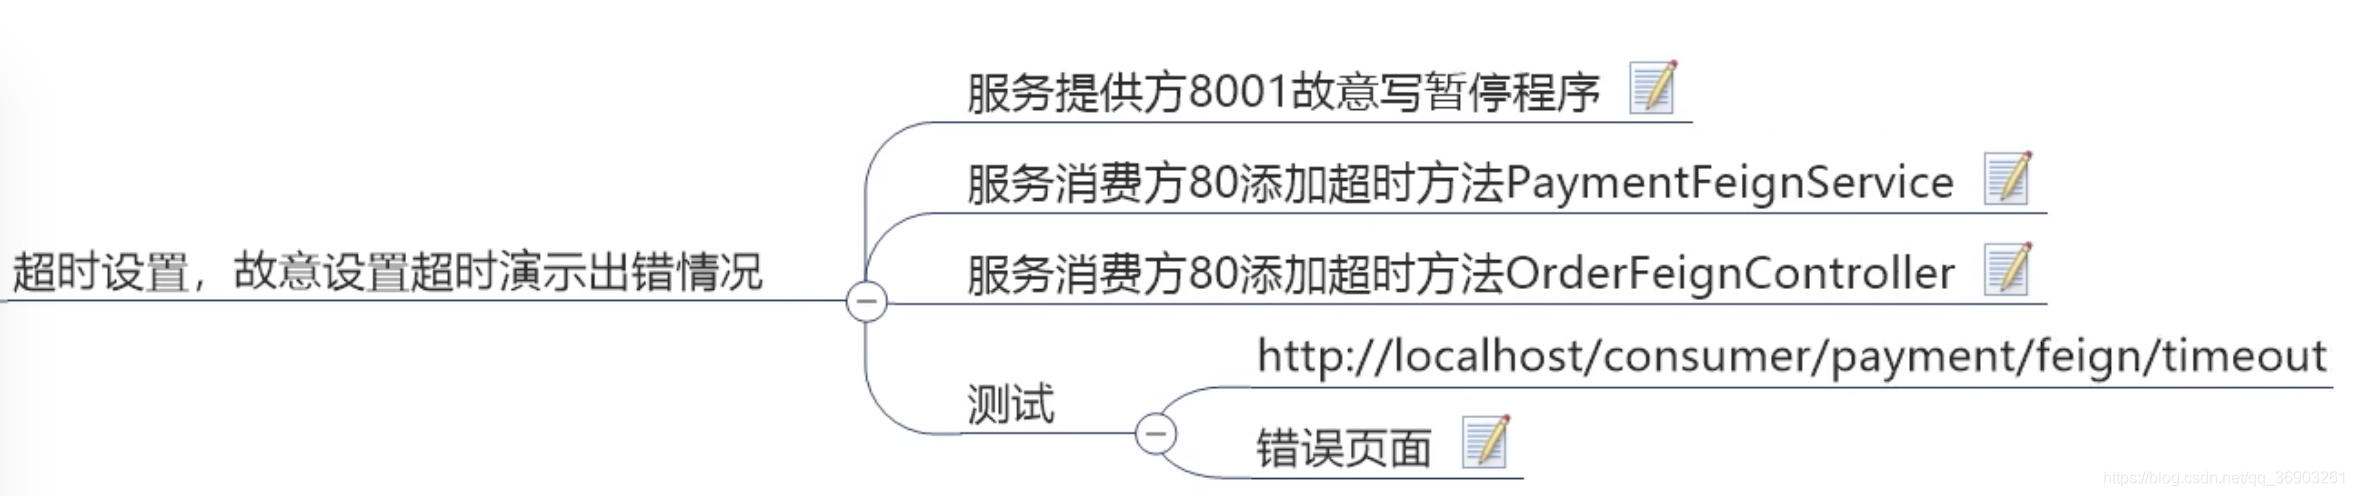
-
在8001的PaymentController里添加:(模拟服务处理时间长)
@GetMapping("/payment/feign/timeout") public String paymentFeignTimeout(){ try { TimeUnit.SECONDS.sleep(3); } catch (InterruptedException e) { e.printStackTrace(); } return serverPort; } -
在80的PaymentFeignService中添加:
@GetMapping("/payment/feign/timeout") public String paymentFeignTimeout(); -
然后在80的OrderFeignController中添加:
@GetMapping("/consumer/payment/feign/timeout") public String paymentFeignTimeout(){ //openFeign-ribbon,客户端一般默认等待1秒 return paymentFeignService.paymentFeignTimeout(); } -
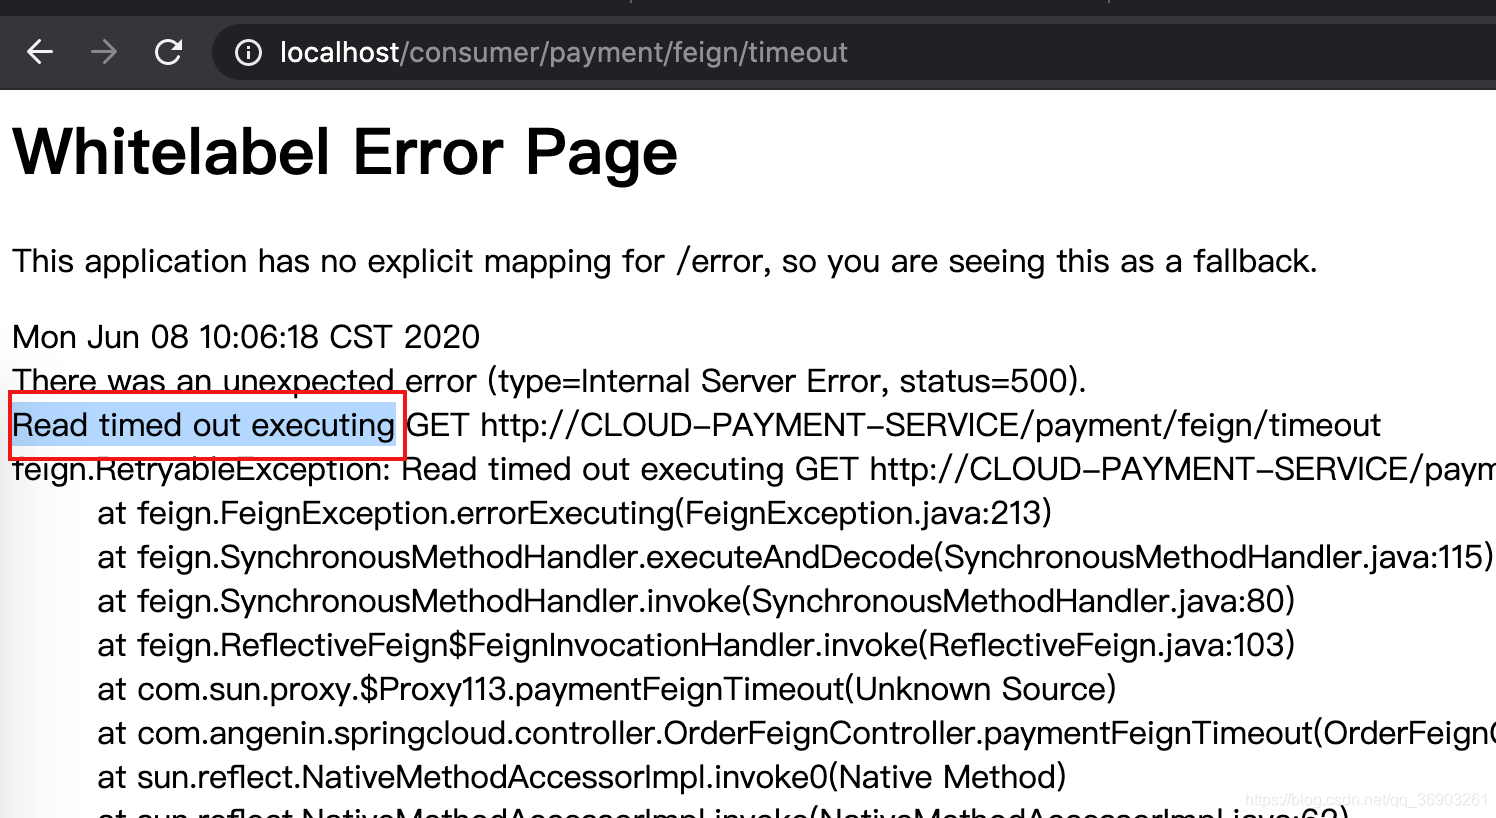
启动server集群,提供者8001,消费者80
http://localhost/consumer/payment/feign/timeout
三秒后报错。

5、在80的yml中添加:
server:
	...

eureka:
	...

#没提示不管它,可以设置
ribbon:
  #指的是建立连接后从服务器读取到可用资源所用的时间
  ReadTimeout: 5000
  #指的是建立连接使用的时间,适用于网络状况正常的情况下,两端连接所用的时间
  ConnectTimeout: 5000
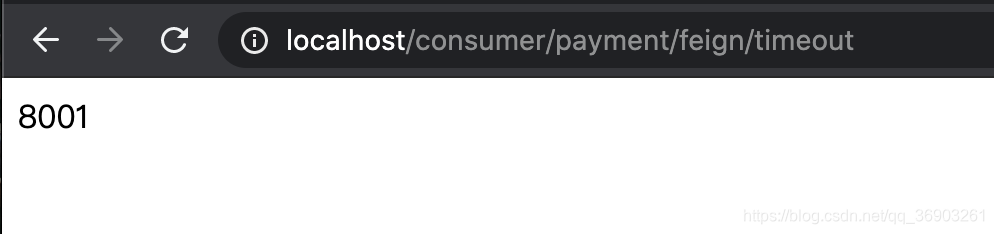
6、重新访问http://localhost/consumer/payment/feign/timeout,3秒后显示。
OpenFeign日志打印功能
OpenFeign日志打印功能

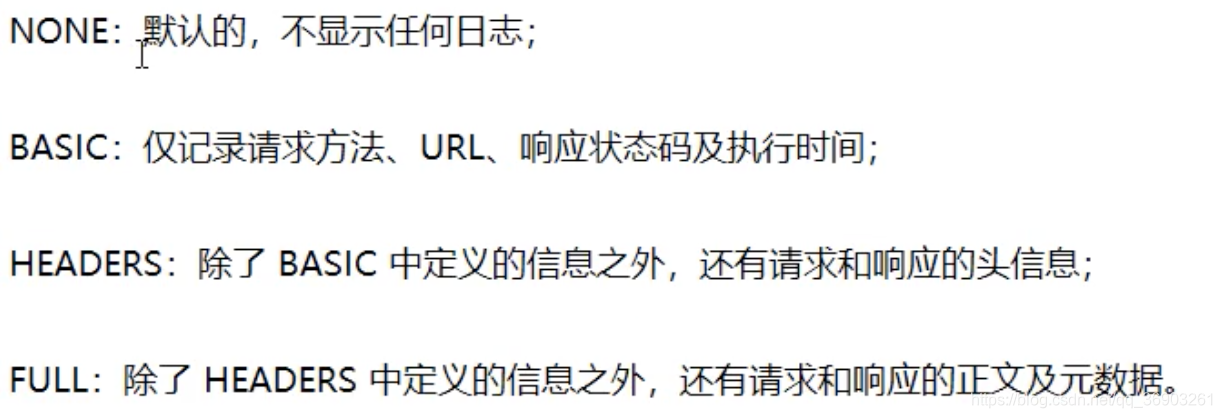
日志级别
步骤
- 配置日志bean
在80的springcloud包下新建config.FeignConfig
import feign.Logger;	//不要导错包

@Configuration
public class FeignConfig {


    @Bean
    Logger.Level feignLoggerLevel(){


        //打印最详细的日志
        return Logger.Level.FULL;
    }

}
-
在80的yml文件中添加:
#开启日志的feign客户端 logging: level: #feign日志以什么级别监控哪个接口 com.achang.springcloud.service.PaymentFeignService: debug #写你们自己的包名 -
启动项目,
http://localhost/consumer/payment/feign/timeout
![[外链图片转存失败,源站可能有防盗链机制,建议将图片保存下来直接上传(img-W319BZpq-1612693196994)(C:\Users\PePe\AppData\Roaming\Typora\typora-user-images\image-20210207181048697.png)]](https://img-blog.csdnimg.cn/20210207182011724.png?x-oss-process=image/watermark,type_ZmFuZ3poZW5naGVpdGk,shadow_10,text_aHR0cHM6Ly9ibG9nLmNzZG4ubmV0L3FxXzQzMjg0NDY5,size_16,color_FFFFFF,t_70)