学习内容和文章内容来自 黄轶老师
黄轶老师的慕课网视频教程地址:《Vue.js2.0 源码揭秘》、
黄轶老师拉钩教育教程地址:《Vue.js 3.0 核心源码解析》
这里分析的源码是Runtime + Compiler 的 Vue.js
调试代码在:node_modules\vue\dist\vue.esm.js 里添加
vue版本:Vue.js 2.5.17-beta
你越是认真生活,你的生活就会越美好——弗兰克·劳埃德·莱特
《人生果实》经典语录
依赖收集
单步调试代码
// src/App.vue
<template>
  <div id="app">
    <img alt="Vue logo" src="./assets/logo.png" />
    <div v-if="flag">message: {

   { message }}</div>
    <div v-else>msg: {

   { msg }}</div>
    <p>this.flag: {

   { flag }}</p>
    <button @click="change">change msg</button>
    <button @click="toggle" style="margin-left: 20px">flag = !flag</button>
  </div>
</template>
<script>
export default {


  name: "App",
  data() {


    return {


      message: "hello world message",
      msg: "hello Vue  msg",
      title: "this is App.vue",
      flag: false,
      userInfo: {


        name: '陈坚泓',
        job: 'web'
      }
    };
  },
  methods: {


    change() {


      console.log("change()");
      this.msg = "hello Vue  msg" + Math.random();
      console.log("this.msg:" + this.msg);
      this.userInfo.likes = '篮球'
    },
    toggle() {


      console.log("toggle()");
      this.flag = !this.flag;
      console.log("this.flag:" + this.flag);
    },
  }
};
</script>
// src/main.js
import Vue from 'vue'
import App from './App.vue'

new Vue({


  el: '#app',
  render: h => h(App)
})
通过上一节的分析我们了解 Vue 会把普通对象变成响应式对象,响应式对象 getter 相关的逻辑就是做依赖收集,这一节我们来详细分析这个过程。
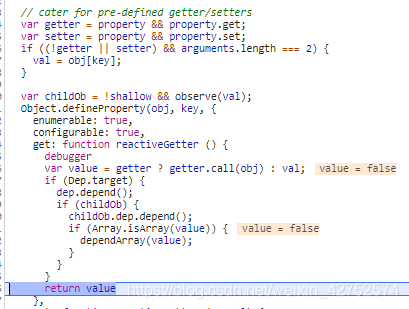
我们先来回顾一下 getter 部分的逻辑:
export function defineReactive (
  obj: Object,
  key: string,
  val: any,
  customSetter?: ?Function,
  shallow?: boolean
) {


  const dep = new Dep()

  const property = Object.getOwnPropertyDescriptor(obj, key)
  if (property && property.configurable === false) {


    return
  }

  // cater for pre-defined getter/setters
  const getter = property && property.get
  const setter = property && property.set
  if ((!getter || setter) && arguments.length === 2) {


    val = obj[key]
  }

  let childOb = !shallow && observe(val)
  Object.defineProperty(obj, key, {


    enumerable: true,
    configurable: true,
    get: function reactiveGetter () {


      const value = getter ? getter.call(obj) : val
      if (Dep.target) {


        dep.depend()
        if (childOb) {


          childOb.dep.depend()
          if (Array.isArray(value)) {


            dependArray(value)
          }
        }
      }
      return value
    },
    // ...
  })
}
defineReactive方法这段代码我们只需要关注 2 个地方,
一个是 const dep = new Dep() 实例化一个 Dep 的实例,
另一个是在 get 函数中通过 dep.depend 做依赖收集,这里还有个对 childOb 判断的逻辑,我们之后会介绍它的作用。
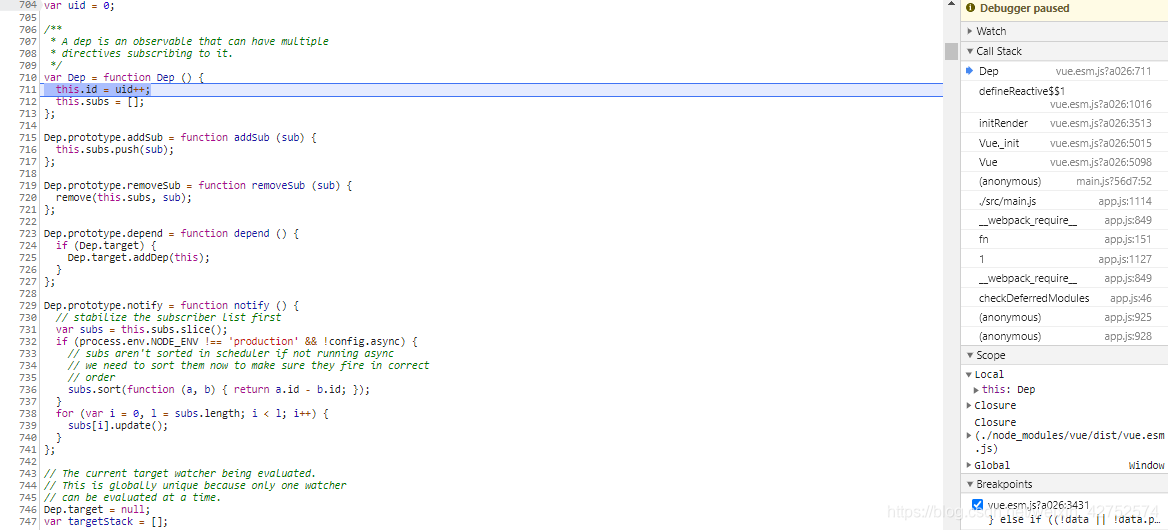
Dep
Dep 是整个 getter 依赖收集的核心,它的定义在 src/core/observer/dep.js 中:
import type Watcher from './watcher'
import {
remove } from '../util/index'
let uid = 0
/**
* A dep is an observable that can have multiple
* directives subscribing to it.
*/
export default class Dep {
static target: ?Watcher;
id: number;
subs: Array<Watcher>;
constructor () {
this.id = uid++
this.subs = []
}
addSub (sub: Watcher) {
this.subs.push(sub)
}
removeSub (sub: Watcher) {
remove(this.subs, sub)
}
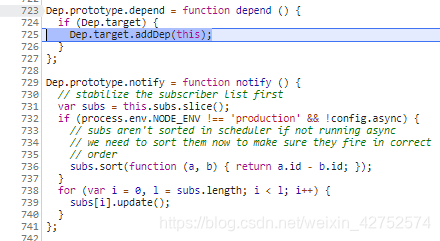
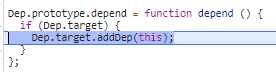
depend () {
if (Dep.target) {
Dep.target.addDep(this)
}
}
notify () {
// stabilize the subscriber list first
const subs = this.subs.slice()
for (let i = 0, l = subs.length; i < l; i++) {
subs[i].update()
}
}
}
// the current target watcher being evaluated.
// this is globally unique because there could be only one
// watcher being evaluated at any time.
Dep.target = null
const targetStack = []
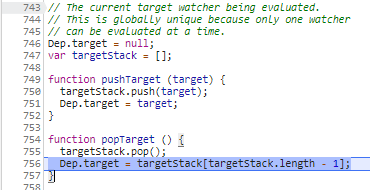
export function pushTarget (_target: ?Watcher) {
if (Dep.target) targetStack.push(Dep.target)
Dep.target = _target
}
export function popTarget () {
Dep.target = targetStack.pop()
}


Dep 是一个 Class,它定义了一些属性和方法,这里需要特别注意的是它有一个静态属性 target,这是一个全局唯一 Watcher,这是一个非常巧妙的设计,因为在同一时间只能有一个全局的 Watcher 被计算,另外它的自身属性 subs 也是 Watcher 的数组。
Dep 实际上就是对 Watcher 的一种管理,Dep 脱离 Watcher 单独存在是没有意义的,为了完整地讲清楚依赖收集过程,我们有必要看一下 Watcher 的一些相关实现,它的定义在 src/core/observer/watcher.js 中:
Watcher
let uid = 0

/**
 * A watcher parses an expression, collects dependencies,
 * and fires callback when the expression value changes.
 * This is used for both the $watch() api and directives.
 */
export default class Watcher {


  vm: Component;
  expression: string;
  cb: Function;
  id: number;
  deep: boolean;
  user: boolean;
  computed: boolean;
  sync: boolean;
  dirty: boolean;
  active: boolean;
  dep: Dep;
  deps: Array<Dep>;
  newDeps: Array<Dep>;
  depIds: SimpleSet;
  newDepIds: SimpleSet;
  before: ?Function;
  getter: Function;
  value: any;

  constructor (
    vm: Component,
    expOrFn: string | Function,
    cb: Function,
    options?: ?Object,
    isRenderWatcher?: boolean
  ) {


    this.vm = vm
    if (isRenderWatcher) {


      vm._watcher = this
    }
    vm._watchers.push(this)
    // options
    if (options) {


      this.deep = !!options.deep
      this.user = !!options.user
      this.computed = !!options.computed
      this.sync = !!options.sync
      this.before = options.before
    } else {


      this.deep = this.user = this.computed = this.sync = false
    }
    this.cb = cb
    this.id = ++uid // uid for batching
    this.active = true
    this.dirty = this.computed // for computed watchers
    this.deps = []
    this.newDeps = []
    this.depIds = new Set()
    this.newDepIds = new Set()
    this.expression = process.env.NODE_ENV !== 'production'
      ? expOrFn.toString()
      : ''
    // parse expression for getter
    if (typeof expOrFn === 'function') {


      this.getter = expOrFn
    } else {


      this.getter = parsePath(expOrFn)
      if (!this.getter) {


        this.getter = function () {

    }
        process.env.NODE_ENV !== 'production' && warn(
          `Failed watching path: "${

      expOrFn}" ` +
          'Watcher only accepts simple dot-delimited paths. ' +
          'For full control, use a function instead.',
          vm
        )
      }
    }
    if (this.computed) {


      this.value = undefined
      this.dep = new Dep()
    } else {


      this.value = this.get()
    }
  }

  /**
   * Evaluate the getter, and re-collect dependencies.
   */
  get () {


    pushTarget(this)
    let value
    const vm = this.vm
    try {


      value = this.getter.call(vm, vm)
    } catch (e) {


      if (this.user) {


        handleError(e, vm, `getter for watcher "${

      this.expression}"`)
      } else {


        throw e
      }
    } finally {


      // "touch" every property so they are all tracked as
      // dependencies for deep watching
      if (this.deep) {


        traverse(value)
      }
      popTarget()
      this.cleanupDeps()
    }
    return value
  }

  /**
   * Add a dependency to this directive.
   */
  addDep (dep: Dep) {


    const id = dep.id
    if (!this.newDepIds.has(id)) {


      this.newDepIds.add(id)
      this.newDeps.push(dep)
      if (!this.depIds.has(id)) {


        dep.addSub(this)
      }
    }
  }

  /**
   * Clean up for dependency collection.
   */
  cleanupDeps () {


    let i = this.deps.length
    while (i--) {


      const dep = this.deps[i]
      if (!this.newDepIds.has(dep.id)) {


        dep.removeSub(this)
      }
    }
    let tmp = this.depIds
    this.depIds = this.newDepIds
    this.newDepIds = tmp
    this.newDepIds.clear()
    tmp = this.deps
    this.deps = this.newDeps
    this.newDeps = tmp
    this.newDeps.length = 0
  }
  // ...
}
Watcher 是一个 Class,在它的构造函数中,定义了一些和 Dep 相关的属性:
this.deps = []
this.newDeps = []
this.depIds = new Set()
this.newDepIds = new Set()
其中,this.deps 和 this.newDeps 表示 Watcher 实例持有的 Dep 实例的数组;而 this.depIds 和 this.newDepIds 分别代表 this.deps 和 this.newDeps 的 id Set(这个 Set 是 ES6 的数据结构,它的实现在 src/core/util/env.js 中)。那么这里为何需要有 2 个 Dep 实例数组呢,稍后我们会解释。
Watcher 还定义了一些原型的方法,和依赖收集相关的有 get、addDep 和 cleanupDeps 方法,单个介绍它们的实现不方便理解,我会结合整个依赖收集的过程把这几个方法讲清楚。
过程分析
之前我们介绍当对数据对象的访问会触发他们的 getter 方法,那么这些对象什么时候被访问呢?还记得之前我们介绍过 Vue 的 mount 过程是通过 mountComponent 函数,其中有一段比较重要的逻辑,大致如下:
updateComponent = () => {
vm._update(vm._render(), hydrating)
}
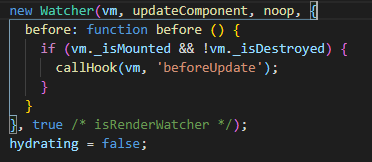
new Watcher(vm, updateComponent, noop, {
before () {
if (vm._isMounted) {
callHook(vm, 'beforeUpdate')
}
}
}, true /* isRenderWatcher */)
var uid$2 = 0;

/**
 * A watcher parses an expression, collects dependencies,
 * and fires callback when the expression value changes.
 * This is used for both the $watch() api and directives.
 */
var Watcher = function Watcher (
  vm,
  expOrFn,
  cb,
  options,
  isRenderWatcher
) {


  this.vm = vm;
  if (isRenderWatcher) {


    vm._watcher = this;
  }
  vm._watchers.push(this);
  // options
  if (options) {


    this.deep = !!options.deep;
    this.user = !!options.user;
    this.lazy = !!options.lazy;
    this.sync = !!options.sync;
    this.before = options.before;
  } else {


    this.deep = this.user = this.lazy = this.sync = false;
  }
  this.cb = cb;
  this.id = ++uid$2; // uid for batching
  this.active = true;
  this.dirty = this.lazy; // for lazy watchers
  this.deps = [];
  this.newDeps = [];
  this.depIds = new _Set();
  this.newDepIds = new _Set();
  this.expression = process.env.NODE_ENV !== 'production'
    ? expOrFn.toString()
    : '';
  // parse expression for getter
  if (typeof expOrFn === 'function') {


    this.getter = expOrFn;
  } else {


    this.getter = parsePath(expOrFn);
    if (!this.getter) {


      this.getter = noop;
      process.env.NODE_ENV !== 'production' && warn(
        "Failed watching path: \"" + expOrFn + "\" " +
        'Watcher only accepts simple dot-delimited paths. ' +
        'For full control, use a function instead.',
        vm
      );
    }
  }
  this.value = this.lazy
    ? undefined
    : this.get();
};
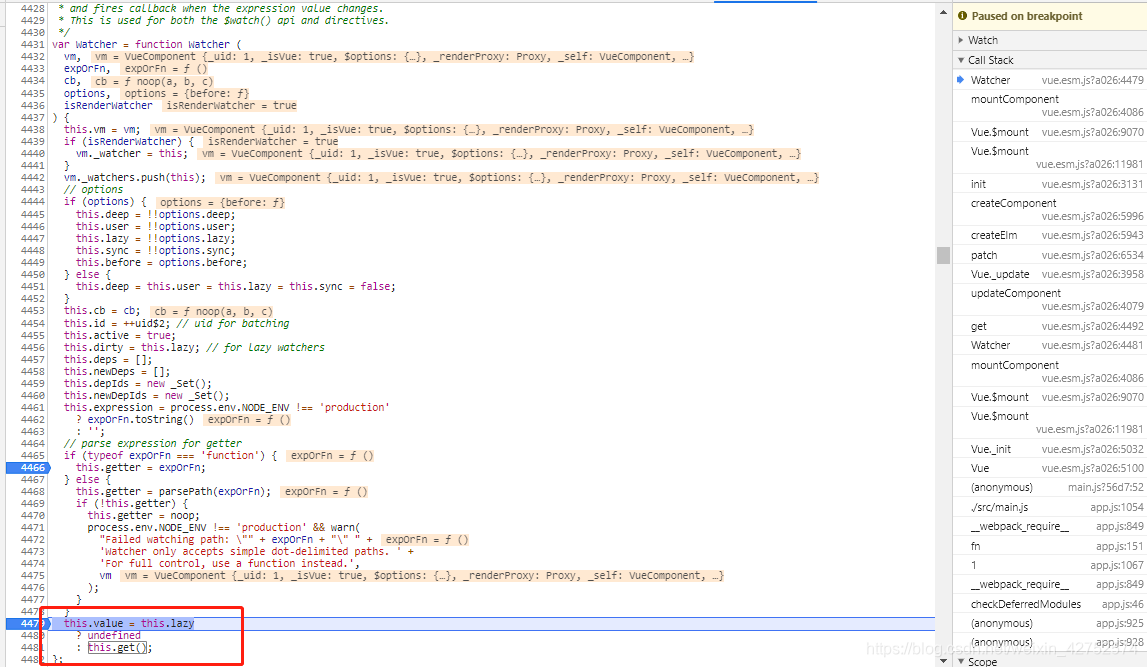
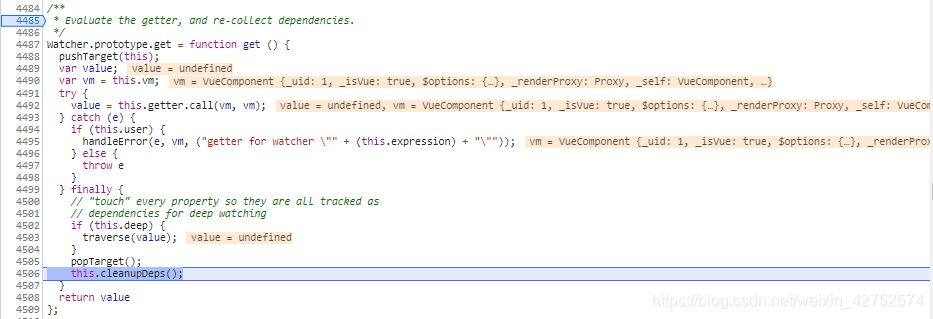
当我们去实例化一个渲染 watcher 的时候,首先进入 watcher 的构造函数逻辑,然后会执行它的 this.get() 方法,进入 get 函数,首先会执行:

pushTarget(this)
pushTarget 的定义在 src/core/observer/dep.js 中:
export function pushTarget (_target: Watcher) {


  if (Dep.target) targetStack.push(Dep.target)
  Dep.target = _target
}
实际上就是把 Dep.target 赋值为当前的渲染 watcher 并压栈(为了恢复用)。接着又执行了:
value = this.getter.call(vm, vm)
this.getter 对应就是 updateComponent 函数,这实际上就是在执行:
vm._update(vm._render(), hydrating)
它会先执行 vm._render() 方法,因为之前分析过这个方法会生成 渲染 VNode,并且在这个过程中会对 vm 上的数据访问,这个时候就触发了数据对象的 getter。
那么每个对象值的 getter 都持有一个 dep,在触发 getter 的时候会调用 dep.depend() 方法,也就会执行 Dep.target.addDep(this)。
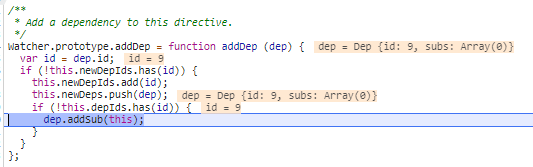

刚才我们提到这个时候 Dep.target 已经被赋值为渲染 watcher,那么就执行到 addDep 方法:
addDep (dep: Dep) {


  const id = dep.id
  if (!this.newDepIds.has(id)) {


    this.newDepIds.add(id)
    this.newDeps.push(dep)
    if (!this.depIds.has(id)) {


      dep.addSub(this)
    }
  }
}
这时候会做一些逻辑判断(保证同一数据不会被添加多次)后执行 dep.addSub(this),那么就会执行 this.subs.push(sub),也就是说把当前的 watcher 订阅到这个数据持有的 dep 的 subs 中,这个目的是为后续数据变化时候能通知到哪些 subs 做准备。
所以在 vm._render() 过程中,会触发所有数据的 getter,这样实际上已经完成了一个依赖收集的过程。
那么到这里就结束了么,其实并没有,在完成依赖收集后,还有几个逻辑要执行,首先是:
if (this.deep) {


  traverse(value)
}
这个是要递归去访问 value,触发它所有子项的 getter,这个之后会详细讲。接下来执行:
popTarget()
popTarget 的定义在 src/core/observer/dep.js 中:
Dep.target = targetStack.pop()
实际上就是把 Dep.target 恢复成上一个状态,因为当前 vm 的数据依赖收集已经完成,那么对应的渲染Dep.target 也需要改变。最后执行:
this.cleanupDeps()
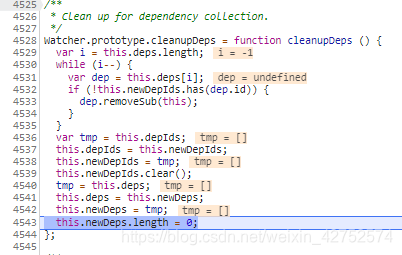
其实很多人都分析过并了解到 Vue 有依赖收集的过程,但我几乎没有看到有人分析依赖清空的过程,其实这是大部分同学会忽视的一点,也是 Vue 考虑特别细的一点。
cleanupDeps () {


  let i = this.deps.length
  while (i--) {


    const dep = this.deps[i]
    if (!this.newDepIds.has(dep.id)) {


      dep.removeSub(this)
    }
  }
  let tmp = this.depIds
  this.depIds = this.newDepIds
  this.newDepIds = tmp
  this.newDepIds.clear()
  tmp = this.deps
  this.deps = this.newDeps
  this.newDeps = tmp
  this.newDeps.length = 0
}
考虑到 Vue 是数据驱动的,所以每次数据变化都会重新 render,那么 vm._render() 方法又会再次执行,并再次触发数据的 getters,所以 Watcher 在构造函数中会初始化 2 个 Dep 实例数组,
newDeps 表示新添加的 Dep 实例数组,
而 deps 表示上一次添加的 Dep 实例数组。
在执行 cleanupDeps 函数的时候,会首先遍历 deps,移除对 dep.subs 数组中 Wathcer 的订阅,
然后把 newDepIds 和 depIds 交换,
newDeps 和 deps 交换,
并把 newDepIds 和 newDeps 清空。
那么为什么需要做 deps 订阅的移除呢,在添加 deps 的订阅过程,已经能通过 id 去重避免重复订阅了。
考虑到一种场景,我们的模板会根据 v-if 去渲染不同子模板 a 和 b,当我们满足某种条件的时候渲染 a 的时候,会访问到 a 中的数据,这时候我们对 a 使用的数据添加了 getter,做了依赖收集,那么当我们去修改 a 的数据的时候,理应通知到这些订阅者。
那么如果我们一旦改变了条件渲染了 b 模板,又会对 b 使用的数据添加了 getter,如果我们没有依赖移除的过程,那么这时候我去修改 a 模板的数据,会通知 a 数据的订阅的回调,这显然是有浪费的。
因此 Vue 设计了在每次添加完新的订阅,会移除掉旧的订阅,这样就保证了在我们刚才的场景中,
如果渲染 b 模板的时候去修改 a 模板的数据,a 数据订阅回调已经被移除了,所以不会有任何浪费,真的是非常赞叹 Vue 对一些细节上的处理。
总结
通过这一节的分析,我们对 Vue 数据的依赖收集过程已经有了认识,并且对这其中的一些细节做了分析。
收集依赖的目的是为了当这些响应式数据发生变化,触发它们的 setter 的时候,能知道应该通知哪些订阅者去做相应的逻辑处理,我们把这个过程叫派发更新,其实 Watcher 和 Dep 就是一个非常经典的观察者设计模式的实现,下一节我们来详细分析一下派发更新的过程。
派发更新
通过上一节分析我们了解了响应式数据依赖收集过程,收集的目的就是为了当我们修改数据的时候,可以对相关的依赖派发更新,那么这一节我们来详细分析这个过程。
我们先来回顾一下setter部分的逻辑:
/**
* Define a reactive property on an Object.
*/
export function defineReactive (
obj: Object,
key: string,
val: any,
customSetter?: ?Function,
shallow?: boolean
) {
const dep = new Dep()
const property = Object.getOwnPropertyDescriptor(obj, key)
if (property && property.configurable === false) {
return
}
// cater for pre-defined getter/setters
const getter = property && property.get
const setter = property && property.set
if ((!getter || setter) && arguments.length === 2) {
val = obj[key]
}
let childOb = !shallow && observe(val)
Object.defineProperty(obj, key, {
enumerable: true,
configurable: true,
// ...
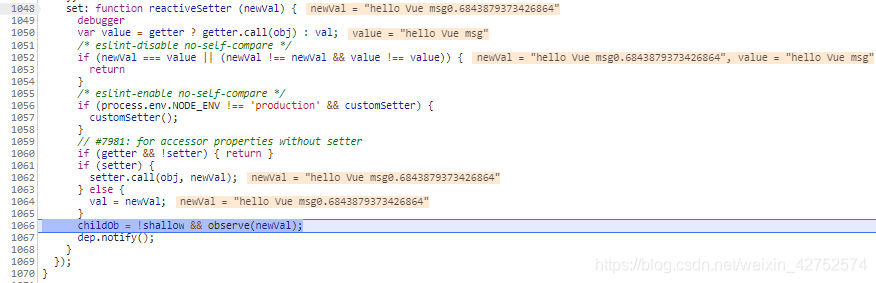
set: function reactiveSetter (newVal) {
const value = getter ? getter.call(obj) : val
/* eslint-disable no-self-compare */
if (newVal === value || (newVal !== newVal && value !== value)) {
return
}
/* eslint-enable no-self-compare */
if (process.env.NODE_ENV !== 'production' && customSetter) {
customSetter()
}
if (setter) {
setter.call(obj, newVal)
} else {
val = newVal
}
childOb = !shallow && observe(newVal)
dep.notify()
}
})
}
setter 的逻辑有 2 个关键的点,
一个是 childOb = !shallow && observe(newVal),如果 shallow 为 false 的情况,会对新设置的值变成一个响应式对象;
另一个是 dep.notify(),通知所有的订阅者,这是本节的关键,接下来我会带大家完整的分析整个派发更新的过程。
过程分析
文章开头的单步调试代码 点击按钮时 改变msg的值
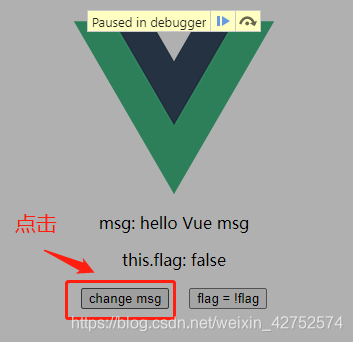
当我们在组件中对响应的数据做了修改,就会触发 setter 的逻辑,最后调用 dep.notify() 方法,
它是 Dep 的一个实例方法,定义在 src/core/observer/dep.js 中:
class Dep {


  // ...
  notify () {


  // stabilize the subscriber list first
    const subs = this.subs.slice()
    for (let i = 0, l = subs.length; i < l; i++) {


      subs[i].update()
    }
  }
}
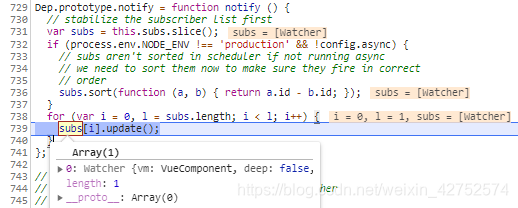
这里的逻辑非常简单,遍历所有的 subs,也就是 Watcher 的实例数组,然后调用每一个 watcher 的 update 方法,它的定义在 src/core/observer/watcher.js 中:
class Watcher {
// ...
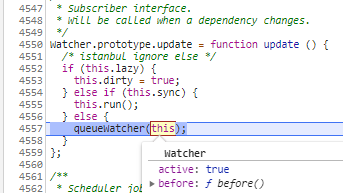
update () {
/* istanbul ignore else */
if (this.computed) {
// A computed property watcher has two modes: lazy and activated.
// It initializes as lazy by default, and only becomes activated when
// it is depended on by at least one subscriber, which is typically
// another computed property or a component's render function.
if (this.dep.subs.length === 0) {
// In lazy mode, we don't want to perform computations until necessary,
// so we simply mark the watcher as dirty. The actual computation is
// performed just-in-time in this.evaluate() when the computed property
// is accessed.
this.dirty = true
} else {
// In activated mode, we want to proactively perform the computation
// but only notify our subscribers when the value has indeed changed.
this.getAndInvoke(() => {
this.dep.notify()
})
}
} else if (this.sync) {
this.run()
} else {
queueWatcher(this)
}
}
}
这里对于 Watcher 的不同状态,会执行不同的逻辑,
computed 和 sync 等状态的分析我会之后抽一小节详细介绍,
在一般组件数据更新的场景,会走到最后一个 queueWatcher(this) 的逻辑,queueWatcher 的定义在 src/core/observer/scheduler.js 中:
const queue: Array<Watcher> = []
let has: {

     [key: number]: ?true } = {

    }
let waiting = false
let flushing = false
/**
 * Push a watcher into the watcher queue.
 * Jobs with duplicate IDs will be skipped unless it's
 * pushed when the queue is being flushed.
 */
export function queueWatcher (watcher: Watcher) {


  const id = watcher.id
  if (has[id] == null) {


    has[id] = true
    if (!flushing) {


      queue.push(watcher)
    } else {


      // if already flushing, splice the watcher based on its id
      // if already past its id, it will be run next immediately.
      let i = queue.length - 1
      while (i > index && queue[i].id > watcher.id) {


        i--
      }
      queue.splice(i + 1, 0, watcher)
    }
    // queue the flush
    if (!waiting) {


      waiting = true
      nextTick(flushSchedulerQueue)
    }
  }
}

这里引入了一个队列的概念,这也是 Vue 在做派发更新的时候的一个优化的点,
它并不会每次数据改变都触发 watcher 的回调,而是把这些 watcher 先添加到一个队列里,然后在 nextTick 后执行 flushSchedulerQueue。
这里有几个细节要注意一下,首先用 has 对象保证同一个 Watcher 只添加一次;
接着对 flushing 的判断,else 部分的逻辑稍后我会讲;
最后通过 waiting 保证对 nextTick(flushSchedulerQueue) 的调用逻辑只有一次,另外 nextTick 的实现我之后会抽一小节专门去讲,目前就可以理解它是在下一个 tick,也就是异步的去执行 flushSchedulerQueue。
接下来我们来看 flushSchedulerQueue 的实现,它的定义在 src/core/observer/scheduler.js 中。
let flushing = false
let index = 0
/**
* Flush both queues and run the watchers.
*/
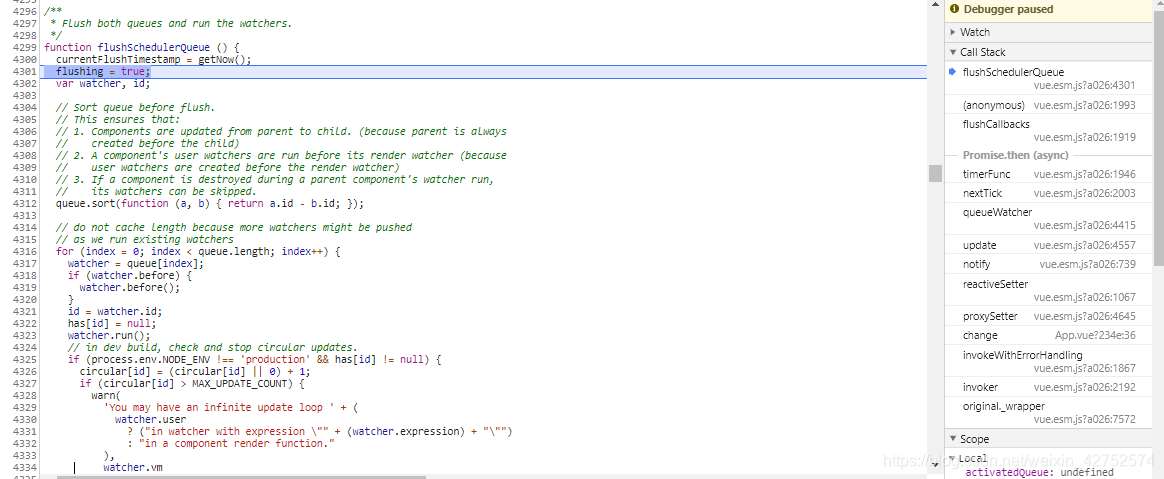
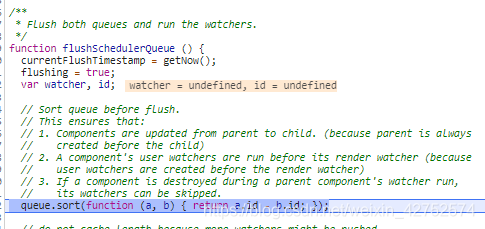
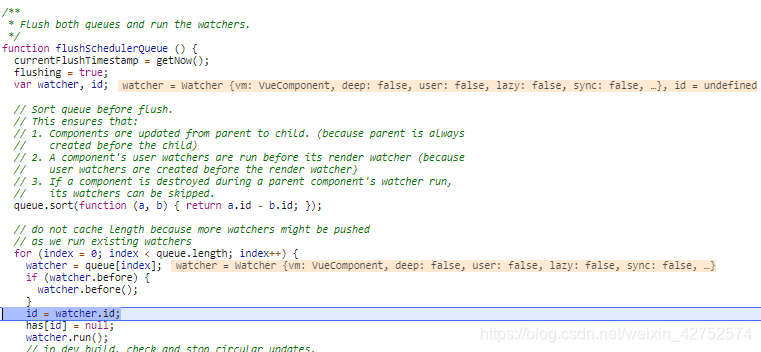
function flushSchedulerQueue () {
flushing = true
let watcher, id
// Sort queue before flush.
// This ensures that:
// 1. Components are updated from parent to child. (because parent is always
// created before the child)
// 2. A component's user watchers are run before its render watcher (because
// user watchers are created before the render watcher)
// 3. If a component is destroyed during a parent component's watcher run,
// its watchers can be skipped.
queue.sort((a, b) => a.id - b.id)
// do not cache length because more watchers might be pushed
// as we run existing watchers
for (index = 0; index < queue.length; index++) {
watcher = queue[index]
if (watcher.before) {
watcher.before()
}
id = watcher.id
has[id] = null
watcher.run()
// in dev build, check and stop circular updates.
if (process.env.NODE_ENV !== 'production' && has[id] != null) {
circular[id] = (circular[id] || 0) + 1
if (circular[id] > MAX_UPDATE_COUNT) {
warn(
'You may have an infinite update loop ' + (
watcher.user
? `in watcher with expression "${
watcher.expression}"`
: `in a component render function.`
),
watcher.vm
)
break
}
}
}
// keep copies of post queues before resetting state
const activatedQueue = activatedChildren.slice()
const updatedQueue = queue.slice()
resetSchedulerState()
// call component updated and activated hooks
callActivatedHooks(activatedQueue)
callUpdatedHooks(updatedQueue)
// devtool hook
/* istanbul ignore if */
if (devtools && config.devtools) {
devtools.emit('flush')
}
}
这里有几个重要的逻辑要梳理一下,对于一些分支逻辑如 keep-alive 组件相关和之前提到过的 updated 钩子函数的执行会略过。
- 队列排序
queue.sort((a, b) => a.id - b.id) 对队列做了从小到大的排序,这么做主要有以下要确保以下几点:
1.组件的更新由父到子;因为父组件的创建过程是先于子的,所以 watcher 的创建也是先父后子,执行顺序也应该保持先父后子。
2.用户的自定义watcher 要优先于渲染 watcher 执行;因为用户自定义 watcher 是在渲染 watcher 之前创建的。
3.如果一个组件在父组件的 watcher 执行期间被销毁,那么它对应的 watcher 执行都可以被跳过,所以父组件的 watcher 应该先执行。
- 队列遍历
在对 queue 排序后,接着就是要对它做遍历,拿到对应的 watcher,执行 watcher.run()。
这里需要注意一个细节,在遍历的时候每次都会对 queue.length 求值,因为在 watcher.run() 的时候,很可能用户会再次添加新的 watcher,这样会再次执行到 queueWatcher,如下:
PS:
更新视图先会触发beforeUpdate这个钩子函数

export function queueWatcher (watcher: Watcher) {


  const id = watcher.id
  if (has[id] == null) {


    has[id] = true
    if (!flushing) {


      queue.push(watcher)
    } else {


      // if already flushing, splice the watcher based on its id
      // if already past its id, it will be run next immediately.
      let i = queue.length - 1
      while (i > index && queue[i].id > watcher.id) {


        i--
      }
      queue.splice(i + 1, 0, watcher)
    }
    // ...
  }
}


可以看到,这时候 flushing 为 true,就会执行到 else 的逻辑,然后就会从后往前找,找到第一个待插入 watcher 的 id 比当前队列中 watcher 的 id 大的位置。
把 watcher 按照 id的插入到队列中,因此 queue 的长度发生了变化。
- 状态恢复
这个过程就是执行 resetSchedulerState 函数,它的定义在 src/core/observer/scheduler.js 中。
PS: 我调试的代码是Vue.version = '2.6.12',没看到有resetSchedulerState这个方法
const queue: Array<Watcher> = []
let has: {

     [key: number]: ?true } = {

    }
let circular: {

     [key: number]: number } = {

    }
let waiting = false
let flushing = false
let index = 0
/**
 * Reset the scheduler's state.
 */
function resetSchedulerState () {


  index = queue.length = activatedChildren.length = 0
  has = {

    }
  if (process.env.NODE_ENV !== 'production') {


    circular = {

    }
  }
  waiting = flushing = false
}
逻辑非常简单,就是把这些控制流程状态的一些变量恢复到初始值,把 watcher 队列清空。
接下来我们继续分析 watcher.run() 的逻辑,它的定义在 src/core/observer/watcher.js 中。
class Watcher {


  /**
   * Scheduler job interface.
   * Will be called by the scheduler.
   */
  run () {


    if (this.active) {


      this.getAndInvoke(this.cb)
    }
  }

  getAndInvoke (cb: Function) {


    const value = this.get()
    if (
      value !== this.value ||
      // Deep watchers and watchers on Object/Arrays should fire even
      // when the value is the same, because the value may
      // have mutated.
      isObject(value) ||
      this.deep
    ) {


      // set new value
      const oldValue = this.value
      this.value = value
      this.dirty = false
      if (this.user) {


        try {


          cb.call(this.vm, value, oldValue)
        } catch (e) {


          handleError(e, this.vm, `callback for watcher "${

      this.expression}"`)
        }
      } else {


        cb.call(this.vm, value, oldValue)
      }
    }
  }
}

run 函数实际上就是执行 this.getAndInvoke 方法,并传入 watcher 的回调函数。
getAndInvoke 函数逻辑也很简单,先通过 this.get() 得到它当前的值,然后做判断,如果满足新旧值不等、新值是对象类型、deep 模式任何一个条件,则执行 watcher 的回调,
注意
回调函数执行的时候会把第一个和第二个参数传入新值 value 和旧值 oldValue,这就是当我们添加自定义 watcher 的时候能在回调函数的参数中拿到新旧值的原因。
那么对于渲染 watcher 而言,它在执行 this.get() 方法求值的时候,会执行 getter 方法:
updateComponent = () => {


  vm._update(vm._render(), hydrating)
}
所以这就是当我们去修改组件相关的响应式数据的时候,会触发组件重新渲染的原因,接着就会重新执行 patch 的过程,但它和首次渲染有所不同,之后我们会花一小节去详细介绍。
触发循环更新的情况
添加用户watcher,同时在回调里修改被watcher的变量
watch: {


    msg() {


      this.msg = Math.random()
    }
  },
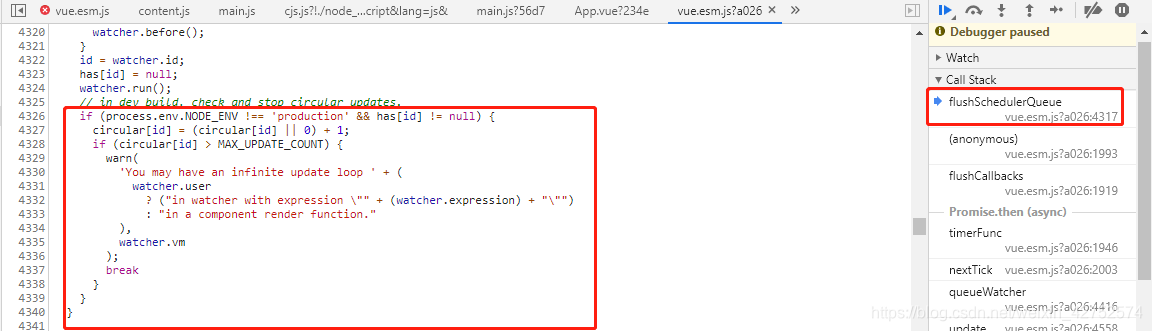
has 对象保证同一个 Watcher 只添加一次;通过watcher的id来判断是否为同一个watcher
这里判断同一个Watcher多次执行flushSchedulerQueue方法circular就会递增,当超过MAX_UPDATE_COUNT(目前是100)的值时就会报错

总结
通过这一节的分析,我们对Vue 数据修改派发更新的过程也有了认识,
实际上就是当数据发生变化的时候,触发 setter 逻辑,把在依赖过程中订阅的的所有观察者,也就是 watcher,都触发它们的 update 过程,
这个过程又利用了队列做了进一步优化,在 nextTick 后执行所有 watcher 的 run,最后执行它们的回调函数。
- 派发更新就是当数据发生改变后,通知所有订阅了这个数据变化的 watcher 执行update
- 派发更新的过程中会把需要执行update的watcher推入到队列中,在nextTick后执行flush
nextTick 是 Vue 一个比较核心的实现了,下一节我们来重点分析它的实现。
Vue源码学习目录
组件化 (一) createComponent
组件化 (二) patch
组件化 (三) 合并配置
组件化 (四) 生命周期
组件化(五) 组件注册
深入响应式原理(一) 响应式对象
Vue源码 深入响应式原理 (三)nextTick & 检测变化的注意事项
谢谢你阅读到了最后~
期待你关注、收藏、评论、点赞~
让我们一起 变得更强