整体项目可查看汇总目录链接:Spring Boot开发常用技术博客目录
目录结构

Spring Boot 整合Redis
在pom.xml中引入依赖
<!-- 引入 redis 依赖 -->
<dependency>
	<groupId>org.springframework.boot</groupId>
	<artifactId>spring-boot-starter-data-redis</artifactId>
</dependency>
application.yml
spring:
  redis:
    host: 127.0.0.1   # Redis服务器地址
    port: 6379      # Redis服务器端口
    password:       # Redis服务器链接密码(默认空)
    database: 0  #Reidis数据库索引(默认0)
    timeout: 0  #连接超时时间(毫秒)
    jedis:
      pool:
        max-active: 1000  # 连接池最大连接数(使用负值表示没有限制)
        max-wait: -1 # 最大阻塞等待时间(使用负值表示没有限制)
        max-idle: 10  # 最大空闲连接
        min-idle: 2  # 最小空闲连接
RedisController.java
import org.springframework.beans.factory.annotation.Autowired;
import org.springframework.data.redis.core.RedisTemplate;
import org.springframework.stereotype.Controller;
import org.springframework.web.bind.annotation.RequestMapping;
import org.springframework.web.bind.annotation.ResponseBody;

import com.xiangty.common.Result;
import com.xiangty.pojo.User;

@Controller
@RequestMapping("/redis")
@SuppressWarnings({

    "unchecked","rawtypes"})
public class RedisController {


	@Autowired
	private RedisTemplate redisTemplate;

	@RequestMapping("/testRedis")
	@ResponseBody
	public Result testRedis() {


		String key = "testRedis";
		redisTemplate.opsForValue().set(key, "testRedisValue");
		return Result.ok("从Redis中获取值:"+redisTemplate.opsForValue().get(key));
	}

	@RequestMapping("/testRedisUser")
	@ResponseBody
	public Result testRedisUser() {


		String key = "testRedisUser";
		User user = new User();
		user.setUsername("测试UserName");
		user.setPassword("测试passWord");
		redisTemplate.opsForValue().set(key, user);
		return Result.ok(redisTemplate.opsForValue().get(key));
	}
}
访问http://localhost:8088/redis/testRedis

访问http://localhost:8088/redis/testRedisUser
 需要注意:Redis保存对象的时候,对象需要实现序列化。User.java实现Serializable在访问就可以了。

Spring Boot 整合定时任务
SpringbootStarterApplication.java
添加:
@EnableScheduling注解
@ComponentScan(basePackages= {“com.xiangty”})包扫描数据
新建SystemDateTask.java,建一个定时任务每隔五秒输出一次时间
import java.text.SimpleDateFormat;
import java.util.Date;
import org.springframework.scheduling.annotation.Scheduled;
import org.springframework.stereotype.Component;
@Component
public class SystemDateTask {


	// 每五秒一次,时间格式可以网上搜索cron设置即可(可以参考https://cron.qqe2.com/)
	@Scheduled(cron="0/5 * * * * ?")
	public void systemDateTask(){


		System.out.println("SystemDateTask输出:"+new SimpleDateFormat("yyyy-MM-dd HH:mm:ss").format(new Date()));
	}
}
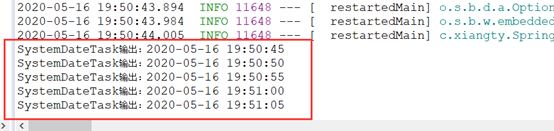
项目启动后,查看控制台输出如下:
Spring Boot 异步任务
SpringbootStarterApplication.java添加@EnableAsync注解
AsyncService.java
import java.text.SimpleDateFormat;
import java.util.Date;
import org.springframework.scheduling.annotation.Async;
import org.springframework.stereotype.Service;
@Service
public class AsyncService {
@Async
public void tesetAsync() {
try {
Thread.sleep(3000);
} catch (InterruptedException e) {
e.printStackTrace();
}
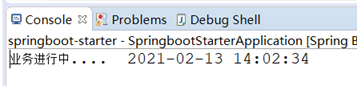
System.out.println("业务进行中.... " + new SimpleDateFormat("yyyy-MM-dd HH:mm:ss").format(new Date()));
}
}
HelloController.java
import java.text.SimpleDateFormat;
import java.util.Date;
import org.springframework.beans.BeanUtils;
import org.springframework.beans.factory.annotation.Autowired;
import org.springframework.web.bind.annotation.RequestMapping;
import org.springframework.web.bind.annotation.RestController;
import com.xiangty.common.Result;
import com.xiangty.pojo.Resource;
import com.xiangty.service.AsyncService;
@RestController
public class HelloController {
@Autowired
private AsyncService asyncService;
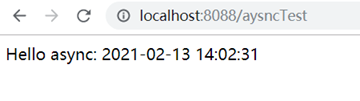
@RequestMapping("/aysncTest")
public Object asyncTest() {
asyncService.tesetAsync();
return "Hello async: " + new SimpleDateFormat("yyyy-MM-dd HH:mm:ss").format(new Date());
}
}
页面请求了以后,页面很快就得到了响应,控制台会在三秒后输出内容。使用@EnableAsync和@Async可以异步执行方法。
整体项目可查看汇总目录链接:Spring Boot开发常用技术博客目录