1 安装python
下载Python 3.6
注:如果手里有有python3.6的安装包,则跳过下载Python 3.6的步骤。
下载python3.6.x,官网下载地址是:https://www.python.org/downloads/,选择合适的版本,点击download,进入下载页面
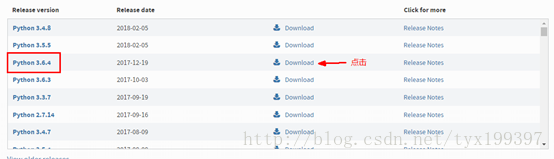
在下载页面选择executable installer格式的文件,点击即可下载:

安装Python
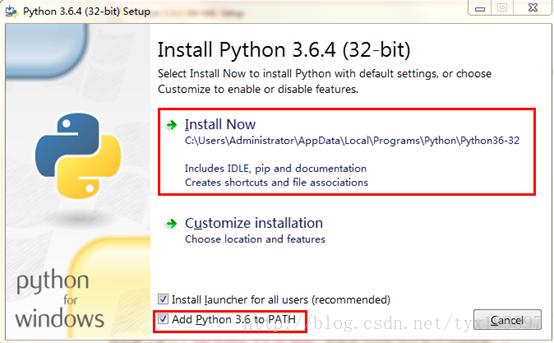
双击下载好的python-3.6.4.exe,运行下载的EXE安装包,一定要勾选上Add Python 3.6 to Path,不然用起来特别不方便。然后点击Install Now进行安装。
运行python
安装成功后,打开CMD命令提示符窗口,输入python后,如果出现类似如下内容,则python安装成功;如果没有出现,极有可能是因为安装过程中没有勾选Add Python 3.6 to Path。请参考网上python添加环境变量的教程。
打开CMD窗口,输入:
pip3 install selenium
会自动安装selenium,如无报错,且提示安装成功,则成功安装selenium。
我们可以验证是否安装成功并且能正常使用,验证方式:
打开python自带的IELD,输入from selenium importwebdriver,敲击回车。如果没有报错,则selenium成功安装且能正常使用。
基本环境安装好了,我们需要一个好用的IDE进行脚本的编写工作。个人推荐pycharm,也可以根据自己的喜好进行选择。
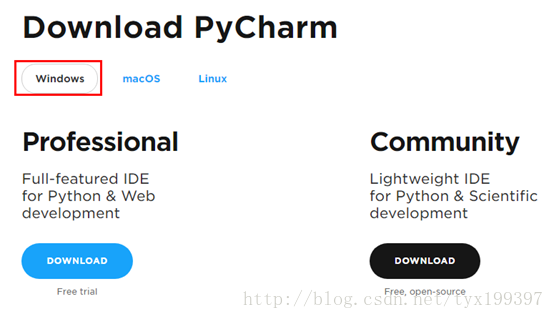
进入https://www.jetbrains.com/pycharm/download/#section=windows 下载pycharm。Professional是专业版,功能强大,但需要收费
Community是社区版,一般来说功能够用,而且免费
可以根据个人需求来选择。
具体安装步骤和使用方法,可以参考网上资料。
4 安装firefox(火狐)浏览器和相关插件
为什么需要安装firefox浏览器呢,原因是firefox浏览器有两个插件是我们需要用到的:
Selenium IDE:可以实现脚本录制
Firebug:帮助我们定位元素
4.1 安装firefox
首先我们下载firefox,因为Selenium IDE不能支持最新版本的firefox浏览器,所以我们选择版本为54的firefox,下载链接如下:
1. http://ftp.mozilla.org/pub/firefox/releases/54.0/win64/zh-CN/
2.火狐浏览器多个版本下载链接(很重要): http://ftp.mozilla.org/pub/firefox/releases/
安装过程省略
然后打开firefox浏览器,点击


依次点击高级>>更新>>不检查更新,为了防止firfox自动更新后不支持selenium IDE。

4.2 安装Selenium IDE插件
用firefox浏览器打开链接:
https://addons.mozilla.org/en-US/firefox/addon/selenium-ide/
出现以下画面,点击+ Add to Firefox即可添加该插件,安装好后,重启浏览器生效。
重启浏览器后,打开Selenium IDE,出现以下界面,则成功添加该插件:

4.3 添加Firebug插件
用firefox浏览器打开链接:
https://addons.mozilla.org/zh-CN/firefox/addon/firebug/
出现以下画面,点击+ Add to Firefox即可添加该插件,安装好后,重启浏览器生效。
重启浏览器后,键盘敲击F12,得出如下界面,则添加插件成功:
5 安装Firefox驱动
以上环境都装好了,我们需要思考这样一个问题。Python和selenium怎么去操作浏览器的呢?
我们需要安装浏览器的driver(驱动),不同的浏览器有不同的驱动,对于firefox,我们需要打开以下链接:
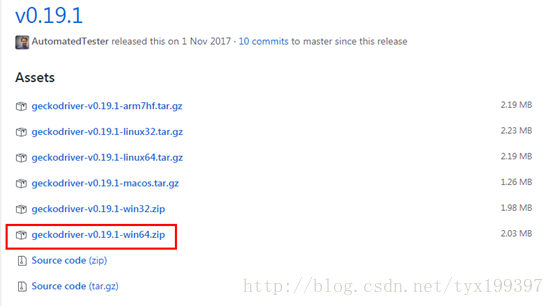
https://github.com/mozilla/geckodriver/releases
选择合适的版本,因为我是64位的windows系统,所以我选择下载geckodriver-v0.19.1-win64.zip
下载完成后将geckodriver-v0.19.1-win64.zip解压到python的根录下。这里我的python安装路径在E:\Python\Python36-32\Scripts,所以我解压到E:\Python\Python36-32\Scripts下面。
6 测试整个环境以及代码
运行如下代码,如果能成功打开听旅系统页面,则环境搭建完成:
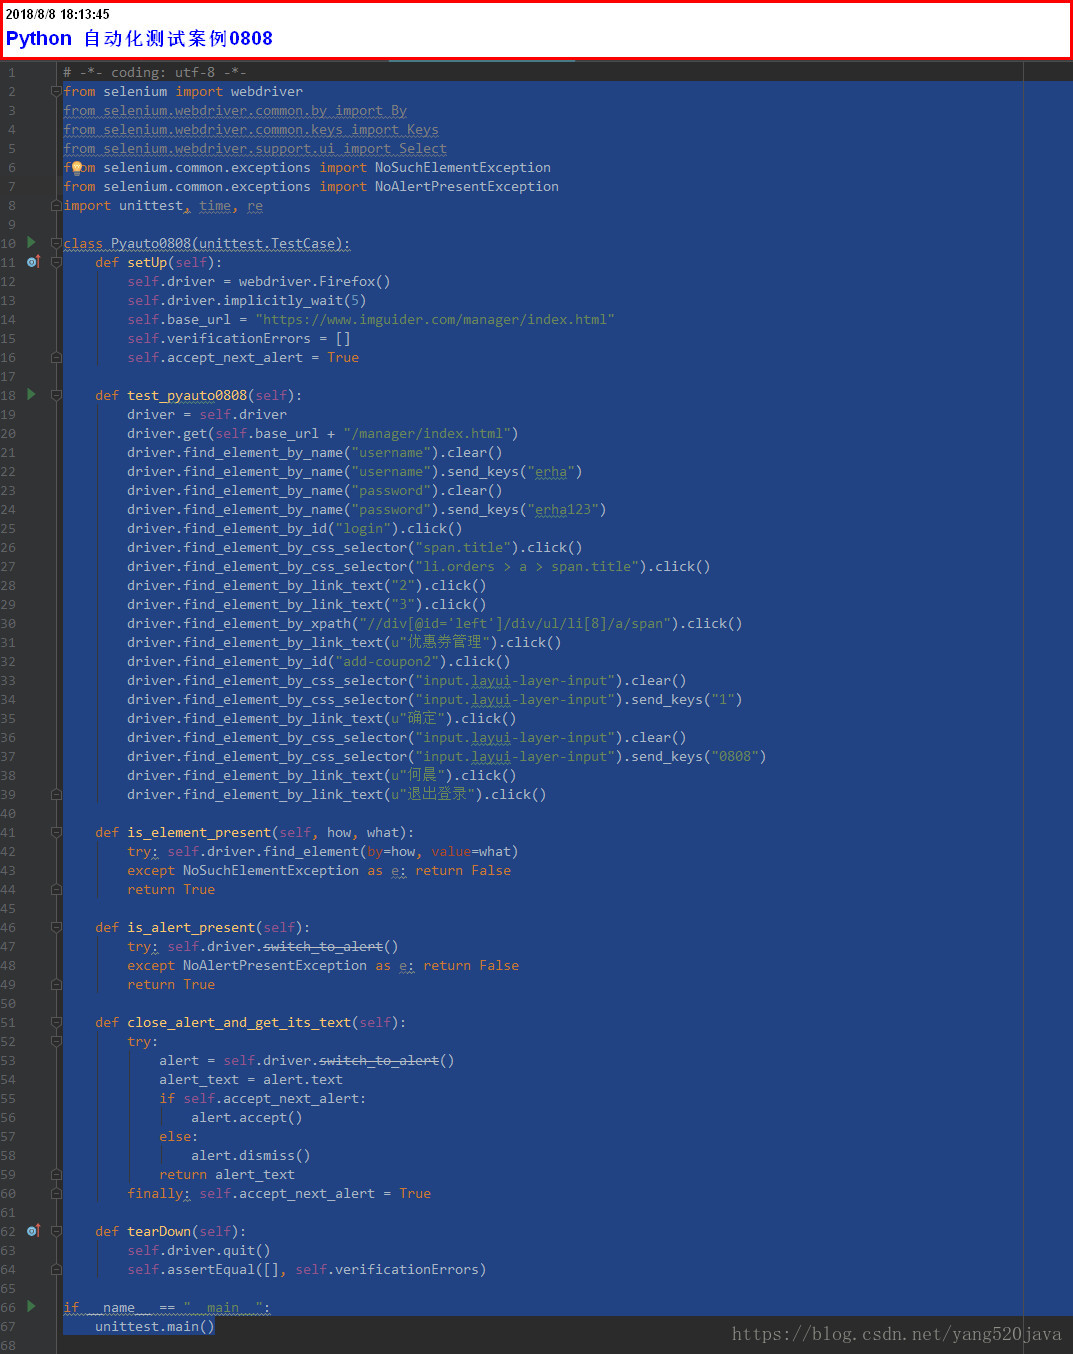
from selenium import webdriver
from selenium.webdriver.common.by import By
from selenium.webdriver.common.keys import Keys
from selenium.webdriver.support.ui import Select
from selenium.common.exceptions import NoSuchElementException
from selenium.common.exceptions import NoAlertPresentException
import unittest, time, re

class Pyauto0808(unittest.TestCase):
    def setUp(self):
        self.driver = webdriver.Firefox()
        self.driver.implicitly_wait(5)
        self.base_url = "https://www.imguider.com/manager/index.html"
        self.verificationErrors = []
        self.accept_next_alert = True

    def test_pyauto0808(self):
        driver = self.driver
        driver.get(self.base_url + "/manager/index.html")
        driver.find_element_by_name("username").clear()
        driver.find_element_by_name("username").send_keys("erha")
        driver.find_element_by_name("password").clear()
        driver.find_element_by_name("password").send_keys("erha123")
        driver.find_element_by_id("login").click()
        driver.find_element_by_css_selector("span.title").click()
        driver.find_element_by_css_selector("li.orders > a > span.title").click()
        driver.find_element_by_link_text("2").click()
        driver.find_element_by_link_text("3").click()
        driver.find_element_by_xpath("//div[@id='left']/div/ul/li[8]/a/span").click()
        driver.find_element_by_link_text(u"优惠券管理").click()
        driver.find_element_by_id("add-coupon2").click()
        driver.find_element_by_css_selector("input.layui-layer-input").clear()
        driver.find_element_by_css_selector("input.layui-layer-input").send_keys("1")
        driver.find_element_by_link_text(u"确定").click()
        driver.find_element_by_css_selector("input.layui-layer-input").clear()
        driver.find_element_by_css_selector("input.layui-layer-input").send_keys("0808")
        driver.find_element_by_link_text(u"何晨").click()
        driver.find_element_by_link_text(u"退出登录").click()

    def is_element_present(self, how, what):
        try: self.driver.find_element(by=how, value=what)
        except NoSuchElementException as e: return False
        return True

    def is_alert_present(self):
        try: self.driver.switch_to_alert()
        except NoAlertPresentException as e: return False
        return True

    def close_alert_and_get_its_text(self):
        try:
            alert = self.driver.switch_to_alert()
            alert_text = alert.text
            if self.accept_next_alert:
                alert.accept()
            else:
                alert.dismiss()
            return alert_text
        finally: self.accept_next_alert = True

    def tearDown(self):
        self.driver.quit()
        self.assertEqual([], self.verificationErrors)

if __name__ == "__main__":
    unittest.main()
