Special effects creation tool
User's Guide
Version 2.0
Beijing Meishe Network Technology Co., Ltd.
Perface:
This tool serves Meishe SDK and Meishe Cloud Editing. Provide them with video special effects materials, allowing users to get rid of scripted special effects writing. With this tool, special effects can be produced quickly. Version information and instructions.
| Special effects creation tool User's Guide Version 2.0 Beijing Meishe Network Technology Co., Ltd. Perface: This tool serves Meishe SDK and Meishe Cloud Editing. Provide them with video special effects materials, allowing users to get rid of scripted special effects writing. With this tool, special effects can be produced quickly. Version information and instructions.
Table of Contents Special effects creation tool 6 2、Software structure introduction. 7 3、Material library introduction. 9 4、Introduction to Track Panel 10 4.1、Multi-frame filter production. 10 5、Introduction to the preview window.. 18 6、Introduction to special effects window.. 20 9. Start to enter the caption production module. 23 11、Caption properties panel 24 12、Introduction to Flower Word Making. 29 12.2、Interface introduction. 30 12.2.1、Interface introduction. 30 12.3、Editing process introduction. 31 12.3.2、Property setting panel 32 13、Border caption production. 34 14、Stretchable background caption. 35 14.2、Introduction to Stretching Elements. 36 14.2.3、Lattice interpretation. 38 16、Explanation of making frame and coordinates. 41 17、Detailed explanation of special effect parameters. 43 17.11、Distortion-horizontal distortion. 50 17.12、Distortion-vertical distortion. 51 17.20、Color difference separation. 57 17.24、Optical compensation. 60 Special effects creation tool1、Start the softwareA. Unzip the tool compression package and double-click the NvStoryboardCreator.exe file inside to start the software. During the startup process, if prompted by anti-virus software, please allow it.
B. After opening, the boot menu appears. Select [New Production] and enter the project name. Select [Material Type] and click [Create] to enter the production page. Note: The album function is completed by filters, just select [Album] when exporting.
2、Software structure introductionAfter entering the production page, you will see an overview of the software. The software is divided into 5 areas
3、Material library introduction
4、Introduction to Track Panel
4.1、Multi-frame filter production
4.2、Preview track
4.3、Track operation
4.3、Keyframe
5、Introduction to the preview window
6、Introduction to special effects window
7、Export settings
8、Caption functionIn version 2.0, caption effects are added. Currently, the caption that can be made are shown in the table below, and the subsequent iterations support more. 12. 13 and 14 topics introduce the production of common caption.
9. Start to enter the caption production moduleAfter opening the tool, a guide page pops up, click [Create New]-[Caption]-[Create] to enter the Caption creation page.
10、Caption trackAfter entering the caption production page, the structure of the caption production page and the filter production page are similar, with the following differences:
The preview video can be replaced (the video will not be brought into the caption package).
11、Caption properties panelClick on the caption track, the text attribute panel appears on the right, as follows:
12、Introduction to Flower Word Making12.1、Making interfaceAfter entering the editing interface, you can see the default caption track. In the caption attribute area on the right, click the [Flower Word Editing] button to enter the flower Word making interface。
In the Flower Word making interface, you can see the following parts, which are introduced in topic 12.2.
12.2、Interface introduction12.2.1、Interface introduction Switch background color, adjust text size, preview caption effect in real time.
12.2.2、Edit interface The Flower Word editing and making window will be described in detail later. 12.2.3、Preview button Switch to the preview window to preview the real package. Simulate display of text size and background color to verify the production effect.
12.3、Editing process introduction12.3.1、Default attributes Before entering Flower Word editing, in the caption properties, you can set the default text, text size, and text font. After entering the Flower Word editing window, the default attributes are used for editing. Note: The font size set in the outer layer is automatically brought into the Flower Word package as the caption text size. If not set, the system default font size is 72.
12.3.2、Property setting panel 12.3.2.1、Properties panel The red box on the right.
12.3.2.2、Panel function
12.3.3、Use and export After editing, there are two results:
Note: After using flower word editing, the color and drawing stroke functions are not available. Delete the flower word package and continue to use the previous parameter settings. 13、Border caption productionBorder caption, control the caption display range, the text will not exceed the range for display, and automatically adjust the text size and line break according to the number of texts.
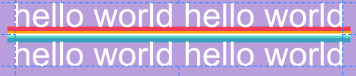
14、Stretchable background captionSpecial text matching with base image. After inputting different amount of text, the background is adjusted according to the actual length of text, for example:
14.1、Stretchable captionThe text length is changed, the base image is automatically stretched, and the caption track and related tracks are set.
14.2、Introduction to Stretching ElementsAfter checking as stretchable subtitles, set the stretch elements for other tracks. The specific steps are as follows:
. The stretching element binds the four sides of the material on the track, the four sides of the text, and the two center lines. The material changes with the text and the size of the material changes. This is a deformation process. 14.2.1、Baseline
As shown in the figure above, in the subtitles, there are six baselines: CL, CR, CT, CB, CVC, and CHC, which represent: cl=left, cr=right, ct=top, cb=bottom, cvc=vertical center, chc=horizontal center. Add stretch elements to the text, and bind the four sides of the material to 6 datums. Examples are as follows: When the text changes horizontally and vertically in the middle, the four sides of the element are left=cl, right=cr, top=ct, and bottom=cb. 14.2.2、Element change A、Normal element size:
B、Stretching elements:
C、After adding more text: Become a background stretching element, providing a quick setting method for sudoku. When setting, click on a position in the sudoku to see the changes.
14.2.3、Lattice interpretation
The above shortcut operations are more convenient to determine the attributes of the stretched element. You can also set the boundary to determine the stretch of the element.
14.2.4、Other effects You can offset based on each boundary setting, and make the following effects: A. No offset:
B. After offset:
C. Manually set the offset of the boundary, which is the horizontal and vertical center, and set the effect based on the center, such as the colorful line in the figure below:
The stretching element and the text movement together provide a function. The transformation attribute of the stretching element is the same as that of the caption, and the same caption effect can be achieved, and the defa ult is synchronized state.
15、Shortcut key
16、Explanation of making frame and coordinatesFor the particularity of different scenes, Meishe special effects can be produced in a special effects package for multi-frame special effects. For example, some foreground animations, borders and other effects, through designing different frames, in order to achieve the most perfect effect in use. There are various editing frames of the video itself. In the process of design and production, you can make typical frames. Inside the Meishe SDK, there is a compatible matching mechanism to ensure actual shooting and editing in different frame situations, allowing special effects to adapt. Listed below are which ones need to be produced in multiple formats and which ones can be produced in one format
Frame coordinates of Meishe: The Meishe coordinate system uses the center of the frame as the (0,0) point. For example: 1280x720 frame distance, the upper left corner of the screen is (-640, 360), the lower right corner of the screen is (640, -360), the coordinate origin of the material is the center point of the current material
17、Detailed explanation of special effect parameters17.1、Transformation
17.2、ALPHA channel
17.3、Surround
17.4、Blur-fast blur
17.5、Blur-Gaussian blur
17.6、Blur-direction blur
17.7、Blur-zoom blur
17.8、Blur-rotation blur
17.9、Blur-particle blur
17.10、Dark part noise
17.11、Distortion-horizontal distortion
17.12、Distortion-vertical distortion
17.13、Edge enhancement
17.14、LUT
17.15、Vignetting
17.16、Sharpen
17.17、Linear
17.18、Grille
17.19、Water ripples
17.20、Color difference separation
17.21、Split screen trick
17.22、Texture blur
17.23、Mosaic
17.24、Optical compensation
17.25、Chroma noise
17.26、Noise distortion
17.27、Wave distortion
17.28、Texture
17.29、Texture distortion
17.30、Lens distortion
18、knowledge base
|
||||||||||||||||||||||||||||||||||||||||||||||||||||||||||||||||||||||||||||||||||||||||||||||||||||||||||||||||||||||||||||||||||||||||||||||||||||||||||||||||||||||||||||||||||||||||||||||||||||||||||||||||||||||||||||||||||||||||||||||||||||||||||||||||||||||||||||||||||||||||||||||||||||||||||||||||||||||||||||||||||||||||||||||||||||||||||||||||||||||||||||||||||||||||||||||||||||||||||||||||||||||||||||||||||||||||||||||||||||||||||||||||||||||||||||||||||||||||||||||||||||||||||||||||||||||||||||||||||||||||||||||||||||||||||||||||||||||||||||||||||||||||||||||||||||||||||||||||||||||||||||||||||||||||||||||||||||||||||||||||||||||||||||||||||||||||||||||||||||||||||||||||||||||||||||||||||||||||||||||||||||||||||||||||||||||||||||||||||||||||||||||||||||||||||||||||||||||||||||||||||||||||||||||||||||||||||||||||||||||||||||||||||||||||||||||||||||||||||||||||||||||||||||||||||||||||||||||||||||||||||||||||||||||||||||||||||||||||||||||||||||||||||||||||||||||||||||||||||||


| Material package types that can be made |
||
| Name |
Material package suffix |
Support |
| Filter |
Videofx |
Already supported |
| Album |
PhotoAlbum |
Already supported |
| Caption package |
CaptionStyle |
Already supported |
| Flower Word Package |
CaptionRenderer |
Already supported |
| Release Notes |
|
| V1.0 |
Special Effects Creation Tool Basic Edition。 |
| V1.1 |
Add 1:Keyframe curve。Page 11。 |
| Add 2:Copy and paste function。Page 16 |
|
| V1.2 |
Added the function of adding music tracks |
| Add track rename function |
|
| Add more overlay mode |
|
| Add keyframe curve |
|
| Optimize the overall operating experience |
|
| Add trick description |
|
| V2.0 |
Add caption user’s guide |
Table of Contents
Special effects creation tool 6
2、Software structure introduction. 7
3、Material library introduction. 9
4、Introduction to Track Panel 10
4.1、Multi-frame filter production. 10
5、Introduction to the preview window.. 18
6、Introduction to special effects window.. 20
9. Start to enter the caption production module. 23
11、Caption properties panel 24
12、Introduction to Flower Word Making. 29
12.2、Interface introduction. 30
12.2.1、Interface introduction. 30
12.3、Editing process introduction. 31
12.3.2、Property setting panel 32
13、Border caption production. 34
14、Stretchable background caption. 35
14.2、Introduction to Stretching Elements. 36
14.2.3、Lattice interpretation. 38
16、Explanation of making frame and coordinates. 41
17、Detailed explanation of special effect parameters. 43
17.11、Distortion-horizontal distortion. 50
17.12、Distortion-vertical distortion. 51
17.20、Color difference separation. 57
17.24、Optical compensation. 60
1、Start the software
A. Unzip the tool compression package and double-click the NvStoryboardCreator.exe file inside to start the software. During the startup process, if prompted by anti-virus software, please allow it
 .
.
10、Caption track
After entering the caption production page, the structure of the caption production page and the filter production page are similar, with the following differences:
- Add caption track: The caption track is the track for caption text modification and movement. It cannot be deleted. Only one caption track is allowed.
- Cannot add [input source] track: The output of caption production is a caption package, and it is not allowed to add input source track.
The preview video can be replaced (the video will not be brought into the caption package).
- Caption properties panel: The caption track can set the trick of the original track, and you can also set the own properties of the caption, which will be described in detail below.
11、Caption properties panel
Click on the caption track, the text attribute panel appears on the right, as follows:
| Operating |
|
| Text |
Enter the text and check the effect in the caption package. It will not be written into the caption package. The final applied caption content is still input by the user. |
| Default font |
Add a font and the font will be written into the caption package. When applying the caption in the SDK, if the same font is installed on the device, the font effect will be used. |
|
|
The text is displayed in italics. |
|
|
The text is bold, the default is not bold. |
|
|
The thickness of the text, the default is 100, and the maximum is 900. Note:
|
| Font size |
Set the size of the text, but the definition is different for normal caption and border caption
|
| Text color |
Used to set the color of the text, providing a variety of methods such as color wheel and input value for setting |
| Text alignment |
Used to set the alignment of the text, divided into left alignment, center alignment, and right alignment. When the input text is multi-line, you can see the related effects |
| Word spacing |
Used to adjust the space between text |
| Line spacing |
Used to adjust the text spacing between each line when multi-line text |
| Draw shadow |
Function on: After clicking on, you can determine whether the text is shaded |
| Color: Set the shadow color. |
|
| Feather: Set the degree of shadow feathering, which can be used as shadow blur. |
|
| Offset: used to set the x, y offset of the shadow and the text itself, the unit is pixel |
|
| Draw stroke |
Function on: After clicking on, you can add a stroke effect to the text |
| Color: used to formulate the color of the stroke |
|
| Width: used to specify the width of the stroke |
|
| Background color |
Function on: After clicking on, you can add a background color to the text, the default background color is white |
| Color: You can set the color value of the background color |
|
| Ground color rounded corners: refers to the rounded corners of the ground color |
|
| Lateral extension |
It is used to set the content extension method after text input. There are three cases of extension to the right, extension to both sides and extension to the left, as follows
Note 1: The extension method is best to be specified before adjusting the position of the subtitle screen, because changing this value will change some offset of the text Note 2: The change of the extension method will also change the rotation anchor point of the text, and the change of the horizontal extension method will affect the anchor point X position of the entire text box |
| Longitudinal extension |
It is used to set the content extension method after multi-line text input. There are three cases of extending downward, extending on both sides and extending upward, as follows
Note 1: The extension method is best to be specified before adjusting the position of the subtitle screen, because changing this value will change some offset of the text Note 2: The change of the extension method will also change the rotation anchor point of the text. The change of the vertical extension method will affect the Y position of the anchor point of the entire text frame. |
| Flower word edit |
Flower word editing is a special mode in the entire caption. It allows the text to be assembled from multiple effects to design better artistic effects. Here are a few points to pay attention to 1. Flower word can be used as a part of Captionstyle or exported as an independent flower word package 2. Once the flower word is used, the original caption color and stroke function will be disabled, please pay attention There will be a special chapter on flower word to introduce flower word editing |
| Border caption |
Border caption are another form of caption. In the case of ordinary caption, the text will increase in length as the input increases. However, if border caption are used, the caption will be controlled within a fixed border. After increasing the number of texts, it will automatically shrink and wrap the caption. Later we will have a detailed chapter on border caption |
| Stretch caption |
Stretchable caption are another way to allow caption to cooperate with other material tracks to achieve the background stretching effect. When it is not turned on, no matter how much caption are input, other tracks are fixed, and when the stretch is turned on, other The track can be turned into a background stretching element to realize the stretching change that affects the background as the number of text changes, which will be introduced in specific chapters later |
12、Introduction to Flower Word Making
12.1、Making interface
After entering the editing interface, you can see the default caption track. In the caption attribute area on the right, click the [Flower Word Editing] button to enter the flower Word making interface。
In the Flower Word making interface, you can see the following parts, which are introduced in topic 12.2.
12.2、Interface introduction
12.2.1、Interface introduction
Switch background color, adjust text size, preview caption effect in real time.
| Function |
|
| background color |
Color switch, auxiliary Preview |
| Zoom in and out |
Size change, auxiliary preview |
12.2.2、Edit interface
The Flower Word editing and making window will be described in detail later.
12.2.3、Preview button
Switch to the preview window to preview the real package. Simulate display of text size and background color to verify the production effect.
12.3、Editing process introduction
12.3.1、Default attributes
Before entering Flower Word editing, in the caption properties, you can set the default text, text size, and text font. After entering the Flower Word editing window, the default attributes are used for editing.
Note: The font size set in the outer layer is automatically brought into the Flower Word package as the caption text size. If not set, the system default font size is 72.
12.3.2、Property setting panel
12.3.2.1、Properties panel
The red box on the right.
12.3.2.2、Panel function
| Function |
|
| Base color |
When using the Flower Word package, the set color and the reference color are offset and compared in the HSV space. Then apply the offset to other variable colors to achieve the relevant color change. |
| font size |
The text size when editing is not modifiable, which affects the default text size in the Flower Word package. |
| Layer list |
There is one text layer by default, and more than one can be set. The order of the text layer from top to bottom is consistent with the rendering order, and the order can be adjusted by dragging. |
| Delete layer |
Select the layer and click the [Delete] button on the right to delete the layer. |
| Layer type |
There are 4 types in total: body, outline, body and outline, soild body and outline. Four attribute descriptions: 1. Body: This layer only has text body. 2. Outline: This layer has only text outline. 3. Body and outline: This layer contains body and outline, and the color of body and outline is the same. 4. Soild body and outline: This layer can set the color of the body and the outline separately, but can not set the feather [blur] effect, the color can only be a pure color. |
| Fill mode |
There are four types: solid color, gradient, texture, and mask. The texture can be filled with multiple images, and the final rendering will be rendered in order. |
| Color mode |
Sets whether the current color is affected by the base color. 1. No matter how the color is set, it will not change. 2. Variable: if the Flower Word color is set, the color will change according to the offset of the base color. |
| Adjustment mode |
There are two types: relief and feathering. Only one of them can be used. Feathering is used to achieve a blur effect. |
| Position offset |
The offset of each layer relative to the x-axis and y-axis is calculated in pixels. Flower Word used to make multi-layer offset effects. |
| Opacity |
The opacity value, the value ranges from 0 to 1. |
12.3.3、Use and export
After editing, there are two results:
- Click [Export Independent] to export the flower word package with Captionrenderer suffix.
- Click the [OK] button to import CaptionStyle for use.
Note: After using flower word editing, the color and drawing stroke functions are not available.
Delete the flower word package and continue to use the previous parameter
settings.
13、Border caption production
Border caption, control the caption display range, the text will not exceed the range for display, and automatically adjust the text size and line break according to the number of texts.
| Function |
|
| Opening function |
Switch to border caption mode without opening the normal caption state. |
| Font size |
The maximum value of the text in the border. |
| Horizontal alignment |
Align left, right, and center. |
| Vertical alignment |
Align top, bottom, and center. |
| Border size |
Length and height, default [400,200], can be set, pixel is px. |
| Control box parameters |
The control box is a unique concept of Meishe caption. The caption use the drag area, such as the blue box in the figure below, to set the four corner parameters, and use the relevant parameters when dragging. The control frame is orange when it is dragged. The base image and text are wrapped around the frame for a better experience. |
14、Stretchable background caption
Special text matching with base image. After inputting different amount of text, the background is adjusted according to the actual length of text, for example:
14.1、Stretchable caption
The text length is changed, the base image is automatically stretched, and the caption track and related tracks are set.
| Caption function |
|
| Function on |
In the caption special effects panel, [Enable stretchable caption] option. |
| Related tracks |
|
| Track settings |
After the track is imported, the default is the normal state. Select [Stretch Element] from the drop-down menu, the track becomes a stretch element and the original size becomes invalid. |
| Element size |
After the track attribute is the stretched element, click the [Set] button, and a pop-up window will appear for setting. |
14.2、Introduction to Stretching Elements
After checking as stretchable subtitles, set the stretch elements for other tracks. The specific steps are as follows:
- Drag the material to the track.
- The property of the material is set to [stretch element].
- Click the [Set] button to pop up the setting interface
.
The stretching element binds the four sides of the material on the track, the four sides of the text, and the two center lines. The material changes with the text and the size of the material changes. This is a deformation process.
14.2.1、Baseline
As shown in the figure above, in the subtitles, there are six baselines: CL, CR, CT, CB, CVC, and CHC, which represent:
cl=left, cr=right, ct=top, cb=bottom, cvc=vertical center, chc=horizontal center.
Add stretch elements to the text, and bind the four sides of the material to 6 datums. Examples are as follows:
When the text changes horizontally and vertically in the middle, the four sides of the element are left=cl, right=cr, top=ct, and bottom=cb.
14.2.2、Element change
A、Normal element size:
B、Stretching elements:
C、After adding more text:
Become a background stretching element, providing a quick setting method for sudoku. When setting, click on a position in the sudoku to see the changes.
14.2.3、Lattice interpretation
| lattice |
Sample |
Explanation |
| Upper left |
The upper left position of the text, the width and height will not be stretched. |
|
| Upper middle |
The upper position of the text, the width stretches with the text, and the height does not change. |
|
| Upper right |
At the top right of the text, the width and height will not be stretched. |
|
| Middle left |
The width of the text remains at the middle left position, and the height is stretched with the text. |
|
| middle |
In the middle of the text, the width and height stretch with the text. |
|
| Middle right |
The width of the text in the middle right position remains unchanged, and the height is stretched with the text. |
|
| Lower left |
The width and height of the text at the lower left position will not be stretched. |
|
| Middle and lower |
The lower and middle position of the text, the width stretches with the text, and the height does not change. |
|
| Lower right |
The width and height of the text at the lower right position will not be stretched. |
The above shortcut operations are more convenient to determine the attributes of the stretched element. You can also set the boundary to determine the stretch of the element.
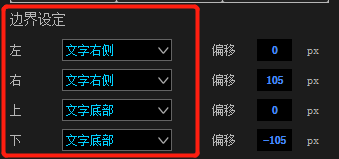
14.2.4、Other effects
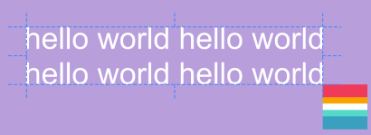
You can offset based on each boundary setting, and make the following effects:
A. No offset:
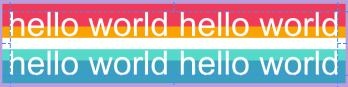
B. After offset:
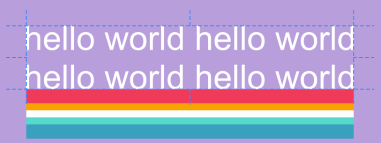
C. Manually set the offset of the boundary, which is the horizontal and vertical center, and set the effect based on the center, such as the colorful line in the figure below:
The stretching element and the text movement together provide a function. The transformation attribute of the stretching element is the same as that of the caption, and the same caption effect can be achieved, and the defa
ult is synchronized state.
15、Shortcut key
| Operating |
|
| Track copy paste |
Select a main track, use Ctrl+C to copy this track, and use Ctrl+V to paste to the current frame or a different frame |
| Multiple choice track |
Hold down Ctrl, you can select multiple tracks, and then copy and paste Hold down Shift to select all the tracks contained in the middle of the tracks clicked twice |
| Special effects copy and paste |
Select the trick in one track, then click Ctrl+C to copy, then select another track, and then click Ctrl+V to copy this trick to the current track, and the key frame of the trick will also be brought into it. |
| Copy and paste properties |
On an attribute, such as the angle of rotation, ctrl+c can copy all key frames or selected key frames of this attribute, and ctrl+v can be pasted to the same frame or different frames. |
| Increase key frame |
In the key frame opening mode of the effect, click [K] to add a key frame |
| Preview area shortcut keys |
Shortcut key B: You can quickly move the starting position of the preview area to the current time code position Shortcut key N: you can quickly move the end position of the preview area to the current time code position |
| Timeline zoom |
Shortcut keys - and = respectively reduce and enlarge the time axis, alt+mouse wheel can also reduce and enlarge the time axis |
| Delete |
[Delete], delete the key frame, track, effect selected by the effect tree. delete, delete the selected material in the view |
| Play control |
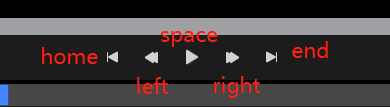
The shortcut keys for timeline playback control are as follows: Home key to go back to the first frame, left key to seek one frame forward, right key to seek one frame backward, End key to seek to the end, and space key to control playback and pause |
| Preview view drag |
Hold down the middle mouse button to drag the view area |
| Time code line drag |
Press the left mouse button in the time axis area, and the cursor will move to the click point of the mouse. Press the left mouse button in the time axis area to drag without releasing it, and the cursor will move with the mouse |
| Curve mode operation (under the curve interface) |
|
| Zoom curve interface |
Ctrl+wheel: can zoom the curve interface |
| Rolling curve interface |
Scroll wheel: scroll up and down the vertical curve interface to view more values |
| Add keyframe |
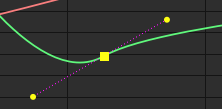
Ctrl+left mouse button: You can add a key frame to the clicked curve position (must be on the curve to take effect) |
| Single handle operation |
Press and hold Shift+drag the handle, operate a handle on the left and right of the key frame to change the curve on one side |
| Delete keyframes |
Then click the Delete button to delete |
16、Explanation of making frame and coordinates
For the particularity of different scenes, Meishe special effects can be produced in a special effects package for multi-frame special effects. For example, some foreground animations, borders and other effects, through designing different frames, in order to achieve the most perfect effect in use. There are various editing frames of the video itself. In the process of design and production, you can make typical frames. Inside the Meishe SDK, there is a compatible matching mechanism to ensure actual shooting and editing in different frame situations, allowing special effects to adapt.
Listed below are which ones need to be produced in multiple formats and which ones can be produced in one format
- Multi-frame production: frame filter, foreground animation type filter, split screen filter, album
- No need to multi-frame: color filter, special effect animation filter (depending on the specific form, there may be differences)
Frame coordinates of Meishe:
The Meishe coordinate system uses the center of the frame as the (0,0) point. For example: 1280x720 frame distance, the upper left corner of the screen is (-640, 360), the lower right corner of the screen is (640, -360), the coordinate origin of the material is the center point of the current material
17、Detailed explanation of special effect parameters
17.1、Transformation
| Parameter name |
Description |
Unit |
Range |
| Anchor point |
The fixed point on the material, the axis of rotation. The default value (0,0) is the center position of the current material |
pixel |
|
| Zoom |
The zoom ratio of the material has two values, X and Y. Represents scaling in the X and Y directions respectively, the default value is 1, which represents the original size |
Value |
|
| Position |
The coordinate position of the material. The added track is added at the center of the screen by default, and the default position coordinate is (0,0) |
Pixel |
|
| Rotate |
The rotation angle of the current material. The default is 0, which means no rotation, if you enter 720, it means two rotations |
Angle |
|
| Opacity |
The transparency of the current material. The default value is 1, which means completely opaque, and 0 means completely transparent |
Value |
(0,1) |
17.2、ALPHA channel
| Parameter name |
Description |
Unit |
Range |
| Mode |
With or without, brightness process, brightness channel three modes, please refer to [alpha channel introduction] |
Options |
|
| File |
The incoming alpha patten file, please refer to [alpha channel introduction] |
PNG/CAF |
|
| Parameter |
Specific reference [alpha channel introduction] |
Value |
17.3、Surround
| Parameter name |
Description |
Unit |
Range |
| Anchor point |
The fixed point of the material, the axis of rotation, the default value (0,0), is the center position of the current material |
Texture coordinates |
|
| Zoom |
The zoom ratio of the material has two values, X and Y, which represent the zoom in the X and Y directions respectively. The default value is 1, which represents the original size |
Value |
|
| Position |
The coordinate position of the material and the added track are added at the center of the screen by default, and the default position coordinates are (0,0) |
Texture coordinates |
|
| Rotation |
The rotation angle of the current material, the default is 0, which means no rotation. If the input of the Keyframe is 720, it means two rotations |
Angle |
|
| Mode |
Three surround modes D. Edge copy: copy and expand the last pixel of the edge E. Repetition: Expanded from around the main screen, it is a repetition of the screen
|
Options |
17.4、Blur-fast blur
| Parameter name |
Description |
Unit |
Range |
| Blur Radius |
The range of blur values, representing the intensity of blur |
Value |
(0,64) |
17.5、Blur-Gaussian blur
| Parameter name |
Description |
Unit |
Range |
| Blur radius |
The range of blur value represents the intensity of blur. Note: In theory, Gaussian Blur has no upper limit range. But too high will cause gridding problems. The ideal value range is 0-50 |
Value |
(0,50) |
17.6、Blur-direction blur
| Parameter name |
Description |
Unit |
Range |
| Blur length |
When setting the direction blur, the degree of blur |
Value |
(0,50) |
| Blur angle |
Set the blur angle when the direction is blurred |
Angle |
(0,360) |
| Fuzzy optimization |
After opening, optimize the blur effect |
Options |
17.7、Blur-zoom blur
| Parameter name |
Description |
Unit |
Range |
| Blur length |
When setting the direction blur, the degree of blur |
Value |
(0,500) |
| X axis blur center |
X position of zoom center |
Normalized coordinate |
(-1,1) |
| Y-axis blur center |
Y position of zoom center |
Normalized coordinate |
(-1,1) |
| Fuzzy optimization |
After opening, optimize the blur effect |
Options |
17.8、Blur-rotation blur
| Parameter name |
Description |
Unit |
Range |
| X axis blur center |
X position of zoom center |
Normalized coordinate |
(-1,1) |
| Y-axis blur center |
Y position of zoom center |
Normalized coordinate |
(-1,1) |
| Blur radius |
The range of influence when rotating blur |
Normalized coordinate |
(0,∞) |
| Degree of blur |
The intensity of the rotation blur |
Value |
(0,∞) |
| Rotation angle |
Rotate the blur angle |
Angle |
(0,360) |
17.9、Blur-particle blur
| Parameter name |
Description |
Unit |
Range |
| Blur intensity |
The intensity of the particle blur. |
Value |
(0,∞) |
| Rotation angle |
The angle of the particle blur. |
angle |
(0,360) |
17.10、Dark part noise
| The dark noise is an independent special effect, no adjustment parameters, and no Keyframe support |
17.11、Distortion-horizontal distortion
| Parameter name |
Description |
Unit |
Range |
| Twisting intensity |
Intensity of the distortion parameter, 0 means no distortion |
Value |
|
| Twist curve |
Adjust the way of the distortion curve, set the distortion degree, there is a distortion by default. You can press CTRL+left button on the twist icon to increase the twist position |
17.12、Distortion-vertical distortion
| Parameter name |
Description |
Unit |
Range |
| Twisting intensity |
Set the intensity of twist parameter, 0 is no twist state |
Value |
|
| Twist curve |
Adjust the way of the distortion curve, set the distortion degree, there is a distortion by default. You can press CTRL+left button on the twist icon to increase the twist position |
17.13、Edge enhancement
| Parameter name |
Description |
Unit |
Range |
| Edge intensity |
The displayed edge intensity . After the display edge intensity effect is turned on, this track only displays the edges, and the images that are not edges will become transparent |
Value |
(0,1) |
| Edge width |
Displayed edge width |
Value |
(1,10) |
| Edge threshold |
The display of weak edges, the smaller the value, the more edges are displayed, the larger the value, the fewer edges are displayed |
Value |
(0,1) |
17.14、LUT
| Parameter name |
Description |
Unit |
Range |
| File name |
Used to import LUT files. Currently supports importing PNG, CUBE and MSLUT, which file format is |
File |
|
| Intensity |
Apply the display intensity of the LUT file |
Value |
(0,1) |
17.15、Vignetting
| Parameter name |
Description |
Unit |
Range |
| Size |
The size of the vignetting |
Value |
(0,1) |
| Colour |
The color of the dark corners |
Color wheel |
|
| Minimum feathering range Alpha |
The alpha of the minimum value of vignetting feathering, the default is 0 |
Value |
(0,1) |
| Maximum feathering range Alpha |
The alpha of the maximum value of vignetting feathering, the default is 1 |
Value |
(0,1) |
17.16、Sharpen
| Parameter name |
Description |
Unit |
Range |
| Degree |
Sharpness |
Value |
(0,5) |
| Radius |
Pixel radius of sharp edge area |
Color wheel |
17.17、Linear
| Parameter name |
Description |
Unit |
Range |
| Style |
Two linear processing styles, stripe and blur |
Options |
|
| Direction |
The processing direction of linear effects, there are two kinds of 0 and 90 degrees |
Options |
|
| Intensity |
Processing degree of linear effect |
Value |
(0,1) |
17.18、Grille
| Parameter name |
Description |
Unit |
Range |
| Style |
Grid processing, there are three types, network, point and line |
Options |
|
| Amplitude |
After the grid, the vibration amplitude of the screen |
Value |
(0,3) |
17.19、Water ripples
| Parameter name |
Description |
Unit |
Sample |
| Add files |
This special effect is quite special, allowing the screen to appear, with a simulated water ripple effect. Pass in a png picture, the picture is grayscale, simulating water ripples. Create water ripples through the black and white changing area, and then add ripple animation to the screen. The following is a sample image |
File |
17.20、Color difference separation
| Parameter name |
Description |
Unit |
|
| Mixed mode |
The mixing mode between the separated layers, with or without, brightening, and darkening three mixing modes |
Options |
|
| Change mode |
Set the change form of the color difference separation effect, with four modes: none, increasing, decreasing, and diffusing |
Options |
|
| Gray color difference separation |
Set whether to separate grayscale and color difference, the default is no |
Options |
|
| R component X axis offset |
X axis offset of the red channel |
Value |
|
| R component Y axis offset |
Y-axis offset of the red channel |
Value |
|
| G component X axis offset |
X-axis offset of the green channel |
Value |
|
| G component Y axis offset |
Y-axis offset of the green channel |
Value |
|
| B component X axis offset |
X-axis offset of the blue channel |
Value |
|
| B component Y axis offset |
Y-axis offset of the blue channel |
Value |
|
| 模糊半径 |
Set the blur effect radius of chromatic aberration separation |
Value |
17.21、Split screen trick
| Parameter name |
Description |
Unit |
Range |
| Horizontal quantity |
Number of frames in the horizontal direction |
Value |
|
| Vertical quantity |
Number of frames in the vertical direction |
Value |
|
| Note: If the length and width of each screen is inconsistent with the original length and width after split screen, only the center area will be taken |
|||
17.22、Texture blur
| Parameter name |
Description |
Unit |
Range |
| Blur |
Sets the blur degree of texture blur |
Value |
17.23、Mosaic
| Parameter name |
Description |
Unit |
Range |
| Size |
Set mosaic particle size |
Value |
17.24、Optical compensation
| 参数名称 |
Description |
Unit |
Range |
| Type |
Set the type of optical compensation |
Options |
|
| Distortion Center |
Set the reference coordinate center of the distortion, you can choose X, Y |
Options |
|
| 补边样式 |
Set the edge types of distortion compensation, including mirror, stack and repeat |
Options |
|
| Degree of distortion |
Set the degree of distortion |
Value |
17.25、Chroma noise
| Parameter name |
Description |
Unit |
Range |
| Texture image |
Texture image of incoming noise |
File |
|
| Monochrome |
Choose whether the noise is monochromatic or multicolor |
Options |
|
| Intensity |
Set the intensity value of noise |
Value |
|
| Density |
Set the density of the entire noise |
Value |
|
| Texture intensity |
If there is a noisy texture image, you can set the intensity of the texture |
Value |
|
| Texture scaling |
If there is a noise texture image, you can set the size of the texture |
Value |
|
| Blur radius |
Set the blur size of the noise itself |
Value |
|
| Red channel offset |
Set the red channel offset value of the noise itself |
Value |
|
| Green channel offset |
Set the green channel offset value of the noise itself |
Value |
|
| Blue channel offset |
Set the blue channel offset value of the noise itself |
Value |
|
| Size |
Set the size of the noise itself |
Value |
17.26、Noise distortion
| Parameter name |
Description |
Unit |
Range |
| Wavelength |
Set the length of the noise |
Value |
|
| Amplitude |
Set the amplitude between noises |
Value |
|
| Speed |
Set the speed of noise |
Value |
|
| Intensity |
Set the intensity of noise |
Value |
17.27、Wave distortion
| Parameter name |
Description |
Unit |
Range |
| Repeat |
Set whether the wave distortion is repeated |
Fill |
|
| Start time |
Set the start time of the first wave distortion |
Value |
|
| Cycle |
Set the interval period of wave distortion |
Value |
|
| Amplitude |
Set the vibration amplitude of wave distortion |
Value |
|
| Threshold |
Set the threshold of wave distortion |
Value |
17.28、Texture
| Parameter name |
Description |
Unit |
Range |
| Texture |
Select a local texture image |
Fill |
|
| Intensity |
Set the overlay intensity of texture image and picture |
Value |
|
| Zoom |
Set the zoom size of the texture image |
Value |
17.29、Texture distortion
| Parameter name |
Description |
Unit |
Range |
| Texture |
Select a local texture image |
File |
|
| Brightness distortion X |
Set the degree of distortion of the texture image in the X direction |
Value |
|
| Brightness distortion Y |
Set the degree of distortion of the texture image in the Y direction |
Value |
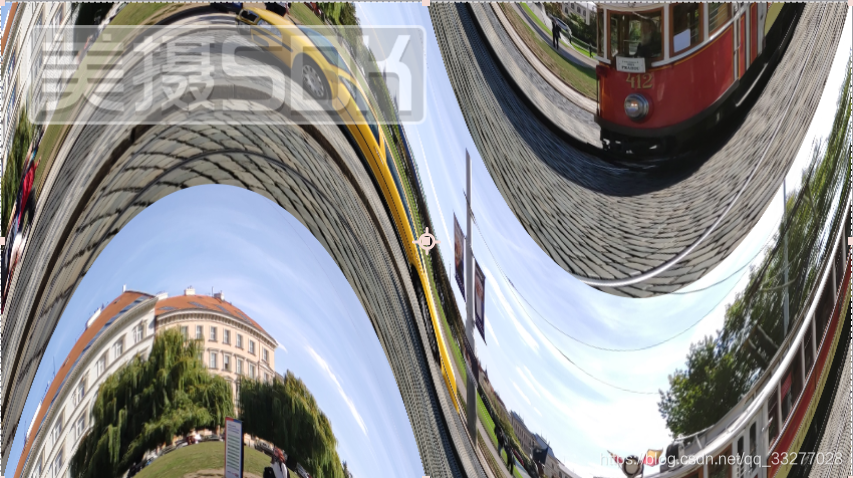
17.30、Lens distortion
| Parameter name |
Description |
Unit |
Range |
| Type of fill image boundary |
Set the type of fill image boundary after twisting, including mirroring, repeating and stacking |
Options |
|
| Degree |
Set the degree of distortion |
Value |
|
| Distortion Center X |
Set the center X coordinate of the lens distortion |
Value |
|
| Distortion Center Y |
Set the Y coordinate of the center of lens distortion |
Value |
|
| First order coefficient X |
Set the X value of the first distortion stage |
Value |
|
| First order coefficient Y |
Set the Y value of the first distortion stage |
Value |
|
| Second order coefficient X |
Set the X value of the second distortion stage |
Value |
|
| Second order coefficient Y |
Set the Y value of the second distortion stage |
Value |
|
| Third order coefficient X |
Set the X value of the third distortion stage |
Value |
|
| Third order coefficient Y |
Set the Y value of the third distortion stage |
Value |
18、knowledge base
| Knowledge base |
|
| Serial number |
Description |
| 1 |
CAF: A set of sequence frame animation format defined by the Meishe SDK. The sequence frame animation exported by PS and other tools can be made into a CAF file and used in the beauty effect. This manual contains, CAF production help |
| 2 |
Frame adaptation: In video production, there are often multiple frames. After putting in a special effects package, you will find the frame closest to it and use it. For example, when making a 16:9 video and applying special effects, if there is a 16:9 frame in the package, this frame design will be applied. However, the frames in the package often cannot cover all video frames. The SDK will automatically find the closest frame and adapt it. For example, there is an 18:9 frame design in the bag. When making a 17.5:9 video, the 18:9 frame will be used for adaptation so that the effect is appropriate No frame adaptation is required. Case: Some filters can be compatible with all productions even if you only write one frame. For example, color filters and some special effects filters will not be affected by the frame. When making effects, you only need to make a default 16:9 ratio. |
| 3 |
Introduction to Alpha channel diagram, there are special documents, please refer to the detailed document [Introduction to Alpha Channel] |
| 4 |
LUT: Meishe supports the use of 3D LUT files for color matching. The file that supports import is mslut. Compared with the direct PNG LUT, MSLUT is a unique format of Meishe. Significantly reduce the size of the LUT file in order to reduce the special effects package. MSLUT is also a conversion tool we provide |
| 5 |
Normalized coordinates: The screen coordinates are normalized, and the center point of the screen is (0,0). The range of X is -1 to 1, and the range of Y is -1 to 1. Under normalized coordinates, the coordinates of the four points are (-1,1), (1,1), (-1,-1), (1,-1), respectively, for the upper left, upper right, lower left, and lower right. |